Стилизация
Ряд виджетов, например, Label или Text, поддерживают установку шрифта через параметр font . Каждая платформа может определять свои специфические шрифты. Но также библиотека Tk по умолчанию включает ряд именнованных шрифтов, которые могут использоваться на различных компонентах графического интерфейса и которые доступны на всех платформах:
- TkDefaultFont : шрифт по умолчанию, который применяется, если для виджета явным образом не определен шрифт
- TkTextFont : шрифт по умолчанию, который применяется для виджетов Entry, Listbox и ряда других
- TkFixedFont : шрифт с фиксированной шириной
- TkMenuFont : шрифт для пунктов меню
- TkHeadingFont : шрифт для заголовков в Listbox и в таблицах
- TkCaptionFont : шрифт для строки статуса в окнах
- TkSmallCaptionFont : шрифт малого размера для диалоговых окон
- TkIconFont : шрифт для подписей к иконкам
- TkTooltipFont : шрифт для высплывающих окон
В принципе мы можем использовать эти шрифты не только в любых виджетах:
ttk.Label(text="Hello World", font="TkTextFont")
Tk также предоставляет дополнительный набор именнованных шрифтов, которые определены только на определенных платформах. Для их получения можно использовать функцию names() из пакета tkinter.font :
from tkinter import font for font_name in font.names(): print(font_name)
Например, на Windows мы получим следующий набор:
fixed oemfixed TkDefaultFont TkMenuFont ansifixed systemfixed TkHeadingFont device TkTooltipFont defaultgui TkTextFont ansi TkCaptionFont system TkSmallCaptionFont TkFixedFont TkIconFont
В данном случае выводятся и платформа-независимые, и платформо-специфичные шрифты, например, «system».
ttk.Label(text="Hello World", font="system")
Определение шрифта
За определение шрифта в Tkinter отвечает класс Font из модуля tkinter.font . Он принимет следующие параметры:
- name : имя шрифта
- family : семейство шрифтов
- size : высота шрифта (в точках при положительном значении или в пикселях при негативном значении)
- weight : вес шрифта. Принимает значения normal (обычный) или bold (жирный)
- slant : наклон. Принимает значения roman (обычный) или italic (наклонный)
- underline : подчеркивание. Принимает значения True (с подчеркиванием) или False (без подчеркивания)
- overstrike : зачеркивание. Принимает значения True (с зачеркиванием) или False (без зачеркивания)
Для получения всех доступных семейств шрифтов на текущей платформе можно использовать функцию families() из модуля tkinter.font
from tkinter import font for family in font.families(): print(family)
Пример применения шрифтов:
from tkinter import * from tkinter import ttk from tkinter import font root = Tk() root.title("METANIT.COM") root.geometry("250x200") font1 = font.Font(family= "Arial", size=11, weight="normal", slant="roman", underline=True, overstrike=True) label1 = ttk.Label(text="Hello World", font=font1) label1.pack(anchor=NW) font2 = font.Font(family= "Verdana", size=11, weight="normal", slant="roman") label2 = ttk.Label(text="Hello World", font=font2) label2.pack(anchor=NW) root.mainloop() 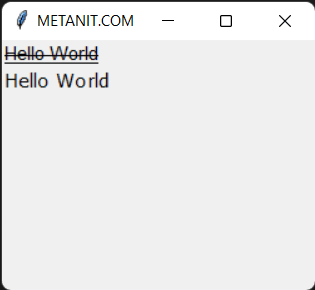
Также можно использовать определение шрифта в виде строки:
from tkinter import * from tkinter import ttk root = Tk() root.title("METANIT.COM") root.geometry("250x200") label1 = ttk.Label(text="Hello World", font="Arial 11 normal roman") label1.pack(anchor=NW) label2 = ttk.Label(text="Hello World", font="Verdana 11 normal roman") label2.pack(anchor=NW) root.mainloop() Например, в определении «Arial 11 normal roman» , применяется семейство шрифта Arial, высота 11 единиц, нежирный шрифт без наклона.
Change Font Size and Font Style – Python Tkinter GUI Tutorial 193
In this video we’ll add the ability to change the font size and font style in our font dialog app.
We’ll add whatever font sizes you want, and we’ll also add these styles: regular (normal), bold, italic, underline, and strikethrough.
Python Code: font_dialog.py
(Github Code)
from tkinter import * from tkinter import font root = Tk() root.title('Codemy.com - Font Dialog Box') root.iconbitmap('c:/gui/codemy.ico') root.geometry("540x500") # Change Font Size def font_size_chooser(e): our_font.config( size=font_size_listbox.get(font_size_listbox.curselection())) # Change Font Style def font_style_chooser(e): style = font_style_listbox.get(font_style_listbox.curselection()).lower() if style == "bold": our_font.config(weight=style) if style == "regular": our_font.config(weight="normal", slant="roman", underline=0, overstrike=0) if style == "italic": our_font.config(slant=style) if style == "bold/italic": our_font.config(weight="bold", slant="italic") if style == "underline": our_font.config(underline=1) if style == "strike": our_font.config(overstrike=1) # Create font chooser function def font_chooser(e): our_font.config( family=my_listbox.get(my_listbox.curselection())) # Designate Our Font our_font = font.Font(family="Helvetica", size="32") # Add Frame my_frame = Frame(root, width=510, height=275) my_frame.pack(pady=10) # Freeze Frame in place my_frame.grid_propagate(False) my_frame.columnconfigure(0, weight=10) # Add Text Box my_text = Text(my_frame, font=our_font) my_text.grid(row=0, column=0) my_text.grid_rowconfigure(0, weight=1) my_text.grid_columnconfigure(0, weight=1) # Bottom Frame bottom_frame = Frame(root) bottom_frame.pack() # Add Labels font_label = Label(bottom_frame, text="Choose Font", font=("Helvetica", 14)) font_label.grid(row=0, column=0, padx=10, sticky=W) size_label = Label(bottom_frame, text="Font Size", font=("Helvetica", 14)) size_label.grid(row=0, column=1, sticky=W) style_label = Label(bottom_frame, text="Font Style", font=("Helvetica", 14)) style_label.grid(row=0, column=2, padx=10, sticky=W) # Add Listbox my_listbox = Listbox(bottom_frame, selectmode=SINGLE, width=40) my_listbox.grid(row=1, column=0, padx=10) # Size Listbox font_size_listbox = Listbox(bottom_frame, selectmode=SINGLE, width=20 ) font_size_listbox.grid(row=1, column=1) # Style Listbox font_style_listbox = Listbox(bottom_frame, selectmode=SINGLE, width=20 ) font_style_listbox.grid(row=1, column=2, padx=10) # Add Font Families To Listbox for f in font.families(): my_listbox.insert('end', f) # Add Sizes to Size Listbox font_sizes = [8, 10, 12, 14, 16, 18, 20, 36, 48] for size in font_sizes: font_size_listbox.insert('end', size) # Add Styles To Style Listbox font_styles = ["Regular", "Bold", "Italic", "Bold/Italic", "Underline", "Strike"] for style in font_styles: font_style_listbox.insert('end', style) # Bind The Listbox my_listbox.bind('', font_chooser) font_size_listbox.bind('', font_size_chooser) font_style_listbox.bind('', font_style_chooser) root.mainloop() John Elder
John is the CEO of Codemy.com where he teaches over 100,000 students how to code! He founded one of the Internet’s earliest advertising networks and sold it to a publicly company at the height of the first dot com boom. After that he developed the award-winning Submission-Spider search engine submission software that’s been used by over 3 million individuals, businesses, and governments in over 42 countries. He’s written several Amazon #1 best selling books on coding, and runs a popular Youtube coding channel.
Python — Tkinter Listbox
The Listbox widget is used to display a list of items from which a user can select a number of items.
Syntax
Here is the simple syntax to create this widget −
w = Listbox ( master, option, . )
Parameters
- master − This represents the parent window.
- options − Here is the list of most commonly used options for this widget. These options can be used as key-value pairs separated by commas.
The normal background color displayed behind the label and indicator.
The size of the border around the indicator. Default is 2 pixels.
The cursor that appears when the mouse is over the listbox.
The font used for the text in the listbox.
The color used for the text in the listbox.
Number of lines (not pixels!) shown in the listbox. Default is 10.
Color shown in the focus highlight when the widget has the focus.
Thickness of the focus highlight.
Selects three-dimensional border shading effects. The default is SUNKEN.
The background color to use displaying selected text.
Determines how many items can be selected, and how mouse drags affect the selection −
- BROWSE − Normally, you can only select one line out of a listbox. If you click on an item and then drag to a different line, the selection will follow the mouse. This is the default.
- SINGLE − You can only select one line, and you can’t drag the mouse.wherever you click button 1, that line is selected.
- MULTIPLE − You can select any number of lines at once. Clicking on any line toggles whether or not it is selected.
- EXTENDED − You can select any adjacent group of lines at once by clicking on the first line and dragging to the last line.
The width of the widget in characters. The default is 20.
If you want to allow the user to scroll the listbox horizontally, you can link your listbox widget to a horizontal scrollbar.
If you want to allow the user to scroll the listbox vertically, you can link your listbox widget to a vertical scrollbar.
Methods
Methods on listbox objects include −
Selects the line specifies by the given index.
Returns a tuple containing the line numbers of the selected element or elements, counting from 0. If nothing is selected, returns an empty tuple.
delete ( first, last=None )
Deletes the lines whose indices are in the range [first, last]. If the second argument is omitted, the single line with index first is deleted.
Returns a tuple containing the text of the lines with indices from first to last, inclusive. If the second argument is omitted, returns the text of the line closest to first.
If possible, positions the visible part of the listbox so that the line containing index i is at the top of the widget.
insert ( index, *elements )
Insert one or more new lines into the listbox before the line specified by index. Use END as the first argument if you want to add new lines to the end of the listbox.
Return the index of the visible line closest to the y-coordinate y relative to the listbox widget.
Adjust the position of the listbox so that the line referred to by index is visible.
Returns the number of lines in the listbox.
To make the listbox horizontally scrollable, set the command option of the associated horizontal scrollbar to this method.
xview_moveto ( fraction )
Scroll the listbox so that the leftmost fraction of the width of its longest line is outside the left side of the listbox. Fraction is in the range [0,1].
xview_scroll ( number, what )
Scrolls the listbox horizontally. For the what argument, use either UNITS to scroll by characters, or PAGES to scroll by pages, that is, by the width of the listbox. The number argument tells how many to scroll.
To make the listbox vertically scrollable, set the command option of the associated vertical scrollbar to this method.
yview_moveto ( fraction )
Scroll the listbox so that the top fraction of the width of its longest line is outside the left side of the listbox. Fraction is in the range [0,1].
yview_scroll ( number, what )
Scrolls the listbox vertically. For the what argument, use either UNITS to scroll by lines, or PAGES to scroll by pages, that is, by the height of the listbox. The number argument tells how many to scroll.
Example
Try the following example yourself −
from Tkinter import * import tkMessageBox import Tkinter top = Tk() Lb1 = Listbox(top) Lb1.insert(1, "Python") Lb1.insert(2, "Perl") Lb1.insert(3, "C") Lb1.insert(4, "PHP") Lb1.insert(5, "JSP") Lb1.insert(6, "Ruby") Lb1.pack() top.mainloop()
When the above code is executed, it produces the following result −