Виджет Tkinter Frame в Python – размещение в окне
Виджет Python Tkinter Frame используется для организации группы виджетов. Он действует как контейнер, который можно использовать для хранения других виджетов. Прямоугольные области экрана используются для организации виджетов в приложении Python.
Синтаксис для использования виджета Frame приведен ниже.
Список возможных вариантов приведен ниже.
| № | Вариант | Описание |
|---|---|---|
| 1 | bd | Он представляет ширину границы. |
| 2 | bg | Цвет фона виджета. |
| 3 | cursor | Указатель мыши изменяется на тип курсора, для которого заданы другие значения, такие как стрелка, точка и т. д. |
| 4 | height | Высота виджета. |
| 5 | highlightbackground | Цвет фона, когда он находится в фокусе. |
| 6 | highlightcolor | Цвет текста, когда виджет находится в фокусе. |
| 7 | highlightthickness | Он определяет толщину вокруг границы, когда виджет находится в фокусе. |
| 8 | relief | Он определяет тип границы. Значение по умолчанию FLAT. |
| 9 | width | Он представляет ширину виджета. |
Пример
from tkinter import * top = Tk() top.geometry("140x100") frame = Frame(top) frame.pack() leftframe = Frame(top) leftframe.pack(side = LEFT) rightframe = Frame(top) rightframe.pack(side = RIGHT) btn1 = Button(frame, text="Submit", fg="red",activebackground = "red") btn1.pack(side = LEFT) btn2 = Button(frame, text="Remove", fg="brown", activebackground = "brown") btn2.pack(side = RIGHT) btn3 = Button(rightframe, text="Add", fg="blue", activebackground = "blue") btn3.pack(side = LEFT) btn4 = Button(leftframe, text="Modify", fg="black", activebackground = "white") btn4.pack(side = RIGHT) top.mainloop() Python tkinter frame
We can specify width and height of the frame. If you are using pack layout then set the exapand=True to cover all the available space.
frame_top=Frame(my_w,width=390, height=390) frame_top.pack(expand=True)Adding border to frame
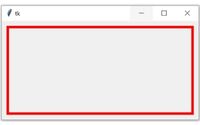
We will use the options highlightbackground=’red’ and highlightthicknes=5 to add red colour and thickness of 5 to the borders. For grid layout we can use rowconfigure , columnconfigure to manage full width
import tkinter as tk from tkinter import * my_w = tk.Tk() my_w.geometry("400x200") frame_top=Frame(my_w,width=380, height=180, highlightbackground='red',highlightthicknes=5) frame_top.pack(expand=True) my_w.mainloop()Adding image to Frame
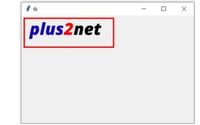
We will use Label to place the image. We can use Button also to place the image. Here to use jpg image we have to use PIL.
import tkinter as tk from tkinter import * my_w = tk.Tk() my_w.geometry("400x400") frame_top=Frame(my_w,width=390, height=390, highlightbackground='red',highlightthicknes=3) frame_top.grid(row=0,column=0,padx=5,pady=5,ipadx=5,ipady=5) my_img = tk.PhotoImage(file = "D:\\top2.png") l2 = tk.Label(frame_top, image=my_img ) l2.grid(row=0,column=0,padx=5,pady=5) my_w.mainloop()Background colour of Frame
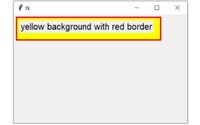
Use the option background=’yellow’ or use Hex code ( #FFFF00 ) to assign background colour to the frame.
If you are using pack layout then keep the option expand=True to cover all available areas.
import tkinter as tk from tkinter import * my_w = tk.Tk() my_w.geometry("400x400") frame_top=Frame(my_w,width=390, height=390,background='yellow', highlightbackground='red',highlightthicknes=3) frame_top.grid(row=0,column=0,padx=5,pady=5,ipadx=5,ipady=5) l2 = tk.Label(frame_top,text='yellow background with red border' ) l2.grid(row=0,column=0,padx=5,pady=5) my_w.mainloop()Understanding Multiple frame layout
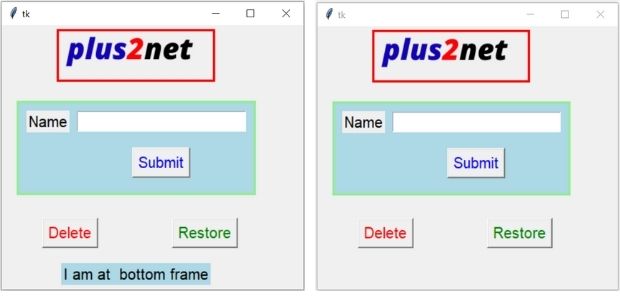
To remove the butom frame ( frame_bottom ) the command option for button is used. command=lambda:frame_bottom.grid_forget() , here in place of grid_forget(), pack_forget() is to be used for pack layout manager.
import tkinter as tk from tkinter import * my_w = tk.Tk() my_w.geometry("400x350") frame_top=Frame(my_w,width=390, height=150, highlightbackground='red',highlightthicknes=3) frame_top.grid(row=0,column=0, padx=5,pady=5,ipadx=5,ipady=5,columnspan=2) my_img = tk.PhotoImage(file = "D:\\top2.png") l2 = tk.Label(frame_top, image=my_img ) l2.grid(row=0,column=0,padx=5,pady=5) frame_body=Frame(my_w,width=380, height=150,background='lightblue', highlightbackground='lightgreen',highlightthicknes=3) frame_body.grid(row=1,column=0, padx=20,pady=20,ipadx=5,ipady=5,columnspan=2) l3=tk.Label(frame_body,text='Name',font=16) l3.grid(row=0,column=0,padx=10,pady=10) t1=tk.Entry(frame_body,width=20,font=16) t1.grid(row=0,column=1) b1=tk.Button(frame_body,text='Submit',font=20,fg='blue') b1.grid(row=1,column=1,padx=20,pady=10) b2=tk.Button(my_w,text='Delete',font=20, fg='Red',command=lambda:frame_bottom.grid_forget() ) b2.grid(row=2,column=0,padx=10,pady=10) b3=tk.Button(my_w,text='Restore',font=20,fg='Green', command=lambda:frame_bottom.grid(row=3,column=0,columnspan=2) ) b3.grid(row=2,column=1,pady=10) frame_bottom=Frame(my_w,width=380, height=150) frame_bottom.grid(row=3,column=0,columnspan=2) l4=tk.Label(frame_bottom,text='I am at bottom frame' , bg='lightblue',font=18) l4.grid(row=0,column=0,pady=10,sticky='w') my_w.mainloop()Config options
| background | Background colour to use, check the Output in above code for background |
| bg | Same as background |
| borderwidth | Width of the border of the Frame ( check examples) |
| bd | Same as borderwidth |
| class | Assign class , default is Frame |
| colormap | specify which color map to use |
| container | Default is 0 |
| cursor | List of cursor shape is available here . The shape of mouse pointer to be displayed over the frame |
| height | Default is 0, part of size ( width , height) |
| highlightbackground | Default is system specific 9, border colour |
| highlightcolor | Default is system specific, border colour when in focus |
| highlightthicknes | Default is 0, border thickness when in focus |
| padx | Horizontal padding, Default is 0 |
| pady | Vertical padding, Default is 0 |
| relief | FLAT ( default ), SUNKEN, RAISED, GROOVE,RIDGE . The border decoration |
| takefocus | If true , tab can be used to move focus, Default is 0 |
| visual | No Default |
| width | Default is 0, part of size ( width , height) |
Example
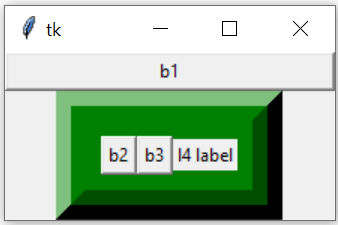
import tkinter as tk from tkinter import * my_w=tk.Tk() my_bottom=Frame(my_w,bg='green',cursor='boat',bd=20,relief=RAISED, width=100,padx=10,pady=10,highlightcolor='yellow') my_bottom.pack(side=BOTTOM) b1=tk.Button(my_w,text='b1', width=30) b1.pack(side=LEFT) # Using Frame by_bottom b2=tk.Button(my_bottom,text='b2') b2.pack(side=LEFT) b3=tk.Button(my_bottom,text='b3') b3.pack(side=LEFT) l4=tk.Label(my_bottom,text='l4 label') l4.pack(side=LEFT) my_w.mainloop()We can update the above options by using config(). Here we are changing the background colour of the Frame on button click.
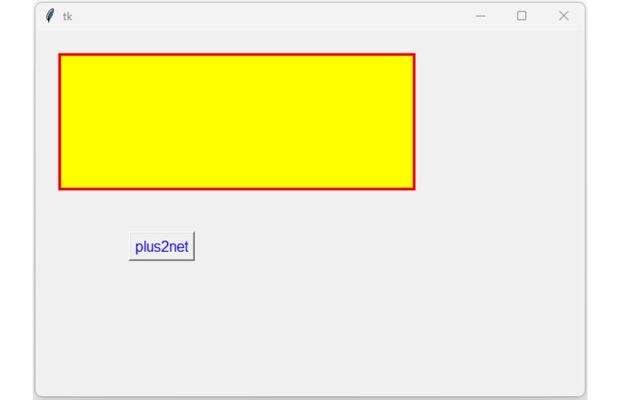
import tkinter as tk my_w = tk.Tk() my_w.geometry("600x400") # width x height of window def my_open(): frame_top.config(bg='lightgreen') frame_top=tk.Frame(my_w,width=390, height=150,bg='yellow', highlightbackground='red',highlightthicknes=3) frame_top.grid(row=0,column=0,padx=25,pady=25,columnspan=2) my_button = tk.Button(my_w,text="plus2net", fg="blue", cursor="hand2",font=18,command=my_open) my_button.grid(row=1, column=0,padx=20, pady=20) my_w.mainloop()separator
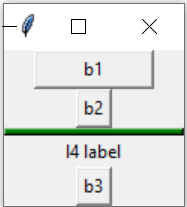
import tkinter as tk from tkinter import * my_w=tk.Tk() b1=tk.Button(my_w,text='b1', width=10) b1.pack(side=TOP) # Using Frame by_bottom b2=tk.Button(my_w,text='b2') b2.pack(side=TOP) my_line=Frame(my_w,bg='green',bd=20,height=5,width=20, relief=RAISED,highlightcolor='yellow') my_line.pack(side=TOP,fill=X) b3=tk.Button(my_w,text='b3') b3.pack(side=BOTTOM) l4=tk.Label(my_w,text='l4 label') l4.pack(side=BOTTOM) my_w.mainloop()