Python Tkinter Frame
The Python Tkinter Frame outlines the frame or “structure” for your Tkinter window of a fixed size. Just like the human skeleton, a Tkinter window requires a frame to support it and give it a proper shape.
The Tkinter frame is useful for organizing your widgets in a specified area within the window. You also have the option to create Frames within Frames, allowing for better organization of widgets.
Frame Syntax:
frame1 = tk.Frame(master, option1, option2, . )The first parameter of the Frame Widget always has to point to a Tkinter instance and is the only compulsory parameter. All others are optional.
List of Options
Tkinter Frame Example:
Every widget in Tkinter requires a “parent” or “master” which they take as the first parameter. Normally, the object created from Tk() called root is used as the parent. However when using frames, the widgets meant to be in the frame will take the frame as their parent.
Basically while the Tkinter frame will take root as the parent, the widgets will take one of the many frames we created as their parent.
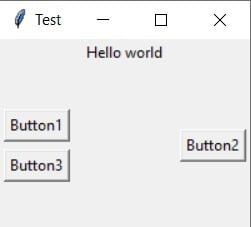
from tkinter import * root = Tk() root.geometry("200x150") frame = Frame(root) frame.pack() leftframe = Frame(root) leftframe.pack(side=LEFT) rightframe = Frame(root) rightframe.pack(side=RIGHT) label = Label(frame, text = "Hello world") label.pack() button1 = Button(leftframe, text = "Button1") button1.pack(padx = 3, pady = 3) button2 = Button(rightframe, text = "Button2") button2.pack(padx = 3, pady = 3) button3 = Button(leftframe, text = "Button3") button3.pack(padx = 3, pady = 3) root.title("Test") root.mainloop() In the code above we’ve created several Tkinter frames and packed them side by side. Next we’ve created a few other widgets like a Buttons and a Label which we insert into the frames we made. Check the image below to see the output of the above code.
The above code will make more sense once you go through the tutorials for other widgets (buttons) and layouts (pack). Also remember that a Tkinter frame is also a widget. which is why you can add a frame within a frame. Instead of passing root as the frame’s parent, simply write the name of another frame. You can use this technique to create nested frames and diversify the layout options on your GUI program.
Code Explanation
- Using pack() instead of other placement functions like place() allows the frames and their contents to auto adjust as window size is adjusted. pack() can also take several parameters to adjust position of the widget.
- root.geometry(«width x height») is another way of setting the size for the whole window.
- root.title() is used to add a title on the title bar of the window.
- root.mainloop() triggers the GUI. Any modifications and widgets to be included should be written before it. More information on it can be found in this article.
Output:
We chose not to define any width or height for our Tkinter frames, thus their default size is that of the widgets contained within them.
Customizing the Tkinter Frame:
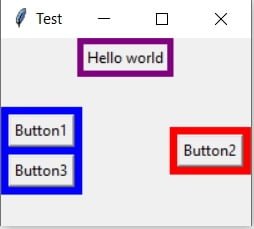
By updating the following lines in our code, we can add some extra color to our Tkinter frame, and by extension, our Tkinter window.
frame = Frame(root, bd = 5, bg = "purple") frame.pack() leftframe = Frame(root, bg = "blue", bd = 3) leftframe.pack(side=LEFT) rightframe = Frame(root, bg = "red", bd = 3) rightframe.pack(side=RIGHT)
You can see the boundaries of the Frames much clearer in here, now that they are colored.
You can make use of many other options shown in the table at the start of the article to further customize your frame.
Tkinter LabelFrame
Tkinter offers a variant of the Frame widget, called LabelFrame. This offers the same functionality as a regular frame, with a few additional features. Below is a simple implementation of the LabelFrame widget.
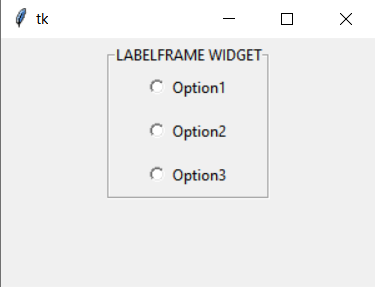
If you want to learn how to make this, follow this link to the Tkinter LabelFrame tutorial.
This marks the end of the Python Tkinter Frame Article. You can head back to the main Tkinter article using this link.. Any suggestions or contributions for our site, CodersLegacy are more than welcome. Questions regarding the tutorial can be asked in the comments section below.
Tkinter Frame
Summary: in this tutorial, you’ll learn about the Tkinter Frame and how to manipulate its attributes including sizes, paddings, and borders.
Introduction to Tkinter Frame
A frame is a widget that displays as a simple rectangle. Typically, you use a frame to organize other widgets both visually and at the coding level.
To create a frame, you use the ttk.Frame class:
frame = ttk.Frame(container, **options)Code language: Python (python)A frame has various configuration objects which determine its appearance.
| borderwidth | Specify the border width of the frame. It defaults to zero |
| class_ | Set widget class name |
| cursor | Change the cursor appearance when the mouse cursor is over the frame |
| height | Set the height of the frame. |
| padding | To create padding inside the frame and outside of the contained widgets. |
| relief | Specify the relief style for the border. To make it effective, you also need to set the borderwidth . |
| style | Specify custom widget custom style name |
| takefocus | A boolean value specifies whether the frame is visited during focus traversal. By default, it is False . So the frame widget does not accept focus. |
| width | Set the width of the frame. |
Frame size
The size of a frame is determined by the size and layout of the widgets it contains. Also, you can explicitly specify the height and width of the frame when creating it:
frame = ttk.Frame(container, height, width)Code language: Python (python)Padding
The padding allows you to add extra space inside the frame and outside of the contained widgets. Paddings are in pixels.
To specify padding for each side of the frame separately, you use the following:
frame['padding'] = (left, top, right, bottom)Code language: Python (python)frame['padding'] = (5,10,5,10)Code language: Python (python)Or you can specify paddings for the left, right and top, bottom as follows:
frame['padding'] = (5, 10)Code language: Python (python)In this example, the left and right paddings are 5 and the top and bottom paddings are 10. If the paddings of all sides are the same, you can specify the padding like this:
frame['padding'] = 5Code language: Python (python)Frame borders
By default, the border width of a frame is zero. In other words, the frame has no border.
To set a border for a frame, you need to set both border’s width and style.
The border’s width of a frame is in pixels. The border’s style of a frame can be flat, groove, raised, ridge, solid, or sunken. The default border style of a frame is flat.
The following example sets the border width of the frame to 5 pixels and the border style of the frame to sunken .
frame['borderwidth'] = 5 frame['relief'] = 'sunken'Code language: Python (python)The following picture illustrates the border styles of a frame:
Tkinter Frame example
We’re going to create the following Replace window that is quite common in the text editors like Notepad:
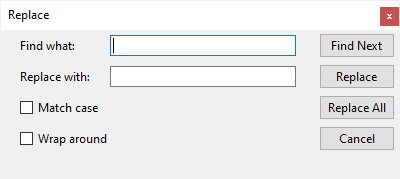
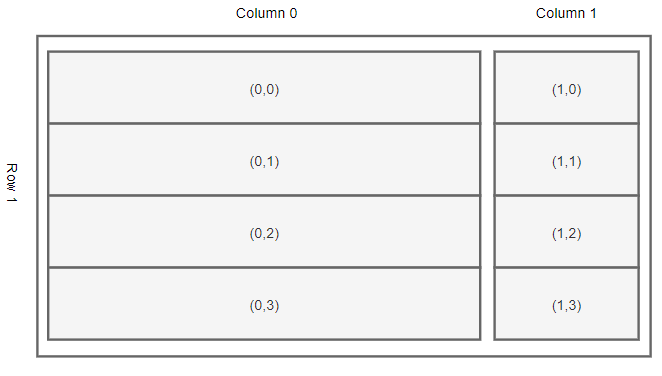
To make the widgets more organized, you can divide the window into two frames:
- The left frame consists of Label, Entry, and Checkbox widgets. The left frame will use the grid geometry manager that has two columns and four rows.
- The right frame consists of the Button widgets. The right frame will also use the grid geometry manager that has four rows and one column.
To place the left and right frames on the window, you can use the grid geometry manager that has one row and two columns:
The following program illustrates how to create the Replace window above:
import tkinter as tk from tkinter import TclError, ttk def create_input_frame(container): frame = ttk.Frame(container) # grid layout for the input frame frame.columnconfigure(0, weight=1) frame.columnconfigure(0, weight=3) # Find what ttk.Label(frame, text='Find what:').grid(column=0, row=0, sticky=tk.W) keyword = ttk.Entry(frame, width=30) keyword.focus() keyword.grid(column=1, row=0, sticky=tk.W) # Replace with: ttk.Label(frame, text='Replace with:').grid(column=0, row=1, sticky=tk.W) replacement = ttk.Entry(frame, width=30) replacement.grid(column=1, row=1, sticky=tk.W) # Match Case checkbox match_case = tk.StringVar() match_case_check = ttk.Checkbutton( frame, text='Match case', variable=match_case, command=lambda: print(match_case.get())) match_case_check.grid(column=0, row=2, sticky=tk.W) # Wrap Around checkbox wrap_around = tk.StringVar() wrap_around_check = ttk.Checkbutton( frame, variable=wrap_around, text='Wrap around', command=lambda: print(wrap_around.get())) wrap_around_check.grid(column=0, row=3, sticky=tk.W) for widget in frame.winfo_children(): widget.grid(padx=5, pady=5) return frame def create_button_frame(container): frame = ttk.Frame(container) frame.columnconfigure(0, weight=1) ttk.Button(frame, text='Find Next').grid(column=0, row=0) ttk.Button(frame, text='Replace').grid(column=0, row=1) ttk.Button(frame, text='Replace All').grid(column=0, row=2) ttk.Button(frame, text='Cancel').grid(column=0, row=3) for widget in frame.winfo_children(): widget.grid(padx=5, pady=5) return frame def create_main_window(): root = tk.Tk() root.title('Replace') root.resizable(0, 0) try: # windows only (remove the minimize/maximize button) root.attributes('-toolwindow', True) except TclError: print('Not supported on your platform') # layout on the root window root.columnconfigure(0, weight=4) root.columnconfigure(1, weight=1) input_frame = create_input_frame(root) input_frame.grid(column=0, row=0) button_frame = create_button_frame(root) button_frame.grid(column=1, row=0) root.mainloop() if __name__ == "__main__": create_main_window() Code language: Python (python)First, import the tkinter module and tkinter.ttk submodule:
import tkinter as tk from tkinter import ttkCode language: JavaScript (javascript)Second, create the left frame in the create_input_frame() function. The following code adds paddings to all widgets within the input_frame:
for widget in frame.winfo_children(): widget.grid(padx=0, pady=5)Third, create the right frame in the create_button_frame() function.
Fourth, create the root window in the create_main_window() function. The following code removes the minimize/maximize buttons from the window:
root.attributes('-toolwindow', True)Code language: PHP (php)Note that this code only works on Windows.
In the create_main_window() function, we also create the left frame, and right frame, and use the grid geometry manager to arrange them on the root window.
Finally, call the create_main_window() function on the if __name__ == «__main__»: block.
Summary
- A ttk.Frame is a simple rectangle widget that can hold other widgets.
- Tkinter frames are used to organize user interfaces visually and at the coding level.
Виджет Tkinter Frame в Python – размещение в окне
Виджет Python Tkinter Frame используется для организации группы виджетов. Он действует как контейнер, который можно использовать для хранения других виджетов. Прямоугольные области экрана используются для организации виджетов в приложении Python.
Синтаксис для использования виджета Frame приведен ниже.
Список возможных вариантов приведен ниже.
| № | Вариант | Описание |
|---|---|---|
| 1 | bd | Он представляет ширину границы. |
| 2 | bg | Цвет фона виджета. |
| 3 | cursor | Указатель мыши изменяется на тип курсора, для которого заданы другие значения, такие как стрелка, точка и т. д. |
| 4 | height | Высота виджета. |
| 5 | highlightbackground | Цвет фона, когда он находится в фокусе. |
| 6 | highlightcolor | Цвет текста, когда виджет находится в фокусе. |
| 7 | highlightthickness | Он определяет толщину вокруг границы, когда виджет находится в фокусе. |
| 8 | relief | Он определяет тип границы. Значение по умолчанию FLAT. |
| 9 | width | Он представляет ширину виджета. |
Пример
from tkinter import * top = Tk() top.geometry("140x100") frame = Frame(top) frame.pack() leftframe = Frame(top) leftframe.pack(side = LEFT) rightframe = Frame(top) rightframe.pack(side = RIGHT) btn1 = Button(frame, text="Submit", fg="red",activebackground = "red") btn1.pack(side = LEFT) btn2 = Button(frame, text="Remove", fg="brown", activebackground = "brown") btn2.pack(side = RIGHT) btn3 = Button(rightframe, text="Add", fg="blue", activebackground = "blue") btn3.pack(side = LEFT) btn4 = Button(leftframe, text="Modify", fg="black", activebackground = "white") btn4.pack(side = RIGHT) top.mainloop()