- How to change the width or height of a tkinter entry field
- 2 Answers 2
- How to resize an Entry Box by height in Tkinter?
- Example
- Output
- Как изменить размер Entry в tkinter
- Как установить высоту и ширину виджета для входа в систему
- Опция width в виджете Entry , чтобы установить ширину
- Опция width и height в методе геометрии place для установки width и height виджета Tkinter Entry
- Опции ipadx и ipady в методе пакета и grid для установки ширины и высоты виджета Tkinter Entry
- Сопутствующая статья — Tkinter Entry
How to change the width or height of a tkinter entry field
I’ve been making a script for checking grammar. Now I’ve updated it to be in a gui using Tkinter. The problem is that I’m trying to indicate the row where the grammar is wrong, and when I use an entry field to input the text everything is in one row. My question is how do you expand the entry field? This is my code:
import re from tkinter import * window = Tk() window.minsize(width=300, height= 20) wr = [] def work(): x = e1.get() print(x) BigLetterSearcher = re.compile(r'\. .|\n') mo = BigLetterSearcher.findall(e1.get()) x = 1 y = 0 v = 0 z = "" wr = [] for i in mo: if i == '\n': x += 1 elif i != i.upper(): v = 1 if x != y: z = "Row", x wr.append(z) wr.append(i) y = x if v == 0: wr.append ("Congratulations none of your grammar was wrong!") l1.configure(text=wr) l1 = Label(window, text="example") e1 = Entry(window, text="Enter text here: ") b1 = Button(window, text="Work", command=work) leb = [l1, e1, b1] for all in leb: all.pack() window.mainloop() You cannot expand the height of an entry field. Use the text widget instead. For the width all you need to specify is width=some_number_here when setting up the widget.
2 Answers 2
The entry widget is not capable of being expanded vertically. This is because there is already a widget designed for this and that is called Text() . For adding text to the text widget we can use insert() and you specify where with a 2 part index. The first part is the row and the 2nd is the column. For the row/line it starts at number 1 and for the index of that row it starts at zero.
For example if you wish to insert something at the very first row/column you would do insert(«1.0», «some data here») .
Here is you code with the use of Text() instead.
import re from tkinter import * window = Tk() window.minsize(width=300, height= 20) wr = [] def work(): x = e1.get("1.0", "end-1c") print(x) BigLetterSearcher = re.compile(r'\. .|\n') mo = BigLetterSearcher.findall(x) x = 1 y = 0 v = 0 z = "" wr = [] for i in mo: if i == '\n': x += 1 elif i != i.upper(): v = 1 if x != y: z = "Row", x wr.append(z) wr.append(i) y = x if v == 0: wr.append ("Congratulations none of your grammar was wrong!") l1.configure(text=wr) l1 = Label(window, text="example") e1 = Text(window, width=20, height=3) e1.insert("end", "Enter text here: ") b1 = Button(window, text="Work", command=work) leb = [l1, e1, b1] for all in leb: all.pack() window.mainloop() How to resize an Entry Box by height in Tkinter?
An Entry widget in a Tkinter application supports singleline user inputs. You can configure the size of an Entry widget such as its width using the width property. However, tkinter has no height property to set the height of an Entry widget. To set the height, you can use the font(‘font_name’, font-size) property. The font size of the text in an Entry widget always works as a height of the Entry widget.
Example
Let us take an example to understand this more clearly. Follow the steps given below −
- Import the required libraries
- Create an Entry widget, set its width and height by specifying the font(‘font-name’, font-size) property.
- Create a Button to print the name of the user with the help of a Label widget.
- Define a function to create a Label to display the name of the users.
- Use the get() function to return the string input from the Entry widget.
# Import the required libraries from tkinter import * # Create an instance of tkinter frame win = Tk() # Set the size of the tkinter window win.geometry("700x350") # Define a function def myClick(): greet= "Hello " + name.get() label=Label(win, text=greet, font=('Arial', 12)) label.pack(pady=10) # Create an entry widget name=Entry(win, width=50, font=('Arial 24')) name.pack(padx=10, pady=10) # Create a button button=Button(win, text="Submit", command=myClick) button.pack(pady=10) win.mainloop() Output
Running the above program will display a window with an Entry widget asking users to enter their name and a Button to submit the name. When you hit «submit», it will display a Label widget on the screen.

Now enter your name in the field and click «Submit» to see the output.
Как изменить размер Entry в tkinter
То что я хотел сделать — калькулятор. Но я не могу изменять размер Entry(ans) в tkinter и не задевая других. Если не изменить размер то Entry будет очень маленьким для калькулятора. Проверьте пожалуйста. Иначе вы просто скажите «все норм же». Спасибо заранее! Вот часть кода:
import tkinter as tk wn = tk.Tk() fnt = ('Arial',18) fr = tk.Frame(bg = 'black') fr.grid(sticky = 'nsew') ans = tk.Entry(master = fr,width = 4,text = '',relief = 'sunken',borderwidth = 10,bg = 'black',fg = 'white') ans.grid(row = 0, column = 1) def check(): if ans.get() == '0': ans.delete(0,tk.END) def b1a(): check() ans.insert(tk.END,'1') def b2a(): check() ans.insert(tk.END,'2') def b3a(): check() ans.insert(tk.END,'3') wn.resizable(width=False, height=False) b1 = tk.Button(master = fr,text = '1',width = 4,height = 2,command = b1a,bg = 'lightgreen')# Это кнопка b2 = tk.Button(master = fr,text = '2',width = 4,height = 2,command = b2a,bg = 'lightgreen')#Это кнопка b3 = tk.Button(master = fr,text = '3',width = 4,height = 2,command = b3a,bg = 'lightgreen')#Это кнопка ans.configure(font = fnt)# Это просто изменяет размер и шрифт b1.configure(font = fnt)# Это просто изменяет размер и шрифт b2.configure(font = fnt)# Это просто изменяет размер и шрифт b3.configure(font = fnt)# Это просто изменяет размер и шрифт b1.grid(padx = 3,pady = 3,row = 1,column = 0) b2.grid(padx = 3,pady = 3,row = 1,column = 1) b3.grid(padx = 3,pady = 3,row = 1,column = 2) Как установить высоту и ширину виджета для входа в систему

- Опция width в виджете Entry , чтобы установить ширину
- Опция width и height в методе геометрии place для установки width и height виджета Tkinter Entry
- Опции ipadx и ipady в методе пакета и grid для установки ширины и высоты виджета Tkinter Entry
Виджет Tkinter Entry — это виджет, позволяющий пользователю вводить или отображать одну строку текста. Поэтому обычно нет необходимости задавать высоту виджета Entry . Но у него есть несколько способов задать высоту, а также ширину виджета Tkinter Entry .
- Опция width в виджете Entry для установки ширины.
- Опции width и height в методе place для установки ширины и высоты виджета Tkinter Entry .
- Опции ipadx и ipady в методе pack и grid для установки ширины и высоты виджета Tkinter Entry .
Опция width в виджете Entry , чтобы установить ширину
Если нужно указать только ширину виджета Entry , то опция width в виджете Entry может быть самым простым методом.
import tkinter as tk app = tk.Tk() app.geometry("400x200") entryExample = tk.Entry(app, width=10) entryExample.pack(side=tk.LEFT, padx=10) app.mainloop() 
Единицей опции width в виджете Tkinter Entry являются текстовые единицы, а не пиксели. Один текстовый юнит в ширину равен ширине 0 в системном шрифте. Поэтому на изображении выше отображается 10 нулей, когда width равна 10.
Опция width и height в методе геометрии place для установки width и height виджета Tkinter Entry
width и height в Методе place геометрии задает ширину и высоту виджета, в единицах пикселей.
import tkinter as tk app = tk.Tk() app.geometry("400x200") entryExample = tk.Entry(app) entryExample.place(x = 10, y = 10, width=200, height=100) app.mainloop() Опции ipadx и ipady в методе пакета и grid для установки ширины и высоты виджета Tkinter Entry
ipadx и ipady устанавливают внутреннюю обивку в горизонтальном и вертикальном направлении. Он может устанавливать ширину и высоту виджета Tkinter Entry косвенно.
Геометрия виджета Tkinter Entry с методом grid приведена ниже,
Реальная ширина кинтера Entry равна 2*ipadx + Default Entry width , аналогично фактической ширине Entry равна 2*ipady + Default Entry height .
import tkinter as tk app = tk.Tk() entryExample1 = tk.Entry(app) entryExample2 = tk.Entry(app) entryExample1.grid(row=0, column=0, padx=10, pady=10, ipady=30) entryExample2.grid(row=1, column=0, padx=10, pady=10, ipadx=20, ipady=30) app.geometry("200x200") app.mainloop() 
Как вы могли видеть, поскольку entryExample2 имеет ipadx как 20 , в то время как ipadx entryExample1 по умолчанию равен 0 , следовательно, ширина entryExample2 составляет 40 пикселей шире, чем entryExample1 .
Аналогично можно было бы установить ipady для изменения ширины виджета Tkinter Entry .
import tkinter as tk app = tk.Tk() entryExample1 = tk.Entry(app) entryExample2 = tk.Entry(app) entryExample1.grid(row=0, column=0, padx=10, pady=10, ipady=50) entryExample2.grid(row=0, column=1, padx=10, pady=10, ipady=60) app.geometry("300x200") app.mainloop() 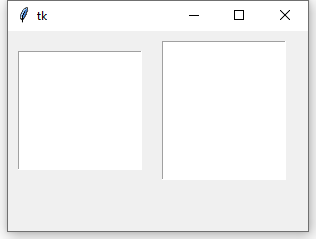
Founder of DelftStack.com. Jinku has worked in the robotics and automotive industries for over 8 years. He sharpened his coding skills when he needed to do the automatic testing, data collection from remote servers and report creation from the endurance test. He is from an electrical/electronics engineering background but has expanded his interest to embedded electronics, embedded programming and front-/back-end programming.