- Tkinter — события и обработчики событий | Python GUI ч.5
- События и связывания событий (event and bind) в Tkinter
- Метод bind
- Практическая работа
- Bind in Tkinter: A Complete Guide
- What is bind?
- 1. Instance-level binding
- Output
- Multiple Binding
- 2. Class-level binding
- Output
- 3. Application-level binding
- Output
- Summary
Tkinter — события и обработчики событий | Python GUI ч.5
Любой пользовательский интерфейс предназначен (в том числе, но не только) для того чтобы получать от пользователя информацию и команды.
Когда пользователь жмет на кнопку , или нажимает Ввод в текстовом поле — это событие (event) в программе и, возможно (но не обязательно), программа должна обработать его в одной из своих функций. Такие функции называют Обработчиками Событий .
И мы должны как-то уметь связывать событие ( bind ) (напр. нажатие на кнопку с функцией обработчиком).
События и связывания событий (event and bind) в Tkinter
В зависимости от виджета в Tkinter у него могут быть одни события, и не быть других. И есть два способа связывания событий с обработчиками:
- Первый — это указанию виджету обработчика на стандартное для данного виджета событие (например на нажатие или клик по кнопке) через передачу callback в аргументе command этого виджета при создании виджета и перед размещением его в контейнере. При этом не у всех виджетов Tk есть такой аргумент. Например у виджета Button аргумент command есть, а у Label нет.
- Второй способ — использование метода bind . Этот метод есть у всех виджетов унаследованных от класса Widget.
Также мы можем создавать свои события и назначать их на виджеты. Подробнее о всех этих возможностях в видео:
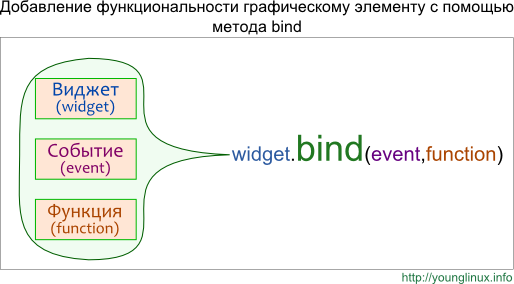
Метод bind
В tkinter с помощью метода bind между собой связываются виджет, событие и действие. Например, виджет – кнопка, событие – клик по ней левой кнопкой мыши, действие – отправка сообщения. Другой пример: виджет – текстовое поле, событие – нажатие Enter , действие – получение текста из поля методом get для последующей обработки программой. Действие оформляют как функцию или метод, которые вызываются при наступлении события.
Один и тот же виджет можно связать с несколькими событиями. В примере ниже используется одна и та же функция-обработчик, однако могут быть и разные:
from tkinter import * root = Tk() def change(event): b['fg'] = "red" b['activeforeground'] = "red" b = Button(text='RED', width=10, height=3) b.bind('', change) b.bind('', change) b.pack() root.mainloop()
Здесь цвет текста на кнопке меняется как при клике по ней (событие ), так и при нажатии клавиши Enter (событие ). Однако Enter сработает, только если кнопка предварительно получила фокус. В данном случае для этого надо один раз нажать клавишу Tab . Иначе нажатие Enter будет относиться к окну, но не к кнопке.
У функций-обработчиков, которые вызываются через bind , а не через свойство command , должен быть обязательный параметр event , через который передается событие. Имя event – соглашение, идентификатор может иметь другое имя, но обязательно должен стоять на первом месте в функции, или может быть вторым в методе:
from tkinter import * root = Tk() class RedButton: def __init__(self): self.b = Button(text='RED', width=10, height=3) self.b.bind('', self.change) self.b.pack() def change(self, event): self.b['fg'] = "red" self.b['activeforeground'] = "red" RedButton() root.mainloop()
Что делать, если в функцию надо передать дополнительные аргументы? Например, клик левой кнопкой мыши по метке устанавливает для нее один шрифт, а клик правой кнопкой мыши – другой. Можно написать две разные функции:
from tkinter import * root = Tk() def font1(event): l['font'] = "Verdana" def font2(event): l['font'] = "Times" l = Label(text="Hello World") l.bind('', font1) # ЛКМ l.bind('', font2) # ПКМ l.pack() root.mainloop()
Но это не совсем правильно, так как код тела функций фактически идентичен, а имя шрифта можно передавать как аргумент. Лучше определить одну функцию:
… def changeFont(event, font): l['font'] = font …
Однако возникает проблема, как передать дополнительный аргумент функции в метод bind ? Ведь в этот метод мы передаем объект-функцию, но не вызываем ее. Нельзя написать l.bind(», changeFont(event, «Verdana»)) . Потому что как только вы поставили после имени функции скобки, значит вызвали ее, то есть заставили тело функции выполниться. Если в функции нет оператора return , то она возвращает None . Поэтому получается, что даже если правильно передать аргументы, то в метод bind попадет None , но не объект-функция.
На помощь приходят так называемые анонимные объекты-функции Python, которые создаются инструкцией lambda . Применительно к нашей программе выглядеть это будет так:
… l.bind('', lambda e, f="Verdana": changeFont(e, f)) l.bind('', lambda e, f="Times": changeFont(e, f)) …
Лямбда-функции можно использовать не только с методом bind , но и опцией command , имеющейся у ряда виджет. Если функция передается через command , ей не нужен параметр event . Здесь обрабатывается только одно основное событие для виджета – клик левой кнопкой мыши.
У меток нет command , однако это свойство есть у кнопок:
from tkinter import * def change_font(font): label['font'] = font root = Tk() label = Label(text="Hello World") label.pack() Button(command= lambda f="Verdana": change_font(f))\ .pack() Button(command= lambda f="Times": change_font(f))\ .pack() root.mainloop()
Практическая работа
Напишите программу по следующему описанию. Нажатие Enter в однострочном текстовом поле приводит к перемещению текста из него в список (экземпляр Listbox ). При двойном клике ( ) по элементу-строке списка, она должна копироваться в текстовое поле.
Курс с примерами решений практических работ: pdf-версия
Tkinter. Программирование GUI на Python
Bind in Tkinter: A Complete Guide
In this article let’s try to understand the concept of bind used in Tkinter. Before starting with this topic, we must remember that Python’s Tkinter package is used to design GUI-based interfaces. Tkinter has a variety of built-in functionalities and extensions that can be used to enhance the functionality and performance of the application.
What is bind?
The basic definition of the word bind is stick together or cause to stick together in a single mass. Similarly, Tkinter bind is used to connect an event passed in the widget along with the event handler. The event handler is the function that gets invoked when the events take place.
widget.bind(sequence=None, func=None, add=None)
The sequence the argument describes what event we expect, and the func argument is a function to be called when that event happens to the widget. If there was already a binding for that event for this widget, normally the old callback is replaced with func, but you can preserve both callbacks by passing add=’+’ .
The events can be bonded to an event handler using the bind function at different levels.
1. Instance-level binding
One can bind an event to one specific widget. To bind an event of a widget, call the .bind() method on that widget.
widget.bind(event, event handler)- Event – occurrence caused by the user that might reflect changes.
- Event Handler – function in your application that gets invoked when the event takes place.
- Bind – configuring an event handler (python function) that is called when an event occurs to a widget.
Following is an example of how to bind an event to a particular instance of a widget.
import tkinter as tk class Display: def __init__(self): self.root = tk.Tk() self.entry1 = tk.Entry(self.root) self.entry1.bind("", self.onKeyPress) self.entry1.pack() self.root.mainloop() def onKeyPress(self, event): print("Key has been Pressed.") display = Display() Output

Multiple Binding
What if we need to bind more than one function to a particular widget? Passing two statements containing the bind the function will certainly not work because the second statement will override the first statement hence only the second function will be invoked as shown below

This problem is solved by adding one extra parameter add to the second statement that uses the bind function. Also do not forget to assign add=”+”. This will invoke both functions. Hence we can enable multiple binding in Tkinter.

2. Class-level binding
One can bind an event to all widgets of a class. For example, you might set up all Button widgets to respond to middle mouse button clicks by changing back and forth between English and Japanese labels. To bind an event to all widgets of a class, call the .bind_class() method on any widget.
The “class” mentioned in bind_class refers to the internal class name used by the tk library, not the python class name. bind_class is a method available to all widgets and simply calls the Tk bind command again, however not with the instance name, but the widget class name.
w.bind_class(className, sequence=None, func=None, add=None)
The basic working of .bind_class is the same as the .bind function.
For example, suppose you have several widgets of the same class, here let’s consider we have multiple entry widgets and we need to set all of them to the same function. Rather than having to call .bind() for every one of them, you can set them all up with one call something like this:
from tkinter import * import tkinter as tk class Display: def __init__(self): self.root = tk.Tk() self.entry_username = tk.Entry(self.root) self.entry_birthday = tk.Entry(self.root) self.entry_password= tk.Entry(self.root) self.entry_username.bind_class("Entry", "", self.onReturn) self.entry_username.pack() self.entry_birthday.pack() self.entry_password.pack() #to know the class type of the widget use following command. #print(self.entry_username.winfo_class()) self.root.mainloop() def onReturn(self, event): print("Return pressed") display = Display() Output

3. Application-level binding
One can set up a binding so that a certain event calls a handler no matter what widget has the focus or is under the mouse.
w.bind_all(sequence=None, func=None, add=None)
Like .bind() , but applies to all widgets in the entire application.
For example, you might have multiple widgets of the same type throughout the program, they make be part of different classes. To bind an event at the application level, call the .bind_all() method on any widget. While using .bind_all you do not need to mention the class name as the bind is applied on each and every event of the application. Here’s how to implement it,
from tkinter import * import tkinter as tk class Display: def __init__(self): self.root = tk.Tk() self.entry_username = tk.Entry(self.root) self.entry_birthday = tk.Entry(self.root) self.entry_password = tk.Entry(self.root) self.entry_username.bind_all("", self.onReturn) self.entry_username.pack() self.entry_birthday.pack() self.entry_password.pack() #to know the class type of the widget use following command. print(self.entry_username.winfo_class()) self.root.mainloop() def onReturn(self, event): print("Return pressed") display = Display() Output

Summary
In this article, we have understood that Bind is the function used in Tkinter to join or associate an event with a particular function called event handler for a widget. Also, Tkinter supports three levels of binding they are: instance-level binding, class-level binding, and application-level binding.