- Python requests request cookies
- # Table of Contents
- # Python: How to get and set Cookies when using Requests
- # Accessing the path and the domain when using Cookies with requests
- # Sending cookies with a request
- # Accessing the cookies attribute directly on the Response object
- # Saving the requests cookies in a file and restoring them
- # Additional Resources
- Use Cookies in Python Requests
- Use requests.get() to Get Cookies in Python
- Use Session() Class to Stay Connected With Pages After Login
- Related Article — Python Requests
Python requests request cookies
Last updated: Jul 2, 2023
Reading time · 4 min
# Table of Contents
# Python: How to get and set Cookies when using Requests
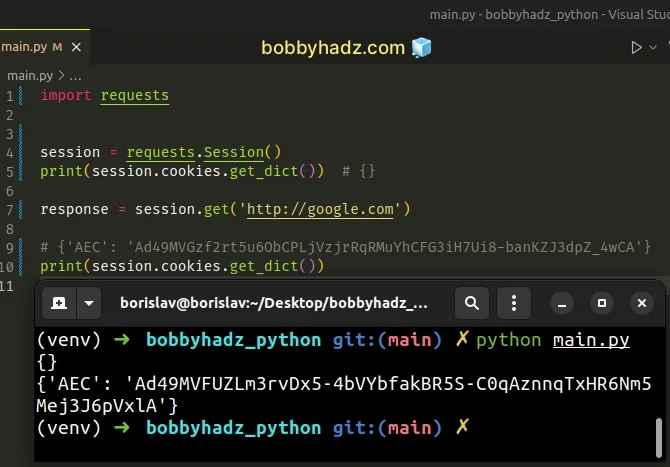
Use the Session class to set and get cookies when using the requests module in Python.
The class creates a Session object that stores the cookies and all requests that are made handle cookies automatically.
Copied!import requests session = requests.Session() print(session.cookies.get_dict()) # <> response = session.get('http://google.com') # print(session.cookies.get_dict())
Make sure you have the requests module installed to be able to run the code sample.
Copied!pip install requests # or with pip3 pip3 install requests
The Session object enables you to persist cookies across requests.
The object persists cookies across all requests that were made using the Session instance.
The Session object has all of the methods of the main requests API.
The get_dict() method returns a Python dictionary of the name-value pairs of cookies.
You can also use Sessions as context managers.
Copied!import requests with requests.Session() as session: print(session.cookies.get_dict()) # <> response = session.get('http://google.com') # print(session.cookies.get_dict())
Make sure the code that accesses the Session object is inside the indented block.
# Accessing the path and the domain when using Cookies with requests
It is very likely, that you will also have to access the domain and the path to which the request was made when accessing the cookies.
You can use a list comprehension to construct a list of dictionaries that contain the path and domain.
Copied!import requests session = requests.Session() print(session.cookies.get_dict()) # <> print('-' * 50) response = session.get('http://google.com') # print(session.cookies.get_dict()) print('-' * 50) result = [ 'name': c.name, 'value': c.value, 'domain': c.domain, 'path': c.path> for c in session.cookies ] # [] print(result)
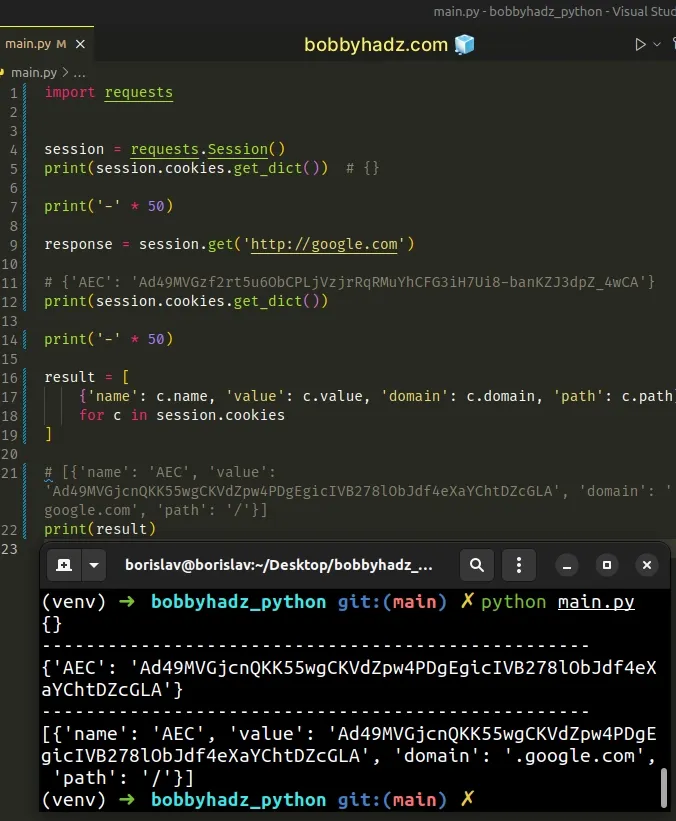
We used a list comprehension to iterate over the RequestCookieJar object ( session.cookies ) and returned a dictionary on each iteration.
The dictionary contains the name and value of the cookie, the path and the domain.
# Sending cookies with a request
If you want to send cookies with a request, set the cookies keyword argument.
Copied!import requests session = requests.Session() response = session.get( 'https://httpbin.org/cookies', cookies='my-cookie': 'my-value'> ) # # "cookies": # "my-cookie": "my-value" # > # > print(response.text)
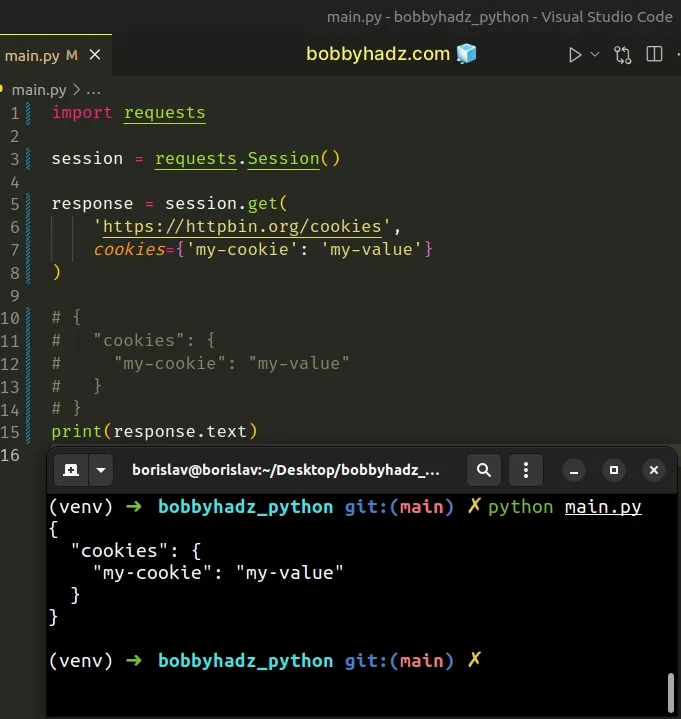
We set the cookies keyword argument to a dictionary of key-value pairs.
# Accessing the cookies attribute directly on the Response object
In more recent versions of the requests module, you can also access the cookies attribute directly on the Response object.
Copied!import requests response = requests.get('http://google.com', timeout=30) # print(response.cookies.get_dict()) result = [ 'name': c.name, 'value': c.value, 'domain': c.domain, 'path': c.path> for c in response.cookies ] # [] print(result)
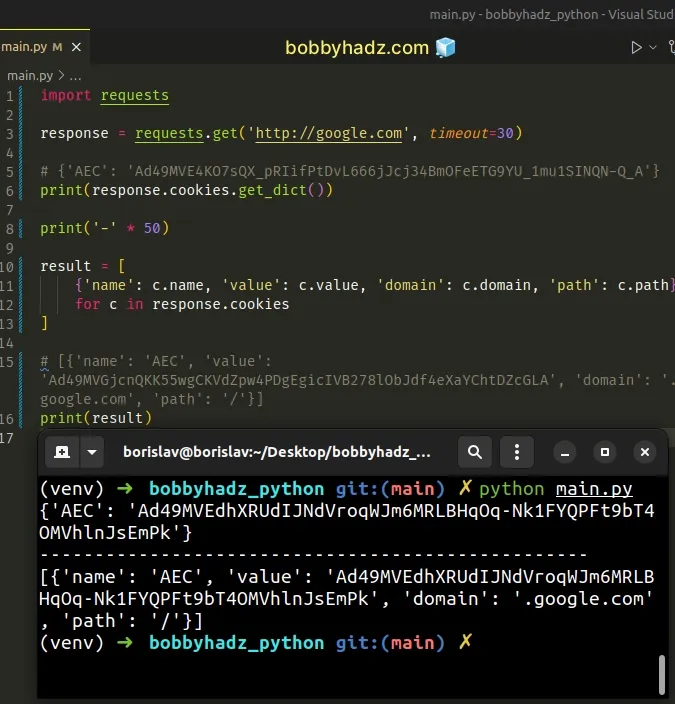
Notice that we didn’t instantiate the Session class.
We simply accessed the cookies attribute on the Response object and called the get_dict() method on the RequestCookieJar object.
However, the management of cookies is automated when you use a Session object.
This means that you won’t have to send the cookies explicitly:
Copied!import requests session = requests.Session() response = session.get( 'https://httpbin.org/cookies', cookies='my-cookie': 'my-value'> ) # # "cookies": # "my-cookie": "my-value" # > # > print(response.text)
Because it will be done for your automatically.
# Saving the requests cookies in a file and restoring them
You can also save the requests cookies in a file.
Copied!import json import requests response = requests.get('http://google.com', timeout=30) with open('cookies.txt', 'w', encoding='utf-8') as f: json.dump( requests.utils.dict_from_cookiejar(response.cookies), f )
The cookies.txt file stores the following JSON string.
Copied!"AEC": "Ad49MVEu4N64Tk1gEROw417s9FgcqdqeIeVZ8eL9m-HQldzOrLAF2HvxHQ">
Notice that we used the requests.utils.dict_from_cookiejar method to create a dictionary from the RequestCookieJar object.
We then passed the dictionary and the file object to the json.dump method.
The json.dump method serializes the supplied object as a JSON formatted stream and writes it to a file.
You can then read and restore the cookies from the file.
Copied!import json import requests session = requests.session() with open('cookies.txt', 'r', encoding='utf-8') as f: cookies = requests.utils.cookiejar_from_dict(json.load(f)) session.cookies.update(cookies) # print(session.cookies.get_dict())
We created a brand new Session object but you can use an existing Session .
- We used the json.load() method to convert the contents of the file to a native Python dictionary.
- We used the requests.utils.cookiejar_from_dict method to create a RequestCookieJar object from the dictionary.
- The last step is to update the cookies of the Session object with the newly read cookies.
# Additional Resources
You can learn more about the related topics by checking out the following tutorials:
I wrote a book in which I share everything I know about how to become a better, more efficient programmer.
Use Cookies in Python Requests

- Use requests.get() to Get Cookies in Python
- Use Session() Class to Stay Connected With Pages After Login
This tutorial demonstrates the use of requests.get() to get cookies with the help of the cookies parameter in Python and how to access a particular web page that requires a login.
Further, we will also learn the use of requests.Session() to stay connected with that page.
Use requests.get() to Get Cookies in Python
The requests library lets create and read HTTP cookies from the server. According to the MDN documentation, a cookie is “a small piece of data that a server sends to the user’s web browser.”
- Session management for login
- Shopping carts
- User personalization, or tracking user behavior
This section demonstrates how to work with cookies, and in the next section, we will use the first purpose (session management for login).
To send and receive cookies with the requests library, we will start by importing requests . Following the import, we will set a variable named URL to pass the link as a string .
We will use this URL because it provides a simple response body to see the cookie information we sent to the server. For example, let’s say we want to customize our user experience based on a user’s location.
This way, we can provide shipping estimates for our products without the user having to enter an address. To do this, we will request to know the user’s location in the cookie, and if they agree, we will store the information in a cookie.
To mimic the content received in this event, we will declare a dictionary called CK with the key of location and a value is New York .
Next, we will declare our response object response and set it using the requests.get() method. We will enter our URL variable as the first parameter, followed by the cookies keyword that will be set equal to our CK dictionary.
Now that the request is set up, we can print the text from the response object using response.text . When a script is run, we can see the cookie we just sent is within the response body.
import requests URL='https://httpbin.org/cookies' CK='location':'New York'> response=requests.get(URL,cookies=CK) print(response.text) "cookies": "location": "New York" > > To receive a cookie from a server, we will use a cookie already set up on the google website.
Use Session() Class to Stay Connected With Pages After Login
Using the inspect element tool in our browser, we can see where the login request is sent and mimic that in our program. And the session part allows us to stay alive and access all the pages behind the login.
Before writing our code, we must do a few things; however, we need to find the login URL and see what parameters are sent with that post request.
We need the login credentials, so we will share the login information with you in this example because we are using a dummy site.
We have a simple login form with a username and password required; if we log into this using the given information, we will be logged in and get a secure area.
We will see the request and response by using the inspect element and going to the network tab. We can see here if we click the Login button, several requests pops-up.
Before login into the page, you should check the Preserve log so that we can see everything in the network tab. After opening the authenticate request, we will get some information, and one of them is a post request.
A post request is a request sent to the server from the web browser, and a get request is the information coming back to find out the URL that is being posted.
We will copy the post request URL because we will send our post request from our python script. We can find our form data inside the payload .
Sometimes you find more information inside the payload , so you must ensure that all parameters go along with the post request.
But, in our case, we see there is only a username and password . So, after login, we got directed back to the secure page, and this is our get request; by using a secure response, we will copy the request URL to use in our python script.
Now we will jump into the code editor and start writing our code, the first thing we need to do, as always, is import requests , and we need to set our login URL for the post request and secure URL for get request.
Now we need to call the post() method to send the username & password and get authenticated with the server. To do that, we need to send some payload using a dictionary called ACCESS_DATA .
We wrapped up the code inside the Login_Dummy_web() and created another python file called data.py .
After importing the data file, we accessed the username and password from this file while calling the function and returning the RESULT.text of the secure page.
Let’s try to get back to the secure page using the get() method; it will send us back to a login page because we are not authenticated.
import requests import data def Login_Dummy_web(username,password): LOGIN_URL='https://the-internet.herokuapp.com/authenticate' SECURE_URL='https://the-internet.herokuapp.com/secure' ACCESS_DATA= 'username':username, 'password' :password > RESULT=requests.post(LOGIN_URL,data=ACCESS_DATA) RESULT2=requests.get(SECURE_URL) return RESULT2.text print(Login_Dummy_web(data.username,data.password)) 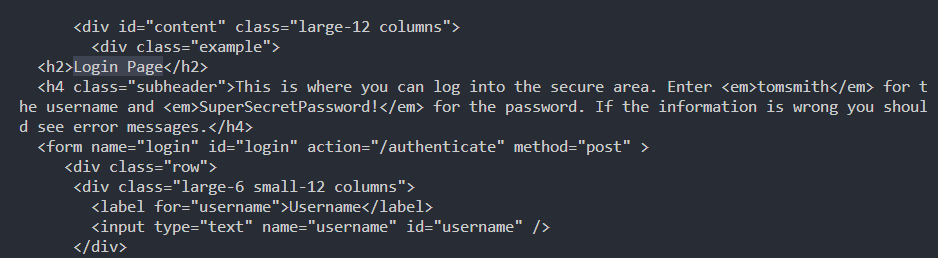
We already logged in using the post() method, but still, it denies use to send the secure page because we do not have our session. The session allows us to persist cookies for a particular website; to get a secure page, we need to use requests.Session() .
Using the with keyword, we use context manager; context manager is handy because it will allow us to stay connected and stay logged in as long as we remain.
Now we have to call get() and post() methods from the session variable called ss because now we are accessing it from the Session() class.
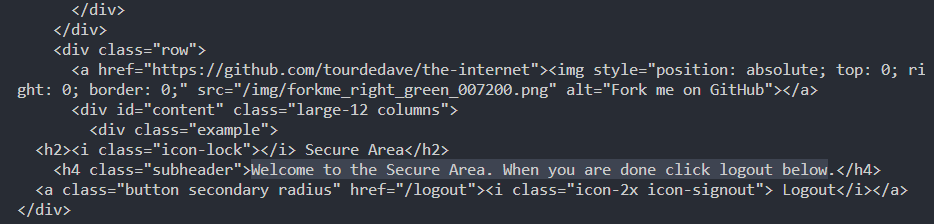
import requests import data def Login_Dummy_web(username,password): LOGIN_URL='https://the-internet.herokuapp.com/authenticate' SECURE_URL='https://the-internet.herokuapp.com/secure' ACCESS_DATA= 'username':username, 'password' :password > with requests.Session() as ss: ss.post(LOGIN_URL,data=ACCESS_DATA) RESULT=ss.get(SECURE_URL) return RESULT.text print(Login_Dummy_web(data.username,data.password)) Now it says ( Welcome to the Secure Area ), which proves we have logged in there; using the requests.Session() variable called ss , we can get another URL content.
The code of the data.py file is given below:
username='tomsmith' password='SuperSecretPassword!' For more details, you can visit this website.
Hello! I am Salman Bin Mehmood(Baum), a software developer and I help organizations, address complex problems. My expertise lies within back-end, data science and machine learning. I am a lifelong learner, currently working on metaverse, and enrolled in a course building an AI application with python. I love solving problems and developing bug-free software for people. I write content related to python and hot Technologies.