- Drawing Multiple Plots with Matplotlib in Python
- Plotting a Single Plot
- Plotting Multiple plots
- Using the subplot() function
- Using the subplots() function
- About The Python Tutorials Blog
- Creating multiple subplots using plt.subplots #
- A figure with just one subplot#
- Stacking subplots in one direction#
- Stacking subplots in two directions#
- Sharing axes#
- Polar axes#
Drawing Multiple Plots with Matplotlib in Python
Python’s Matplotlib library is one of the most widely used data visualization libraries. With Matplotlib, you can plot your data using all kinds of chart types, including line charts, bar charts, pie charts and scatter plots.
Matplotlib lets you plot a single chart but it also allows you to draw multiple charts at once in the form of grids.
In this tutorial, we’ll demonstrate exactly how to draw multiple plots with the Matplotlib library.
Plotting a Single Plot
Before we show you how to plot multiple plots, let’s make sure we have the fundamentals down by walking through an example showing how to draw a single plot with Matplotlib. In this example, we’re going to draw a line plot.
To draw plots with Matplotlib, use the pyplot submodule from the Matplotlib library.
Specifically, to draw a line plot, you need to call the plot() function from the pyplot module and pass it lists of values for your x and y axes.
The script below draws a line plot for the sine function. The input values consists of 50 equidistant points between -100 to 100.
import matplotlib.pyplot as plt %matplotlib inline import numpy as np x = np.linspace(-100, 100, 50) y_sin = [np.sin(i) for i in x] plt.plot(x, y_sin, 'bo-')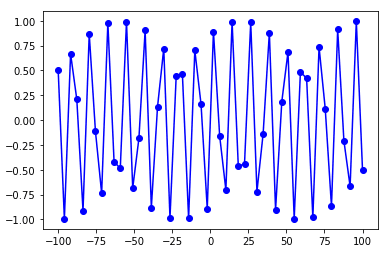
Note: The %matplotlib inline snippet only works with the Jupyter Notebook. If you’re not using Jupyter Notebook, just add plt.show() right after the point where we start making plots.
Plotting Multiple plots
Once you know how to do that, you’re ready to plot multiple plots. Again, Matplotlib allows you to plot multiple plots in the form of a grid. There are a couple of ways to do it:
Using the subplot() function
To draw multiple plots using the subplot() function from the pyplot module, you need to perform two steps:
- First, you need to call the subplot() function with three parameters: (1) the number of rows for your grid, (2) the number of columns for your grid, and (3) the location or axis for plotting. For instance, the subplot(2,3,1) tells the Python interpreter that the next plot should be plotted in a grid that contains 2 rows and 3 columns and the plot should appear at the first location in the grid (row 1, column 1). The order of the plotting locations first goes from left to right, then top to bottom. This means means that the subplot(2,3,4) command will draw a plot in the second row and first column of the grid.
- After the subplot() command, simply call the corresponding function or chart type you want to plot using the the pyplot module. For instance, the script below makes line charts using the plot() method.
This script is going to make six line plots in a grid of two rows and three columns, using the subplot() function.
import matplotlib.pyplot as plt import numpy as np import math %matplotlib inline x = np.linspace(-100, 100, 50) y_sin = [np.sin(i) for i in x] y_cos = [np.cos(i) for i in x] y_tan = [np.tan(i) for i in x] y_log = [np.log(i) for i in x] y_exp = [np.exp(i) for i in x] y_sqr = [i*i for i in x] plt.rcParams["figure.figsize"] = [12,8] plt.subplot(2,3,1) plt.plot(x, y_sin, 'bo-') plt.subplot(2,3,2) plt.plot(x, y_cos, 'rx-') plt.subplot(2,3,3) plt.plot(x, y_tan, 'g*-') plt.subplot(2,3,4) plt.plot(x, y_log, 'y) plt.subplot(2,3,5) plt.plot(x, y_exp, 'g') plt.subplot(2,3,6) plt.plot(x, y_sqr, 'r*-') plt.show()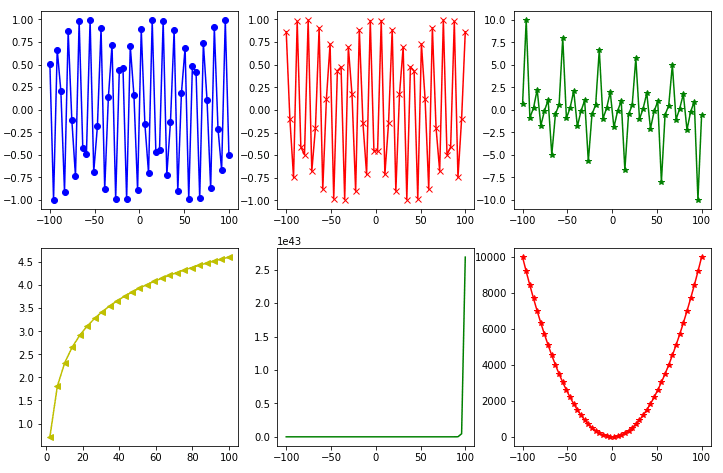
Get Our Python Developer Kit for Free
I put together a Python Developer Kit with over 100 pre-built Python scripts covering data structures, Pandas, NumPy, Seaborn, machine learning, file processing, web scraping and a whole lot more — and I want you to have it for free. Enter your email address below and I’ll send a copy your way.
Using the subplots() function
With the subplot() function, you need to set the location for every subsequent plot. The subplots() function eliminates this requirement.
You can set the the number of rows and columns for your grid at once using the subplots() function from the pyplot module. The number of rows and columns are passed as integer values to the nrows and ncols attriubtes of the subplots() function. Depending on the number of rows and columns, the subplots() function returns a list of AxesSubplot objects.
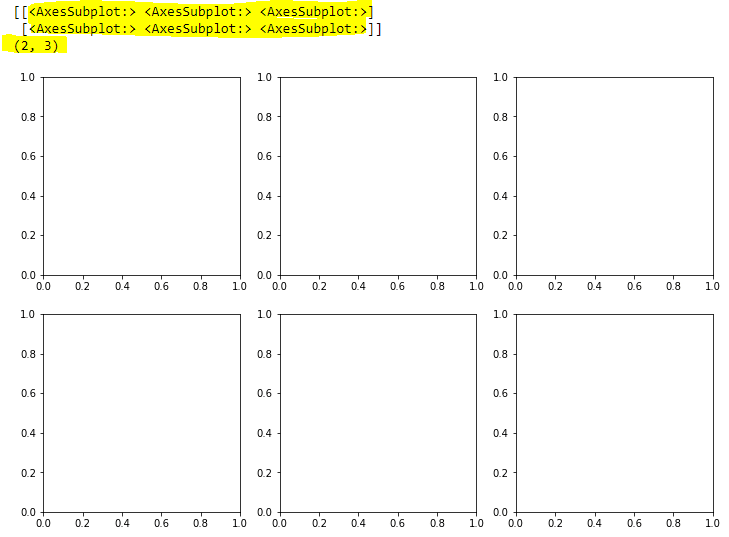
For instance, in the script below, you call the subplots() method that creates a grid with 2 rows and 3 columns. The “axes” variable in the script below contains the list of “AxesSubplot” objects which are printed on the console.
import matplotlib.pyplot as plt import numpy as np import math x = np.linspace(-100, 100, 50) y_sin = [np.sin(i) for i in x] y_cos = [np.cos(i) for i in x] y_tan = [np.tan(i) for i in x] y_log = [np.log(i) for i in x] y_exp = [np.exp(i) for i in x] y_sqr = [i*i for i in x] plt.rcParams["figure.figsize"] = [12,8] fig, axes = plt.subplots(nrows= 2, ncols=3) print(axes) print(axes.shape) plt.show()In the output, you can see a list of lists corresponding to the rows and columns of your grid. You can also see the empty axes. We’ve highlighted the list in yellow, along with the grid dimensions.
The next step is to draw plots in these empty charts. To do this, you have to select an item from the list of AxesSubplot objects and call the plot() function using that object.
For example, to draw a plot at the first row and first column in the grid, you need to access the AxesSubplot at index [0,0]. Notice the index numbers for the subplots begin at 0.
The script below draws six line plots in 2 rows and 3 columns using the subplots() function.
import matplotlib.pyplot as plt import numpy as np import math x = np.linspace(-100, 100, 50) y_sin = [np.sin(i) for i in x] y_cos = [np.cos(i) for i in x] y_tan = [np.tan(i) for i in x] y_log = [np.log(i) for i in x] y_exp = [np.exp(i) for i in x] y_sqr = [i*i for i in x] plt.rcParams["figure.figsize"] = [12,8] fig, axes = plt.subplots(nrows= 2, ncols=3) axes[0,0].plot(x, y_sin, 'bo-') axes[0,1].plot(x, y_cos, 'rx-') axes[0,2].plot(x, y_tan, 'g*-') axes[1,0].plot(x, y_log, 'y) axes[1,1].plot(x, y_exp, 'g') axes[1,2].plot(x, y_sqr, 'r*-') plt.show()
That’s all there is to it! We have a lot of tutorials showing how to visualize data with Python, including with Pandas and Seaborn. If you want more tutorials like these, go ahead and subscribe using the form below and we’ll send them your way.
About The Python Tutorials Blog

The Python Tutorials Blog was created by Ryan Wells, a Nuclear Engineer and professional VBA Developer. After launching his VBA Tutorials Blog in 2015, he designed some VBA Cheat Sheets, which have helped thousands learn to write better macros. He expanded in 2018 with The Python Tutorials Blog to teach people Python in a similar systematic way. Today, wellsr.com reaches over 2 million programmers each year!
Creating multiple subplots using plt.subplots #
pyplot.subplots creates a figure and a grid of subplots with a single call, while providing reasonable control over how the individual plots are created. For more advanced use cases you can use GridSpec for a more general subplot layout or Figure.add_subplot for adding subplots at arbitrary locations within the figure.
import matplotlib.pyplot as plt import numpy as np # Some example data to display x = np.linspace(0, 2 * np.pi, 400) y = np.sin(x ** 2)
A figure with just one subplot#
subplots() without arguments returns a Figure and a single Axes .
This is actually the simplest and recommended way of creating a single Figure and Axes.
fig, ax = plt.subplots() ax.plot(x, y) ax.set_title('A single plot')

Stacking subplots in one direction#
The first two optional arguments of pyplot.subplots define the number of rows and columns of the subplot grid.
When stacking in one direction only, the returned axs is a 1D numpy array containing the list of created Axes.
fig, axs = plt.subplots(2) fig.suptitle('Vertically stacked subplots') axs[0].plot(x, y) axs[1].plot(x, -y)

If you are creating just a few Axes, it’s handy to unpack them immediately to dedicated variables for each Axes. That way, we can use ax1 instead of the more verbose axs[0] .
fig, (ax1, ax2) = plt.subplots(2) fig.suptitle('Vertically stacked subplots') ax1.plot(x, y) ax2.plot(x, -y)

To obtain side-by-side subplots, pass parameters 1, 2 for one row and two columns.
fig, (ax1, ax2) = plt.subplots(1, 2) fig.suptitle('Horizontally stacked subplots') ax1.plot(x, y) ax2.plot(x, -y)

Stacking subplots in two directions#
When stacking in two directions, the returned axs is a 2D NumPy array.
If you have to set parameters for each subplot it’s handy to iterate over all subplots in a 2D grid using for ax in axs.flat: .
fig, axs = plt.subplots(2, 2) axs[0, 0].plot(x, y) axs[0, 0].set_title('Axis [0, 0]') axs[0, 1].plot(x, y, 'tab:orange') axs[0, 1].set_title('Axis [0, 1]') axs[1, 0].plot(x, -y, 'tab:green') axs[1, 0].set_title('Axis [1, 0]') axs[1, 1].plot(x, -y, 'tab:red') axs[1, 1].set_title('Axis [1, 1]') for ax in axs.flat: ax.set(xlabel='x-label', ylabel='y-label') # Hide x labels and tick labels for top plots and y ticks for right plots. for ax in axs.flat: ax.label_outer()
![Axis [0, 0], Axis [0, 1], Axis [1, 0], Axis [1, 1]](https://matplotlib.org/stable/_images/sphx_glr_subplots_demo_005.png,)
You can use tuple-unpacking also in 2D to assign all subplots to dedicated variables:
fig, ((ax1, ax2), (ax3, ax4)) = plt.subplots(2, 2) fig.suptitle('Sharing x per column, y per row') ax1.plot(x, y) ax2.plot(x, y**2, 'tab:orange') ax3.plot(x, -y, 'tab:green') ax4.plot(x, -y**2, 'tab:red') for ax in fig.get_axes(): ax.label_outer()

Sharing axes#
By default, each Axes is scaled individually. Thus, if the ranges are different the tick values of the subplots do not align.
fig, (ax1, ax2) = plt.subplots(2) fig.suptitle('Axes values are scaled individually by default') ax1.plot(x, y) ax2.plot(x + 1, -y)

You can use sharex or sharey to align the horizontal or vertical axis.
fig, (ax1, ax2) = plt.subplots(2, sharex=True) fig.suptitle('Aligning x-axis using sharex') ax1.plot(x, y) ax2.plot(x + 1, -y)

Setting sharex or sharey to True enables global sharing across the whole grid, i.e. also the y-axes of vertically stacked subplots have the same scale when using sharey=True .
fig, axs = plt.subplots(3, sharex=True, sharey=True) fig.suptitle('Sharing both axes') axs[0].plot(x, y ** 2) axs[1].plot(x, 0.3 * y, 'o') axs[2].plot(x, y, '+')

For subplots that are sharing axes one set of tick labels is enough. Tick labels of inner Axes are automatically removed by sharex and sharey. Still there remains an unused empty space between the subplots.
To precisely control the positioning of the subplots, one can explicitly create a GridSpec with Figure.add_gridspec , and then call its subplots method. For example, we can reduce the height between vertical subplots using add_gridspec(hspace=0) .
label_outer is a handy method to remove labels and ticks from subplots that are not at the edge of the grid.
fig = plt.figure() gs = fig.add_gridspec(3, hspace=0) axs = gs.subplots(sharex=True, sharey=True) fig.suptitle('Sharing both axes') axs[0].plot(x, y ** 2) axs[1].plot(x, 0.3 * y, 'o') axs[2].plot(x, y, '+') # Hide x labels and tick labels for all but bottom plot. for ax in axs: ax.label_outer()

Apart from True and False , both sharex and sharey accept the values ‘row’ and ‘col’ to share the values only per row or column.
fig = plt.figure() gs = fig.add_gridspec(2, 2, hspace=0, wspace=0) (ax1, ax2), (ax3, ax4) = gs.subplots(sharex='col', sharey='row') fig.suptitle('Sharing x per column, y per row') ax1.plot(x, y) ax2.plot(x, y**2, 'tab:orange') ax3.plot(x + 1, -y, 'tab:green') ax4.plot(x + 2, -y**2, 'tab:red') for ax in fig.get_axes(): ax.label_outer()

If you want a more complex sharing structure, you can first create the grid of axes with no sharing, and then call axes.Axes.sharex or axes.Axes.sharey to add sharing info a posteriori.
fig, axs = plt.subplots(2, 2) axs[0, 0].plot(x, y) axs[0, 0].set_title("main") axs[1, 0].plot(x, y**2) axs[1, 0].set_title("shares x with main") axs[1, 0].sharex(axs[0, 0]) axs[0, 1].plot(x + 1, y + 1) axs[0, 1].set_title("unrelated") axs[1, 1].plot(x + 2, y + 2) axs[1, 1].set_title("also unrelated") fig.tight_layout()

Polar axes#
The parameter subplot_kw of pyplot.subplots controls the subplot properties (see also Figure.add_subplot ). In particular, this can be used to create a grid of polar Axes.
fig, (ax1, ax2) = plt.subplots(1, 2, subplot_kw=dict(projection='polar')) ax1.plot(x, y) ax2.plot(x, y ** 2) plt.show()

Total running time of the script: ( 0 minutes 8.036 seconds)