- Python opencv in ranges
- Theory
- HSV colorspace
- Code
- OpenCV на python: цветовой фильтр
- 1. Функция OpenCV для выделения цветового диапазона
- 2. Программа для настройки цветового фильтра в OpenCV
- OpenCV на python: цветовой фильтр : 6 комментариев
- OpenCV Detect Colors
- Use the inRange() Function of OpenCV to Detect Colors on Images in Python
- Related Article — Python OpenCV
- Related Article — OpenCV Image
Python opencv in ranges
In this tutorial you will learn how to:
- Perform basic thresholding operations using OpenCV cv::inRange function.
- Detect an object based on the range of pixel values in the HSV colorspace.
Theory
- In the previous tutorial, we learnt how to perform thresholding using cv::threshold function.
- In this tutorial, we will learn how to do it using cv::inRange function.
- The concept remains the same, but now we add a range of pixel values we need.
HSV colorspace
HSV (hue, saturation, value) colorspace is a model to represent the colorspace similar to the RGB color model. Since the hue channel models the color type, it is very useful in image processing tasks that need to segment objects based on its color. Variation of the saturation goes from unsaturated to represent shades of gray and fully saturated (no white component). Value channel describes the brightness or the intensity of the color. Next image shows the HSV cylinder.

Since colors in the RGB colorspace are coded using the three channels, it is more difficult to segment an object in the image based on its color.

Formulas used to convert from one colorspace to another colorspace using cv::cvtColor function are described in Color conversions
Code
The tutorial code’s is shown lines below. You can also download it from here
OpenCV на python: цветовой фильтр
Еще один полезный фильтр OpenCV, который поможет нашим роботам в детектировании и распознавании объектов — цветовой фильтр. Этот алгоритм используется для того, чтобы убрать из кадра всё лишнее по цветовому признаку.
Предположим, что в кадре где-то находится зеленое яблоко.

Чтобы найти на картинке яблоко, машина может сначала найти найти круглый объект, а затем проверить его цвет. А что значит круглый объект? Это значит, что его край представляет собой окружность. А как найти край? Один из способов — это найти такие места на картинке, где радикально меняется цвет. Действительно, на краю яблока цвет резко меняется с зеленого на коричневый. Но поиск таких мест на каждом кадре видеопотока достаточно сложная вычислительная задача, особенно для таких слабых компьютеров как Raspberry Pi. Требуется как-то упростить задачу.
А что если радикально упростить картинку с яблоком? Пусть всё, что было хоть немного зеленым станет белым, а всё остальное станет черным. Тогда нам не придется долго анализировать каждый пиксель картинки, ведь на ней останутся только белые и черные точки. Там, где за черной точкой следует белая и наоборот, за белой — черная, и есть край искомого яблока (это, конечно, грубо, но не далеко от истины).

Именно такую процедуру нам и предстоит сделать с помощью OpenCV.
1. Функция OpenCV для выделения цветового диапазона
Функция inRange позволяет наложить на кадр цветовой фильтр в заданном диапазоне.
inRange( кадр, цвет 1, цвет 2 )
- кадр — изображение, на которое мы накладываем фильтр;
- цвет 1 — начальный цвет диапазона;
- цвет 2 — конечный цвет диапазона.
Чтобы выделить яблоко нам нужен именно диапазон цветов, а не один конкретный. Одна часть яблока может находиться в тени, а на другую в это время падает свет из окна. Значит нам интересен и светло-зеленый и темно-зеленый цвет, а также все оттенки между ними.
Пример программы на python, которая выделяет в кадре всё зеленое, разных оттенков.
import cv2 import numpy as np import video if __name__ == '__main__': def callback(*arg): print (arg) cv2.namedWindow( "result" ) cap = video.create_capture(0) hsv_min = np.array((53, 0, 0), np.uint8) hsv_max = np.array((83, 255, 255), np.uint8) while True: flag, img = cap.read() hsv = cv2.cvtColor(img, cv2.COLOR_BGR2HSV ) thresh = cv2.inRange(hsv, hsv_min, hsv_max) cv2.imshow('result', thresh) ch = cv2.waitKey(5) if ch == 27: break cap.release() cv2.destroyAllWindows()Эта программа хоть и будет более или менее сносно выделять яблоко, но она использует очень простой фильтр, который ограничивает только первый компонент модели HSV.
По факту, такой фильтр кроме яблока найдет еще много чего ненужного в кадре. В реальной жизни фильтр использует все три компонента HSV, и мы сейчас научимся делать такие фильтры.
2. Программа для настройки цветового фильтра в OpenCV
Библиотека OpenCV позволяет создавать формы и некоторые примитивные элементы на них. С помощью этого нехитрого инструментария напишем программу, в которой можно будет в режиме реального времени настраивать все три компонента HSV картинки для создания подходящего фильтра.
import cv2 import numpy as np import video if __name__ == '__main__': def nothing(*arg): pass cv2.namedWindow( "result" ) # создаем главное окно cv2.namedWindow( "settings" ) # создаем окно настроек cap = video.create_capture(0) # создаем 6 бегунков для настройки начального и конечного цвета фильтра cv2.createTrackbar('h1', 'settings', 0, 255, nothing) cv2.createTrackbar('s1', 'settings', 0, 255, nothing) cv2.createTrackbar('v1', 'settings', 0, 255, nothing) cv2.createTrackbar('h2', 'settings', 255, 255, nothing) cv2.createTrackbar('s2', 'settings', 255, 255, nothing) cv2.createTrackbar('v2', 'settings', 255, 255, nothing) crange = [0,0,0, 0,0,0] while True: flag, img = cap.read() hsv = cv2.cvtColor(img, cv2.COLOR_BGR2HSV ) # считываем значения бегунков h1 = cv2.getTrackbarPos('h1', 'settings') s1 = cv2.getTrackbarPos('s1', 'settings') v1 = cv2.getTrackbarPos('v1', 'settings') h2 = cv2.getTrackbarPos('h2', 'settings') s2 = cv2.getTrackbarPos('s2', 'settings') v2 = cv2.getTrackbarPos('v2', 'settings') # формируем начальный и конечный цвет фильтра h_min = np.array((h1, s1, v1), np.uint8) h_max = np.array((h2, s2, v2), np.uint8) # накладываем фильтр на кадр в модели HSV thresh = cv2.inRange(hsv, h_min, h_max) cv2.imshow('result', thresh) ch = cv2.waitKey(5) if ch == 27: break cap.release() cv2.destroyAllWindows()Перед тем как запустить программу рекомендуем посмотреть небольшой видеоурок-инструкцию.
Your browser does not support the video tag.
Теперь запускаем программу и подбираем значения начала и конца цветового диапазона фильтр. В случае фигурки зеленого андроида значения будут такими:
hsv_min = np.array((53, 55, 147), np.uint8) hsv_max = np.array((83, 160, 255), np.uint8)
Можем вставить их в первую программу и посмотреть насколько хорошо фильтр выделяет объект.
Надо заметить, что подобный способ имеет один большой недостаток. Дело в том, что цвет объекта сильно зависит от освещения. Например, если настроить фильтр при солнечном свете, он будет плохо работать при свете комнатной лампы.
И напоследок. Вообще, выделять цветовой диапазон можно не вручную. Как вариант, можно написать программу, которая предложит пользователю несколько раз кликнуть мышкой в разные места целевого объекта и вычислит с помощью этого подходящий цветовой диапазон. Если переложить эту идею на зрение робота, то разумно использовать следующий алгоритм:
- оператор берет целевой объект в руки и размещает его прямо перед камерой робота;
- оператор водит объектом туда-сюда, давая роботу зафиксировать цвета разных точек объекта;
- робот синтезирует на основе нескольких точек всё тот же цветовой диапазон.
В следующем уроке поговорим об алгоритме детектирования цветового пятна на картинке. Вот там то нам и пригодятся все, ранее полученные знания.
OpenCV на python: цветовой фильтр : 6 комментариев
у вас пропущен TAB на 7-ой строчке в:
2. Программа для настройки цветового фильтра в OpenCV
5| if __name__ == ‘__main__’:
6| def nothing(*arg):
7|-> pass
8|
9| cv2.namedWindow( «result» ) # создаем главное окно
10| cv2.namedWindow( «settings» ) # создаем окно настроек
OpenCV Detect Colors

This tutorial will discuss detecting colors in images using the inRange() function of OpenCV in Python.
Use the inRange() Function of OpenCV to Detect Colors on Images in Python
We can detect and extract colors present in an image using the inRange() function of OpenCV. Sometimes, we want to remove or extract color from the image for some reason.
We can use the inRange() function of OpenCV to create a mask of color, or in other words, we can detect a color using the range of that color. The colors are stored in an RGB triplet value format inside a color image.
To create its mask, we have to use the RGB triplet value of that color’s light and dark version. For example, in a BRG image, if we want to extract the red color, we can use (0,0,50) for light red and (255,50,50) for the dark red color to create a mask of red color.
We can pass the image and the lower and upper BRG values to create a mask.
For example, let’s read an image containing some circles of different colors and create a mask of red color and a mask of green color. See the code below.
import cv2 img = cv2.imread("download.png") ## mask of red color mask1 = cv2.inRange(img, (0, 0, 50), (50, 50,255)) ## mask of blue color mask2 = cv2.inRange(img, (50,0,0), (255, 50, 50)) cv2.imshow('Original Image',img) cv2.imshow('mask red color',mask1) cv2.imshow('mask blue color',mask2) cv2.waitKey(0) 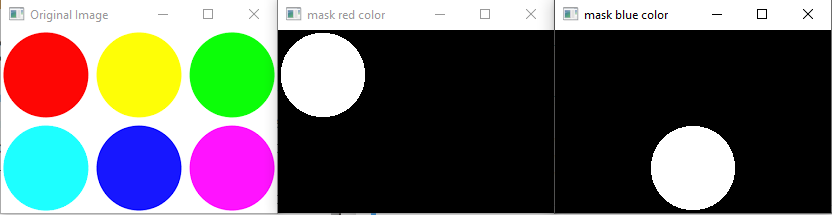
We can compare the two masks with the original image to know if they contain the right color or not. We can see that mask one is on top of red color and mask two is on top of blue color.
The inRange() function creates a new binary image similar to the original image. As you see, there are only two colors in the mask image white and black.
The inRange() function sets the value of the color to 1 or white if color is present in the given color range and 0 if the color is not present in the specified color range. The above image was in the BRG color scale.
That’s why we used BRG values inside the inRange() function, but we can also convert images to other color scales like HSV, and in this case, we will use the HSV scale value to create a mask. Now let’s extract the red and blue colors from the image.
To extract the two colors, we have to combine the two masks to create a single mask using the bitwise_or() function of OpenCV. After that, we can use the bitwise_and() function of OpenCV to extract the colors from the image using the image as the first and second argument and mask as the third argument.
import cv2 img = cv2.imread("download.png") ## mask of red color mask1 = cv2.inRange(img, (0, 0, 50), (50, 50,255)) ## mask of blue color mask2 = cv2.inRange(img, (50,0,0), (255, 50, 50)) ## final mask mask = cv2.bitwise_or(mask1, mask2) target = cv2.bitwise_and(img,img, mask=mask) cv2.imshow('Original Image',img) cv2.imshow('mask red color',mask1) cv2.imshow('mask blue color',mask2) cv2.imshow('mask of both colors',mask) cv2.imshow('target colors extracted',target) cv2.waitKey(0) 
The red and blue color is successfully extracted from the given image, as seen in the last image. To convert one color space to another, we can use the cvtColor() function of OpenCV.
If we have an image with HSV color space, we must use the HSV values to create a mask. In HSV, color has three values Hue, Saturation, and Value which define the color.
Hello! I am Ammar Ali, a programmer here to learn from experience, people, and docs, and create interesting and useful programming content. I mostly create content about Python, Matlab, and Microcontrollers like Arduino and PIC.
Related Article — Python OpenCV
Related Article — OpenCV Image
Copyright © 2023. All right reserved