- Как отобразить и закрыть изображение в Python?
- 3 ответа
- Отображение прозрачного изображения PNG без окна в Python
- Отображение прозрачного изображения PNG без окна в Python
- 5 Ways To Display Images in Python
- Ways to Display Images Using Python
- Upskill 2x faster with Educative
- 1. OpenCV to Display Images in Python
- 2. Matplotlib
- 3. Pillow
- 4. Scikit-Image
- 5. Tensorflow
- Conclusion
Как отобразить и закрыть изображение в Python?
Я хотел бы отображать изображение в python и закрывать его после того, как пользователь вводит имя изображения в терминале. Я использую PIL для отображения изображения, вот код:
im = Image.open("image.jpg") im.show() Мое приложение отображает это изображение, но задача пользователя — распознавать объект на изображении и писать ответ в терминале. Если введен правильный ответ, пользователь должен получить другое изображение. Проблема с PIL заключается в том, что я не могу закрыть изображение, и с исследованием единственным решением было убить процесс просмотра изображений, но это не очень надежный и элегантный. Существуют ли другие библиотеки для отображения изображений с такими методами, как .show() и .close()?
3 ответа
Просто откройте любой просмотрщик/редактор изображений в отдельном процессе и убейте его, как только пользователь ответит на ваш вопрос, например.
from PIL import Image import subprocess p = subprocess.Popen(["display", "/tmp/test.png"]) raw_input("Give a name for image:") p.kill() Означает ли это, что «display» — это исполняемый файл, отображающий изображение на пути пользователя? Это кажется немного . хрупким?
Это пример, но программное обеспечение должно полагаться на что-то, что работает, это самый простой способ для данной ситуации, в общем случае для кроссплатформенного приложения вы можете использовать некоторую библиотеку, такую как wxPython или PyQT, для создания окна и отображения изображения. Вы также можете использовать im.show PIL, который может быть кроссплатформенным, но вы не можете закрыть окно автоматически.
Терминал предназначен для работы с линейным потоком команд, то есть он задает вопрос, ответы пользователя, а затем может задавать другой вопрос. То, что вы пытаетесь сделать здесь, — это сделать терминал, чтобы сделать две вещи, показать изображение и в то же время задать вопрос пользователю. Для этого вы можете сделать две вещи:
Multiprocessing
Вы можете запустить новый поток/процесс и сделать PIL показом изображения с помощью этого потока, а между тем в первом потоке/процессе задайте пользователю вопрос. Затем, после ответа пользователя, вы можете закрыть другой поток/процесс. Вы можете посмотреть модуль Python threading (ссылка) для получения дополнительной информации о том, как вы можете это сделать.
Вместо того, чтобы сделать свой пользовательский интерфейс в терминале, сделайте простое приложение с графическим интерфейсом, используя удобную инфраструктуру. Мне лично нравится PyQt4. Qt — очень мощный инструментарий разработки графического интерфейса, а PyQt4 — обертка для него. Если вы создаете графический интерфейс, то то, что вы делаете, является довольно тривиальным.
Отображение прозрачного изображения PNG без окна в Python
Я пытаюсь отображать изображения PNG с прозрачностью без заголовка или любого другого указания информации об окне (представьте, что наклеиваете наклейку на экран). Я уже сделал это однажды на другом языке, поместив изображение в окно и удалив все элементы окна, включая заголовок и фон, но я не могу добиться этого на python.
Я уже пробовал Tkinter, но похоже, что он не предназначен для работы с прозрачностью PNG и не может иметь отдельную прозрачность для родительских и дочерних окон.
Сейчас пробую wxPython. Я считаю, что можно было бы сделать родительское окно прозрачным, а дочернее окно (которое содержит изображение) непрозрачным, но не могу понять, возможно ли это вообще.
Вот упрощенная версия моей попытки:
app = wx.App() path = 'Images/02.png' bitmap = wx.Bitmap(path, wx.BITMAP_TYPE_PNG) # Create bitmap frame = wx.Frame(None,-1,'Transparent Window',size=(1000,1000)) # Create frame (top level window) frame.SetTransparent(100) # Change transparency of the frame panel = wx.Panel(frame, -1) # Create panel (to hold the image) wx.StaticBitmap(panel, -1, bitmap) # Put the image in the panel panel.SetTransparent(255) # Change transparency of the panel (the image) frame.Show() app.MainLoop() Но, к сожалению, «.SetTransparent()» работает только в окне верхнего уровня, поэтому я не могу установить прозрачность панели на что-либо еще.
Но в основном вопрос в том, можно ли с помощью Python отображать изображение с прозрачностью? Я не ищу какого-либо конкретного метода достижения этого, тот, который я предоставил, был единственным, что я знаю. Так что, пожалуйста, помогите мне, если сможете 🙂
Изменить 1: пытался использовать wx.lib.agw.advancedsplash:
import wx import wx.lib.agw.advancedsplash as AS app = wx.App() frame = wx.Frame(None, -1, "AdvancedSplash Test") imagePath = "Images/05.png" bitmap = wx.Bitmap(imagePath) splash = AS.AdvancedSplash(frame, bitmap=bitmap) app.MainLoop() Но он по-прежнему заполняет прозрачные области
Отображение прозрачного изображения PNG без окна в Python
Я пытаюсь отобразить PNG-изображения с прозрачностью без заголовка или любого другого указания информации об окне (представьте, что вы наклеиваете наклейку на свой экран). Я уже сделал это однажды на другом языке, поместив изображение в окно и удалив все элементы окна, включая заголовок и фон, но я не могу добиться этого в python.
Я уже пробовал Tkinter, но похоже, что он не предназначен для работы с прозрачностью PNG и не может иметь отдельную прозрачность для родительского и дочернего окон.
Сейчас пробую wxPython. Моя идея состоит в том, что возможно сделать родительское окно прозрачным, а дочернее окно (которое содержит изображение) непрозрачным, но я не могу понять, возможно ли это вообще.
Вот упрощенная версия моей попытки:
app = wx.App() path = 'Images/02.png' bitmap = wx.Bitmap(path, wx.BITMAP_TYPE_PNG) # Create bitmap frame = wx.Frame(None,-1,'Transparent Window',size=(1000,1000)) # Create frame (top level window) frame.SetTransparent(100) # Change transparency of the frame panel = wx.Panel(frame, -1) # Create panel (to hold the image) wx.StaticBitmap(panel, -1, bitmap) # Put the image in the panel panel.SetTransparent(255) # Change transparency of the panel (the image) frame.Show() app.MainLoop() Но, к сожалению, «.SetTransparent()» работает только в окне верхнего уровня, поэтому я не могу настроить прозрачность панели на что-либо еще.
Но в основном вопрос в том, возможно ли отображать изображение с прозрачностью самостоятельно с помощью Python? Я не ищу какой-либо конкретный метод достижения этого, тот, который я предоставил, был единственным, который я знаю. Так что, пожалуйста, помогите мне, если можете 🙂
Редактировать 1: пытался использовать wx.lib.agw.advancedsplash:
import wx import wx.lib.agw.advancedsplash as AS app = wx.App() frame = wx.Frame(None, -1, "AdvancedSplash Test") imagePath = "Images/05.png" bitmap = wx.Bitmap(imagePath) splash = AS.AdvancedSplash(frame, bitmap=bitmap) app.MainLoop() Но он по-прежнему заполняет прозрачные области
5 Ways To Display Images in Python

In this article, we shall study the different ways how you can read and display images in Python. We can achieve this in numerous ways. The reason is due to the abundant library support. We will also explore how we can use them in crossbreeding with each other.
Ways to Display Images Using Python
The following is a list of libraries of Python that enable us to process the images and do the corresponding tasks.
Upskill 2x faster with Educative
Supercharge your skillset with Educative Python courses → use code: ASK15 to save 15%
Let’s now see how to display an image in a Python GUI window easily. There may be many other modules and/or hacks to view images too, so don’t limit yourself to just these 5 modules!
1. OpenCV to Display Images in Python
This is a very famous, beginner-friendly and open-source, and powerful package that is responsible for image processing. With a small set of commands, we can take our Computer Vision journey to next level. There are two main functions OpenCV provides to read and display images.
import sys # to access the system import cv2 img = cv2.imread("sheep.png", cv2.IMREAD_ANYCOLOR) while True: cv2.imshow("Sheep", img) cv2.waitKey(0) sys.exit() # to exit from all the processes cv2.destroyAllWindows() # destroy all windows 
Explanation:
- Import the OpenCV package to access the functions. Also, import the sys module for additional packages.
- Create a variable as img that holds our image. Call the cv2.imread() function and deliver the image path/image name as a first parameter. Then set the cv2.IMREAD_ANYCOLOR is the next parameter to read every color of the image.
- Then set a while loop and that will help us render the image an infinite number of times till we exit the system.
- Then use the cv2.imshow() function inside the while loop. It takes two parameters, the image title and the image path variable img.
- The cv2.waitkey() method waits till we exit or click on the close button.
- Then call the sys.exit() method to safely exit the technique.
- Finally, we destroy all the created windows using cv2.destroyAllWindows().
2. Matplotlib
This package is mainly for data visualization. But, through the plotting techniques, we can view the image in a graphical format where each pixel lies on 2D x-y axes.
Thie library also has the equivalent functions as that of open cv. Just the package name changes.
from matplotlib import pyplot as plt from matplotlib import image as mpimg plt.title("Sheep Image") plt.xlabel("X pixel scaling") plt.ylabel("Y pixels scaling") image = mpimg.imread("sheep.png") plt.imshow(image) plt.show() 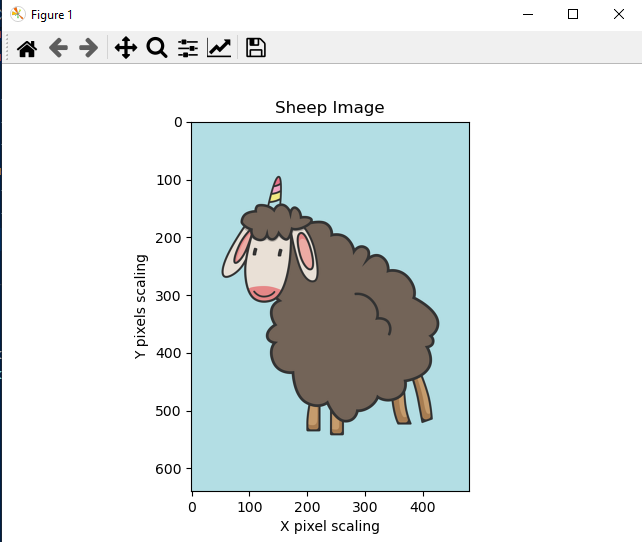
Explanation:
- Import the Matplotlib packages’ pylot and image modules.
- Set the title of the image as Sheep Image using plt.title() method.
- As matplotlib reads the image in x-y plane. We need labels xlabel() and ylabel() functions to mention the axes and the pixels.
- Create a variable as an image that holds our image. Call the mpimg.imread() function and give the image path/imagename as a first parameter.
- Then set a while loop and that will help us render the image an infinite number of times till we exit the system.
- Then use the plt.imshow() function that takes image variable img. But it will show it in the backend.
- To view it on the screen use the plt.show() method and we have our image with properly scaled parameters on the screen.
3. Pillow
This library often offers simple methods for Image manipulations. We can say that it is an image-only library because of its simplicity and adaptability. The functions we are gonna using are open() and show() from PILLOW’s Image module. This action is just within three lines of code.
from PIL import Image img = Image.open("sheep.png") img.show() 
Explanation:
- Import the module Image from PIL.
- Create a variable img and then call the function open() in it. Give the path that has the image file.
- Call the show() function in joint with img variable through the dot operator “.”.
- It displays the image through the built-in Photo app in your respective OS.
4. Scikit-Image
Scikit-Image is a sub-module of Scikit-Learn. It is built upon Python and supportive library Matplotlib thus it derives some of its functionalities. Methods are similar to that of the previous packages we saw before.
from skimage import io img = io.imread("sheep.png") io.imshow(img) 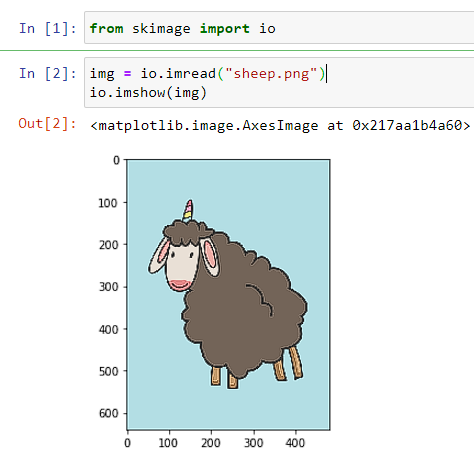
5. Tensorflow
This is a powerful Machine Learning library especially from Google.Inc. It works on different aspects of Machine Learning, Deep Learning, and related concepts. It also has built-in datasets to start a hassle-free journey of Data Science and ML engineering. It works specifically on the computer’s GPU CUDA cores. This makes the model training more efficient and gives less stress to the CPU.
We will be using this library in joint with the Matplotlib module. Because this makes image plotting and displaying much easier.
from warnings import filterwarnings import tensorflow as tf from tensorflow import io from tensorflow import image from matplotlib import pyplot as plt filterwarnings("ignore") tf_img = io.read_file("sheep.png") tf_img = image.decode_png(tf_img, channels=3) print(tf_img.dtype) plt.imshow(tf_img) # plt.show() Explanation:
- Import TensorFlow. Then from TensorFlowalso import io and image.
- Import matplotlib’s pyplot module for plotting purposes.
- (Optional) also, use the warnings package to avoid unnecessary warnings.
- Create a TensorFlow image variable “tf_img” and call the io.read_file() method. Give the image path inside it.
- It is read as a default file. To view it as the image we need to use the decode_png() function from the image to get recognized by the system. Make sure you use the correct decider function. They are different for each image type. Use channels = 3. for default GPU usage.
- Finally, display the captured image through the plt.imshow() method.

Conclusion
So, these are the different considerable ways through which we can perform image processing. Python has a ton of options for each unique task. Comment down which method and library do you like the most we implemented in this article.