- How to easily build Desktop Apps with HTML, CSS and Javascript
- In this Article we will be focussing mainly on how Electron can be used to create desktop applications with Web Technologies like HTML, CSS and Javascript
- Electron
- Electron Forge
- Pre-requisites
- Let’s get started with the application
- Understanding the Existing Folder Structure and Code
- package.json
- src/index.js
- Main Process and Renderer process
- src/index.html
- Code in index.js explained
- Let’s create a Temperature Converter Desktop Application
- Writing the Code
- Running the application
- Packaging the application
- Creating a make File
- Code
- Congrats 😄
- PyScript: Run Python in HTML File – Step by Step Tutorial
- Important Things About PyScript
- 1. Let’s Create Our First Program with PyScript
- 2. Print Current Date Time
- 3. Bokeh Chart with PyScript
- Conclusion
How to easily build Desktop Apps with HTML, CSS and Javascript
Can HTML, CSS and Javascript really be used to build Desktop Applications?
In this Article we will be focussing mainly on how Electron can be used to create desktop applications with Web Technologies like HTML, CSS and Javascript
Electron
Electron can be used to build Desktop Apps with HTML, CSS and Javascript. Also these apps work for multiple platforms like Windows, Mac, Linux and so on.
Electron Combines Chromium and NodeJS into a single Runtime. This enables Us to run the HTML, CSS and Javascript Code as a desktop application.
Electron Forge
If Electron is used directly, then some manual setup is needed before building your application. Also if you want to use angular, react, vue or any other framework or library, you will need to manually configure for that.
Electron Forge makes the above things much easier.
It provides template applications with angular, react, vue and other frameworks. This avoids the extra manual setups needed.
Also it provides an easy way to build and package the application. It also provides many other features which can be found in their documenation.
Pre-requisites
Ensure you have NodeJS installed. It can be installed from here
Install Electron Forge Globally using the following command
npm install -g electron-forge Let’s get started with the application
Use the following command to create your application
electron-forge init simple-desktop-app-electronjs simple-desktop-app-electronjs is the name of the application
The above command will take some time to run.
Once it finishes running, Start the application using the following commands
cd simple-desktop-app-electronjs npm start This should open up a window like the one shown below
Understanding the Existing Folder Structure and Code
The application created has a folder structure. Here I will be mentioning some of the important things in this folder structure
package.json
It has information about the application you are creating, it has all the dependencies needed for the app and also it has some scripts. Some of the scripts are already pre configured and you can add new scripts as well.
The config.forge path has all the configurations which are specific to ElectronJS. For example make-targets is used specify the target make files for various platforms like Windows, Mac or Linux.
Also package.json has «main»: «src/index.js» which indicates that src/index.js is the starting point of the application
src/index.js
According to package.json, index.js is the main script. The process which runs the main script is known as the Main Process. So Main Process runs the index.js script.
The main process is used to display GUI elements. It does this by creating Web Pages.
Each Web page created runs in a process called as renderer process
Main Process and Renderer process
The purpose of the Main Process is to create web pages using a BrowserWindow Instance.
The BrowserWindow Instance uses a renderer process to run each Web page.
Each App can have only one Main Process but can have many renderer processes
It is possible to communicate between the main and the renderer process as well. This will not be covered in this article.
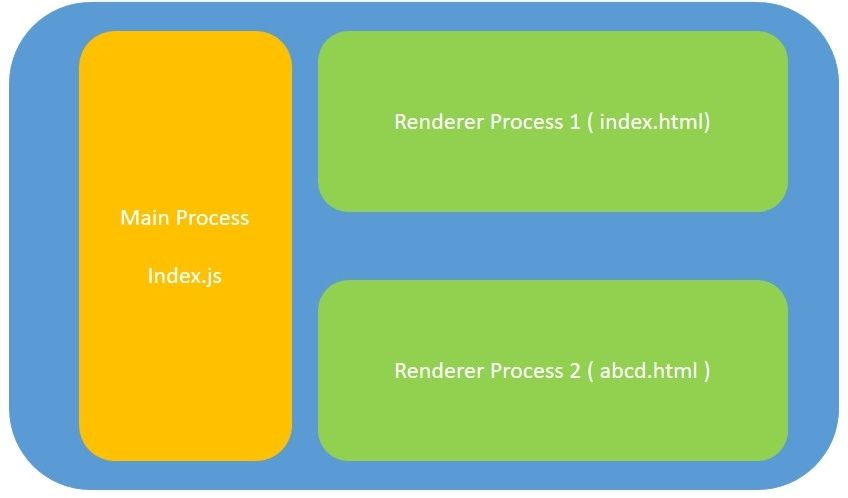
Electron Architecture showing main and renderer process. The file names can vary
abcd.html is shown as a second webpage in the above architecture. But in our code we won’t be having a second web page.
src/index.html
index.js loads the index.html file into a new BrowerWindow Instance.
What this basically means is that, index.js creates a new GUI Window, and loads it with index.html web page. The index.html web page runs in its own renderer process.
Code in index.js explained
Most of the code created in index.js has good comments explaining what it does. Here I will mention a few key points to note in index.js
mainWindow = new BrowserWindow( width: 800, height: 600, >); // and load the index.html of the app. mainWindow.loadURL(`file://$__dirname>/index.html`); The above code snippet basically creates a BrowserWindow Instance and loads index.html into the BrowserWindow.
You would see app used often in the code. For example take the below code snippet.
app is used to control the applications’s event life cycle.
The above code snippet says that when the application is ready, load the first window.
Similarily app can be used to perform other actions on various events. For example it can be used to perform some action right before the application closes and so on.
Let’s create a Temperature Converter Desktop Application
Writing the Code
Let us use the same application we used before and modify it slightly to create a temperature converter application.
First Let us install Bootstrap. Install bootstrap using the following command
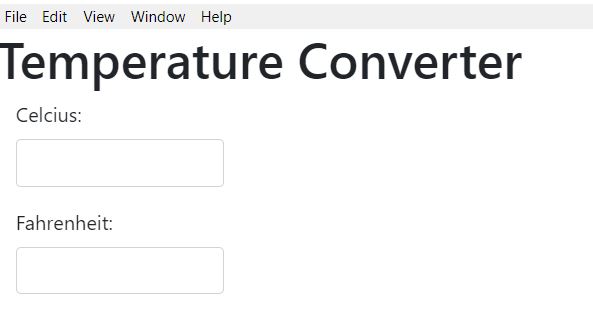
npm install bootstrap --save Copy the following code into src/index.html
charset="utf-8"> Temperature Converter rel="stylesheet" type="text/css" href="../node_modules/bootstrap/dist/css/bootstrap.min.css"> Temperature Converter class="form-group col-md-3"> for="usr">Celcius: type="text" class="form-control" id="celcius" onkeyup="celciusToFahrenheit()"> class="form-group col-md-3"> for="pwd">Fahrenheit: type="text" class="form-control" id="fahrenheit" onkeyup="fahrenheitToCelcius()"> src='./renderer.js'> The above code does the following
- Creates a text box with id celcius. whenever anything is typed in this textbox, celciusToFahrenheit() function is called.
- Creates a text box with id fahrenheit. whenever anything is typed in this textbox, fahrenheitToCelcius() function is called.
- Whenever a new value is typed in celcius text box, the value in the fahrenheit text box displays the same temperature in fahrenheit
- Whenever a new value is typed in fahrenheit text box, the value in the celcius text box displays the same temperature in celcius
The 2 functions which do the temperature conversion are present in renderer.js
Create a file called renderer.js inside src. Copy the following code into it.
function celciusToFahrenheit() let celcius = document.getElementById('celcius').value; let fahrenheit = (celcius* 9/5) + 32; document.getElementById('fahrenheit').value = fahrenheit; > function fahrenheitToCelcius() let fahrenheit = document.getElementById('fahrenheit').value; let celcius = (fahrenheit - 32) * 5/9 document.getElementById('celcius').value = celcius; > celciusToFahrenheit() function reads the value in celcius text box, converts it to fahrenheit and writes the new temperature into fahrenheit text box.
fahrenheitToCelcius() function does the exact opposite of this.
Running the application
Run the application using the following command
This should display the following window. Try it out with different values.
Packaging the application
The command to package the application is
This command will take some time to run. Once it finishes check the out folder within the project folder.
I tested this in a windows machine. This creates a folder called simple-desktop-app-electronjs-win32-x64 inside out folder
So in the out/simple-desktop-app-electronjs-win32-x64 folder, the command creates an .exe file for this application. Clicking on the exe file automatically starts the desktop application.
The folder name simple-desktop-app-electronjs-win32-x64 can be broken down as appname-platform-architecture where
When you run this command without any parameters, by default it packages for the platform which you are using for development
Let’s say you want to package for a different platform and architecture. Then you can use the following syntax
npm run package -- --platform= arch=
For example, in order to package for linux you can use the following command
npm run package -- --platform=linux --arch=x64 This will create a folder called as simple-desktop-app-electronjs-linux-x64 inside out folder.
Creating a make File
In order to create a make file or an installer for the application, use the following command
This command will take some time to run. Once it finishes check the out folder within the project folder.
The out/make folder will have a windows installer for the desktop application.
When you run this command without any parameters, by default it creates the installer for the platform which you are using for development
Code
The code for this desktop application is available in my github repo
Congrats 😄
You now know how to create desktop applications using HTML, CSS and Javascript.
This article covered very basic concepts of electron and electron-forge.
To know more about them, you can checkout their documentation.
PyScript: Run Python in HTML File – Step by Step Tutorial
If you are a python developer, and thinking that how cool if I can write my python code directly into HTML as all the Javascript developers do. Well, there is good news for all the Python developers. Here is the step by step tutorial for how to run python in HTML using PyScript.
In a keynote speech at PyCon US 2022, Anaconda company’s CEO Peter Wang revealed a new project named PyScript. Which is a JavaScript framework. It allows us to create Python applications in web browsers. It will allow us to embed Python code directly into HTML files. Just like we use JavaScript code in our HTML files.
Important Things About PyScript
- It allows us to write python code into our HTML file. So we can use Python’s libraries within our browser.
- As we use PyScript, we don’t need to worry about deployments. Everything happens in a web browser. We can share our HTML files with anyone containing fancy dashboards or any chars data. They can directly run it in a web browser without any complex setup.
- Run Many popular libraries of Python like pandas, numpy etc.
- PyScript allows us to write python code with the help of 3 main components:
- Py-env: It defines the python packages list which needs to run your code.
- Py-script: In this tag, the user will write their python code.
- Py-repl: It will Create a REPL component. The REPL component executes the code user enters and displays the result of the code in the browser.
1. Let’s Create Our First Program with PyScript
You can download the alpha release of PyScript on pyScript.net. We’ll use the CDN of one stylesheet and one script in our HTML file. Add below CDNs to your HTML .
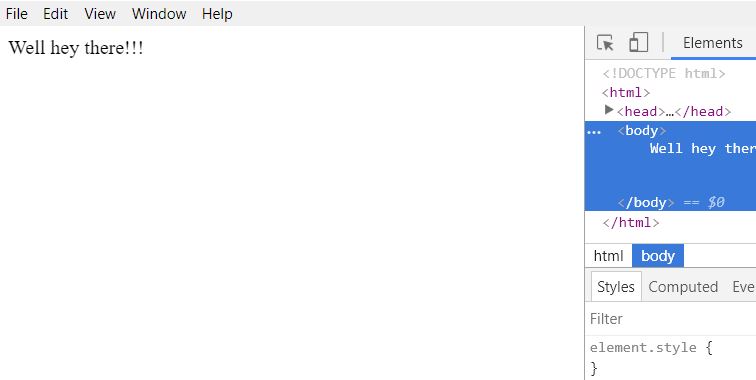
Our Hello world program will look something like this:
print("Hello World!") When you run this HTML file into your browser, it will print Hello World. Something like this:

2. Print Current Date Time
from datetime import datetime print(f"It's now ") In the above example, we are using python’s DateTime library for current DateTime.
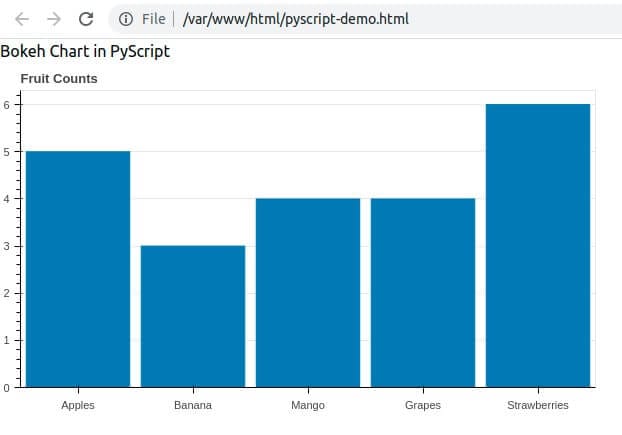
3. Bokeh Chart with PyScript
Let’s create a chart to display the number of fruits sells during a month.
- bokeh Bokeh Chart in PyScript
import json import pyodide from js import Bokeh, console, JSON from bokeh.embed import json_item from bokeh.plotting import figure from bokeh.resources import CDN fruits = ['Apples', 'Banana', 'Mango', 'Grapes', 'Strawberries'] counts = [5, 3, 4, 4, 6] p = figure(x_range=fruits, height=350, title="Fruit Counts", toolbar_location=None, tools="") p.vbar(x=fruits, top=counts, width=0.9) p.xgrid.grid_line_color = None p.y_range.start = 0 p_json = json.dumps(json_item(p, "chart")) Bokeh.embed.embed_item(JSON.parse(p_json)) When you run this code, you will see a chart like;
As you see how easily we can create a graph into our HTML file only. There is no need to create complex components to display a chart like this. That’s how simply you can use PyScript to run python in HTML.
Conclusion
This project is still in the alpha stage, so maybe we can see many more new things in the upcoming days. PyScript looks very promising for python developers, but there might be a lot of security issues. Also, we are running Python libraries into the browser, so execution time is also high.
All these concerns might be resolved in upcoming releases. Comment down your thoughts about this new technology.