- Saved searches
- Use saved searches to filter your results more quickly
- License
- ParthJadhav/Tkinter-Designer
- Name already in use
- Sign In Required
- Launching GitHub Desktop
- Launching GitHub Desktop
- Launching Xcode
- Launching Visual Studio Code
- Latest commit
- Git stats
- Files
- README.md
- About
- Use Tkinter To Design GUI Layout Create a simple and structured layout using the Frame widget, Tkinter and Python 3
- Plan The Layout
- Frame Widget
- Frame In Frame
- Purchasing Power Parity
- A Few Other Features
- Create A Simple GUI Layout
- Summary
Saved searches
Use saved searches to filter your results more quickly
You signed in with another tab or window. Reload to refresh your session. You signed out in another tab or window. Reload to refresh your session. You switched accounts on another tab or window. Reload to refresh your session.
An easy and fast way to create a Python GUI 🐍
License
ParthJadhav/Tkinter-Designer
This commit does not belong to any branch on this repository, and may belong to a fork outside of the repository.
Name already in use
A tag already exists with the provided branch name. Many Git commands accept both tag and branch names, so creating this branch may cause unexpected behavior. Are you sure you want to create this branch?
Sign In Required
Please sign in to use Codespaces.
Launching GitHub Desktop
If nothing happens, download GitHub Desktop and try again.
Launching GitHub Desktop
If nothing happens, download GitHub Desktop and try again.
Launching Xcode
If nothing happens, download Xcode and try again.
Launching Visual Studio Code
Your codespace will open once ready.
There was a problem preparing your codespace, please try again.
Latest commit
Git stats
Files
Failed to load latest commit information.
README.md

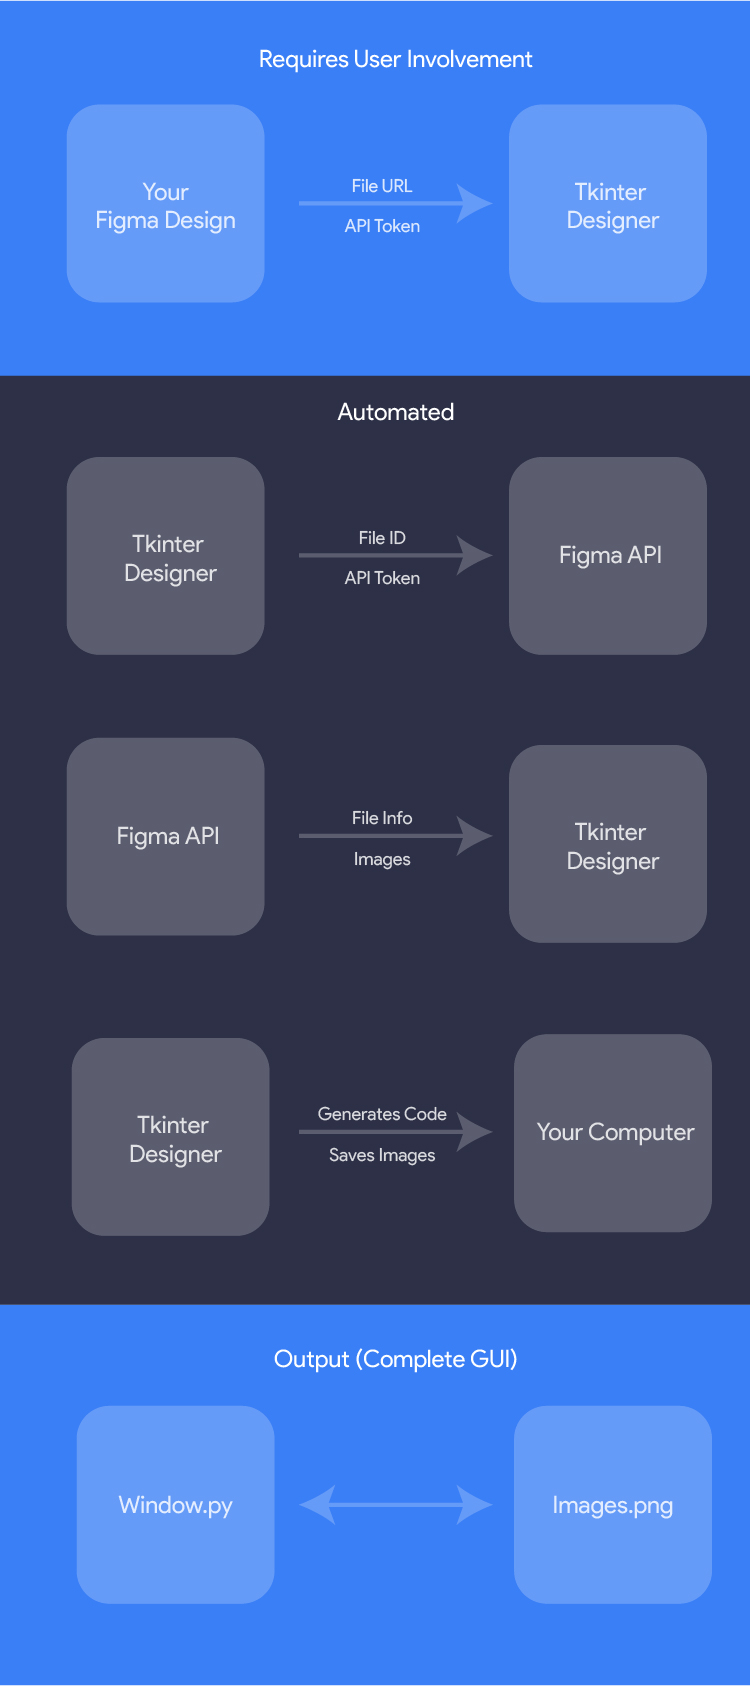
Tkinter Designer was created to speed up the GUI development process in Python. It uses the well-known design software Figma to make creating beautiful Tkinter GUIs in Python a piece of cake 🍰 .
Tkinter Designer uses the Figma API to analyze a design file and create the respective code and files needed for the GUI. Even Tkinter Designer’s GUI is created using Tkinter Designer.

🎉 Multi frame support is here! 🎉
You can now create multiple frames in a single design file and Tkinter Designer will create the respective code and files for each frame. This is a huge step for Tkinter Designer and I’m really excited to see what you guys create with it.
Feel free to share your creations with the community on Discord.
If you encounter any bugs or have any suggestions, please create an issue here.
☄️ Advantages of Tkinter Designer
- Interfaces with drag and drop.
- A great deal quicker than writing code by hand
- Produce more gorgeous interfaces
⚡️ Read the instruction here
View the YouTube video or read the instructions below.


🦋 Supporting Tkinter Designer
Consider making a donation to the Tkinter Designer project if you or your business have benefited from it. This will accelerate Tkinter Designer’s development! Making coffee is simple; I’ll be happy to enjoy one.


Click the button below to join the discord server or Linkedin

The only thing the user needs to do is design an interface with Figma, and then paste the Figma file URL and API token into Tkinter Designer.
Tkinter Designer will automatically generate all the code and images required to create the GUI in Tkinter.
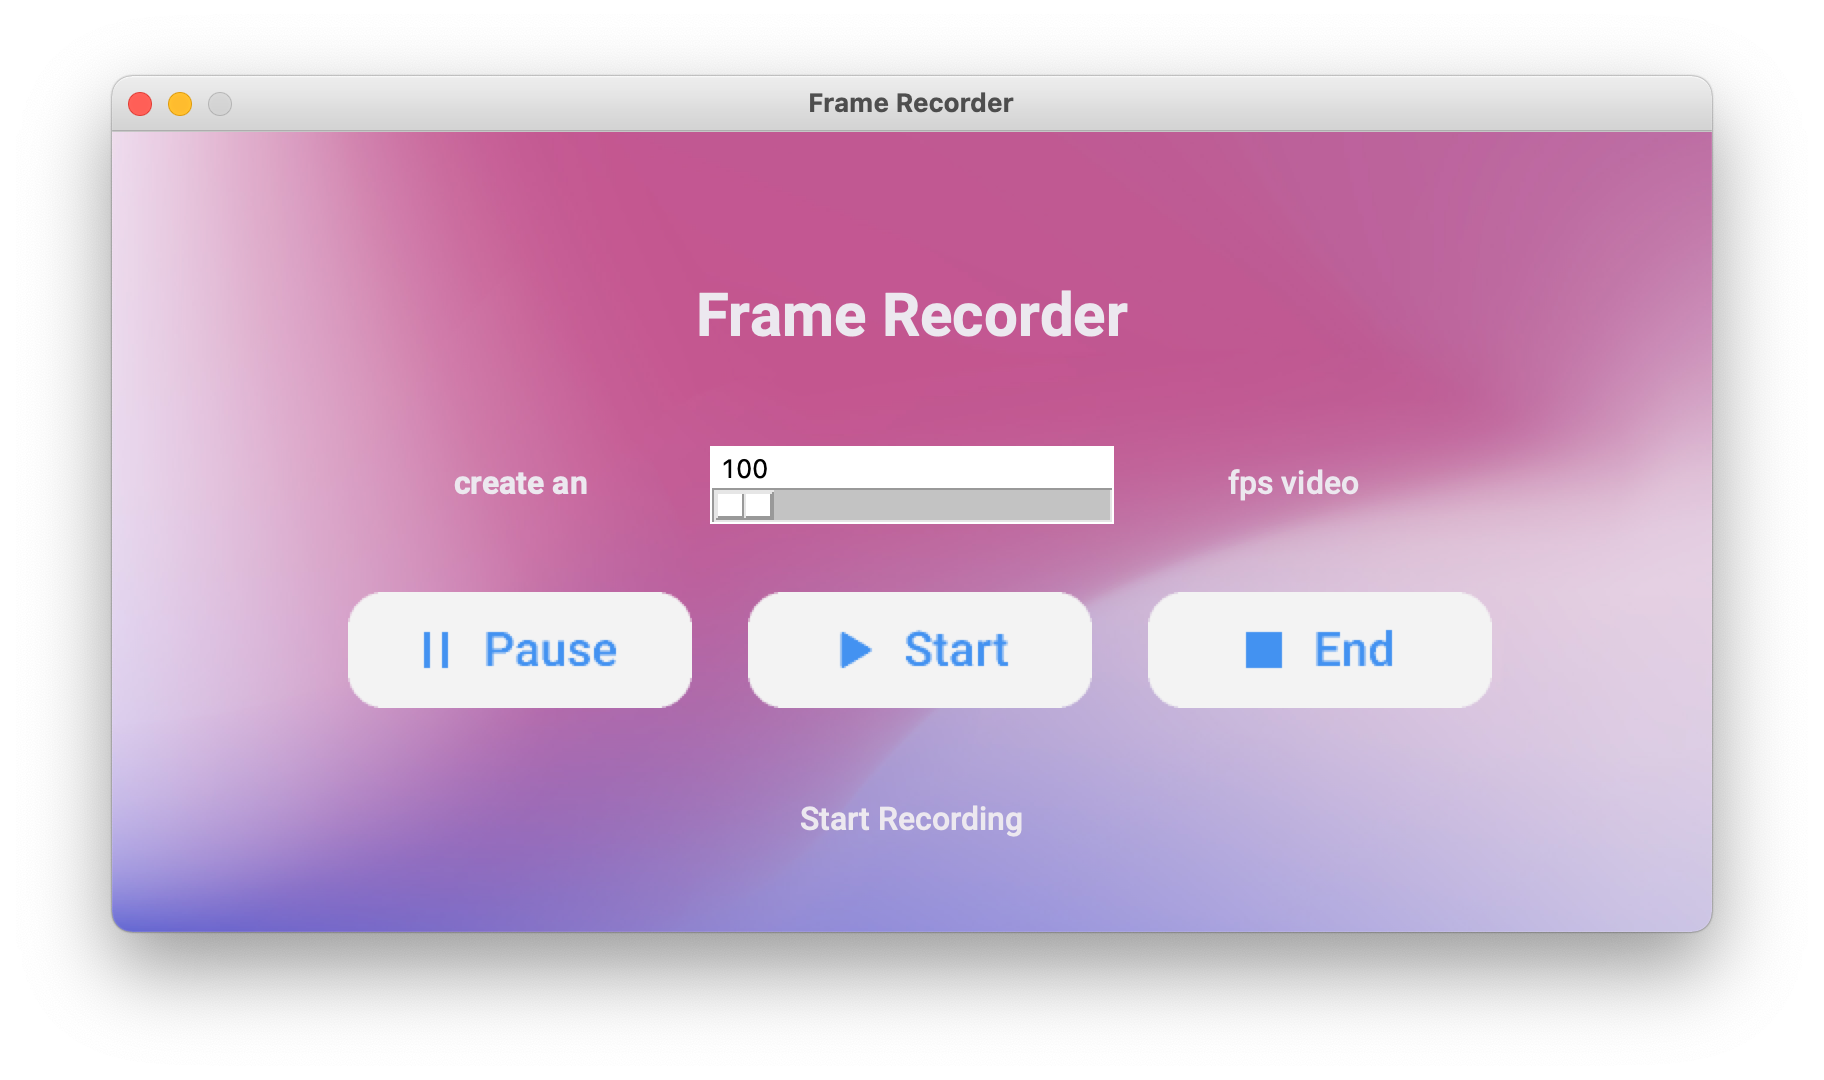
The possibilities are endless with Tkinter Designer, but here are a couple of GUIs that can be perfectly replicated in Tkinter.
The following are not my creations.


Please let me know if Tkinter Designer was used to create your app. More illustrations will be beneficial for other people!
(See: Contact Me) or use Show and Tell section in Discussions.
Tkinter Designer is licensed under the BSD 3-Clause «New» or «Revised» License.
View Here.
| Permissions | Restrictions | Conditions |
|---|---|---|
| ✓ Commercial Use | × Liability | 🛈 License and Copyright Notice |
| ✓ Modification | × Warranty | |
| ✓ Distribution | ||
| ✓ Private Use |
All contributions from the open-source community, individuals, and partners are welcomed. Our achievement is a result of your active participation.
If you want to contact me, you can reach me at Jadhavparth99@gmail.com
About
An easy and fast way to create a Python GUI 🐍
Use Tkinter To Design GUI Layout
Create a simple and structured layout using the Frame widget, Tkinter and Python 3
Today’s tutorial might be a short, but very important, one when it comes to making a GUI: the layout. Previously, we talked about the basics of getting started with Tkinter — creating the window, and creating a Label to display text or images. However, I found that the layout of the window needed some work as boxes and images didn’t look very organized. Rather than teaching about buttons or other widgets just yet, let’s get started with thinking about our interface and how to arrange objects in the window.
By the end of this tutorial you will learn how to create a simple and structured layout using the Frame widget, Tkinter and Python 3.
Of course, playing around with the functions and different widgets in Tkinter is one way to get started. But if you have a project that you really want to make, then having a plan for where things go in the window will be more helpful in the long run.
Plan The Layout
Below is a simple idea for what kind of window we will make in this tutorial. Planning before we get started can help us think about where our widgets and frames will go.

Basic design for the photo editor. The left displays various tools and on the right is the image.
For this tutorial, let’s build the foundation for what could be a photo editing application. A large area of the GUI will need to be devoted to the photograph. On the upper-left side of the GUI, a small label is used to see keep track of what the original image looked like for reference. Underneath that is a menu to select the basic tools or filters for editing the image.
Frame Widget
Organizing the GUI is made possible and easier with the Frame widget. Frames are like boxes or mini-windows within the parent window — self-contained areas that each contain their own grids, so adding widgets to them is super easy. Nesting frames is even an option if needed.
from tkinter import * root = Tk() # create root window root.title("Frame Example") root.config(bg="skyblue") # Create Frame widget left_frame = Frame(root, width=200, height=400) left_frame.grid(row=0, column=0, padx=10, pady=5) root.mainloop() Here we import Tkinter and all its functions, and set up the root window in lines 3-5. To add a frame into the root window, create a Frame1 widget as seen in line 8. Let’s look at the Frame parameters. We set left_frame as part of the root window. Then, specify the width and height . It is important to note that the frames will resize to whatever has been put inside of them. For example, if you display a small label inside the frame, then the frame will adjust to the label’s size.
Next, we place left_frame in the main window using grid() . Grid is another layout method in Tkinter for organizing widgets. You can think of grid like an Excel spreadsheet. Each «cell» has a row number and a column number. We can assign different widgets in the window by specifying the values. So the frame up above is in (row 0, column 0). The other two parameters, padx and pady , specify the amount of padding around the widget in pixels.
Congrats! You have just created a simple frame. The background of the root window (sky blue) has been changed in line 5 in order to see the new frame (white). Of course, you can also change the color of the Frame widget.

All of the white is the frame. The sky blue is the root window.
Frame In Frame
Now, let’s take a quick look at adding a frame within the larger frame. Be sure to focus on the row numbers below and see if their order makes sense.
# Create Frame widget left_frame = Frame(root, width=200, height=400) left_frame.grid(row=0, column=0, padx=10, pady=5) # Create frame within left_frame tool_bar = Frame(left_frame, width=180, height=185, bg="purple") tool_bar.grid(row=2, column=0, padx=5, pady=5) # Create label above the tool_bar Label(left_frame, text="Example Text").grid(row=1, column=0, padx=5, pady=5) 
Example of how to use frames.

Downloadable ebook (PDF, ePub) & Complete Source code
[[ discount.discount_pc ]]% OFF for the next [[ discount.duration ]] [[discount.description ]] with the code [[ discount.coupon_code ]]Purchasing Power Parity
Developers in [[ country ]] get [[ discount.discount_pc ]]% OFF on all books & courses with code [[ discount.coupon_code ]]
A Few Other Features
The Frame widget also has a few other parameters that we will go over. Listed below are a few common ones, but there are also others.
- bg — change the background color.
- bd — adjust the width of the border.
- cursor — change the type of cursor that appears over the frame, ‘arrow’ , ‘dot’ , ‘circle’ .
Create A Simple GUI Layout
Of course, we want to add other frames and widgets into our window. The following is a simple example of a better organized GUI with label widgets. While it is not aesthetically pleasing yet, it is functioning properly.
from tkinter import * root = Tk() # create root window root.title("Basic GUI Layout") # title of the GUI window root.maxsize(900, 600) # specify the max size the window can expand to root.config(bg="skyblue") # specify background color # Create left and right frames left_frame = Frame(root, width=200, height=400, bg='grey') left_frame.grid(row=0, column=0, padx=10, pady=5) right_frame = Frame(root, width=650, height=400, bg='grey') right_frame.grid(row=0, column=1, padx=10, pady=5) # Create frames and labels in left_frame Label(left_frame, text="Original Image").grid(row=0, column=0, padx=5, pady=5) # load image to be "edited" image = PhotoImage(file="rain.gif") original_image = image.subsample(3,3) # resize image using subsample Label(left_frame, image=original_image).grid(row=1, column=0, padx=5, pady=5) # Display image in right_frame Label(right_frame, image=image).grid(row=0,column=0, padx=5, pady=5) # Create tool bar frame tool_bar = Frame(left_frame, width=180, height=185) tool_bar.grid(row=2, column=0, padx=5, pady=5) # Example labels that serve as placeholders for other widgets Label(tool_bar, text="Tools", relief=RAISED).grid(row=0, column=0, padx=5, pady=3, ipadx=10) # ipadx is padding inside the Label widget Label(tool_bar, text="Filters", relief=RAISED).grid(row=0, column=1, padx=5, pady=3, ipadx=10) # Example labels that could be displayed under the "Tool" menu Label(tool_bar, text="Select").grid(row=1, column=0, padx=5, pady=5) Label(tool_bar, text="Crop").grid(row=2, column=0, padx=5, pady=5) Label(tool_bar, text="Rotate & Flip").grid(row=3, column=0, padx=5, pady=5) Label(tool_bar, text="Resize").grid(row=4, column=0, padx=5, pady=5) Label(tool_bar, text="Exposure").grid(row=5, column=0, padx=5, pady=5) root.mainloop() The code above has been commented to make things clearer. Take a look at the pictures below and you will notice how the frame is scaled by the size of the widgets within it.
A few things to note: to use a different image to display, change the name of the file passed to the file parameter in line 18. The subsample() method in line 19 reduces the scale of the image by only using every x and y number of pixels. So, it will reduce the image by skipping pixels.

Example of GUI with forest image.

Example of GUI with Pikachu image.
Summary
Using the Frame widget is a great way to establish a layout for our GUI. When creating the layout, you should be aware of which geometry manager you want to use — pack , grid , or place . In the next tutorial, we’ll add a new widget to our arsenal, Button , before discussing the three layout methods and understand when is best the sitaution to use them.