Как обрабатывать события от клавиатуры
Любая, даже самая простая игра предполагает взаимодействие с пользователем. Часто для этого используется клавиатура (или тачпад) или мышь. На этом занятии мы с вами увидим как происходит обработка событий от клавиатуры и какие нюансы здесь существуют.
Вообще, за обработку событий отвечает модуль
и ранее мы уже познакомились с методом
import pygame pygame.init() W = 600 H = 400 sc = pygame.display.set_mode((W, H)) pygame.display.set_caption("События от клавиатуры") pygame.display.set_icon(pygame.image.load("app.bmp")) WHITE = (255, 255, 255) BLUE = (0, 0, 255) GREEN = (0, 255, 0) RED = (255, 0, 0) FPS = 60 # число кадров в секунду clock = pygame.time.Clock() x = W // 2 y = H // 2 speed = 5 while 1: for event in pygame.event.get(): if event.type == pygame.QUIT: exit() elif event.type == pygame.KEYDOWN: if event.key == pygame.K_LEFT: x -= speed elif event.key == pygame.K_RIGHT: x += speed sc.fill(WHITE) pygame.draw.rect(sc, BLUE, (x, y, 10, 20)) pygame.display.update() clock.tick(FPS)
Смотрите, нажимая на курсорные клавиши, происходит изменение координаты x и прямоугольник перерисовывается в новой позиции. Но, если нажать и удерживать клавишу нажатой, то объект сместится только один раз. Постоянного перемещения не происходит, как можно было ожидать. Все дело в том, что при нажатии клавиши в PyGame формируется только одно событие pygame.KEYDOWN. После того, как мы его прочитали из очереди и обработали, повторного такого события там уже нет и, соответственно, условие event.type == pygame.KEYDOWN не срабатывает. Если мы все же хотим, чтобы при удержании клавиши, прямоугольник постоянно перемещался, то, конечно, это можно реализовать так:
flLeft = flRight = False while 1: for event in pygame.event.get(): if event.type == pygame.QUIT: exit() elif event.type == pygame.KEYDOWN: if event.key == pygame.K_LEFT: flLeft = True elif event.key == pygame.K_RIGHT: flRight = True elif event.type == pygame.KEYUP: if event.key in [pygame.K_LEFT, pygame.K_RIGHT]: flLeft = flRight = False if flLeft: x -= speed elif flRight: x += speed sc.fill(WHITE) pygame.draw.rect(sc, BLUE, (x, y, 10, 20)) pygame.display.update()

Здесь мы по событию pygame.KEYDOWN изменяем состояния флагов flLeft или flRight в зависимости от нажатия на левую или правую курсорные клавиши. А в основном цикле по этим флагам осуществляем изменение координат прямоугольника. Теперь, он перемещается непрерывно, удерживая клавишу нажатой. При отпускании клавиши генерируется событие pygame.KEYUP и флаги flLeft, flRight устанавливаются в False, движение прекращается. У вас может возникнуть вопрос: а зачем нам вторая проверка if event.key in [pygame.K_LEFT, pygame.K_RIGHT] Это защита от двойных нажатий. Например, удерживая нажатой курсорную клавишу, мы нажимаем, а потом отпускаем еще какую-нибудь. Тогда без этой второй проверки по событию pygame.KEYUP флаги flLeft, flRight станут равными False и движение остановится. Хотя, курсорная клавиша остается нажатой. Чтобы этого не происходило и делается эта дополнительная проверка. Однако, тот же самый функционал можно реализовать проще, используя модуль работы с клавиатурой pygame.key В частности, в нем есть функция: pygame.key.get_pressed() которая возвращает информацию о состояниях клавиш в виде кортежа: Если клавиша с определенным индексом нажата, то в этом кортеже ее значение будет 1, а если отжата, то 0. Используя эту функцию, наша программа может быть записана в таком виде:
while 1: for event in pygame.event.get(): if event.type == pygame.QUIT: exit() keys = pygame.key.get_pressed() if keys[pygame.K_LEFT]: x -= speed elif keys[pygame.K_RIGHT]: x += speed sc.fill(WHITE) pygame.draw.rect(sc, BLUE, (x, y, 10, 20)) pygame.display.update() clock.tick(FPS)
Как видите, все стало предельно простым. Фактически, функция get_pressed() дает маску нажатых на клавиатуре клавиш и никак не влияет на состояния событий, находящихся в очереди. То есть, мы здесь напрямую не работаем с событиями, зарегистрированные в PyGame, а просто используем информацию о том, какая клавиша нажата. И это имеет свои следствия. Например, если мы хотим перемещать прямоугольник при одновременном нажатии на клавишу Ctrl и курсорные клавиши вправо-влево, то с помощью функции get_pressed() нельзя отследить состояния клавиш-модификаторов: Shift, Ctrl, Alt и др. В выходном кортеже информации по ним просто нет. Здесь без обработки событий не обойтись. И лучше всего это сделать вот так:
move = 0 while 1: for event in pygame.event.get(): if event.type == pygame.QUIT: exit() elif event.type == pygame.KEYDOWN: if event.key == pygame.K_LEFT and event.mod == pygame.KMOD_LCTRL: move = -speed elif event.key == pygame.K_RIGHT and event.mod == pygame.KMOD_LCTRL: move = speed elif event.type == pygame.KEYUP: if event.key in [pygame.K_LEFT, pygame.K_RIGHT]: move = 0 x += move sc.fill(WHITE) pygame.draw.rect(sc, BLUE, (x, y, 10, 20)) pygame.display.update() clock.tick(FPS)
При этом важна последовательность нажатия на клавиши: сначала нужно нажать левый Ctrl, а потом курсорную клавишу вправо-влево. В другой последовательности работать уже не будет. Библиотека PyGame обрабатывает такие клавиши-модификаторы несколько иначе стандартных клавиш, отсюда и получаются такие особенности. Вот так в целом выполняется обработка событий от клавиатуры. На следующем занятии мы рассмотрим обработку событий от мыши.
How to Detect Key Presses In Python
This demonstration shows you how to detect key presses using the pynput module. These can then be logged to a file as no console is displayed. This is very similar to a key logger.
If you haven’t used or setup pip before, go to my tutorial at how-to-setup-pythons-pip to setup pip.
We will be using the pynput module to listen to keyboard events. To install this module execute pip install pynput in cmd. Watch the output to make sure no errors have occurred; it will tell you when the module has been successfully installed.

To double-check that it was installed successfully, open up IDLE and execute the command import pynput ; no errors should occur.

Create a new python file and save it with a .py file extension. You will first want to import Listener from pynput.keyboard.
from pynput.keyboard import Listener Setup the listener by creating an instance in a with statement and using it’s .join() method to join it to the main thread.
with Listener() as listener: listener.join() Create three methods; on_press and on_release with the parameters as shown below.
def on_press(key): pass def on_release(key): pass Link these methods to the listener instance with the function names as the args; I have named the methods as they are defined in the listener class. Now when an action occurs, one of these methods will be run.
with Listener(on_press=on_press, on_release=on_release) as listener: To make sure these are running, add some print statements to each method. Save and run the script. Press a few keys, you should see output like below.
def on_press(key): print("Key pressed") def on_release(key): print("Key released") 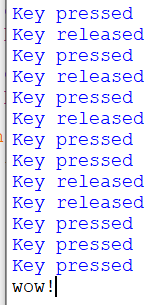
Using these print statements and the parameters provided, we can give more information when printing. Run this again to make sure it is working properly (example output below).
def on_press(key): print("Key pressed: ".format(key)) def on_release(key): print("Key released: ".format(key)) 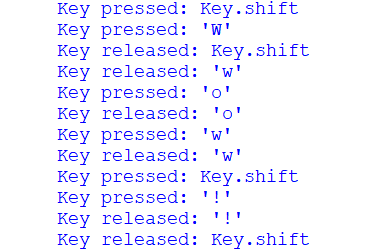
If you want this script to be run in the background. Click File -> Save As and save it with a .pyw file extension. Now when it is run outside IDLE there will be no console window and it will not look like it is running. But to make sure the console doesn’t appear, we need to first remove the print statements.
Import logging and set up the basic configuration as I have below. After that, change all print statements to logging.info.
logging.basicConfig(filename="key_log.txt", level=logging.DEBUG, format='%(asctime)s: %(message)s') def on_press(key): logging.info("Key pressed: ".format(key)) def on_release(key): logging.info("Key released: ".format(key)) Now when the script is run, nothing should be printed to the console. This is because it is all being saved to the file declared in the basic configuration.
Save and close IDLE. Open the file named key_log.txt next to your python script; all the events should be logged in here. For example, here is one of my logs typing Wow! :
2020-04-07 22:52:58,233: Key pressed: Key.shift 2020-04-07 22:52:58,514: Key pressed: 'W' 2020-04-07 22:52:58,649: Key released: Key.shift 2020-04-07 22:52:58,649: Key released: 'w' 2020-04-07 22:52:58,942: Key pressed: 'o' 2020-04-07 22:52:59,058: Key released: 'o' 2020-04-07 22:52:59,205: Key pressed: 'w' 2020-04-07 22:52:59,318: Key released: 'w' 2020-04-07 22:52:59,430: Key pressed: Key.shift 2020-04-07 22:52:59,590: Key pressed: '!' 2020-04-07 22:52:59,710: Key released: '!' 2020-04-07 22:52:59,853: Key released: Key.shift The actual location of this file will be in the current working directory of where you run the script from
Just as a quick note, the Listener class is a thread which means as soon as it has joined to the main thread no code will be executed after the .join() until the Listener is stopped.
As stated here in the pynput docs on readthedocs.io, we can call pynput.keyboard.Listener.stop anywhere in the script to stop the thread or return False from a callback to stop the listener. As shown in my video, we can also just call listener.stop() in one of the definitions due to the fact that that the listener is now in scope and is an instance os Listener.
from pynput.keyboard import Listener import logging # Setup logging logging.basicConfig(filename="key_log.txt", level=logging.DEBUG, format='%(asctime)s: %(message)s') def on_press(key): # The function that's called when a key is pressed logging.info("Key pressed: ".format(key)) def on_release(key): # The function that's called when a key is released logging.info("Key released: ".format(key)) with Listener(on_press=on_press, on_release=on_release) as listener: # Create an instance of Listener listener.join() # Join the listener thread to the main thread to keep waiting for keys Making Things a Bit More Readable
Everything being on a new line with both key presses and releases can be very helpful for identifying sequences but can be a bit hard to read. Here is a modified script that can put everything on one line and enters when enter is pressed.
from pynput.keyboard import Listener, Key filename = "key_log.txt" # The file to write characters to def on_press(key): f = open(filename, 'a') # Open the file if hasattr(key, 'char'): # Write the character pressed if available f.write(key.char) elif key == Key.space: # If space was pressed, write a space f.write(' ') elif key == Key.enter: # If enter was pressed, write a new line f.write('\n') elif key == Key.tab: # If tab was pressed, write a tab f.write('\t') else: # If anything else was pressed, write [] f.write('[' + key.name + ']') f.close() # Close the file with Listener(on_press=on_press) as listener: # Setup the listener listener.join() # Join the thread to the main thread Here is a sample of some of the output:
[shift]I am typing this in notepad [shift]Here is a new line [shift]Opps, [shift]I spelt that wro[backspace][backspace]ro[backspace][backspace]ord incorrectly [shift]Here as [backspace][backspace]re some special keys[shift]:[shift][ctrl_l][alt_l][alt_r][ctrl_r][shift_r] Common Issues and Questions
ModuleNotFoundError/ImportError: No module named ‘pynput’
Did you install pynput? This error will not occur if you installed it properly. If you have multiple versions of Python, make sure you are installing pynput on the same version as what you are running the script with.
Owner of PyTutorials and creator of auto-py-to-exe. I enjoy making quick tutorials for people new to particular topics in Python and tools that help fix small things.