- Binary Study
- Table of Contents:
- Prerequisites:
- Install OpenCV
- Syntax
- Steps
- Example 1.
- Example 2.
- Output:
- Further Readings:
- Useful Resources:
- Функции рисования в OpenCV
- Рисование круга
- Параметры:
- Рисование прямоугольника
- Параметры:
- Рисование эллипса
- Параметры:
- Рисование линий
- Параметры:
- Подпись на изображении
- Параметры:
- Рисование полилиний
- Параметры:
- Python cv2 draw rectangle
- Drawing Line
- Drawing Rectangle
- Drawing Circle
- Drawing Ellipse
- Drawing Polygon
- Adding Text to Images:
- Result
- Additional Resources
- Exercises
Binary Study
OpenCV (Open Source Computer Vision) is an open source computer vision library. To work with computer vision problems OpenCV is very helpful. We can perform many tasks using OpenCV like Recognition, Motion Analysis, Scene Reconstruction, image restoration.
We use cv2.rectangle() to draw rectangle on an image. This method is used to draw bounding boxes of the objects in object detection task.
Table of Contents:
Prerequisites:
Install OpenCV
If you have not already installed OpenCV on you system, you can install it using pip command as written below.
Syntax
The syntax to draw rectangle on an image is as below.
cv2.rectangle(image, start_point, end_point, color, thickness)
Parameters:image: image on that the rectangle to drawnstart_point:(width_min, height_min)= (xmin, ymin):start coordinate of rectangle. It is top left point on the image.end_point: (width_max, height_max)= (xmax, yax):end coordinate of rectangle. It’s bottom right point on the image.color: (B,G,R)- Color of the linethickness: Thickness of the line
Steps
- Load the image
- define starting and ending point of the rectangle
- Define the color of the line of the rectangle
- Define the thickness of the line of the rectangle
- Draw the rectangle
- Display the image with drawn rectangle
Example 1.
Let’s write complete Python 3 program for drawing rectangle on the image.
# Python 3 program to draw rectangle on an image# import cv2import cv2# Read an imageimg = cv2.imread('Koala.jpg')# Start coordinate (xmin, ymin), it represents the top left corner of rectanglestart_point = (320, 200)# End coordinate (xmax, ymax), it represents the bottom right corner of rectangleend_point = (800, 650)# Green color in BGRcolor = (0, 255, 0)# Line thickness of 4 pxthickness = 4# Using cv2.rectangle()# Draw a rectangle with green line of thickness of 4 pximg = cv2.rectangle(img, start_point, end_point, color, thickness)# Display the imagecv2.imshow("Koala", img)cv2.waitKey(0)cv2.destroyAllWindows()
Example 2.
If we use thickness as -1, it will fill whole rectangle with the chosen line color. Here we take green color to draw the rectangle but using thickness as -1, so the whole rectangle is filled with green color.
# Python 3 program to draw rectangle on an image# import cv2import cv2# Read an imageimg = cv2.imread('Koala.jpg')# Start coordinate (xmin, ymin), it represents the top left corner of rectanglestart_point = (320, 200)# End coordinate (xmax, ymax), it represents the bottom right corner of rectangleend_point = (800, 650)# Green color in BGRcolor = (0, 255, 0)# Line thickness of -1 pxthickness = -1# Using cv2.rectangle()# Draw a rectangle with green line of thickness of 4 pximg = cv2.rectangle(img, start_point, end_point, color, thickness)# Display the imagecv2.imshow("Koala", img)cv2.waitKey(0)cv2.destroyAllWindows()
Output:
Further Readings:
Useful Resources:
Функции рисования в OpenCV
Мы можем рисовать различные формы на изображении, такие как круг, прямоугольник, эллипс, полилинии, выпуклости и т. д. Они используются, когда мы хотим выделить какой-либо объект на входном изображении. OpenCV предоставляет функции для каждой формы. Поговорим подробнее о функциях рисования OpenCV.
Рисование круга
Мы можем нарисовать круг на изображении с помощью функции cv2.circle(). Синтаксис следующий:
cv2.circle(img, center, radius, color[,thickness [, lineType[,shift]]])
Параметры:
- img — представляет данное изображение;
- center — центр круга;
- radius — радиус круга;
- color — цвет круга;
- thickness — обозначает толщину контура круга, если она положительна. А отрицательная толщина означает, что нужно нарисовать закрашенный круг;
- lineType — определяет тип границы круга;
- shift — представляет количество дробных битов в координате центра и значение радиуса.
Рассмотрим следующий пример:
import numpy as np import cv2 img = cv2.imread(r"C:\Users\DEVANSH SHARMA\cat.jpeg",1) cv2.circle(img,(80,80), 55,(0,255,0), -1) cv2.imshow('image',img) cv2.waitKey(0) cv2.destroyAllWindows() 
Рисование прямоугольника
OpenCV предоставляет функцию для рисования простого, объемного или заполненного вертикального прямоугольника. Синтаксис следующий:
cv2.rectangle(img, pt1, pt2, color[, thickness[,lineType[,shift]]])
Параметры:
- img — представляет собой изображение;
- pt1 — обозначает вершину прямоугольника;
- pt2 — обозначает вершину прямоугольника напротив pt1;
- color — обозначает цвет прямоугольника яркости (оттенки серого);
- thickness — представляет толщину линий, составляющих прямоугольник. Отрицательные значения (CV_FILLED) означают, что функция должна рисовать прямоугольник с заливкой;
- linetype — представляет типы линии;
- shift — представляет количество дробных битов в координатах точки.
Рассмотрим следующий пример:
import numpy as np import cv2 img = cv2.imread(r"C:\Users\DEVANSH SHARMA\cat.jpeg",1) cv2.rectangle(img,(15,25),(200,150),(0,255,255),15) cv2.imshow('image',img) cv2.waitKey(0) cv2.destroyAllWindows() 
Рисование эллипса
Мы можем нарисовать эллипс на изображении, используя функцию cv2.ellipse(). Он может нарисовать простую или толстую эллиптическую дугу или заполнить сектор эллипса.
cv2.ellipse(img, center, axes, angle, startAngle, endAngle, color[, thickness[, lineType[, shift]]]) cv2.ellipse(img, box, color[, thickness[, lineType]])
Параметры:
- img — представляет собой изображение;
- box — представляет собой альтернативное представление эллипса через RotatedRect или CvBox2D. Это означает, что функция используется для рисования эллипса в изогнутом прямоугольнике;
- color — обозначает цвет эллипса;
- angle — обозначает угол поворота;
- startAngle — обозначает начальный угол эллиптической дуги в градусах;
- endAngle — обозначает конечный угол эллиптической дуги в градусах;
- thickness — используется для рисования толщины контура дуги эллипса, если значение положительное. В противном случае это указывает, что должен быть нарисован заполненный эллипс;
- lineType — обозначает тип границы эллипса;
- shift – представляет собой количество дробных битов в координатах центра и значений осей.
Рассмотрим следующий пример:
import numpy as np import cv2 img = cv2.imread(r"C:\Users\DEVANSH SHARMA\cat.jpeg",1) cv2.ellipse(img,(250, 150),(80, 20), 5, 0, 360,(0,0,255), -1) cv2.imshow('image',img) cv2.waitKey(0) cv2.destroyAllWindows() 
Есть две функции для рисования эллипса. Первая функция используется для рисования всего эллипса, а не дуги в обход startAngle=0 и endAngle = 360. Вторая функция эллипса используется для рисования контура эллипса, закрашенного эллипса, эллиптической дуги или закрашенного сектора эллипса.
Рисование линий
OpenCV предоставляет функцию line() для рисования линии на изображении. Она рисует отрезок между точками ptr1 и ptr2 на изображении. Граница изображения обрезает линию.
cv2.line(img, pt1, pt2, color[, thickness[, lineType[, shift]]])
Параметры:
- img — представляет собой изображение;
- pt1 — обозначает первую точку отрезка линии;
- pt2 — обозначает вторую точку отрезка;
- color — представляет цвет линии;
- thickness — представляет толщину линии;
- lineType — существуют различные типы линий:
- 8 – 8 соединенных линий
- 4 – 4-связная линия
- CV__AA- сглаженная строка
Рассмотрим следующий пример:
import numpy as np import cv2 img = cv2.imread(r"C:\Users\DEVANSH SHARMA\cat.jpeg",1) cv2.line(img,(10,0),(150,150),(0,0,0),15) cv2.imshow('image',img) cv2.waitKey(0) cv2.destroyAllWindows()
Подпись на изображении
Мы можем написать текст на изображении с помощью функции putText(). Синтаксис приведен ниже.
cv2.putText(img, text, org, font, color)
Параметры:
- img: представляет изображение.
- text: представляет собой текст, который мы хотим написать на изображении.
- org: обозначает нижний левый угол текстовой строки на изображении.
- font: структура CvFont инициализируется с помощью InitFont().
- color: представляет цвет текста.
Рассмотрим следующий пример.
import numpy as np import cv2 font = cv2.FONT_HERSHEY_SIMPLEX # Create a black image. img = cv2.imread(r"C:\Users\DEVANSH SHARMA\cat.jpeg",1) cv2.putText(img,'Hack Projects',(10,500), font, 1,(255,255,255),2) #Display the image cv2.imshow("image",img) cv2.waitKey(0)
Рисование полилиний
Мы можем рисовать полилинии на изображении. OpenCV предоставляет функцию polylines(), которая используется для рисования многоугольных кривых на изображении. Синтаксис приведен ниже:
cv2.polyLine(img, polys, is_closed, color, thickness=1, lineType=8, shift=0)
Параметры:
- img — представляет собой изображение;
- pts — обозначает массив полигональных кривых;
- npts — обозначает массив счетчиков вершин полигона;
- ncounters — представляет количество кривых;
- is_Closed — это флаг, который указывает, замкнуты ли нарисованные полилинии или нет;
- color — цвет полилиний;
- thickness — представляет толщину краев полилиний;
- lineType — тип сегмента линии;
- shift — представляет количество дробных битов в координатах точки.
Рассмотрим следующую программу для рисования полилиний на изображении:
import numpy as np import cv2 img = cv2.imread(r'C:\Users\DEVANSH SHARMA\forest.jpg',cv2.IMREAD_COLOR) #defining points for polylines pts = np.array([[100,50],[200,300],[700,200],[500,100]], np.int32) # pts = pts.reshape((-1,1,2)) cv2.polylines(img, [pts], True,(0,255,255), 3) cv2.imshow('image',img) cv2.waitKey(0) cv2.destroyAllWindows()Python cv2 draw rectangle
In all the above functions, you will see some common arguments as given below:
- img : The image where you want to draw the shapes
- color : Color of the shape. for BGR, pass it as a tuple, eg: (255,0,0) for blue. For grayscale, just pass the scalar value.
- thickness : Thickness of the line or circle etc. If -1 is passed for closed figures like circles, it will fill the shape. default thickness = 1
- lineType : Type of line, whether 8-connected, anti-aliased line etc. By default, it is 8-connected.cv.LINE_AA gives anti-aliased line which looks great for curves.
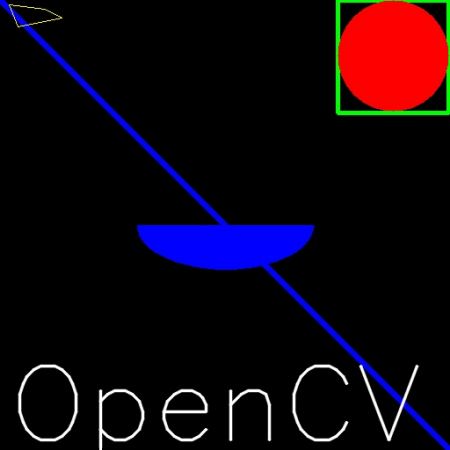
Drawing Line
To draw a line, you need to pass starting and ending coordinates of line. We will create a black image and draw a blue line on it from top-left to bottom-right corners.
Drawing Rectangle
To draw a rectangle, you need top-left corner and bottom-right corner of rectangle. This time we will draw a green rectangle at the top-right corner of image.
Drawing Circle
To draw a circle, you need its center coordinates and radius. We will draw a circle inside the rectangle drawn above.
Drawing Ellipse
To draw the ellipse, we need to pass several arguments. One argument is the center location (x,y). Next argument is axes lengths (major axis length, minor axis length). angle is the angle of rotation of ellipse in anti-clockwise direction. startAngle and endAngle denotes the starting and ending of ellipse arc measured in clockwise direction from major axis. i.e. giving values 0 and 360 gives the full ellipse. For more details, check the documentation of cv.ellipse(). Below example draws a half ellipse at the center of the image.
Drawing Polygon
To draw a polygon, first you need coordinates of vertices. Make those points into an array of shape ROWSx1x2 where ROWS are number of vertices and it should be of type int32. Here we draw a small polygon of with four vertices in yellow color.
Note If third argument is False, you will get a polylines joining all the points, not a closed shape. cv.polylines() can be used to draw multiple lines. Just create a list of all the lines you want to draw and pass it to the function. All lines will be drawn individually. It is a much better and faster way to draw a group of lines than calling cv.line() for each line.
Adding Text to Images:
To put texts in images, you need specify following things.
- Text data that you want to write
- Position coordinates of where you want put it (i.e. bottom-left corner where data starts).
- Font type (Check cv.putText() docs for supported fonts)
- Font Scale (specifies the size of font)
- regular things like color, thickness, lineType etc. For better look, lineType = cv.LINE_AA is recommended.
We will write OpenCV on our image in white color.
Result
So it is time to see the final result of our drawing. As you studied in previous articles, display the image to see it.

Additional Resources
Exercises
Generated on Fri Jul 21 2023 23:29:16 for OpenCV by 1.8.13