- Saved searches
- Use saved searches to filter your results more quickly
- rajdor/pythonConfluenceExamples
- Name already in use
- Sign In Required
- Launching GitHub Desktop
- Launching GitHub Desktop
- Launching Xcode
- Launching Visual Studio Code
- Latest commit
- Git stats
- Files
- README.md
- About
- Таблица в Atlassian Confluence на основе данных из REST запроса
- Установим Power Scripts for Confluence
- Напишем скрипт
- Создадим страницу в Confluence
- Усложним задачу
- Saved searches
- Use saved searches to filter your results more quickly
- License
- kirtov/ctipy
- Name already in use
- Sign In Required
- Launching GitHub Desktop
- Launching GitHub Desktop
- Launching Xcode
- Launching Visual Studio Code
- Latest commit
- Git stats
- Files
- README.md
Saved searches
Use saved searches to filter your results more quickly
You signed in with another tab or window. Reload to refresh your session. You signed out in another tab or window. Reload to refresh your session. You switched accounts on another tab or window. Reload to refresh your session.
Examples of using atlassian-python-api
rajdor/pythonConfluenceExamples
This commit does not belong to any branch on this repository, and may belong to a fork outside of the repository.
Name already in use
A tag already exists with the provided branch name. Many Git commands accept both tag and branch names, so creating this branch may cause unexpected behavior. Are you sure you want to create this branch?
Sign In Required
Please sign in to use Codespaces.
Launching GitHub Desktop
If nothing happens, download GitHub Desktop and try again.
Launching GitHub Desktop
If nothing happens, download GitHub Desktop and try again.
Launching Xcode
If nothing happens, download Xcode and try again.
Launching Visual Studio Code
Your codespace will open once ready.
There was a problem preparing your codespace, please try again.
Latest commit
Git stats
Files
Failed to load latest commit information.
README.md
- Click the page ellipsis and select Page Information
- The page id is found in the web browser url
i.e. http://192.168.1.224:8090/pages/viewinfo.action?pageId=10256402 Hot to get macros and other confluence page source
i.e. http://192.168.1.224:8090/rest/api/content/10256402?expand=body.storage or (depending on your server configuration) http://192.168.1.224:8090/confluence/rest/api/content/10256402?expand=body.storage - Option 2, copy and modify the included script updatePage.py to print the returned values from the following snippet
contents=confluence.get_page_by_id(pageID, expand="body.storage,version", status="current") < "confluence":"http://192.168.1.224:8090" ,"user":"username" ,"password":"password" ,"space":"HOME" ,"page":"My Test Page" >
- Verify Space exists
- Get Page ID by Space and Page Title
- Create Page in Space with Page Title and return Page ID
- Get Page ID by Space and Page Title
- Get Page contents and properties by Page ID
- Update page body and title by Page ID
- Get Page ID by Space and Page Title
- Generate random data for ‘Internet download speeds’
- Use confluence chart macro and html table for page body
- Update page body and title by Page ID

About
Examples of using atlassian-python-api
Таблица в Atlassian Confluence на основе данных из REST запроса
В этой статье я расскажу, как сделать страницу в Atlassian Confluence с таблицей, данные в которую будут приходить из REST запроса.
Мы сделаем страницу в Confluence с таблицей, которая будет содержать данные о проектах в Jira. Эти данные мы будем получать из Jira при помощи метода project из стандартного Jira REST API.
Вы можете посмотреть видео по этой статье вот здесь.
Установим Power Scripts for Confluence
Мы будем выполнять вызов Jira REST API с помощью плагина Power Scripts for Confluence. Это бесплатный плагин, поэтому это решение ничего не будет Вам стоить.
Ну, и первое, что нам нужно сделать, это установить плагин Power Scripts for Confluence в наш Confluence. Подробную инструкцию, как это сделать, можно почитать вот здесь.
Напишем скрипт
Теперь перейдем в пункт меню шестеренка -> Manage apps -> SIL Manager.
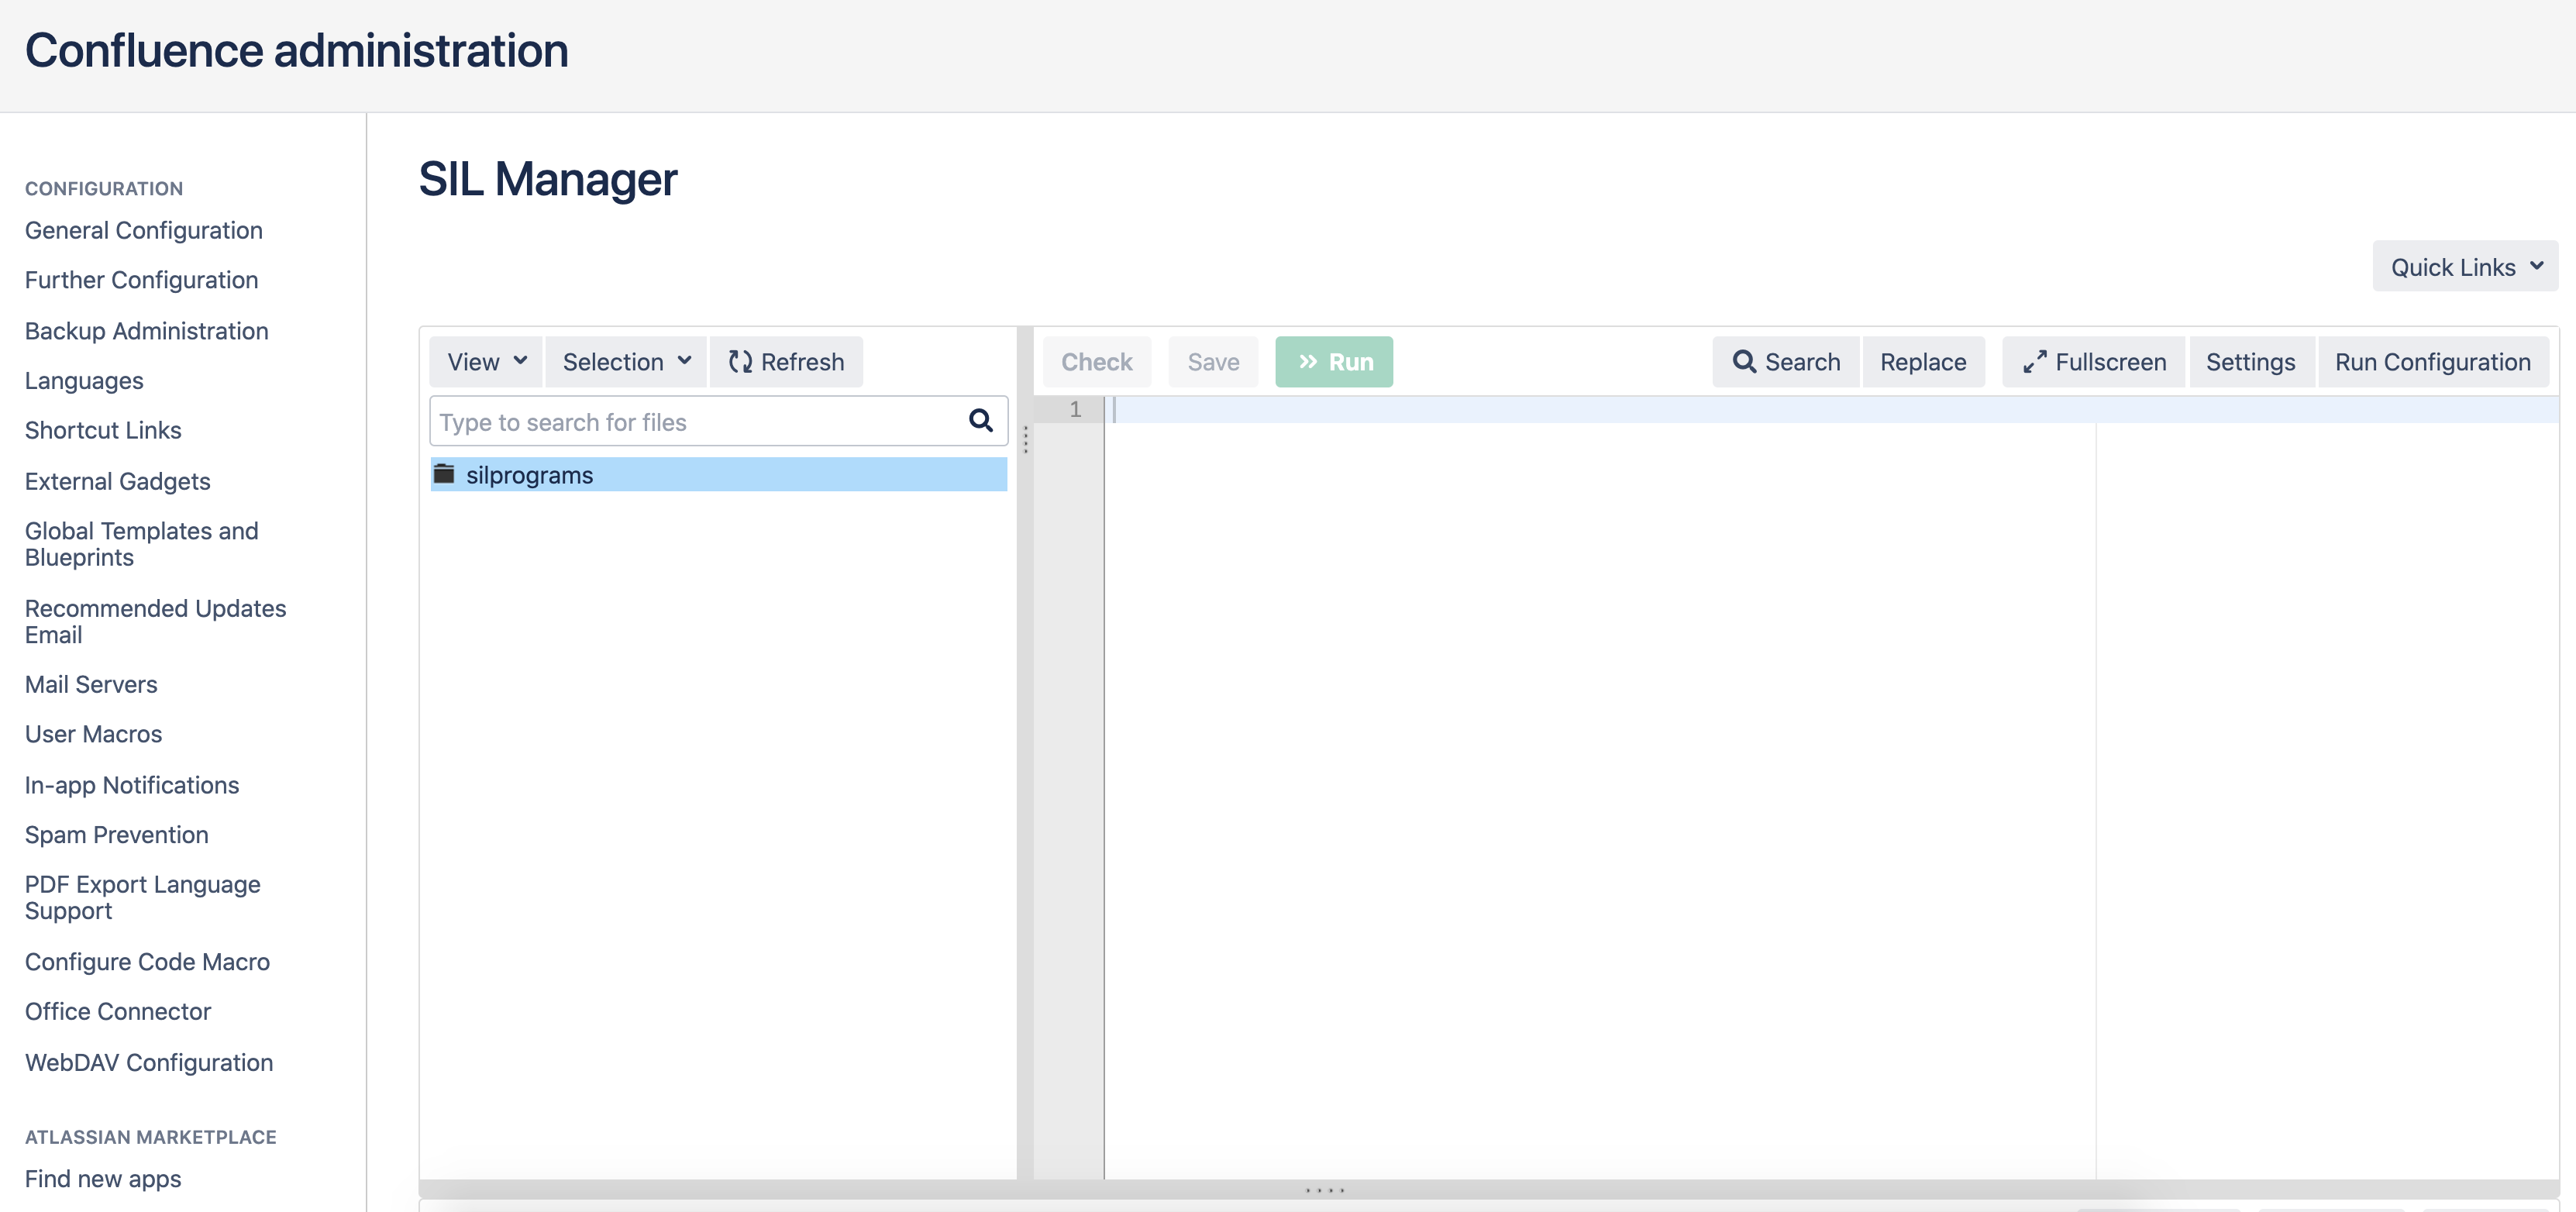
Создадим файл getProjects.sil вот с таким кодом:
struct Project < string key; string name; string projectTypeKey; >HttpRequest request; HttpHeader authHeader = httpBasicAuthHeader("admin", "admin"); request.headers += authHeader; Project [] projects = httpGet("http://host.docker.internal:8080/rest/api/2/project", request); runnerLog(projects); return projects;Измените адрес host.docker.internal:8080/ на адрес Вашего экземпляра Jira.
Запустите скрипт, чтобы проверить, что данные выбираются из Jira:

Создадим страницу в Confluence
Теперь создадим страницу в Confluence с макросом SIL table. В поле scripts введите имя нашего скрипта getProjects.sil:
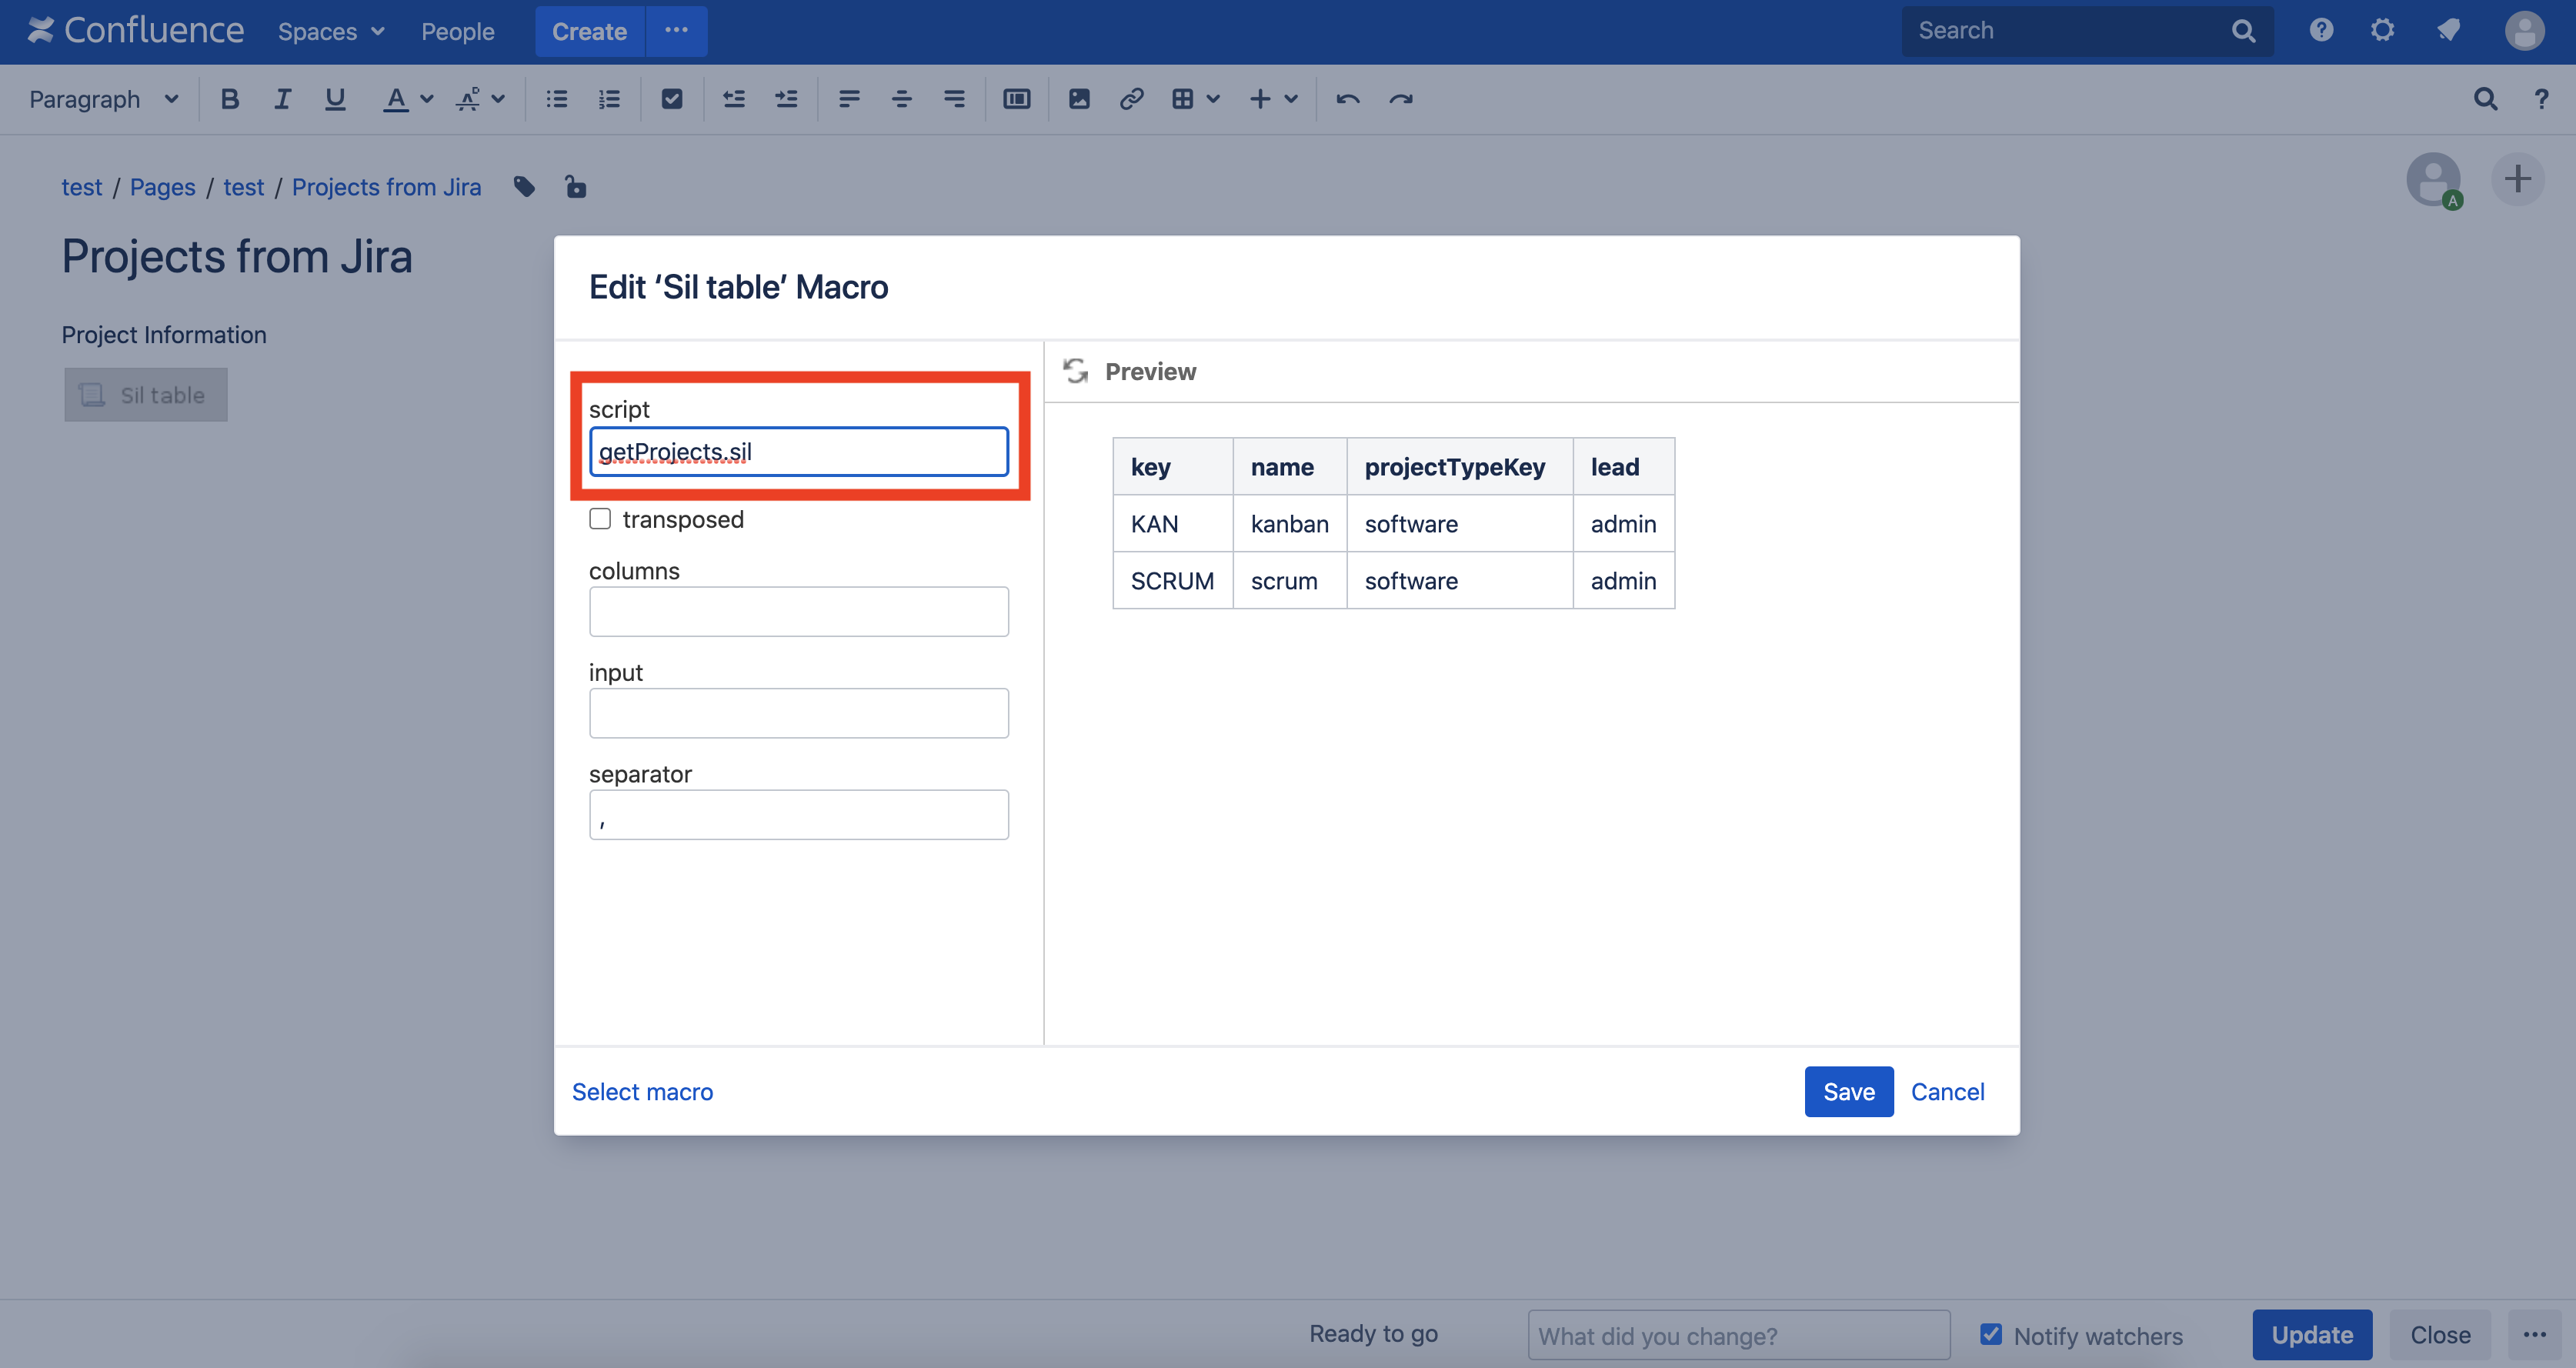
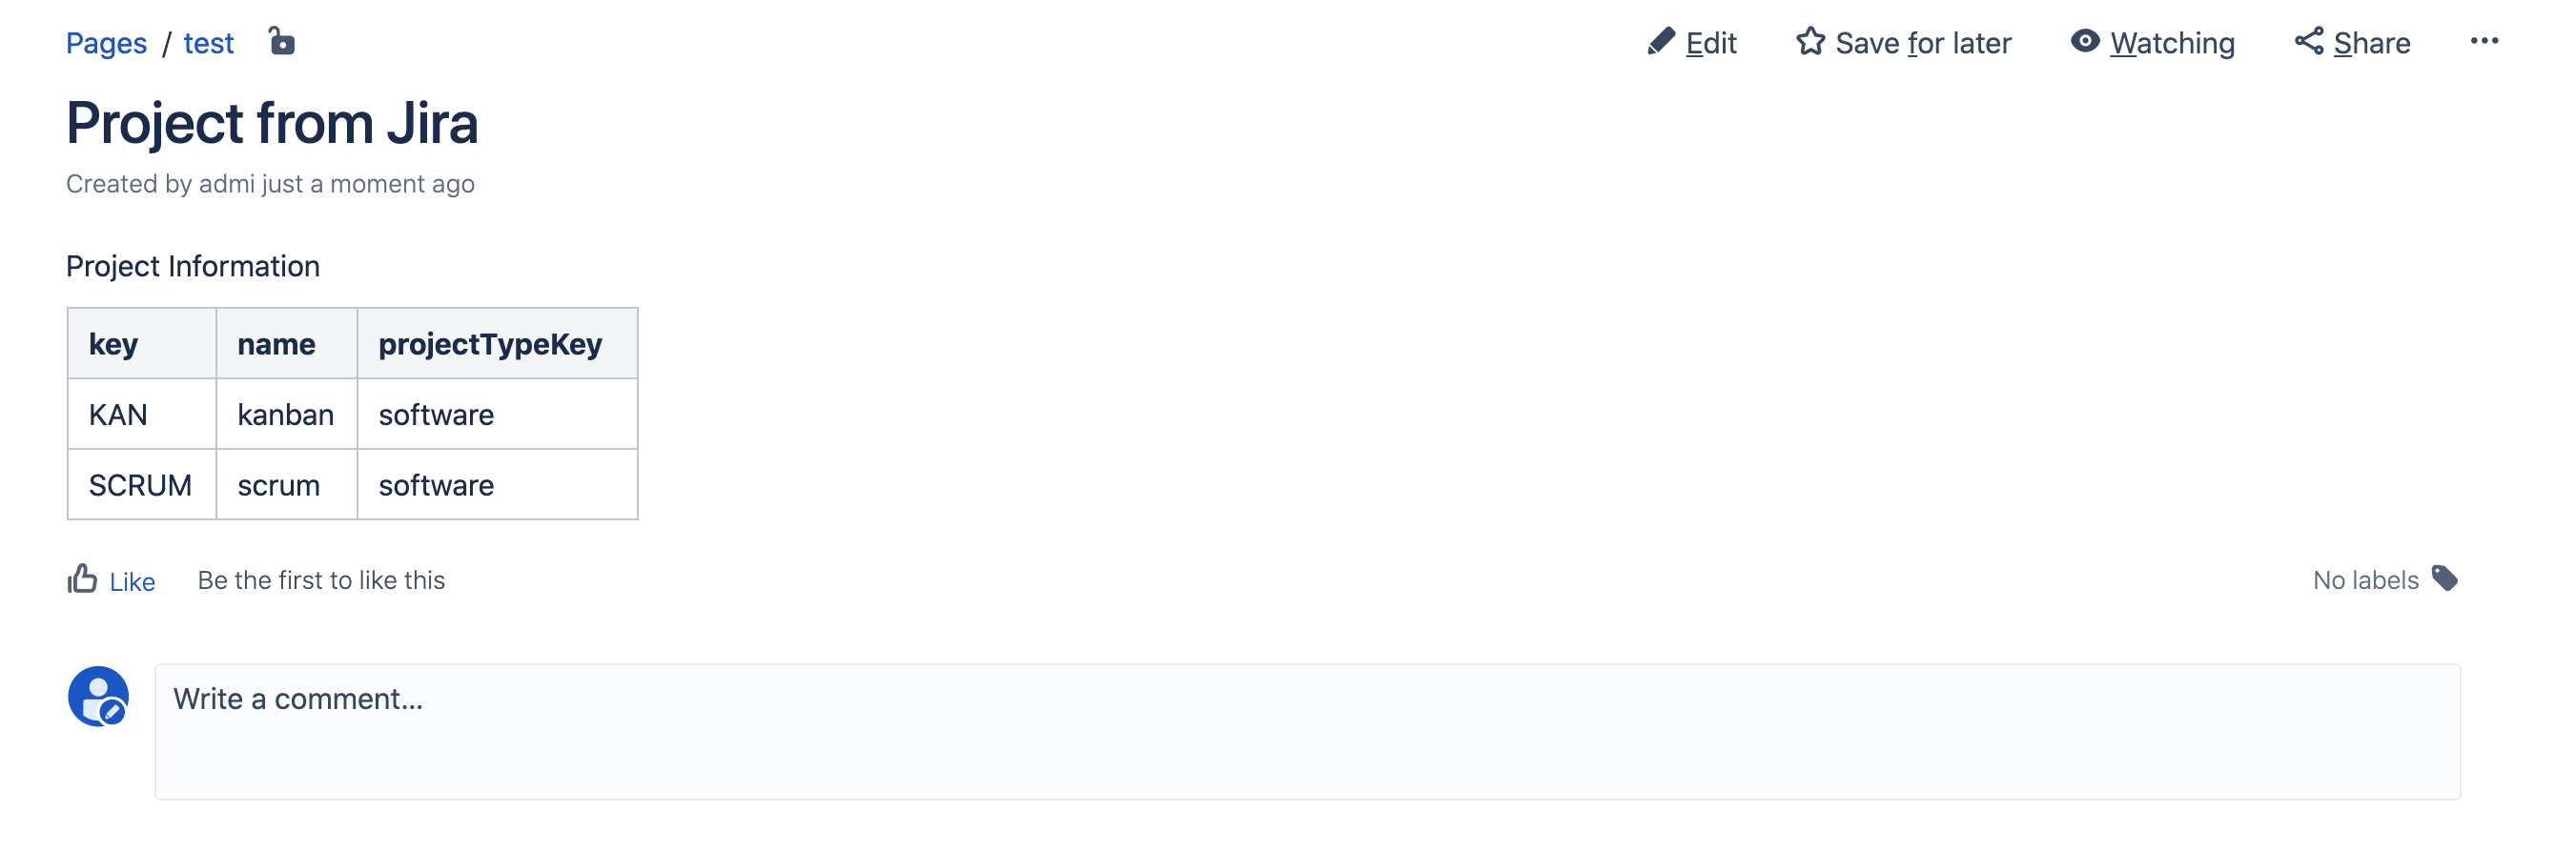
Опубликуйте страницу и Вы увидите вот такой результат:
Усложним задачу
Добавим в таблицу следующую функциональность:
- отобразим информацию о руководителе проекта
- дадим полям более понятные наименования и желательно на русском
Заодно немного отрефакторим.
Вот что будет делать наш скрипт:
- получаем данные о проектах из Jira через вызов Jira REST API
- конвертируем полученные данные о проектах в табличный вид
- выводим результат
Project [] projects = getProjectData(); TableRow [] tableRows = convertProjectDataToTableData(projects); return tableRows;Теперь давайте конкретизируем, как мы получаем данные о проектах:
- создаем запрос
- создаем хедер в запросе с информацией о пользователе, который получает данные из Jira
- добавляем параметр expand к нашему запросу. Нам нужно выбрать данные о руководителе проекта, но в ответе по умолчанию этих данных нет. Поэтому нам нужно сказать Jira, что мы хотим видеть данные о руководителе проекта в ответе. Для этого и используется параметр expand
- выполняем запрос
- возвращаем данные
Теперь определим структуры данных о наших проектах.
Вот ответ, который возвращает project метод из Jira REST API (я удалил ненужные данные, чтобы сделать ответ короче и поэтому более читабельным):
[ < "key":"KAN", "lead":< "name":"admin", "displayName":"Alexey Matveev", >, "name":"kanban", "projectTypeKey":"software" >, < "key":"SCRUM", "description":"", "lead":< "name":"admin", "displayName":"Alexey Matveev", >, "name":"scrum", "projectTypeKey":"software" > ]Как мы видим, значения для полей key, name и projectTypeKey определены на первом уровне нашего json. А вот для поля lead вместо значения мы видим json. А этот json уже и содержит значения полей name и displayName. Поэтому сначала создадим структуру для json в поле lead (Lead):
Вот теперь мы готовы сделать структуру и для первого уровня нашего json (Project):
Но проблема в том, что макрос SIL table может работать только с json с одним уровнем вложенности, поэтому нам нужно переконвертировать нашу структуру с двумя уровнями вложенности (Project) в структуру с одним уровнем вложенности (плоскую структуру). Но сначала создадим плоскую структуру (TableRow):
А теперь напишем функцию для конвертации данных в структуре Project в структуру TableRow:
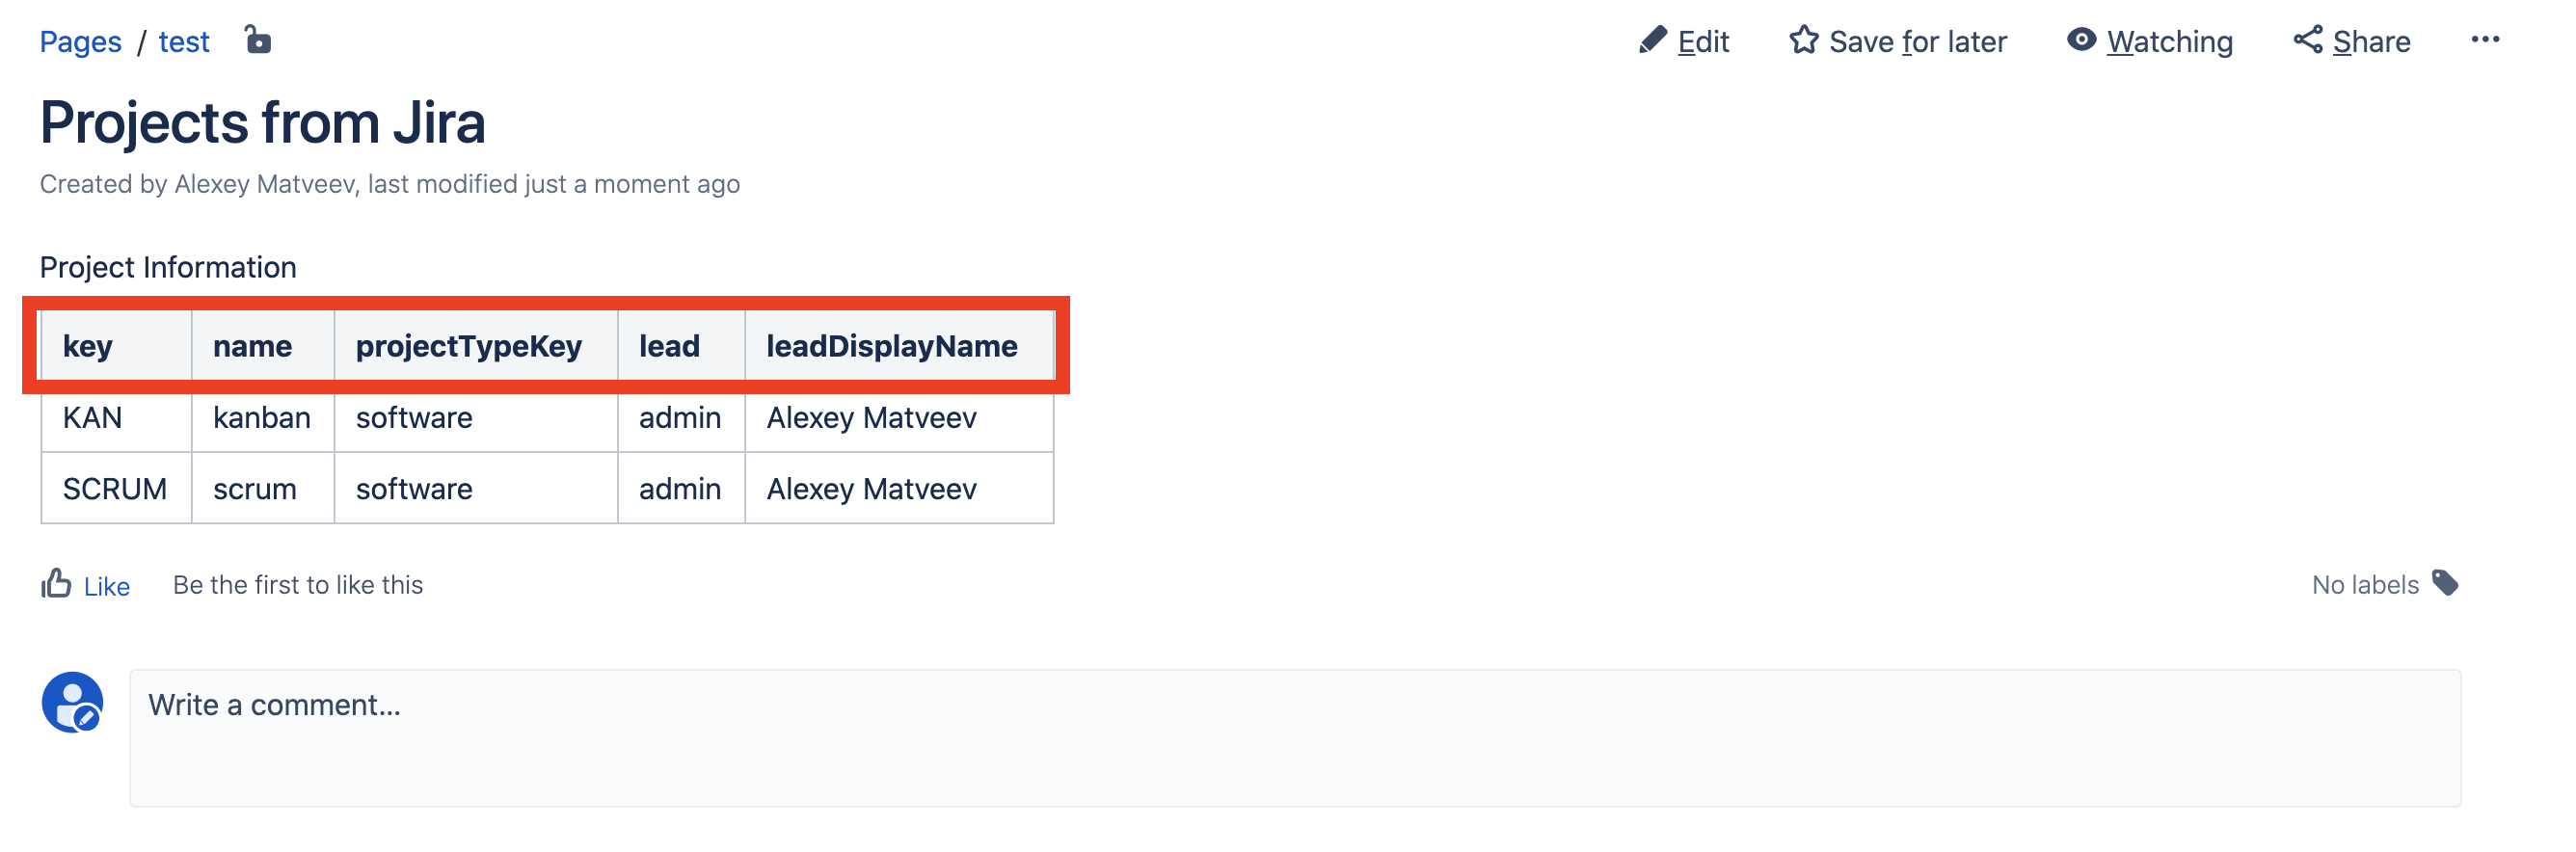
function convertProjectDataToTableData(Project [] projectData) < TableRow [] tableRows; for (Project project in projectData) < TableRow tableRow; tableRow.key = project.key; tableRow.name = project.name; tableRow.projectTypeKey = project.projectTypeKey; tableRow.lead = project.lead.name; tableRow.leadDisplayName = project.lead.displayName; tableRows = arrayAddElement(tableRows, tableRow); >return tableRows; >Вот финальный код getProjects.sil:
struct Lead < string name; string displayName; >struct Project < string key; string name; string projectTypeKey; Lead lead; >struct TableRow < string key; string name; string projectTypeKey; string lead; string leadDisplayName; >function getProjectData() < HttpRequest request; HttpHeader authHeader = httpBasicAuthHeader("admin", "admin"); request.headers += authHeader; HttpQueryParam param = httpCreateParameter("expand", "description,lead,url,projectKeys"); request.parameters += param; string pp = httpGet("http://host.docker.internal:8080/rest/api/2/project", request); runnerLog(pp); Project[] projects = httpGet("http://host.docker.internal:8080/rest/api/2/project", request); return projects; >function convertProjectDataToTableData(Project [] projectData) < TableRow [] tableRows; for (Project project in projectData) < TableRow tableRow; tableRow.key = project.key; tableRow.name = project.name; tableRow.projectTypeKey = project.projectTypeKey; tableRow.lead = project.lead.name; tableRow.leadDisplayName = project.lead.displayName; tableRows = arrayAddElement(tableRows, tableRow); >return tableRows; >Project [] projects = getProjectData(); TableRow [] tableRows = convertProjectDataToTableData(projects); return tableRows; Теперь обновим страницу в Confluence и увидим, что наши данные о руководителе проекта подтянулись:
Но имена колонок какие-то невразумительные. Давайте дадим более красивые имена.
Редактирум страницу, Редактируем макрос SIL table и вводим «Ключ проекта, Имя проекта, Тип проекта, Руководитель проекта, ФИО руководителя проекта» в поле columns:
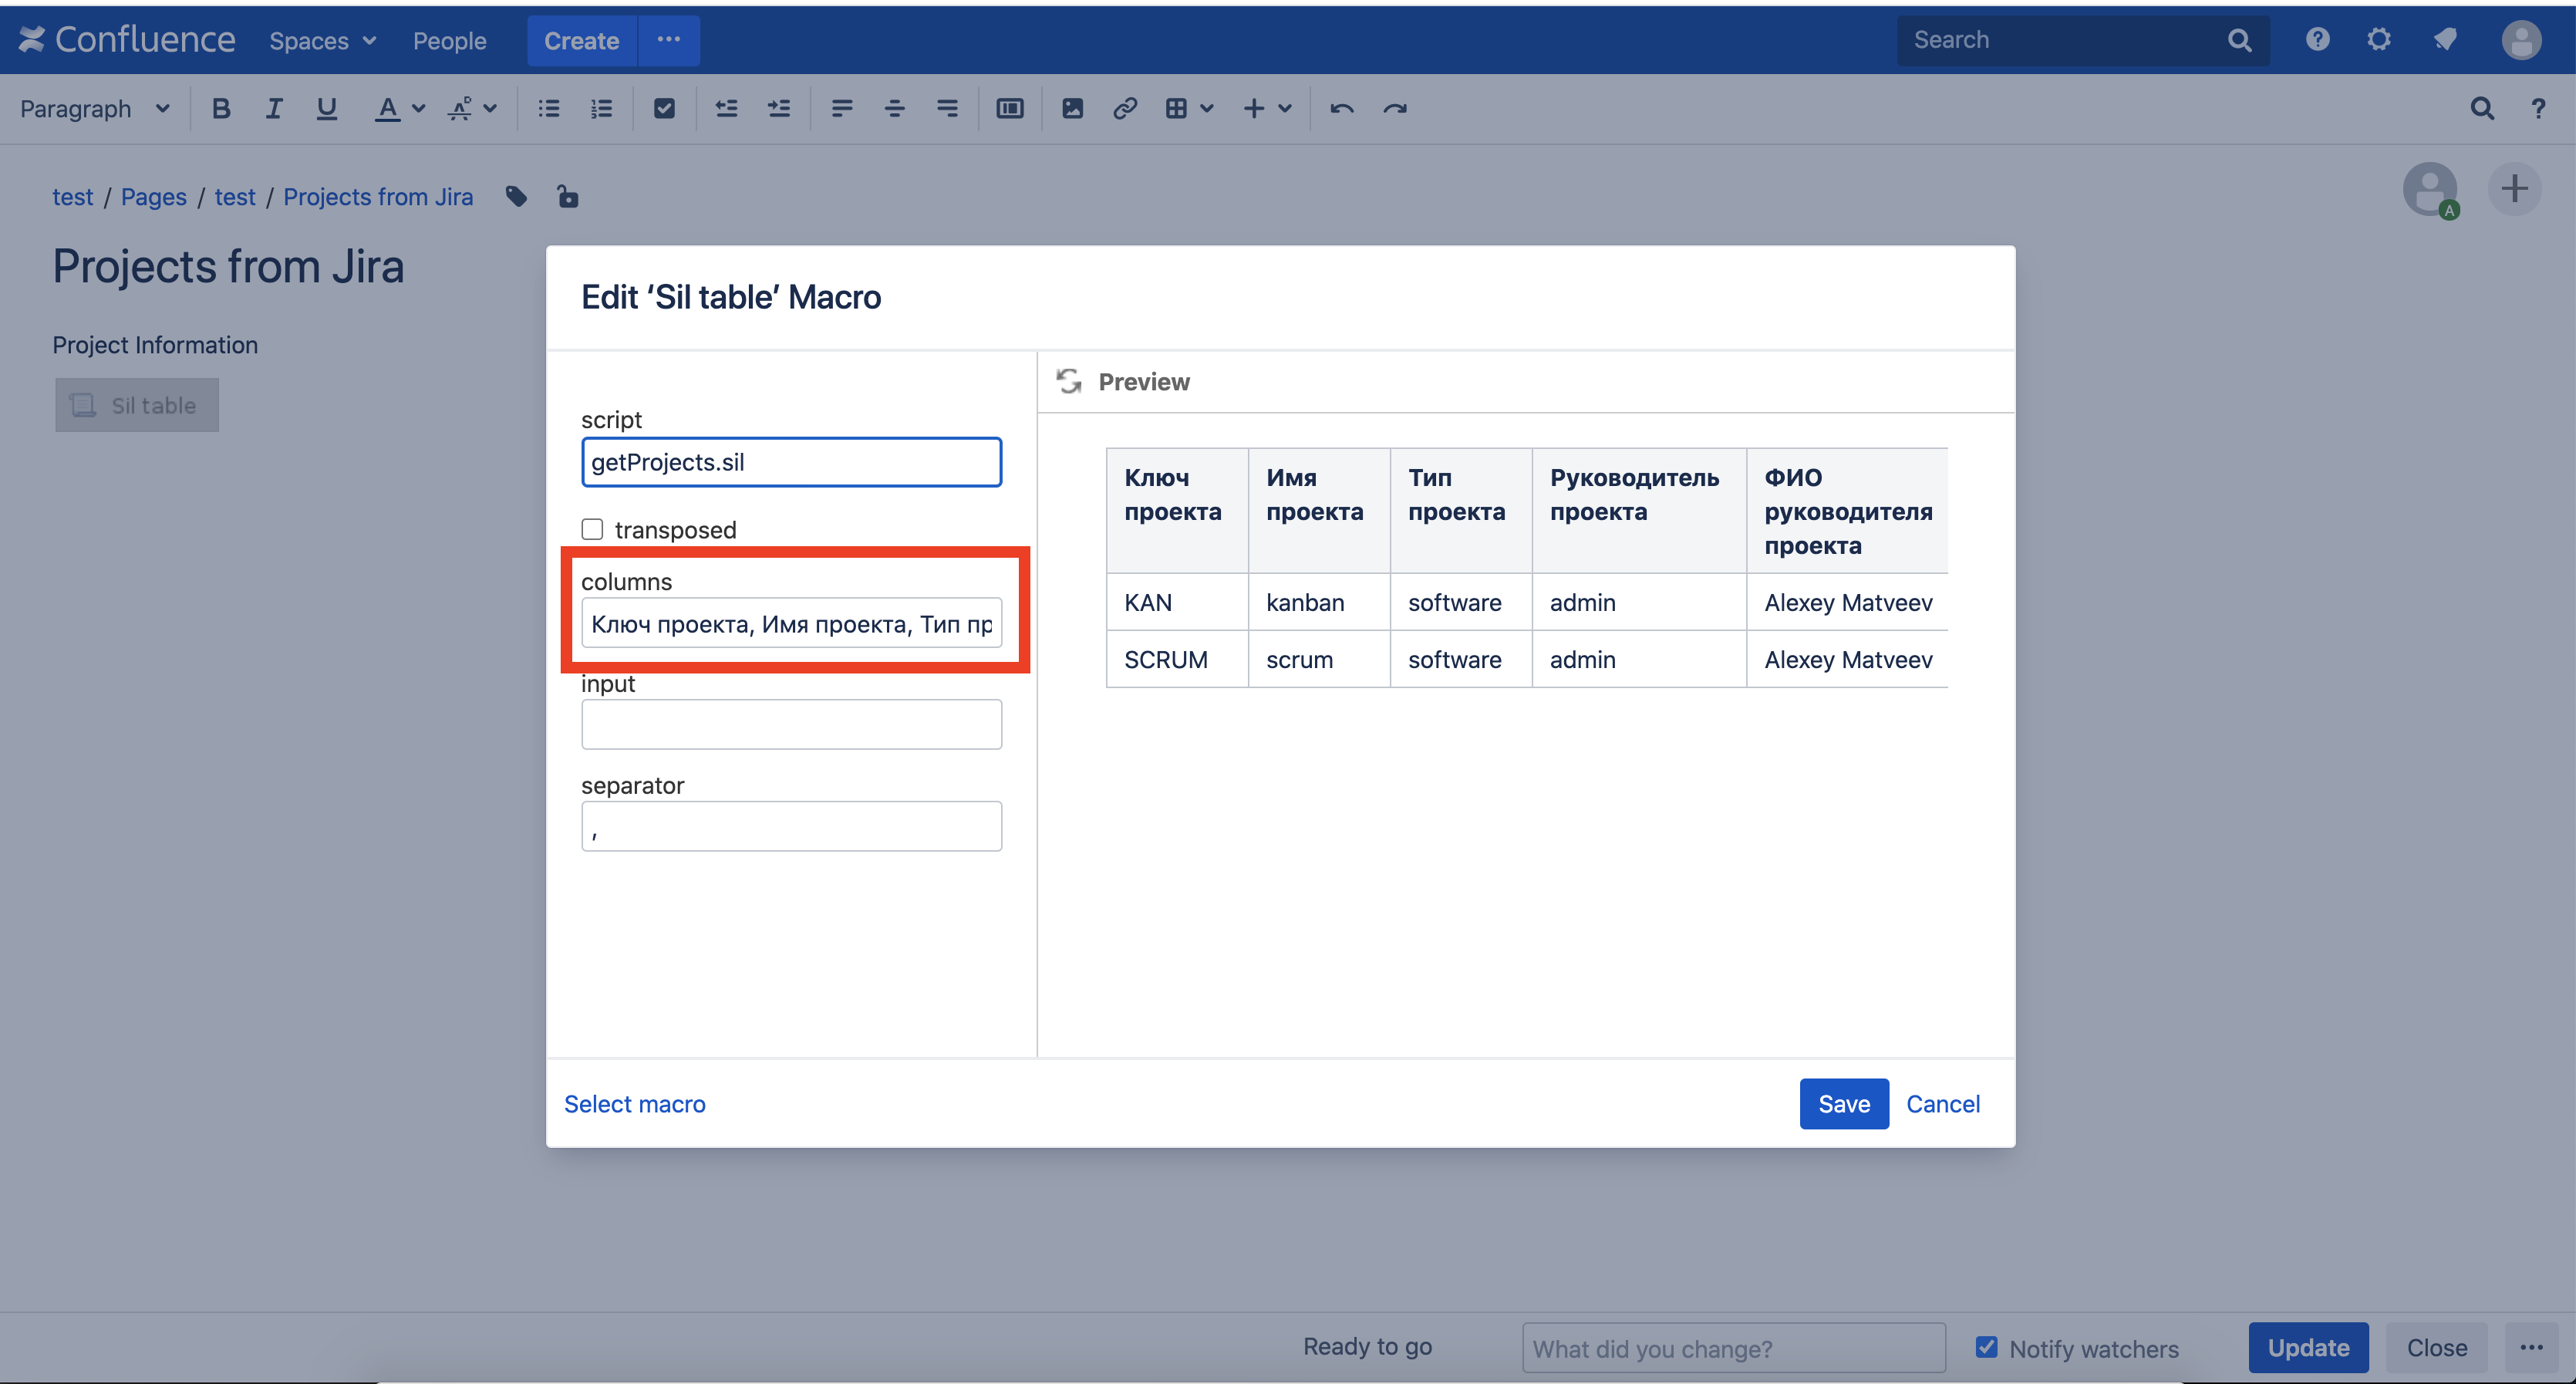
Сохраним страницу и вот результат:
Saved searches
Use saved searches to filter your results more quickly
You signed in with another tab or window. Reload to refresh your session. You signed out in another tab or window. Reload to refresh your session. You switched accounts on another tab or window. Reload to refresh your session.
confluence api for dataframes
License
kirtov/ctipy
This commit does not belong to any branch on this repository, and may belong to a fork outside of the repository.
Name already in use
A tag already exists with the provided branch name. Many Git commands accept both tag and branch names, so creating this branch may cause unexpected behavior. Are you sure you want to create this branch?
Sign In Required
Please sign in to use Codespaces.
Launching GitHub Desktop
If nothing happens, download GitHub Desktop and try again.
Launching GitHub Desktop
If nothing happens, download GitHub Desktop and try again.
Launching Xcode
If nothing happens, download Xcode and try again.
Launching Visual Studio Code
Your codespace will open once ready.
There was a problem preparing your codespace, please try again.
Latest commit
Git stats
Files
Failed to load latest commit information.
README.md
CTIPY (Confluence Tables and Images for PYthon)
Tiny lib which allows you to automatically upload images and tables (and tables with images!) onto Confluence page.
- Do not copy files from server to your local machine for uploading it to Confluence page via browser.
- You can run set of time-consuming experiments and automatically send results and logs onto Confluence page. So that report for your experiment would be compiled right after your computations.
- You can analyze results (right on Clonfluence page) of experiments that were already finished.
Library distributed via PyPi, so you can run:
Also you can install it manually from github repos with:
Firstly you have to create CTIConfluence object with:
from ctipy import CTIConfluence cti = CTIConfluence(url='https://yourcompany.atlassian.net/wiki', username='youremail@yourcompany.com', password='yourpassword', page_id=pageid) - Format of URL of your company’s Confluence can be different from ‘https://yourcompany.atlassian.net/wiki’
- BE CAREFULL: page_id must be provided to functions as a string, but not int
- page_id — ID of page that you want to interact with. It is ~9 digit number which can be found in URL of confluence page preceding its name. E.G.: https://yourcompany.atlassian.net/wiki/spaces/SOME_SPACE/pages/PAGE_ID/PAGE_NAME
Most contribution of this library is correct uploading and displaying pandas DataFrames on Confluence pages. However CTIConfluence directly inherits Confluence class from https://github.com/atlassian-api/atlassian-python-api which provides big amount of low-level functions. Some usefule examples that you can use listed here.
To upload file you can run:
cti.upload_file('path_to_the_file_on_you_local_fs') After this command, file will be attached to your page and you can find it in Attachments section of your page. After that you can manually put it onto the page via browser.
If you want to put file onto the page automatically, you can run:
cti.upload_file('path_to_the_file_on_you_local_fs', append_to_page=True) After this command, file will be attached to your page and placed at the bottom.
Supported types: png, jpg, jpeg
Idea of uploading images is the same as uploading files.
You can run: cti.upload_image() with or without argument append_to_page .
To represent tables CTIPY supports only pandas DataFrames. Uploaded tables are always placed in the bottom of the page. The most interesting feature of CTIPY is that it can upload tables with images inside. To upload table you have to create arbitrary pandas DataFrame. To ‘put’ files in columns you have to put path to the file( or list of pathes). E.g.:
df = pd.DataFrame() df['text'] = [1, 2, 3] df['file'] = ['/path/to/file1', ['/path/to/file2', 'path/to/file3'], '/path/to/file4'] df['image'] = [['/path/to/image1', 'path/to/image2'], '/path/to/image3', '/path/to/image4'] cti.upload_table(df, columns_with_files=['file'], columns_with_images=['image']) And (after 30 seconds — several minutes) your table will be appended to your page. In columns_with_files you have to provide list of DataFrame columns which consists of paths to files. In columns_with_images — paths to images. All other columns will be treated as plain text.
CTIPY can only append file/image/table to the end of the page. However if you want to update your report after each experiment you don’t want to see huge amount of tables on the page. So to totally clean the page you can run:
cti.update_page(None, ID_OF_YOUR_PAGE, TITLE_OF_YOUR_PAGE, '') So after each experiment finish, you can update DataFrame with results, clean the page and upload new version of report.