Tkinter Event Binding
Summary: in this tutorial, you’ll learn about the Tkinter event binding mechanism.
Introduction to the Tkinter event binding
Assigning a function to an event of a widget is called event binding. When the event occurs, the assigned function is invoked automatically.
In the previous tutorial, you learned how to bind a function to an event of a widget via the command option. However, not all Tkinter widgets support the command option.
Therefore, Tkinter provides you with an alternative way for event binding via the bind() method. The following shows the general syntax of the bind() method:
widget.bind(event, handler, add=None)When an event occurs in the widget , Tkinter will invoke the handler automatically with the event detail.
If you want to register an additional handler, you can pass the ‘+’ to the add argument. It means that you can have multiple event handlers that respond to the same event.
Tkinter event binding examples
The following program illustrates how to bind the return_pressed function to the Return key pressed event of the ‘Save’ button:
import tkinter as tk from tkinter import ttk def return_pressed(event): print('Return key pressed.') root = tk.Tk() btn = ttk.Button(root, text='Save') btn.bind('', return_pressed) btn.focus() btn.pack(expand=True) root.mainloop()Code language: Python (python)In this example, the following statement calls the bind() method on the button widget to bind the Return key pressed event:
btn.bind('Return>', return_pressed)Code language: HTML, XML (xml)The following example illustrates how to use the bind() method to register multiple handlers for the same event:
import tkinter as tk from tkinter import ttk def return_pressed(event): print('Return key pressed.') def log(event): print(event) root = tk.Tk() btn = ttk.Button(root, text='Save') btn.bind('', return_pressed) btn.bind('', log, add='+') btn.focus() btn.pack(expand=True) root.mainloop()Code language: Python (python)When you move the focus to the button and press the Return key, Tkinter automatically invokes the return_pressed and log functions.
The following binds the log() function to the Return key pressed event of the ‘Save’ button:
btn.bind('', log, add='+')Code language: Python (python)In this statement, the third argument add=’+’ registered additional handler, which is the log() function.
If you don’t specify the add=’+’ argument, the bind() method will replace the existing handler ( return_pressed ) by the new one ( log ).
Event patterns
Tkinter uses event patterns to map event names with handlers. For example, the denotes the Return key pressed.
The following shows the general syntax of an event pattern:
modifier-type-detail>Code language: HTML, XML (xml)In this syntax, an event is surrounded by angle brackets ( <> ). Inside the angle brackets, there are zero or more modifiers, an event type, and detailed information about the event.
For example, the denotes a keyboard press of the key A . and represents a keypress of Alt + Ctrl + Delete .
The following section shows the most commonly used event modifiers, event types, and event details.
1) Event modifiers
The following table lists the most commonly used event modifiers:
| Event Modifier | Meaning |
|---|---|
| Alt | The Alt key is held |
| Control | The Ctrl key is held |
| Shift | The Shift key is held |
| Any | This modifier makes an event type general. For example, the event pattern applies to the keypress of any key. |
Event types
The following table shows the most commonly used event types:
| Type | Name | Description |
|---|---|---|
| 36 | Activate | The state option of a widget changes from inactive to active. |
| 4 | Button | One mouse button is pressed |
| 5 | ButtonRelease | One mouse button is released |
| 22 | Configure | The size of the widget is changed |
| 37 | Deactivate | The state option of a widget changes from active to inactive. |
| 17 | Destroy | A widget is being destroyed. |
| 7 | Enter | The mouse pointer is moved into a visible part of a widget. |
| 12 | Expose | Some part of the widget or application is visible after having been covered up by another window. |
| 9 | FocusIn | The input focus was moved into a widget. |
| 10 | FocusOut | The input focus was moved out of a widget. |
| 2 | KeyPress | A key is pressed. |
| 3 | KeyRelease | A key is released |
| 8 | Leave | The mouse pointer is moved out of a widget. |
| 19 | Map | A widget is being placed on a container e.g., calling the pack() or grid() method. |
| 6 | Motion | The mouse pointer is moved entirely within a widget. |
| 38 | MouseWheel | The user moved the mouse wheel up or down. |
| 18 | Unmap | A widget is being unmapped and is no longer visible, for example when calling the grid_remove() method on the widget. |
| 15 | Visibility | At least some part of the application window becomes visible on the screen. |
Event Detail
The following table shows several ways to name keys:
| .keysym | .keycode | .keysym_num | Key |
|---|---|---|---|
| Alt_L | 64 | 65513 | The left-hand alt key |
| Alt_R | 113 | 65514 | The right-hand alt key |
| BackSpace | 22 | 65288 | backspace |
| Cancel | 110 | 65387 | break |
| Caps_Lock | 66 | 65549 | CapsLock |
| Control_L | 37 | 65507 | The left-hand control key |
| Control_R | 109 | 65508 | The right-hand control key |
| Delete | 107 | 65535 | Delete |
| Down | 104 | 65364 | ↓ |
| End | 103 | 65367 | end |
| Escape | 9 | 65307 | esc |
| Execute | 111 | 65378 | SysReq |
| F1 | 67 | 65470 | Function key F1 |
| F2 | 68 | 65471 | Function key F2 |
| Fi | 66+i | 65469+i | Function key Fi |
| F12 | 96 | 65481 | Function key F12 |
| Home | 97 | 65360 | home |
| Insert | 106 | 65379 | insert |
| Left | 100 | 65361 | ← |
| Linefeed | 54 | 106 | Linefeed (control-J) |
| KP_0 | 90 | 65438 | 0 on the keypad |
| KP_1 | 87 | 65436 | 1 on the keypad |
| KP_2 | 88 | 65433 | 2 on the keypad |
| KP_3 | 89 | 65435 | 3 on the keypad |
| KP_4 | 83 | 65430 | 4 on the keypad |
| KP_5 | 84 | 65437 | 5 on the keypad |
| KP_6 | 85 | 65432 | 6 on the keypad |
| KP_7 | 79 | 65429 | 7 on the keypad |
| KP_8 | 80 | 65431 | 8 on the keypad |
| KP_9 | 81 | 65434 | 9 on the keypad |
| KP_Add | 86 | 65451 | + on the keypad |
| KP_Begin | 84 | 65437 | The center key (same key as 5) on the keypad |
| KP_Decimal | 91 | 65439 | Decimal ( . ) on the keypad |
| KP_Delete | 91 | 65439 | delete on the keypad |
| KP_Divide | 112 | 65455 | / on the keypad |
| KP_Down | 88 | 65433 | ↓ on the keypad |
| KP_End | 87 | 65436 | end on the keypad |
| KP_Enter | 108 | 65421 | enter on the keypad |
| KP_Home | 79 | 65429 | home on the keypad |
| KP_Insert | 90 | 65438 | insert on the keypad |
| KP_Left | 83 | 65430 | ← on the keypad |
| KP_Multiply | 63 | 65450 | × on the keypad |
| KP_Next | 89 | 65435 | PageDown on the keypad |
| KP_Prior | 81 | 65434 | PageUp on the keypad |
| KP_Right | 85 | 65432 | → on the keypad |
| KP_Subtract | 82 | 65453 | — on the keypad |
| KP_Up | 80 | 65431 | ↑ on the keypad |
| Next | 105 | 65366 | PageDown |
| Num_Lock | 77 | 65407 | NumLock |
| Pause | 110 | 65299 | pause |
| 111 | 65377 | PrintScrn | |
| Prior | 99 | 65365 | PageUp |
| Return | 36 | 65293 | Enter key |
| Right | 102 | 65363 | → |
| Scroll_Lock | 78 | 65300 | ScrollLock |
| Shift_L | 50 | 65505 | The left-hand shift key |
| Shift_R | 62 | 65506 | The right-hand shift key |
| Tab | 23 | 65289 | The tab key |
Binding events to root window
So far, you have learned how to bind an event to a particular widget. Tkinter also allows you to bind an event to the top-level window.
In this case, the syntax for the bind() is the same except that you can call it on the root window like this:
root.bind('Return>', handler)Code language: HTML, XML (xml)The levels of binding
In the previous example, you have learned how to bind an event to a particular instance of a widget. This is called an instance-level binding.
Tkinter also allows you to bind an event to all the instances of a widget. For example, you can bind the event to all the textboxes in a program:
root.bind_class('Entry', '', paste)Code language: JavaScript (javascript)By the way, you use the Entry widget to create a textbox in Tkinter.
This is called class-level binding because you bind the event to a class instead of an instance.
Unbinding events
Sometimes, you may want to undo the effect of an earlier binding. To do it, you can use the unbind() method:
widget.unbind(event)Code language: CSS (css)The following example unbinds the event from the btn button:
btn.unbind('Return>')Code language: HTML, XML (xml)Summary
- Use the bind() method to bind an event to a widget.
- Tkinter supports both instance-level and class-level bindings.
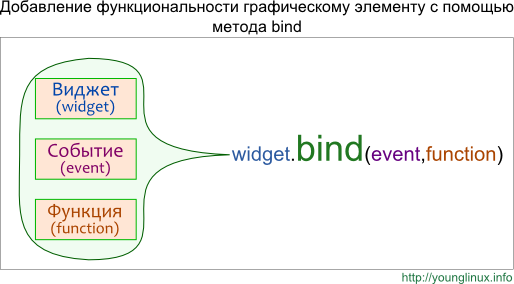
Метод bind
В tkinter с помощью метода bind между собой связываются виджет, событие и действие. Например, виджет – кнопка, событие – клик по ней левой кнопкой мыши, действие – отправка сообщения. Другой пример: виджет – текстовое поле, событие – нажатие Enter , действие – получение текста из поля методом get для последующей обработки программой. Действие оформляют как функцию или метод, которые вызываются при наступлении события.
Один и тот же виджет можно связать с несколькими событиями. В примере ниже используется одна и та же функция-обработчик, однако могут быть и разные:
from tkinter import * root = Tk() def change(event): b['fg'] = "red" b['activeforeground'] = "red" b = Button(text='RED', width=10, height=3) b.bind('', change) b.bind('', change) b.pack() root.mainloop()
Здесь цвет текста на кнопке меняется как при клике по ней (событие ), так и при нажатии клавиши Enter (событие ). Однако Enter сработает, только если кнопка предварительно получила фокус. В данном случае для этого надо один раз нажать клавишу Tab . Иначе нажатие Enter будет относиться к окну, но не к кнопке.
У функций-обработчиков, которые вызываются через bind , а не через свойство command , должен быть обязательный параметр event , через который передается событие. Имя event – соглашение, идентификатор может иметь другое имя, но обязательно должен стоять на первом месте в функции, или может быть вторым в методе:
from tkinter import * root = Tk() class RedButton: def __init__(self): self.b = Button(text='RED', width=10, height=3) self.b.bind('', self.change) self.b.pack() def change(self, event): self.b['fg'] = "red" self.b['activeforeground'] = "red" RedButton() root.mainloop()
Что делать, если в функцию надо передать дополнительные аргументы? Например, клик левой кнопкой мыши по метке устанавливает для нее один шрифт, а клик правой кнопкой мыши – другой. Можно написать две разные функции:
from tkinter import * root = Tk() def font1(event): l['font'] = "Verdana" def font2(event): l['font'] = "Times" l = Label(text="Hello World") l.bind('', font1) # ЛКМ l.bind('', font2) # ПКМ l.pack() root.mainloop()
Но это не совсем правильно, так как код тела функций фактически идентичен, а имя шрифта можно передавать как аргумент. Лучше определить одну функцию:
… def changeFont(event, font): l['font'] = font …
Однако возникает проблема, как передать дополнительный аргумент функции в метод bind ? Ведь в этот метод мы передаем объект-функцию, но не вызываем ее. Нельзя написать l.bind(», changeFont(event, «Verdana»)) . Потому что как только вы поставили после имени функции скобки, значит вызвали ее, то есть заставили тело функции выполниться. Если в функции нет оператора return , то она возвращает None . Поэтому получается, что даже если правильно передать аргументы, то в метод bind попадет None , но не объект-функция.
На помощь приходят так называемые анонимные объекты-функции Python, которые создаются инструкцией lambda . Применительно к нашей программе выглядеть это будет так:
… l.bind('', lambda e, f="Verdana": changeFont(e, f)) l.bind('', lambda e, f="Times": changeFont(e, f)) …
Лямбда-функции можно использовать не только с методом bind , но и опцией command , имеющейся у ряда виджет. Если функция передается через command , ей не нужен параметр event . Здесь обрабатывается только одно основное событие для виджета – клик левой кнопкой мыши.
У меток нет command , однако это свойство есть у кнопок:
from tkinter import * def change_font(font): label['font'] = font root = Tk() label = Label(text="Hello World") label.pack() Button(command= lambda f="Verdana": change_font(f))\ .pack() Button(command= lambda f="Times": change_font(f))\ .pack() root.mainloop()
Практическая работа
Напишите программу по следующему описанию. Нажатие Enter в однострочном текстовом поле приводит к перемещению текста из него в список (экземпляр Listbox ). При двойном клике ( ) по элементу-строке списка, она должна копироваться в текстовое поле.
Курс с примерами решений практических работ: pdf-версия
Tkinter. Программирование GUI на Python