- MicroPython with Arduino Boards
- Arduino Lab for MicroPython
- OpenMV Editor
- OpenMV Examples
- Compatible Boards
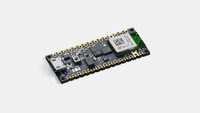
- Nano 33 BLE
- Nano 33 BLE Sense
- Nano RP2040 Connect
- GIGA R1
- Portenta H7
- Learn Python®
- MicroPython Docs
- API
- Functions
- For Loop
- Digital Write
- Digital Read (pull up)
- Digital Read (pull down)
- Analog Read
- PWM
- Delay
- Interrupt
- Использование языка программирования Python вместе с Arduino
- Установка Python на ваш компьютер
- Установка PySerial в Python
- Наша первая совместная программа на Arduino и Python
- Программа для Arduino
MicroPython with Arduino Boards
Learn about compatibility between the popular MicroPython implementation and Arduino boards, how to set up your environment, and discover in-depth tutorials and useful links.
LAST REVISION: 07/21/2023, 03:33 PM
To download the firmware required to run MicroPython on your Arduino board, visit the Arduino MicroPython downloads page.
MicroPython is an implementation of the Python® programming language that comes with a subset of the Python® standard library, and is designed to run on microcontrollers.
A great advantage of using MicroPython is that it is easy to learn and has great documentation for a number of boards. At the moment, there are four boards that can be used together with MicroPython, you can read more about them in the compatible boards section.
Arduino also supports OpenMV’s branch of MicroPython, and through the OpenMV IDE you can install MicroPython, connect/disconnect your board and upload your scripts.
There’s quite the difference between how we program an Arduino board with the Arduino IDE, using the Arduino programming language (based on C++), and how we program it using MicroPython. When uploading what we call a sketch to a board, we first compile the sketch we write, then upload it to the board, replacing the old sketch with a new.
To use MicroPython, we first need to install it on the board. Then, we can load a
1import time2 from machine import Pin3 4led = Pin(6, Pin.OUT) 5 6 while True: 7 led.on() 8 time.sleep_ms(250) 9 led.off() 10 time.sleep_ms(250)As MicroPython is already running on the board, we don’t need to compile and upload the code, we only need to provide the instructions (which is done via serial communication).
When installing MicroPython on a board, it can only run MicroPython scripts, until we «uninstall» it. To put the board back in «normal mode» we need to reset the bootloader, which is a unique process for each board. These instructions are available in the compatible boards section in this article. Basically, you have to put the board in bootloader mode and upload any .ino sketch.
Arduino Lab for MicroPython
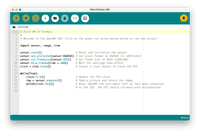
The Arduino Lab for MicroPython is a lightweight editor designed for simple interaction between your computer and board. With it, you can select your port, load scripts, and use the REPL shell and more.
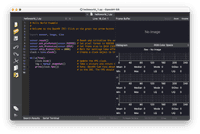
OpenMV Editor
OpenMV is a platform that supports programming Arduino boards using a fork of MicroPython. Through the OpenMV editor, we can install this fork, and upload scripts directly to the board. There’s also a number of examples available directly in the editor.
OpenMV is a great platform for computer vision and machine learning projects.
OpenMV Examples
Further down this article, you can find a lot of useful code examples that will help you to get started.
You can also check out the full list of examples in the OpenMV’s GitHub repository.
Compatible Boards
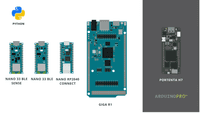
There are currently five Arduino boards that officially supports MicroPython. They are listed below:
All of above are also compatible with the OpenMV IDE.
Currently, the GIGA R1 WiFi is not supported by OpenMV IDE.
Nano 33 BLE
If you need help getting started with MicroPython on the Nano 33 BLE board, you can check out the tutorials below:
To reset the bootloader on the Nano 33 BLE board, double tap the reset button quickly. This will reset your board to factory setting.
Nano 33 BLE Sense
If you need help getting started with MicroPython on the Nano 33 BLE Sense board, you can check out the tutorials below:
To reset the bootloader on the Nano 33 BLE Sense board, double tap the reset button quickly. This will reset your board to factory setting.
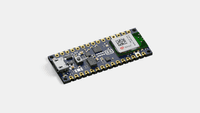
Nano RP2040 Connect
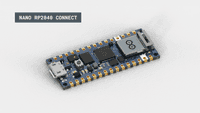
If you need help getting started with MicroPython on the Nano RP2040 Connect board, you can check out the tutorials below:
To reset the bootloader, you will need to short to connect a jumper wire between the REC and GND pin, and press the reset button. More detailed instructions are available in the Nano RP2040 Connect technical reference.
GIGA R1
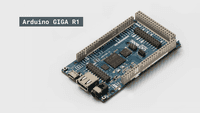
If you need help getting started with MicroPython on the Arduino GIGA R1 board, you can check out the tutorial below:
MicroPython support for the GIGA R1 is currently in an experimental phase.
Portenta H7
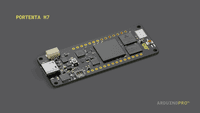
If you need help getting started with MicroPython on the Portenta H7 board, you can check out the tutorial below:
Learn Python®
As MicroPython is an implementation of the Python® language, you can also run a lot of Python® scripts directly on the board. For example, running this Python® script on your computer also works when running it on your board.
1value1 = 2 2value2 = 5 3 4 print(value1 + value2)This means it’s time to learn the Python® language, which there is a lot of resources for. We recommend taking a look at the following resources to better understand the Python® language:
MicroPython Docs
Visit the MicroPython documentation for an understanding on how Python® runs on microcontrollers.
Note that many examples in the MicroPython Docs will not work directly with Arduino boards, but will provide an understanding of how Python® can run on your board.
API
Below you will find some useful examples that can be used by any Arduino board. For more specific features, such as on-board sensors, connectivity and communication, please refer to the individual guides:
A simple script that will print
1import time2 3content = "Hello world!" 4 5 while True: 6 print(content) 7 time.sleep(1)Functions
1import time2 3content = "Hello world!" 4count = 0 5 6 def counter_function(): 7 global count8 count = count + 1 9 10 while True: 11 counter_function() 12 print(content, count) 13 time.sleep(1)For Loop
Simple use of a for loop and functions. This script counts to 10, and then back to 0.
1import time2 3content = "Hello world!" 4count = 0 5 6 def function_increase(): 7 global count8 count = count +1 9 print(count) 10 11 def function_decrease(): 12 global count13 count = count -1 14 print(count) 15 16 while True: 17 for x in range(10): 18 function_increase() 19 time.sleep(1) 20 21 for x in range(10): 22 function_decrease() 23 time.sleep(1)Digital Write
Writes a high and low value to a digital pin every one second. Also prints state in the terminal.
1from machine import Pin2 import utime3 4p2 = Pin(25, Pin.OUT) 5 6 while True: 7 p2.value(0) 8 print("off") 9 utime.sleep(1) 10 p2.value(1) 11 print("on") 12 utime.sleep(1)Digital Read (pull up)
Reading digital pins with a
1from machine import Pin2 import utime3 4p2 = Pin(25, Pin.IN, Pin.PULL_UP) 5 6 while True: 7 print(p2.value()) 8 utime.sleep(1)Digital Read (pull down)
Reading digital pins with a
1from machine import Pin2 import utime3 4p2 = Pin(25, Pin.IN, Pin.PULL_DOWN) 5 6 while True: 7 print(p2.value()) 8 utime.sleep(1)Analog Read
Read an analog pin and print it to the terminal with a delay of 0.5 seconds.
1import machine2 import time3 4 # Make sure to follow the GPIO map for the board you are using. 5 # Pin 29 in this case is the "A3" pin on the Nano BLE / BLE Sense 6adc_pin = machine.Pin(29) 7adc = machine.ADC(adc_pin) 8 9 while True: 10 reading = adc.read_u16() 11 print("ADC: ",reading) 12 time.sleep_ms(500)PWM
Write a specific duty to a specific pin.
1from machine import Pin, PWM, ADC2 3pwm = PWM(Pin(15)) 4duty = 30000 #between 0-65000 5 6pwm.freq(1000) 7 8 while True: 9 pwm.duty_u16(duty)Delay
To use a simple delay, we can use the
1import time2 3 while True: 4 time.sleep(0.5) #or time.sleep_ms(500) 5 print("Hello world!")Interrupt
Below is an example of a simple interrupt that uses a pull up button and an LED.
The program blinks an LED, until the button is pressed. The button is attached to an interrupt, which turns off an LED for 3 seconds.
1import machine2 from machine import Pin3 import time4 5interrupt = False 6 7 def callback(pin): 8 global interrupt9 interrupt = True 10 11led = Pin(6, Pin.OUT) 12 13button = machine.Pin(25, machine.Pin.IN, machine.Pin.PULL_UP) 14 15button.irq(trigger=machine.Pin.IRQ_FALLING, handler=callback) 16 17 while True: 18 19 led.on() 20 time.sleep(0.5) 21 led.off() 22 time.sleep(0.5) 23 24 if interrupt: 25 state = machine.disable_irq() 26 machine.enable_irq(state) 27 led.off() 28 print("Interrupt: LED off for 3 seconds!") 29 time.sleep(3) 30 interrupt = FalseИспользование языка программирования Python вместе с Arduino
В настоящее время Arduino является одной из самых мощных и простых в использовании платформ с открытым исходным кодом. Однако тенденции современного мира таковы, что часто электронными платформами необходимо управлять с помощью высокоуровневого общецелевого языка программирования чтобы сделать их более эффективными и дружественными. Одним из таких языков является Python, который представляет собой интерпретируемый, объектно-ориентированный, высокоуровневый язык программирования с динамической семантикой и высокоуровневыми встроенными структурами данных, что делает его весьма привлекательным для быстрой разработки приложений.

Объединение возможностей Arduino и Python открывает двери для множества новых возможностей, поскольку Python имеет повышенную производительность и умеет взаимодействовать с другими платформами, такими как openCV, Matlab и т. д.
В этой статье мы изучим как установить Python на компьютер и как его использовать вместе с Arduino для включения/выключения встроенного в плату Arduino светодиода.

Установка Python на ваш компьютер
В данном разделе статьи будет рассмотрена установка языка программирования на компьютер с 32 или 64-битной windows. Установка Python на компьютеры под управлением MAC и Linux будет отличаться.
Для установки Python выполните следующую последовательность шагов:
1. Установите 32-битную версию Python 2.7.9 IDLE на ваш компьютер. Не скачивайте 64-битную версию Python или его более свежую версию поскольку они могут быть не совместимы с используемыми нами библиотеками Arduino. Даже если ваш компьютер работает на 64-битной операционной системе, то вы все равно можете использовать на нем 32-битную версию Python.
Примечание : оригинал данной статьи был написан в 2017 году, поэтому, возможно, сейчас Arduino IDE уже поддерживает совместимость с более свежими версиями Python (этот вопрос будет уточняться в дальнейшем).
2. Запустите на выполнение скачанный установочный файл и установите эту версию языка Python на ваш компьютер. Не изменяйте каталог для установки Python, оставьте его по умолчанию — C:\Python27.
3. Возможно, во время установки Python на него будет “ругаться” антивирус – не обращайте на это внимание.
После установки Python вы можете проверить действительно ли он установлен на ваш компьютер введя в строке поиска Windows строку “Python IDLE”.

После его запуска вы должны увидеть на экране компьютера “Python shell” (оболочка Python) как показано на следующем рисунке.

Вы можете непосредственно писать программу в этой оболочке или же создать новый файл и писать и проверять программу в нем. Теперь давайте удостоверимся в том, что Python работает. Для этого напечатайте “print (1+1)” и нажмите enter. Вы должны после этого увидеть в оболочке напечатанный результат вычислений – 2.

Установка PySerial в Python
Следующим шагом необходимо установить программу PySerial, которая представляет собой Python API module (модуль прикладного программного интерфейса Python’а), с помощью которого можно считывать и записывать данные в последовательном виде в плату Arduino или любой другой микроконтроллер.
Кликните на Pyserial Windows чтобы скачать PySerial. По приведенной ссылке вы можете скачать установочный файл этого приложения и установить его. Не изменяйте настройки (в том числе и каталог для установки) во время установки приложения – оставьте их по умолчанию.
Теперь давайте убедимся в том, что PySerial корректно установлена и работает. Для этого снова откройте Python Shell и напечатайте в нем “import serial”. Если библиотека успешно установлена, то после этого вы не увидите никаких сообщений об ошибке как показано на следующем рисунке.

Дальнейший материал статьи предполагает что вы хотя бы немного знакомы с платформой Arduino и умеете загружать в нее программы. Если это не так, то советуем ознакомиться с руководством по Arduino для начинающих.
Наша первая совместная программа на Arduino и Python
Как отмечалось ранее, в этой программе мы будем управлять встроенным в плату Arduino светодиодом.
Программа для Arduino
Полный текст программы для платы Arduino приведен в конце статьи, здесь же обсудим наиболее важные его фрагменты.
Внутри функции setup мы инициализируем последовательную связь со скоростью 9600 бод/с и зададим режим работы для контакта, с которого будем управлять светодиодом. Также мы передадим приветственное сообщение в Python при помощи последовательной связи.