- Custom php.ini file with FastCGI
- 8 thoughts on “ Custom php.ini file with FastCGI ”
- Was this article helpful? Let us know!
- How to Change PHP Settings in your Hosting Account
- How to view your current PHP settings
- Server API: Apache
- Server API: CGI
- Increasing PHP memory in the php.ini
- Modifying the PHP.INI file
- Common Problems when Updating your php.ini file
- I don’t have a php.ini file!
- I made changes to the php.ini file, however I do not see the changes!
- Considering a VPS or Dedicated Server?
- Setting Your PHP Settings in Command Line
- Specify the php.ini File in Command Line
- Change PHP settings
Custom php.ini file with FastCGI
In this article we’ll discuss how you can set a custom php.ini file per user when using FastCGI on your server. FastCGI is a PHP handler that is good for reducing CPU usage on a server, you might be interested in choosing the best PHP handler for your specific server needs if FastCGI isn’t working well for you.
These instructions will allow you to have separate PHP configurations per user, so for instance you can set different memory limits or use opcode caching only on certain users. Please note that making these changes yourself would require root access to your server.
- Login to your server via SSH.
- Make a backup copy of your cPanel PHP wrapper script with the following command: cp -frp /usr/local/cpanel/cgi-sys/php5 /usr/local/cpanel/cgi-sys/php5-BACKUP
- Now edit the cPanel PHP wrapper script with your favorite text editor: vi /usr/local/cpanel/cgi-sys/php5 By default this script should look like:
#!/bin/sh # If you customize the contents of this wrapper script, place # a copy at /var/cpanel/conf/apache/wrappers/php5 # so that it will be reinstalled when Apache is updated or the # PHP handler configuration is changed exec /usr/bin/php
#!/bin/sh # If you customize the contents of this wrapper script, place # a copy at /var/cpanel/conf/apache/wrappers/php5 # so that it will be reinstalled when Apache is updated or the # PHP handler configuration is changed [[ -f ~/public_html/php.ini ]] && exec /usr/bin/php -c ~/public_html/php.ini exec /usr/bin/php
mkdir -p /var/cpanel/conf/apache/wrappers cp -frp /usr/local/cpanel/cgi-sys/php5 /var/cpanel/conf/apache/wrappers/php5
You should now know how to use custom php.ini files for your individual users when you’re using FastCGI as your PHP handler.
InMotion Hosting contributors are highly knowledgeable individuals who create relevant content on new trends and troubleshooting techniques to help you achieve your online goals!
8 thoughts on “ Custom php.ini file with FastCGI ”
Hello Please create a domain sayitloud.com via backend and create an addondomain iloud.com and subdomain i.sayitloud.com and park weloud.com to i.sayitloud.com. Then change the php handler and create a custom php.ini to sayitloud.com. Kinldy attach the steps to dao that.
Hello Nithin, If you have a hosting plan then you should already have your primary domain which I am assuming is sayitloud.com. You would follow this guide on how to add addon domains in cPanel. Here is how you add subdomains to your account, and here is how you add parked domains. If you are on anything above a shared server you can modify your PHP handler via root access. And this guide goes over creating a custom php.ini file. Best Regards,
TJ Edens
HI I am new to cpanel and trying to store one library. My program need one library. So I am trying to give include path for jpgraph in php.ini file, but my system is not recognizing my php.ini file. I tried to put the line you mentioned in .htaccess fie. still it is not changing. Any help is appreciated. Thanks Rashmi
Hello Rashmi, Thank you for contacting us. Were you able to complete Step 7above, in order to verify your settings have been applied? Thank you,
John-Paul
Was this article helpful? Let us know!
- Website Tutorials
- Domain Names
- DNS and Nameserver Changes
- Zend Framework
- Search Engine Optimization
- Secure Socket Layer (SSL)
- Security
- Server Usage
- Software
- SSH and Root Access
- Troubleshooting Hacked Websites
- Web Analytics
- Website Error Numbers
- Backups and Restorations
- cPanel
- Databases
- DNS and Nameserver Changes
- eCommerce
- Email Basics
- Git
- Google Tools
- Hosting Product Guides
- NGINX
- Secure Socket Layer (SSL)
- Security
- Softaculous
- SSH and Root Access
- WebHost Manager (WHM)
- WordPress
- WooCommerce
How to Change PHP Settings in your Hosting Account
PHP is a scripting language used primarily on the web and is available on our shared, VPS, and Dedicated servers. PHP Hosting is highly customizable and has many settings that our users can modify themselves. This article will advise you how to change PHP settings in your php.ini file.
How to view your current PHP settings
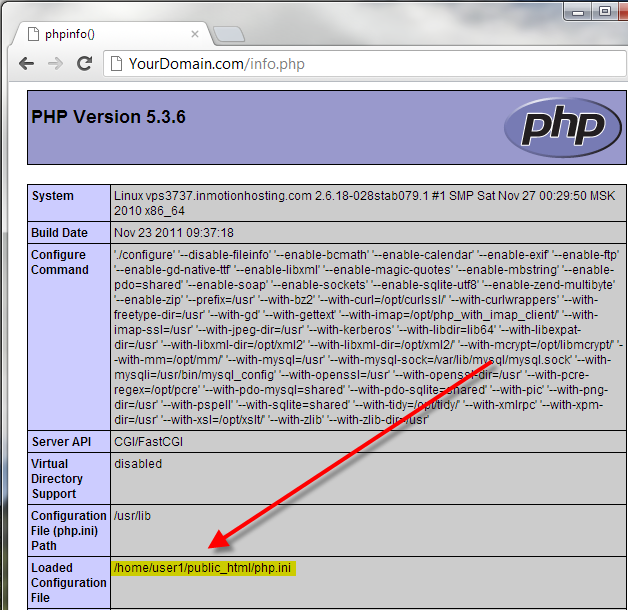
To view your current PHP settings, create a PHPinfo page. If you’re not sure how to do this, please see How can I view my PHP settings using a PHPinfo page ?
The steps in updating the values listed in your PHP info page depend on how PHP is setup on your particular server. In general, PHP runs on our servers as either:
To find out how PHP is configured on your server, create a PHP info page (via the above instructions) and look at the “Server API” value. If the “Server API” is “CGI“, then PHP is running as “CGI module”. If “Apache” is listed, then your server is running PHP as an “Apache module”.
Server API: Apache
If your server runs PHP as an “Apache module“, you can change your PHP settings via a .htaccess file. A .htaccess file is a configuration file you can create and use to change many server settings, including PHP settings. The basic syntax to use in your .htaccess file for updating PHP settings is:
php_value Directive value
For example, if you wanted to change the max_input_time from 60 seconds to 120 seconds, add the following to your .htaccess file:
php_value max_input_time 120
After making this change, refresh your PHP info page, and you should see the changes. If you receive a 500 error, please double check the syntax you used as you may have made a misspelling.
If you don’t have a .htaccess file, you can simply create a new file named .htaccess. As the .htaccess file begins with a dot (.), it is considered a hidden file. If you are using the cPanel’s File Manager, please be sure to select the option to Show Hidden Files (dotfiles), otherwise you will not be able to see your .htaccess file. If you do not see this prompt when opening your File Manager, click the, “reset all interface settings” link at the bottom of your cPanel to reset your File Manager settings.
Server API: CGI
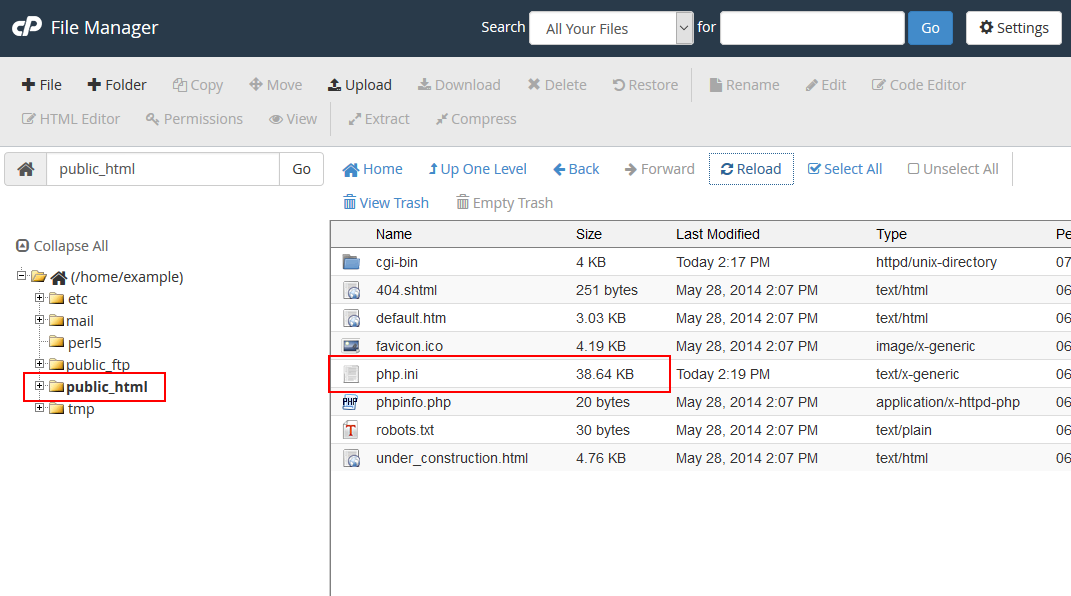
View of the php.ini in the File Manager
If your server runs PHP as a CGI module, you can change your local php.ini file in order to make modifications to your PHP setup. php.ini is a PHP configuration file with a list of PHP directives and their values. In the above example, we modified the max_input_time value. If you open your php.ini file and search for max_input_time, you should see something similar to:
;;;;;;;;;;;;;;;;;;; ; Resource Limits ; ;;;;;;;;;;;;;;;;;;; max_execution_time = 30 max_input_time = 60 memory_limit = 256M upload_max_filesize = 10M
To change the max_input_time from 30 seconds to 120, for example, simply change 30 to 120 and save the file. Refresh your PHP info page, and you should see the changes.
Increasing PHP memory in the php.ini
A common issue when using free open source software or other PHP intensive programs is the “exhausted memory” error. If you have a PHP memory error on your site, you can increase the memory limit PHP uses for the scripts. To learn how to change the memory limit in your php.ini, please see the following link.
Modifying the PHP.INI file
Here is a quick step-by-step tutorial on editing the PHP.INI file.
Find the File Manager in File section of the cPanel. Review our tutorial on using the Code Editor within the File manager if you’re looking on information how to use it.
Navigate to the directory where you will either save or edit the PHP.INI file and then select the file and use the Code Editor. To open the file, you can click on it to select the file and then click on the Code Editor icon in the menu bar of the File Manager. You can also right-click with your mouse and select Code Editor from the menu that appears.
Common Problems when Updating your php.ini file
I don’t have a php.ini file!
Only users running on a server with PHP loaded as a “CGI module” will have a php.ini file. The php.ini file by default will be located at public_html/php.ini. If you do not see a file named php.ini in your public_html, please contact our Support Department and request that we create one for you.
I made changes to the php.ini file, however I do not see the changes!
The php.ini file is not recursive. Updating your php.ini values in public_html/php.ini will not affect PHP files in subfolders of your public_html, such as public_html/staff. To correct this problem, you can make your php.ini file recursive so that it affects all sub folders. More help on this can be found in How can I make my php.ini file recursive?
Considering a VPS or Dedicated Server?
With a VPS or dedicated server, a site owner can truly customize the server to their exact specification. If you are on a Shared Hosting account, and are thinking about upgrading from to a VPS or dedicated server, click here to read more about a VPS vs dedicated server.
Setting Your PHP Settings in Command Line
When you are running a PHP file from the command line (on Cloud VPS Hosting or otherwise), there may be times when you need to make changes to the PHP settings. In this guide, we will show you how to specify the php.ini file, and change a PHP setting in the command line. If you are not working in the command line, you can change your PHP settings in cPanel.
Specify the php.ini File in Command Line
- Connect to your server using SSH.
- You can specify the php.ini file in the command line by using the following syntax: php -c [Path to php.ini file] [Path to .php file] For example: php -c /home/userna5/public_html/php.ini /home/userna5/public_html/example.php Now the example.php file will run, with the limitations set in the php.ini file located here: /home/userna5/public_html
Change PHP settings
- Connect to your server using SSH.
- You can specify php.ini settings in the command line with this syntax: php -c [Path to php.ini file] [Path to .php file] -d [PHP setting] For example: php -c /home/userna5/public_html/php.ini /home/userna5/public_html/example.php -d memory_limit=256M In this example, you can see I am setting the memory limit to 256 Megabytes. Here are some other PHP settings that are often modified:
max_execution_time max_input_time upload_max_filesize
Congratulations, now you know how to set the php.ini file, and change your PHP settings from the command line!
John-Paul is an Electronics Engineer that spent most of his career in IT. He has been a Technical Writer for InMotion since 2013.