- CSS Gradients
- CSS Linear Gradients
- Syntax
- Example
- Example
- Example
- Using Angles
- Syntax
- Example
- Using Multiple Color Stops
- Example
- Example
- Using Transparency
- Example
- Repeating a linear-gradient
- Example
- linear — gradient ( )
- Кратко
- Пример
- Как понять
- Как пишется
- Повторяющийся градиент
- Множественные градиенты
- Подсказки
- На практике
- Денис Ежков советует
- Алёна Батицкая советует
- CSS – CSS3 opacity gradient
- What is Opacity Gradient?
- How to Set CSS3 Opacity Gradient?
- Conclusion
- Полупрозрачный градиент над картинкой на чистом CSS
CSS Gradients
CSS gradients let you display smooth transitions between two or more specified colors.
CSS defines three types of gradients:
- Linear Gradients (goes down/up/left/right/diagonally)
- Radial Gradients (defined by their center)
- Conic Gradients (rotated around a center point)
CSS Linear Gradients
To create a linear gradient you must define at least two color stops. Color stops are the colors you want to render smooth transitions among. You can also set a starting point and a direction (or an angle) along with the gradient effect.
Syntax
Direction — Top to Bottom (this is default)
The following example shows a linear gradient that starts at the top. It starts red, transitioning to yellow:
Example
Direction — Left to Right
The following example shows a linear gradient that starts from the left. It starts red, transitioning to yellow:
Example
Direction — Diagonal
You can make a gradient diagonally by specifying both the horizontal and vertical starting positions.
The following example shows a linear gradient that starts at top left (and goes to bottom right). It starts red, transitioning to yellow:
Example
Using Angles
If you want more control over the direction of the gradient, you can define an angle, instead of the predefined directions (to bottom, to top, to right, to left, to bottom right, etc.). A value of 0deg is equivalent to «to top». A value of 90deg is equivalent to «to right». A value of 180deg is equivalent to «to bottom».
Syntax
The following example shows how to use angles on linear gradients:
Example
Using Multiple Color Stops
The following example shows a linear gradient (from top to bottom) with multiple color stops:
Example
The following example shows how to create a linear gradient (from left to right) with the color of the rainbow and some text:
Example
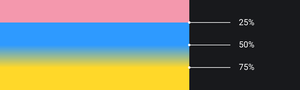
Using Transparency
CSS gradients also support transparency, which can be used to create fading effects.
To add transparency, we use the rgba() function to define the color stops. The last parameter in the rgba() function can be a value from 0 to 1, and it defines the transparency of the color: 0 indicates full transparency, 1 indicates full color (no transparency).
The following example shows a linear gradient that starts from the left. It starts fully transparent, transitioning to full color red:
Example
Repeating a linear-gradient
The repeating-linear-gradient() function is used to repeat linear gradients:
Example
A repeating linear gradient:
linear — gradient ( )
Функция для создания фона в виде градиента или повторяющегося паттерна.
Время чтения: меньше 5 мин
- Кратко
- Пример
- Как понять
- Как пишется
- Количество цветов
- Точки остановки цвета
- Направление градиента
- Повторяющийся градиент
- Множественные градиенты
- Денис Ежков советует
- Алёна Батицкая советует
Обновлено 20 декабря 2021
Кратко
Скопировать ссылку «Кратко» Скопировано
Функция linear — gradient используется для задания фона в виде линейного градиента.
Пример
Скопировать ссылку «Пример» Скопировано
.element background-image: linear-gradient(#6e4aff, #49A16C);>.element background-image: linear-gradient(#6e4aff, #49A16C); >Как понять
Скопировать ссылку «Как понять» Скопировано
Градиент — это плавный переход между цветами. Линейный градиент описывает изменение цвета вдоль прямой линии. В отличие от фоновых изображений градиент не может иметь конкретных размеров и его фактический размер совпадает с размером элемента.
Как пишется
Скопировать ссылку «Как пишется» Скопировано
Самый простой вид градиента — переход между двумя цветами:
.element background-image: linear-gradient(#2E9AFF, #F498AD);>.element background-image: linear-gradient(#2E9AFF, #F498AD); >
Мы можем задавать направление градиента, используя ключевые слова с приставкой to : to left , to top , to right , to bottom (по умолчанию). Значения имеют следующие эквиваленты в углах:
Ключевые слова можно сочетать, чтобы направить градиент в нужный угол элемента: to top left будет рисовать градиент из правого нижнего в левый верхний угол.
Повторяющийся градиент
Скопировать ссылку «Повторяющийся градиент» Скопировано
Если градиент должен многократно повторяться, можно использовать функцию repeating — linear — gradient ( ) .
Множественные градиенты
Скопировать ссылку «Множественные градиенты» Скопировано
Множественный фон элемента может применяться и к градиентам.
Подсказки
Скопировать ссылку «Подсказки» Скопировано
💡 Градиент можно анимировать! 🥳
На практике
Скопировать ссылку «На практике» Скопировано
Денис Ежков советует
Скопировать ссылку «Денис Ежков советует» Скопировано
🛠 Используя возможность резких переходов между цветами, можно генерировать различные паттерны при помощи линейного градиента. Яркий пример — разлинованный под школьную тетрадь фон:
Алёна Батицкая советует
Скопировать ссылку «Алёна Батицкая советует» Скопировано
🛠 Если нужно создать линейный градиент, уходящий в прозрачность, то вы неминуемо столкнётесь с проблемой в Safari и iOS. Во всех браузерах ключевое слово transparent отрабатывает ожидаемо, плавно уводя градиент в прозрачность. А в Safari и iOS из-за особенностей реализации именно этого ключевого слова градиент будет уходить в грязный чёрный.
.element background: linear-gradient(#F498AD 10%, transparent);>.element background: linear-gradient(#F498AD 10%, transparent); >Линейный градиент в Chrome, красиво растворяется
Ровно тот же самый градиент, но в Safari. Это вообще легально? 😐
Решить этот баг можно довольно просто, хоть немного и больно. Нужно вместо ключевого слова transparent указать предыдущий цвет градиента, но с нулевой прозрачностью. Визуально итог будет тот же, и даже в Safari всё заработает.
.element background: linear-gradient(#F498AD 10%, rgb(244 152 173 / 0));>.element background: linear-gradient(#F498AD 10%, rgb(244 152 173 / 0)); >🛠 Статьи и сборники классных паттернов, созданных при помощи градиентов:
CSS – CSS3 opacity gradient

CSS permits its users to apply various effects on the content in HTML. One such gradient is the opacity gradient, which normally consists of one color fading into another. However, with CSS, users have complete control over the transition, from the color to the orientation. The “linear-gradient()” is the most popular and practical gradient type.
This write-up will demonstrate:
What is Opacity Gradient?
Gradients are the CSS element in the form of image data type that depicts a modification in color among two or more shades. These modifications are represented as either radial or linear transitions. Gradients can be utilized everywhere an image could be because these are in the form of image data type. Gradients are most frequently used as backgrounds for elements.
How to Set CSS3 Opacity Gradient?
To set the opacity gradient in CSS, try out the following instructions.
Step 1: Create div Container
First, create a div container with the help of the “ ” element and add an “id” attribute with a particular name.
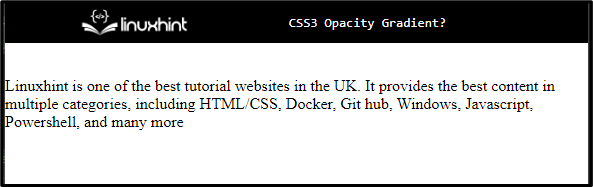
Step 2: Add Data to Paragraph
Next, utilize the “ ” tag and insert a class attribute inside the paragraph opening tag. Then, assign a specific name to the class according to your choice. After that, embed the text in between the paragraph tag:
< div id = "main-content" >
< p class = paragraph- 1 >Linuxhint is one of the best tutorial websites in the UK. It provides the best content in multiple categories, including HTML / CSS, Docker, Github, Windows, Javascript, Powershell, and many more.