- Практическое применение JavaScript на простом примере галереи
- Image gallery
- Starting point
- Project brief
- Steps to complete
- Declare an array of image filenames
- Looping through the images
- Adding a click event listener to each thumbnail image
- Writing a handler that runs the darken/lighten button
- Hints and tips
- Assessment or further help
- Found a content problem with this page?
- How TO — Tab Gallery
- Tab Gallery
- Create a Tab Gallery
- Example
- Example
- Example
Практическое применение JavaScript на простом примере галереи
Настал в моей жизни момент выбора, какое направление в программировании выбрать, пошел в сторону веба. C html и css, какой – никакой, но опыт был, а вот с js знаком не был вообще, начал писать тестовый простой сайт, ограничивающийся статическими страницами, спустя пару дней работы над своим проектом мне понадобилась галерея изображений и как оказалось пагинация. Стал гуглить, искать любую информацию как реализовать новую поставленную задачу, очень много информации, примеров чужого кода, даже удалось кое что слепить из чужих примеров, но понимание не приходило… Приостановил я работу над сайтом и начал читать документацию и примеры кода на js, спустя неделю я вернулся к проекту, и начал писать исходя из полученых знаний, тут то, во время манипуляции элементами страницы на реальном проекте и появилось явное понимание происходящего. Сразу предупрежу это самый обычный велосипед, так как прежде чем браться за тот же jQuery я хотел познакомиться с истоками.
Ниже я покажу код своей галереи и пагинатора соответственно, а под кодом расскажу о (логике реализации) происходящем, в надежде на то, что этот простой на данный момент для меня пример, поможет многим, желающим познакомиться с JS. Но настоятельно рекомендую прежде чем заглядывать в код, прочитать про влияние JS на эелементы страниц и базовые вспомогательные конструкции.
var idx = 0; var count = 0; var pictures = ['001.png', '002.png', '002.png', '001.png', '001.png', '001.png', '002.png', '001.png', '002.png', '001.png', '002.png', '001.png', '001.png', '001.png', '002.png', '001.png', '001.png', '002.png', '002.png', '001.png'] window.onload = function() < var next = document.getElementById('next'); var previous = document.getElementById('back') next.onclick = getNextPage; previous.onclick = getPreviousPage; getNumericButtons(); addImagesToPaginator(); window.addEventListener('keyup', handler, false); >function handler(event) < var KEY_CODE = < LEFT:37, RIGHT:39 >; var numericButtons = document.getElementById('numericButtons'); var quantityPagesInPgn = getQuantityPagesOfPaginator()-1; switch (event.keyCode) < case KEY_CODE.LEFT: if (count == 0) < break; >getPreviousPage(); break; default: if (count == quantityPagesInPgn) < break; >getNextPage(); break; > > function addImagesToPaginator() < var numericButtons = document.getElementById('numericButtons'); var imgPath = 'static/img/'; var next = document.getElementById('next'); var previous = document.getElementById('back') var bodyContainer = document.getElementById('bodyContainer'); var quantityImgsOnPage = 8; var img = document.createElement('IMG'); img.className = 'imgContainer'; for (var i=0; i> //activate and deactivate buttons next and back if (idx else if (idx >= pictures.length) < next.disabled = true; numericButtons.lastChild.disabled = true; >> function removeImagesFromPaginator() < var bodyContainer = document.getElementById('bodyContainer'); while (bodyContainer.hasChildNodes()) < bodyContainer.removeChild(bodyContainer.firstChild); >> function getNextPage() < count += 1; console.log('count_next', count) var numericButtons = document.getElementById('numericButtons'); var previous = document.getElementById('back'); var buttonsArray = numericButtons.getElementsByTagName('INPUT'); previous.disabled = false; removeImagesFromPaginator(); addImagesToPaginator(); buttonsArray[count].disabled = true; if (count >0 ) < buttonsArray[count-1].disabled = false; >> function getPreviousPage() < count -= 1; console.log('count_back', count) var bodyContainer = document.getElementById('bodyContainer'); var numericButtons = document.getElementById('numericButtons'); var next = document.getElementById('next'); var buttonsArray = numericButtons.getElementsByTagName('INPUT'); var imagesOnPage = bodyContainer.getElementsByTagName('IMG').length; next.disabled = false; idx = idx-imagesOnPage-8; removeImagesFromPaginator(); addImagesToPaginator(); buttonsArray[count].disabled = true; if (count >= 0 ) < buttonsArray[count+1].disabled = false; >> function getQuantityPagesOfPaginator() < // function returning quantity pages of pagination var count = 8; var quantity = 1; while (true) < count += 8; quantity += 1; if (count >= pictures.length) < return quantity; >> > function getNumericButtons() < var quantityPagesInPgn = getQuantityPagesOfPaginator(); var numericButtons = document.getElementById('numericButtons'); var numericButton = document.createElement('INPUT'); numericButton.type = 'button'; for (var val = 1; val var allNumericButtons = numericButtons.getElementsByTagName('INPUT'); for (var i = 0; i < allNumericButtons.length; i++) < allNumericButtons[i].onclick = getActionForNumericButtons; >> function getActionForNumericButtons() < var buttonsArray = numericButtons.getElementsByTagName('INPUT'); buttonsArray[count].disabled = false; this.disabled = true; count = parseInt(this.value) -1; idx = (parseInt(this.value)*8)-8; removeImagesFromPaginator(); addImagesToPaginator(); var next = document.getElementById('next'); var previous = document.getElementById('back') if (count >0) < previous.disabled = false; >else < previous.disabled = true; >if (count+1 == buttonsArray.length) < next.disabled = true; >else < next.disabled = false; >> Вот, что у меня получилось:

Теперь как и обещал объясню, что это было:
— Завожу два счетчика, первый-idx следит за изображением в массиве с изображениями, чтобы знать на каком из них мы остановились и с какого изображения начинать генерировать следующую страницу галереии и второй-count для генерации требуемого количества пронумерованных кнопок пагинатора, количеством равным всем страницам галереи, зависящим от общего числа имен файлов изображений в массиве pictures.
— В window.onload добавляю все, что произойдет при полной загрузке html страницы. Вешаю на кнопки переключения сраниц, функции, которые запустятся по событию – нажатия кнопки.
— Инициализирую две функции генерации изображений-addImagesToPaginator() на первой странице галереи и кнопок-getNumericButtons() равным общему количеству страниц галереи.
Теперь пробежимся по сопутствующему функционалу логической цепочки:
—handler() — функция, отвечает за перелистывание страниц стрелками вперед, назад.
—addImagesToPaginator() — добавляет изображения на страницу
—removeImagesFromPaginator() — удаляет все изображения со страницы. Это понадобится когда пользователь обратиться к предыдущей странице, чтобы сгенерировать на текущей странице элементы с предыдущей страницы, контролируются элементы переменной idx, как я уже писал.
—getNextPage() и getPreviousPage() — запускаются по событию обращения к следующей и предыдущей страницам.
—getQuantityPagesOfPaginator() — возвращает общее количество страниц галереи, это необходимо для генерации нумерованных кнопок навигации по страницам.
—getNumericButtons() — генерирует те самые навигационные кнопки пагинатора.
—getActionForNumericButtons() — контролирует действия нумерованных кнопок.
Спасибо за внимание, всем удачного рабочего времени.
Image gallery
Now that we’ve looked at the fundamental building blocks of JavaScript, we’ll test your knowledge of loops, functions, conditionals and events by getting you to build a fairly common item you’ll see on a lot of websites — a JavaScript-powered image gallery.
| Prerequisites: | Before attempting this assessment you should have already worked through all the articles in this module. |
|---|---|
| Objective: | To test comprehension of JavaScript loops, functions, conditionals, and events. |
Starting point
To get this assessment started, you should go and grab the ZIP file for the example, unzip it somewhere on your computer, and do the exercise locally to begin with.
Alternatively, you could use a site like JSBin or Glitch to do your assessment. You could paste the HTML, CSS and JavaScript into one of these online editors. If the online editor you are using doesn’t have separate JavaScript/CSS panels, feel free to put them inline / elements inside the HTML page.
Note: If you get stuck, then ask us for help — see the Assessment or further help section at the bottom of this page.
Project brief
You have been provided with some HTML, CSS and image assets and a few lines of JavaScript code; you need to write the necessary JavaScript to turn this into a working program. The HTML body looks like this:
h1>Image gallery exampleh1> div class="full-img"> img class="displayed-img" src="images/pic1.jpg" alt="Closeup of a blue human eye" /> div class="overlay">div> button class="dark">Darkenbutton> div> div class="thumb-bar">div>
The example looks like this:
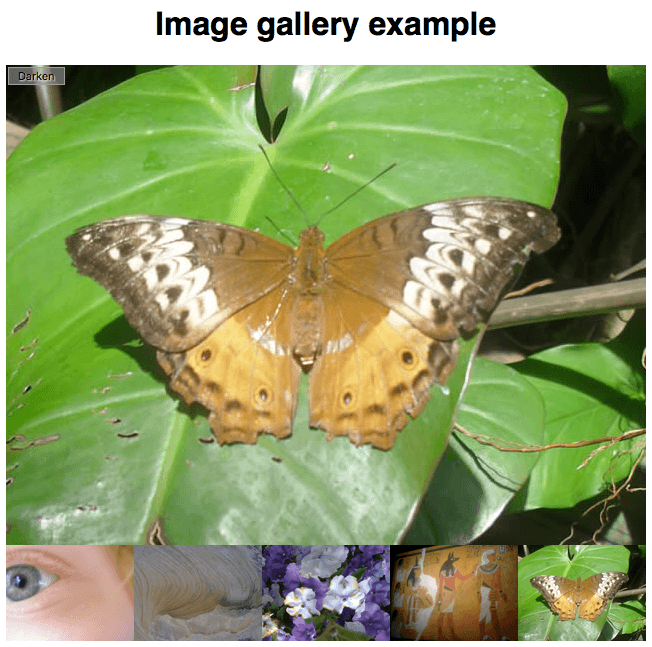
The most interesting parts of the example’s CSS file:
- It absolutely positions the three elements inside the full-img — the
in which the full-sized image is displayed, an empty that is sized to be the same size as the
and put right over the top of it (this is used to apply a darkening effect to the image via a semi-transparent background color), and a that is used to control the darkening effect.
- It sets the width of any images inside the thumb-bar (so-called «thumbnail» images) to 20%, and floats them to the left so they sit next to one another on a line.
- Declare a const array listing the filenames of each image, such as ‘pic1.jpg’ .
- Declare a const object listing the alternative text for each image.
- Loop through the array of filenames, and for each one, insert an
element inside the thumb-bar that embeds that image in the page along with its alternative text.
- Add a click event listener to each
inside the thumb-bar so that, when they are clicked, the corresponding image and alternative text are displayed in the displayed-img
element.
- Add a click event listener to the so that when it is clicked, a darken effect is applied to the full-size image. When it is clicked again, the darken effect is removed again.
To give you more of an idea, have a look at the finished example (no peeking at the source code!)
Steps to complete
The following sections describe what you need to do.
Declare an array of image filenames
You need to create an array listing the filenames of all the images to include in the gallery. The array should be declared as a constant.
Looping through the images
We’ve already provided you with lines that store a reference to the thumb-bar inside a constant called thumbBar , create a new element, set its src and alt attributes to a placeholder value xxx , and append this new
element inside thumbBar .
- Put the section of code below the «Looping through images» comment inside a loop that loops through all the filenames in the array.
- In each loop iteration, replace the xxx placeholder values with a string that will equal the path to the image and alt attributes in each case. Set the value of the src and alt attributes to these values in each case. Remember that the image is inside the images directory, and its name is pic1.jpg , pic2.jpg , etc.
Adding a click event listener to each thumbnail image
In each loop iteration, you need to add a click event listener to the current newImage — this listener should find the value of the src attribute of the current image. Set the src attribute value of the displayed-img to the src value passed in as a parameter. Then do the same for the alt attribute.
Alternatively, you can add one event listener to the thumb bar.
Writing a handler that runs the darken/lighten button
That just leaves our darken/lighten — we’ve already provided a line that stores a reference to the in a constant called btn . You need to add a click event listener that:
- Checks the current class name set on the — you can again achieve this by using getAttribute() .
- If the class name is «dark» , changes the class to «light» (using setAttribute() ), its text content to «Lighten», and the background-color of the overlay to «rgba(0,0,0,0.5)» .
- If the class name is not «dark» , changes the class to «dark» , its text content back to «Darken», and the background-color of the overlay to «rgba(0,0,0,0)» .
The following lines provide a basis for achieving the changes stipulated in points 2 and 3 above.
.setAttribute("class", xxx); btn.textContent = xxx; overlay.style.backgroundColor = xxx;
Hints and tips
Assessment or further help
If you would like your work assessed, or are stuck and want to ask for help:
- Put your work into an online shareable editor such as CodePen, jsFiddle, or Glitch.
- Write a post asking for assessment and/or help at the MDN Discourse forum Learning category. Your post should include:
- A descriptive title such as «Assessment wanted for Image gallery».
- Details of what you have already tried, and what you would like us to do, e.g. if you are stuck and need help, or want an assessment.
- A link to the example you want assessed or need help with, in an online shareable editor (as mentioned in step 1 above). This is a good practice to get into — it’s very hard to help someone with a coding problem if you can’t see their code.
- A link to the actual task or assessment page, so we can find the question you want help with.
- Previous
- Overview: Building blocks
Found a content problem with this page?
This page was last modified on Jul 3, 2023 by MDN contributors.
Your blueprint for a better internet.
How TO — Tab Gallery
Learn how to create a tabbed image gallery with CSS and JavaScript.
Tab Gallery
Click on an image to expand it:


×
×
×
×
Create a Tab Gallery
Step 1) Add HTML:
Example
Use images to expand the specific image. The image that is clicked on inside the column, is shown in a container below the columns.
Step 2) Add CSS:
Create four columns and style the images:
Example
/* The grid: Four equal columns that floats next to each other */
.column float: left;
width: 25%;
padding: 10px;
>
/* Style the images inside the grid */
.column img opacity: 0.8;
cursor: pointer;
>
.column img:hover opacity: 1;
>
/* Clear floats after the columns */
.row:after content: «»;
display: table;
clear: both;
>
/* The expanding image container (positioning is needed to position the close button and the text) */
.container position: relative;
display: none;
>
/* Expanding image text */
#imgtext position: absolute;
bottom: 15px;
left: 15px;
color: white;
font-size: 20px;
>
/* Closable button inside the image */
.closebtn position: absolute;
top: 10px;
right: 15px;
color: white;
font-size: 35px;
cursor: pointer;
>
Step 3) Add JavaScript:
Example
function myFunction(imgs) <
// Get the expanded image
var expandImg = document.getElementById(«expandedImg»);
// Get the image text
var imgText = document.getElementById(«imgtext»);
// Use the same src in the expanded image as the image being clicked on from the grid
expandImg.src = imgs.src;
// Use the value of the alt attribute of the clickable image as text inside the expanded image
imgText.innerHTML = imgs.alt;
// Show the container element (hidden with CSS)
expandImg.parentElement.style.display = «block»;
>