- Using the Arduino Software (IDE)
- Using the offline IDE 1.x.x
- Using the offline IDE 2.x
- Среда разработки Arduino IDE
- Скачать для Windows
- Скачать для macOS
- Скачать для Linux
- Как переключить язык
- Прошлая версия 1.8.19
- Поддерживаемые платы
- Полезные ссылки
- Downloads
- SOURCE CODE
- DOWNLOAD OPTIONS
- Nightly Builds
- Arduino with Chromebook
- MicroPython With Arduino Boards
- DOWNLOAD OPTIONS
- Legacy IDE (1.8.X)
- SOURCE CODE
- DOWNLOAD OPTIONS
- Previous Releases
- DOWNLOAD OPTIONS
- Terms of Service
Using the Arduino Software (IDE)
The offline IDE makes it easy to write code and upload it to the board without an Internet connection.
LAST REVISION: 07/20/2023, 04:24 PM
The Arduino Software (IDE) makes it easy to write code and upload it to the board offline. We recommend it for users with poor or no internet connection. This software can be used with any Arduino board.
There are currently two versions of the Arduino IDE, one is the IDE 1.x.x and the other is IDE 2.x. The IDE 2.x is new major release that is faster and even more powerful to the IDE 1.x.x. In addition to a more modern editor and a more responsive interface it includes advanced features to help users with their coding and debugging.
The following steps can guide you with using the offline IDE (you can choose either IDE 1.x.x or IDE 2.x):
1. Download and install the Arduino Software IDE:
2. Connect your Arduino board to your device.
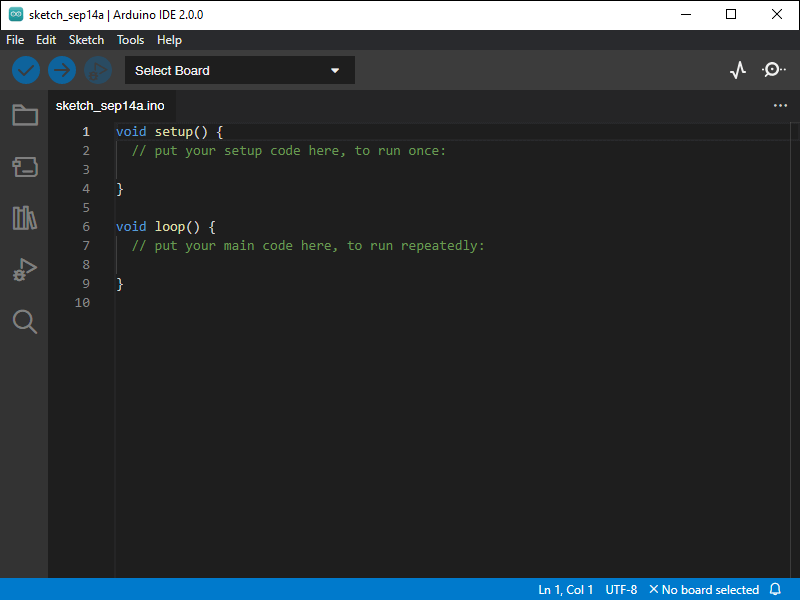
3. Open the Arduino Software (IDE).
The Arduino Integrated Development Environment — or Arduino Software (IDE) — connects to the Arduino boards to upload programs and communicate with them. Programs written using Arduino Software (IDE) are called sketches. These sketches are written in the text editor and are saved with the file extension .ino.
Using the offline IDE 1.x.x
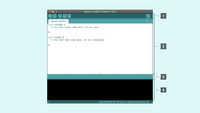
The editor contains the four main areas:
1. A Toolbar with buttons for common functions and a series of menus. The toolbar buttons allow you to verify and upload programs, create, open, and save sketches, and open the serial monitor.
2. The message area, gives feedback while saving and exporting and also displays errors.
3. The text editor for writing your code.
4. The text console displays text output by the Arduino Software (IDE), including complete error messages and other information.
The bottom right-hand corner of the window displays the configured board and serial port.
Now that you are all set up, let’s try to make your board blink!
5. Connect your Arduino or Genuino board to your computer.
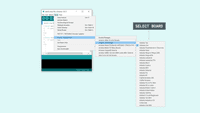
6. Now, you need to select the right core & board. This is done by navigating to Tools > Board > Arduino AVR Boards > Board. Make sure you select the board that you are using. If you cannot find your board, you can add it from Tools > Board > Boards Manager.
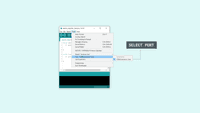
7. Now, let’s make sure that your board is found by the computer, by selecting the port. This is simply done by navigating to Tools > Port, where you select your board from the list.
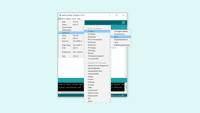
8. Let’s try an example: navigate to File > Examples > 01.Basics > Blink.
9. To upload it to your board, simply click on the arrow in the top left corner. This process takes a few seconds, and it is important to not disconnect the board during this process. If the upload is successful, the message «Done uploading» will appear in the bottom output area.
10. Once the upload is complete, you should then see on your board the yellow LED with an L next to it start blinking. You can adjust the speed of blinking by changing the delay number in the parenthesis to 100, and upload the Blink sketch again. Now the LED should blink much faster.
Congratulations! You have successfully programmed your board to blink its on-board LED! You can find more information about the Arduino Software (IDE) 2.x here.
Using the offline IDE 2.x
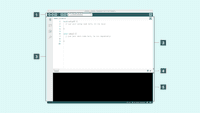
The editor contains the four main areas:
1. A toolbar with buttons for common functions and a series of menus. The toolbar buttons allow you to verify and upload programs, create, open, and save sketches, choose your board and port and open the serial monitor.
2. The Sidebar for regularly used tools. It gives you quick access to board managers, libraries, debugging your board as well as a search and replacement tool.
3. The text editor for writing your code.
4. Console controls gives control over the output on the console.
5. The text console displays text output by the Arduino Software (IDE), including complete error messages and other information.
The bottom right-hand corner of the window displays the configured board and serial port.
Now that you are all set up, let’s try to make your board blink!
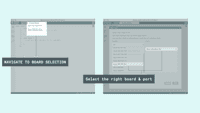
1. Connect your Arduino or Genuino board to your computer.
2. Now, you need to select the right board & port. This is done from the toolbar. Make sure you select the board that you are using. If you cannot find your board, you can add it from the board manager in the sidebar.
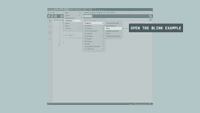
3. Let’s try an example: navigate to File > Examples > 01.Basics > Blink.
4. To upload it to your board, simply click on the arrow in the top left corner. This process takes a few seconds, and it is important to not disconnect the board during this process. If the upload is successful, the message «Done uploading» will appear in the bottom output area.
5. Once the upload is complete, you should see on your board the yellow LED with the letter L next to it, start blinking. You can adjust the speed of blinking by changing the delay number in the parenthesis to 100, and upload the Blink sketch again. Now the LED should blink much faster.
Congratulations! You have successfully programmed your board to blink its on-board LED! You can find more information about the Arduino Software (IDE) here.
Среда разработки Arduino IDE
Мы решили сэкономить вам пару кликов и разместить у себя свежие версии среды разработки Arduino IDE, потому что на официальном сайте порой чёрт ногу сломит, пока найдёт нужную ссылку. Где скачать Arduino IDE — ваш выбор: файлы дистрибутивов абсолютно идентичны. Сейчас представлена актуальная версия среды программирования Arduino IDE 2.1.1 (релиз от 30.06.2023) и legacy-версия 1.8.19 (релиз от 20.12.2021).
Скачать для Windows
- Инсталлятор для Windows — Windows 10 (64 бита) и новее.
- Архив ZIP для Windows — установка без прав админа, портативная версия для флешки.
Скачать для macOS
Скачать для Linux
- AppImage для Linux (64 бита) — переносимое приложение для систем Linux x86-64.
- Архив Linux (64 бита) — версия для Linux-систем с архитектурой x86-64.
Для установки из архива в общем случае нужно выполнить следующие команды.
# Распаковываем архив и заходим в каталог $ tar xvf arduino-latest-*.tar.xz $ cd arduino-1.* # Устанавливаем (только для текущего пользователя) $ ./install.sh # Добавляем себе права на пользование USB-портами $ sudo usermod -a -G dialout $USER В отдельных дистрибутивах Linux проще воспользоваться командой установки из пакетов.
# Arch Linux $ sudo pacman -S arduino # Fedora Linux $ sudo dnf install arduino # Debian, Ubuntu, Mint Linux $ sudo apt-get install arduino Как переключить язык
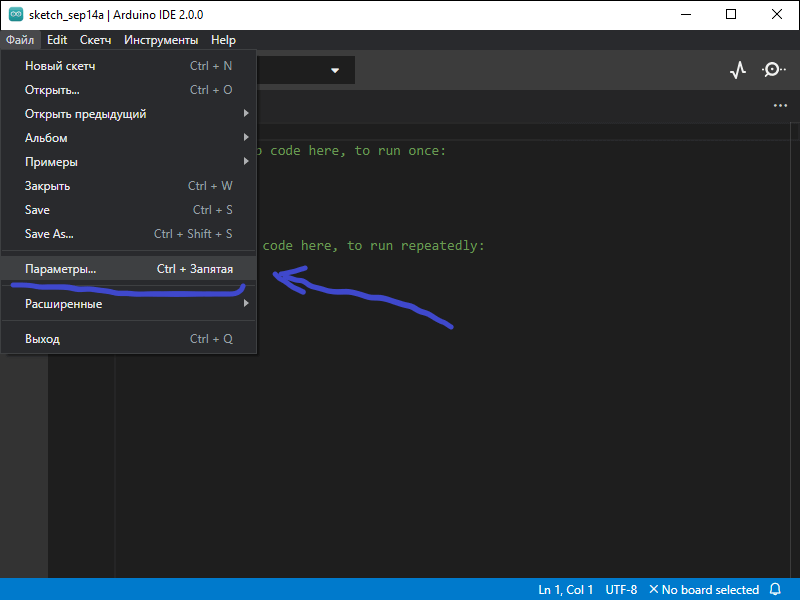
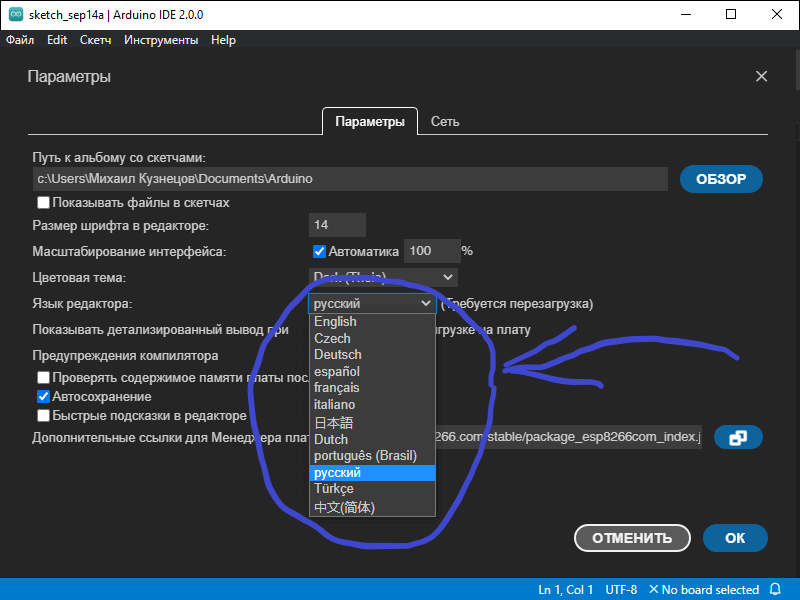
Arduino IDE при установке выбирает язык системы по умолчанию. Если вам понадобится переключить интерфейс на другой язык, это можно сделать в общих настройках программы.
- Заходим в главном меню в пункт «Файл → Параметры».
- Выбираем нужный язык в выпадающем списке «Язык редактора».
- Перезапускаем среду.
Прошлая версия 1.8.19
- Инсталлятор для Windows — Windows 7 и новее.
- Архив ZIP для Windows — установка из архива.
- Приложение для Windows 8.1/10 в Microsoft Store
- App для macOS — macOS X 10.8 Mountain Lion или новее.
- Linux x86 (64 бита)
- Linux x86 (32 бита)
- Linux ARM (64 бита)
- Linux ARM (32 бита)
Поддерживаемые платы
Arduino IDE из коробки работает со всеми оригинальными платами на архитектуре AVR и их прямыми аналогами.
- Оригинальные контроллеры Arduino
- Iskra Uno (аналог Uno)
- Iskra Neo (аналог Leonardo)
- Iskra Mega (аналог Mega 2560)
- Iskra Mini (аналог Mini)
- Uno Slot (гибрид Uno с платформой Troyka Slot)
- Strela (аналог Leonardo с драйверами моторов)
Также поддерживаются сторонние платы и контроллеры на других архитектурах: SAM, SAMD, Cortex-M. Они добавляются в среду отдельными пакетами. Ниже перечислены примеры установки некоторых таких плат.
Полезные ссылки
Downloads

The new major release of the Arduino IDE is faster and even more powerful! In addition to a more modern editor and a more responsive interface it features autocompletion, code navigation, and even a live debugger.
For more details, please refer to the Arduino IDE 2.0 documentation.
Nightly builds with the latest bugfixes are available through the section below.
SOURCE CODE
The Arduino IDE 2.0 is open source and its source code is hosted on GitHub.
DOWNLOAD OPTIONS
Nightly Builds
Download a preview of the incoming release with the most updated features and bugfixes.
Arduino with Chromebook
To program Arduino from a Chromebook, you can use the Arduino Web Editor on Arduino Cloud. The desktop version of the IDE is not available on Chrome OS.
MicroPython With Arduino Boards
To program your boards using MicroPython, visit the MicroPython with Arduino page. There you find download links and additional resources for getting started with MicroPython on your Arduino boards.
Program using IEC 61131-3 languages and mix Arduino sketches through Arduino PLC IDE! Configure easily your pre-mapped resources and get quick no code fieldbus support, dive into your code analysis thanks to the wide set of debugging tools.
For more details, please refer to Arduino PLC IDE documentation.
DOWNLOAD OPTIONS
Legacy IDE (1.8.X)
The open-source Arduino Software (IDE) makes it easy to write code and upload it to the board. This software can be used with any Arduino board.
Refer to the Getting Started page for Installation instructions.
SOURCE CODE
Active development of the Arduino software is hosted by GitHub. See the instructions for building the code. Latest release source code archives are available here. The archives are PGP-signed so they can be verified using this gpg key.
DOWNLOAD OPTIONS
Previous Releases
Download the previous version of the current release, the classic 1.0.x, or old beta releases.
DOWNLOAD OPTIONS
Terms of Service
By downloading the software from this page, you agree to the specified terms.
The Arduino software is provided to you «as is» and we make no express or implied warranties whatsoever with respect to its functionality, operability, or use, including, without limitation, any implied warranties of merchantability, fitness for a particular purpose, or infringement. We expressly disclaim any liability whatsoever for any direct, indirect, consequential, incidental or special damages, including, without limitation, lost revenues, lost profits, losses resulting from business interruption or loss of data, regardless of the form of action or legal theory under which the liability may be asserted, even if advised of the possibility or likelihood of such damages.