HTML | parsing and processing
Before starting with the concept, let’s go through the terminology in detail. The word parsing means to divide something into its components and then describe their syntactic roles. The word processing is a familiar word and stands for dealing with something using a standard procedure. Combined these two explain how HTML parser works in generating DOM trees from text/html resources.
This approach defines the parsing rules for HTML documents for determining whether they are syntactically correct or not. The points where the syntax fails to match, a parse error is initiated. At the end of the procedure if a resource is determined to be in the HTML syntax, then it is an HTML document.

OVERVIEW OF THE PARSING MODEL
The input to the HTML parsing process consists of a stream of code points, which are then passed through a tokenization stage followed by a tree construction stage to produce a Document object as an output. Mostly, the data handled by the tokenization stage comes from the network, but it can also come from a script running in the user agent, e.g. using the document.write() API. The tokenizer and the tree construction stage have only one set of states, but while the tree construction stage is working with one token, the tokenizer can be resumed. Because of this tree construction stage is often considered reentrant. To handle such cases, parsers have a script nesting level, which must initially be set to 0 and a parser pause flag, which must be initialized to false.
PARSE ERRORS: As mentioned earlier, while parsing a resource, it is checked with its syntax and if something doesn’t match the standard protocol it raises a Parse error. If a resource is found to be error-free it becomes a document. Parse errors only deal with errors regarding the syntax of an HTML document. In addition to checking for parse errors conformance checkers also validate documents to match the basic conformance requirements. The error handling for parse errors is well-defined. If one or more parse conditions are found within the document, it is the duty of Conformance checkers to report at least one of them and report none if no error is raised. Conformance checkers may report more than one parse error condition if more than one parse error condition is encountered in the document.
UNDERSTANDING EACH LAYER
- The input byte stream:
The stream of code points that will be the input for the tokenization stage will be initially seen by the user agent as a stream of byte typically coming from a network or a from a local file system. The bytes encode the actual characters as per a particular character encoding, which the user agent uses to decode the bytes into characters. Given a character encoding, the bytes in the input byte stream must be converted to characters for using them with the tokenizer as its input stream, bypassing the input byte stream and character encoding to decode. When the HTML parser is decoding an input byte stream, it uses a character encoding and a confidence that is either tentative, certain, or irrelevant. The encoding used, and the type of confidence in that encoding is employed during the parsing to determine whether to change the encoding. If no encoding is necessary, e.g. because the parser is operating on a Unicode stream and doesn’t have to use a character encoding at all, then the confidence is irrelevant. - Input stream preprocessor: The input stream is made of the characters pushed into it as the input byte stream is decoded or from the various APIs that directly manipulate the input stream. Before the tokenization stage, the newlines are normalized in the input stream. Initially, the next input character is the first character in the input that is yet to be consumed and the current input character is the last character to have been consumed. The insertion point is the position where content inserted using () is actually inserted. The insertion point is not an absolute offset into the input stream rather it is relative to the position of the character immediately after it. Initially, the insertion point is undefined.
- Tokenization: Implementations are expected to act as if they are using the following state machine to tokenize HTML. The state machine is expected to start in a data state. Most states take a single character, which either switches the state machine to a new state to re-consume the current input character or switches it to a new state to consume the next character. Some states have more complicated behavior and can take in several characters before switching to another state. In some cases, the tokenizer state is also affected by the tree construction stage. The output generated in this step is either a series of zero or more of the following tokens: DOCTYPE, start tag, end tag, comment, character, end-of-file. Also creating and emitting tokens are two completely different concepts. When a token is emitted, it must immediately be attended by the tree construction stage. The tree construction stage can affect the state of the tokenization stage and is even allowed to insert additional characters into the stream.
- Tree construction: The sequence of tokens from the tokenization state form the input for the Tree construction stage. Once the parser is created, the tree construction stage is associated with the Document Object Model (DOM). The output of this stage consists of dynamically modifying or extending that document’s DOM tree. As each token is dispatched from the tokenizer the user agent is expected to follow a certain algorithm in order to deal with them.
Работа Processing в браузере и на сайте

Теперь давайте рассмотрим такую интересную тему как работа с Processing в вебе, в браузере и на сайтах. Прелесть этой темы состоит в том, что можно легко использовать потрясающие графические (и не только) возможности Processing для добавления анимации и интерактивной графики на веб-страницы как в локальном варианте, так и на полноценных «больших» сайтах в интернете.
Варианты работы Processing в вебе
Существует несколько вариантов реализации работы Processing-кода на веб-страницах, например:
- использование специально разработанной для этого технологии p5.js
- непосредственное исполнение Processing-скетчей на веб-страницах при помощи специализированной библиотеки
В этой статье мы рассмотрим оба варианта и дадим практические примеры такой интеграции Processing в HTML страницы.
p5.js
p5.js — это специально разработанная технология для интеграции Processing-кода на веб-ресурсы. Эта технология включает специализированный сайт, обширную документацию, онлайн интерактивный редактор кода, специализированную Javascript библиотеку и т. д. Как и в прочих областях разработки на Processing существует большое сообщество энтузиастов и огромное количество бесплатных примеров кода.
Давайте рассмотрим типичный пример работы с этой технологией и снабдим его подробными пояснениями и комментариями.
Сначала мы заходим на основной сайт системы в раздел Examples (Примеры) и не мудрствуя лукаво выбираем пример Geometries из раздела 3D.
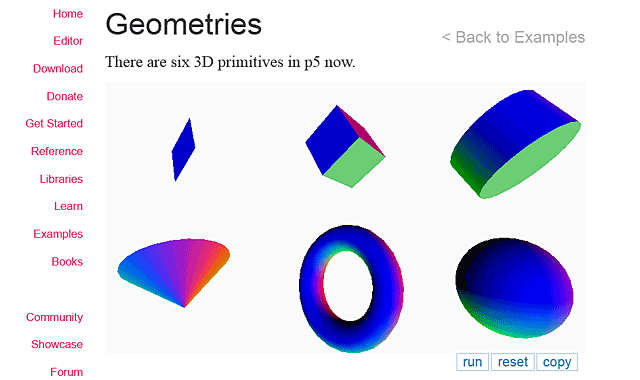
Здесь мы видим 6 3D объектов и код, который их генерирует. Скопируем этот код для дальнейшей работы.
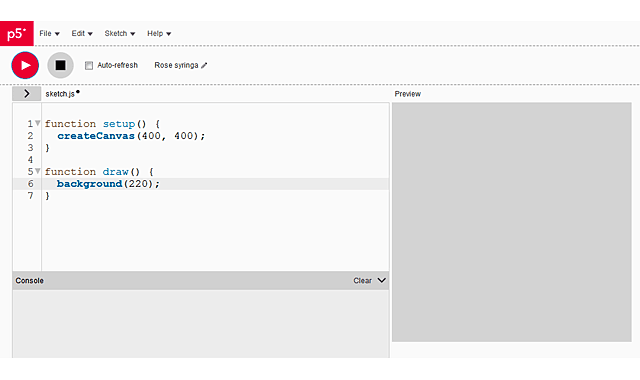
Далее заходим в онлайн редактор системы и видим базовый пример скетча, который можно запустить на выполнение и сразу же увидеть результат.
Поскольку базовый пример нам не нужен, то мы его удаляем и вставляем вместо него ранее скопированный код понравившегося нам примера.
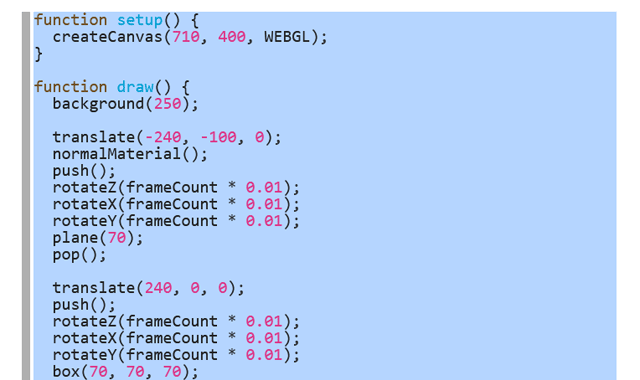
function setup() < createCanvas(710, 400, WEBGL); >function draw()
Тут не происходит ничего сложного, просто задаётся размер холста, цвет фона, и производятся трансформации объектов, которые и порождают 6 различных 3D фигур.
Далее мы редактируем скопированный код так, как нам нравится, в данном случае мы убираем 4 объекта, меняем размер холста и цвет фона.
function setup() < createCanvas(500, 300, WEBGL); >function draw()
И сразу же запускаем скетч на выполнение:
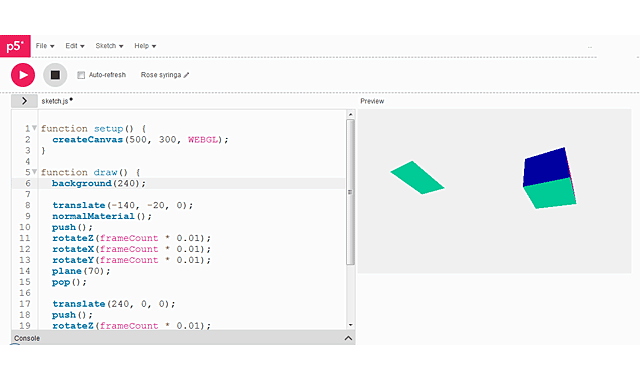
Очень удобно: что-то поменяли в скетче и сразу увиден результат. Таким образом мы можем разработать и отладить нужную нам 3D графику и добавить нужную нам интерактивность.
Ок, мы создали свой цифровой шедевр, а что же делать дальше и как поместить его на веб-страницу? Нет ничего проще и сейчас вы сами в этом убедитесь.
Переходим в раздел Download (Загрузка) и скачиваем complete library со всеми нужными нам файлами.
Далее разархивируем скачанный файл и заходим в папку empty-example и меняем содержимое файла sketch.js на код нашего примера.
Это всё! Далее нажимаем мышкой на файл index.html и видим результат:
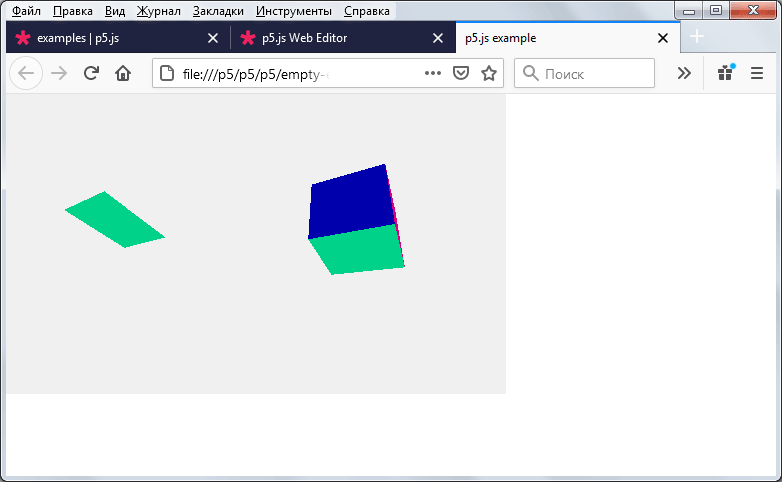
Наш код с 3D объектами работает на веб-страничке. Таким образом можно разрабатывать любую Processing графику и размещать её на HTML страницах.
Интеграция Processing скетчей на веб-страницы
Теперь давайте рассмотрим второй вариант: интеграцию непосредственно самих Processing скетчей на веб-страницы. Здесь речь идёт о тех скетчах которые вы разрабатываете в Processing IDE на своём компьютере.
В качестве примера мы рассмотрим случай, когда код Processing скетча будет интегрирован в веб-сайт и доступ к его странице будет осуществляться по сети по HTTP протоколу.
Начнём с выбора скетча и запуска его в Processing IDE. В данном случае наш выбор пал на «психоделический» скетч Orecuho (Hypnotic animation).
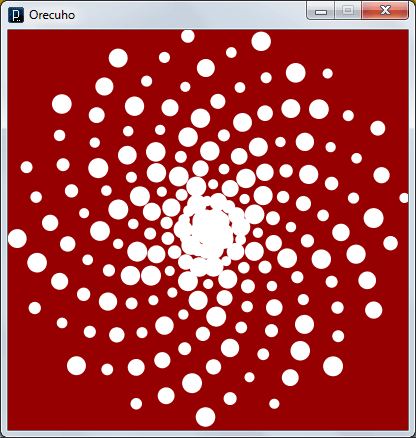
/* Hypnotic animation */ Bug[] orecuho = new Bug[200]; void setup() < size(400, 400); smooth(); noStroke(); fill(255); for (int i = 0; i < orecuho.length; i++) < float x = width/2 + cos(i/10.0) * i; float y = height/2 + sin(i/10.0) * i; orecuho[i] = new Bug(x, y, 0.05 + i/1000.0); >> void mouseMoved() < float k1 = map(mouseX, 0, width, 1, 15); float k2 = map(mouseY, 0, height, 900, 1100); for (int i = 0; i < orecuho.length; i++) < float x = width/2 + cos(i/k1) * i; float y = height/2 + sin(i/k1) * i; orecuho[i].change(x, y, 0.05 + i/k2); >> void draw() < background(150, 0, 0); for (int i = 0; i < orecuho.length; i++) < orecuho[i].live(); >> class Bug < float x; float y; float t; float speed; Bug(float tx, float ty, float tspeed) < x = tx; y = ty; t = 0; speed = tspeed; >void change(float tx, float ty, float tspeed) < x = tx; y = ty; speed = tspeed; >void live() < float sz = map(sin(t), -1, 1, 10, 20); ellipse(x, y, sz, sz); t = t + speed; >>
В данном случае нас интересует только принцип интеграции Processing скетчей на веб-страницы, поэтому мы не будем рассматривать работу самого кода (и оставим это заинтересованному читателю в качестве увлекательного домашнего задания).
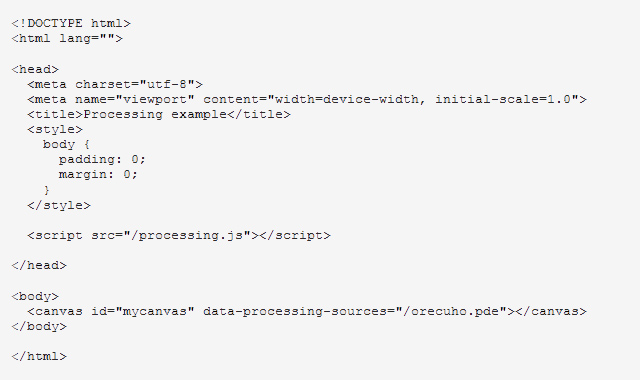
Теперь помещаем фал orecuho.pde (сам скетч в неизменном виде) и специализированную библиотеку processing.js в корневую директорию нашего веб-сайта (в данном случае это сайт test.loc) и добавляем немного HTML магии.
Набираем в адресной строке браузера test.loc и видим результат непосредственной работы Processing скетча на веб-сайте.
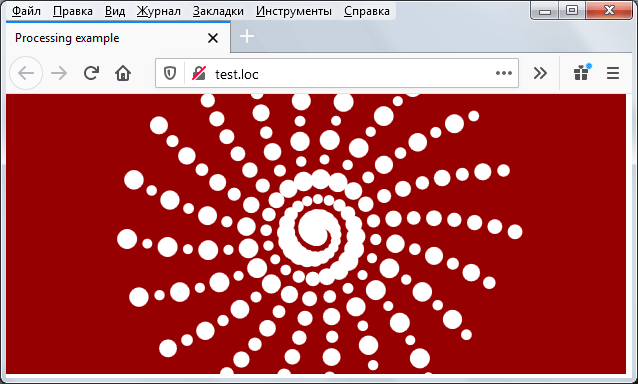
В процессе переноса скетча в нём был только немного изменён размер холста, чтобы лучше соответствовать пропорциям окна браузера.
Это готовая интерактивная графика, которую можно использовать на любом сайте в качестве «живого» фона или декоративного элемента.
Заключение
Мы рассмотрели два способа интеграции Processing-кода на веб-страницы. Учитывая, без преувеличения, фантастические возможности Processing по созданию интерактивных визуализаций и невероятное количество свободного и талантливого кода, вы можете значительно украсить и расширить функционал ваших интернет-сайтов и встроенных IT систем (об интеграции Processing-кода во встроенные системы и микроконтроллеры мы поговорим в наших следующих статьях).
P. S.
Поскольку мы рассказываем об интеграции Processing-кода и интерактивных анимаций на страницы сайтов, то почему бы нам не интегрировать рассматриваемый пример прямо на эту страницу? Нет проблем:
Ссылки по теме
Работа Processing в браузере и на сайте