- Explain nesting and grouping in CSS
- CSS Group
- Example # 1:
- Example # 2:
- Example # 3:
- Example # 4:
- Conclusion
- About the author
- Aqsa Yasin
- How to group multiple HTML elements in CSS
- What is a Grouping Selector in CSS
- Syntax
- How to group multiple HTML elements using a grouping selector
- Conclusion
- About the author
- Anees Asghar
Explain nesting and grouping in CSS
The Nesting & Grouping concept is very important for a web developer to write precise codes. You can group and nest items to reduce the amount of code that you write, which will reduce the length of your code and allow pages to load faster. It is a way to simplify your code. With the help of Nesting and Grouping, we can be more specific in our code. In this article, we will see how nesting & grouping helps to optimize the code & make it efficient & increases readability.
Nesting: The nesting property in CSS facilitates nesting one style rule inside another, with the selector of the child rule that is relative to the selector of the parent rule. It helps to increase the modularity and maintainability of CSS stylesheets & hence increase the overall readability of the code. For instance, if you write a structured CSS module, instead of specifying the separate selectors for every HTML element ie, by using many classes or ID selectors, you can simply specify properties to selectors within other selectors. While nesting the CSS properties, HTML elements form a tree-structured shape. Nesting is a shortcut to create CSS rules for multiple selectors for a specific property. So, instead of rewriting the same set of properties for the different selectors, we can simply nest selectors inside other selectors. For this reason, we are not only reducing the size of the code but also reducing the overall loading time.
class1_selector class2_selector id_selector
- Select the id/class selector & add a space to separate one from the other.
- Add the style properties for the elements.
Note: Be specific with the order of nesting.
CSS Group
![]()
The group selector is used for styling all the elements, which are separated by commas, with the same style properties. Multiple components can be chosen and styled collectively using the CSS grouping selector. Every selector is separated from the others by a space and places a comma between each element or selector. When we want to apply the same style to all elements, we don’t need to put separate properties for all these. Instead we have utilized the grouping selector method and set the properties to all elements at one time. In this tutorial, we will use this grouping selector and will explain to you its usage in detail.
Syntax of Group Selector:
Element1 , element2 , element3 …
Example # 1:
To demonstrate these given examples, Visual Studio Code is being used. We’ll open the new file and choose the “HTML” language, which will create an HTML file. Then, we begin doing it in the freshly created file. When we save the finished code, the “.html” file extension is automatically added to the file name. Once the basic HTML tags have appeared in this newly formed file by adding “!” marks and clicking “Enter,” we are starting by adding the headings “h1” and also “h2”. After these headings, we are putting two different paragraphs in the HTML code. Now, we are producing the CSS file after this and also linking both files for applying the CSS properties to the HTML elements.
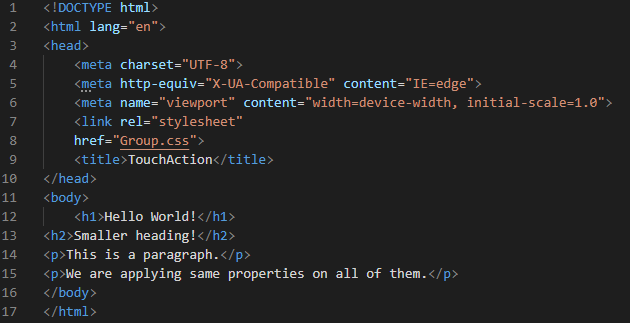
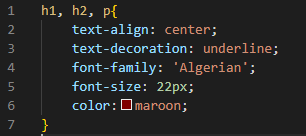
As we want to apply the same style to both the heading and also to the paragraph, we don’t need to put all these elements separately. We just follow the grouping selector and mention all the elements and separate them by putting a comma “,” between them as shown in the screenshot below. We mention all elements as “h1, h2, p”. Now, put curly braces and then utilize properties in these curly braces. When we add properties, then these properties will apply to all elements which we have mentioned. We use the “text-align” property of all of them and set them to “center” by utilizing this one property.
Then, we decorate all these by putting “underline” as the value of the “text-decoration” property. The “font-family” we are utilizing for all these elements is “Algerian”. We adjust the “font-size” to “22px”. Then, we have utilized the “color” property which we set to “maroon” to all headings as well as paragraphs.
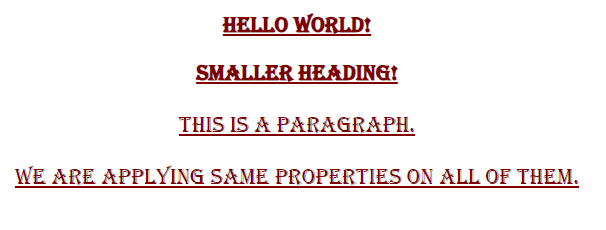
Here is the outcome of the above CSS code. You can see that the color, font-size, font-family, and all other properties which we have utilized above are applied to all headings and paragraphs because we use the grouping selector for all of them. All the styling for these elements is the same here as we have set in the CSS code.
Example # 2:
In this example, we are going to create multiple paragraphs with unique names and also multiple divs with different names. We have a heading here before all these paragraphs and divs. We will apply the grouping selector to all these in CSS code.
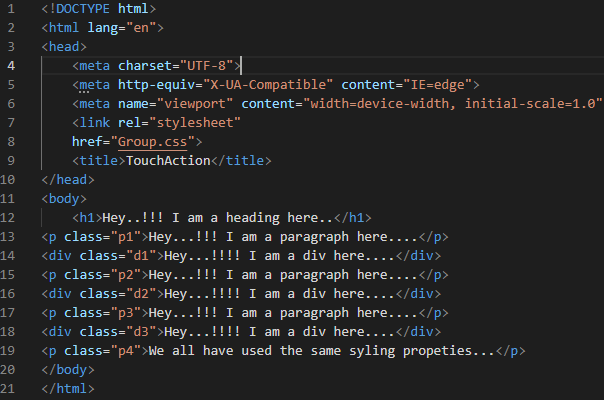
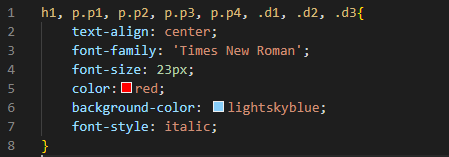
We are putting the names of all paragraph classes and div classes and also the heading. We are going to apply the same properties to all of them. All the properties which we are going to define here in the curly braces will apply to all these elements which we have mentioned. We are aligning all elements in the “center” with the help of the “text-align” property and use the “Times New Roman” as the value of the “font-family” property. Then, set the “font-size” to “23px” and the “color” for all is “red”. Now, we are applying some “background-color” as “light-sky-blue” and the “font-style” to “italic”. All these properties will be applied to all paragraphs, divs, and also to the heading.
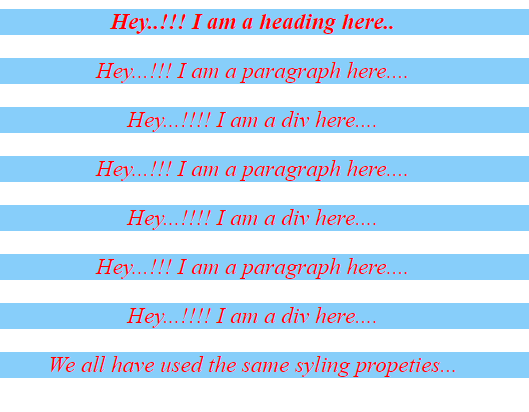
Here, in this result of the above code, all the divs, paragraphs, and also the heading appears in the same style. All the styling properties which are applied on all of them are the same. As we have used the grouping selector for doing this.
Example # 3:
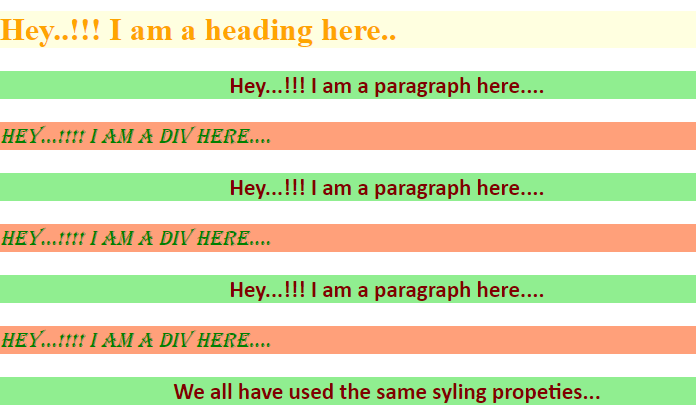
Here, we are going to apply the same properties to paragraphs. All the paragraphs will appear the same. For the divs, we utilize the same properties, so all divs will render in the same style.
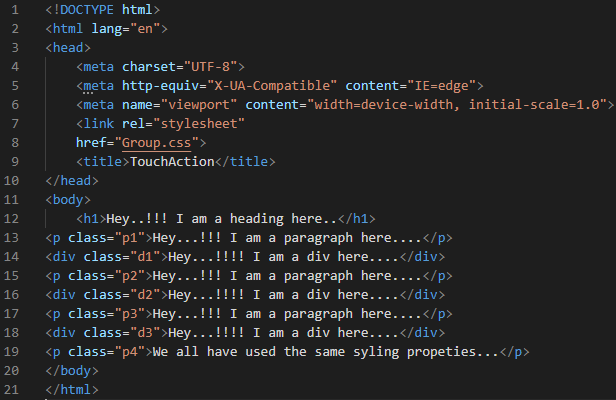
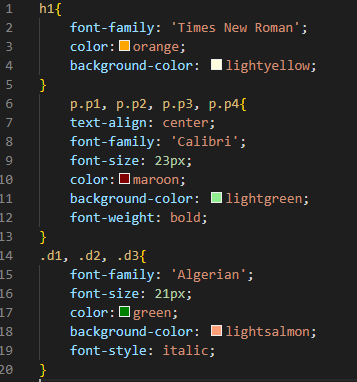
We utilize “Times New Roman” as the “font-family” of the “h1” and “orange” is selected here as its “color”. The “background-color” of this “h1” is set to “light-yellow”. Now, we place all the paragraph names and utilize some properties here. “Calibri” is specified as the value for the “font-family” property and “font-size” will be “23px”. Then, “maroon” for the “color”. Here, we’re putting a “background-color” of “light-green” and the value for the “font-weight” property is set to “bold”. Then, we have the “color” property and we set it to “green” and the “background-color” for all divs is “light-salmon”. We also “italic” them by setting this value in the “text-style” property.
Here, you see that all the paragraphs appear in the same style and all the divs appear in the same style as we have set these values in the CSS code.
Example # 4:
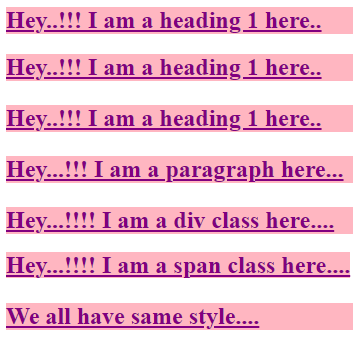
We have three different headings, a paragraph, a div, and also a span class. We will apply the same styling properties to all these in CSS.

We put the names of all elements on which we want to apply the properties. You can see here how to put these names. We must put the comma between all elements’ names and then place the properties inside the curly braces. We utilize the “text-align” property to align “left” all components. The “Times New Roman” font family is set as the value for the “font-family” property. Then, choose “24px” for the “font-size” that will be applied to everyone, and “purple” is selected for the “color”. Here, we’re applying a “background-color” of “light-pink” and the “bold” keyword is selected as the value of the “font-weight” property. Also, we have used “underline” for the “text-decoration” property to make all of them more appealing.

The result of the aforementioned CSS code is shown here. As you can see, all headings and paragraphs and also the span have the same color, font-size, font-family, and all other styles are the same because we used the grouping selector for all of them. The formatting for these items is the same here.
Conclusion
In this tutorial, we have explained that the grouping selector is defined as we can choose multiple components and styles collectively, separating them by a comma. In our codes, we have made use of this concept. In this tutorial, we also discussed how to use this grouping selector and how to set properties inside this. We also gave the results of all these codes. For your advantage, we have developed a full tutorial that includes the code, a thorough explanation, and the results.
About the author
Aqsa Yasin
I am a self-motivated information technology professional with a passion for writing. I am a technical writer and love to write for all Linux flavors and Windows.
How to group multiple HTML elements in CSS
![]()
CSS is all about the styling of web pages, websites, HTML documents, etc. therefore it offers a lot of styling tools like selectors, CSS properties, etc. The selectors are the initial component of CSS rules, the rules that target some HTML element(s) and style it according to some specific CSS properties.
In CSS, selectors are classified into five categories i.e. basic selectors, combinatory selectors, pseudo-class selectors, and attribute selectors. The basic category consists of an element selector, class selector, id selector, universal selector, and grouping selector. You can learn more about the basic selectors in our tutorial CSS selectors.
This write-up will explain the following terminologies:
- What is a grouping selector in CSS?
- Basic Syntax of grouping selector.
- How to group multiple HTML elements using a grouping selector.
Let’s get started with the basic understanding of grouping selector:
What is a Grouping Selector in CSS
The grouping selector targets the multiple HTML elements and styles them simultaneously. It concise the code and reduces the extra bit of effort. While selecting/grouping more than one HTML element, we have to separate each HTML element with a comma.
Syntax
Let’s have a look at the following snippet to understand the syntax of the grouping selector:
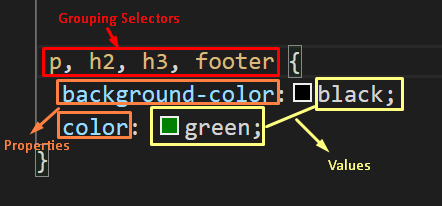
In the above figure, p, h2, h3, and footer are HTML elements grouped together to be styled.
Let’s move one step further to understand the concept of grouping selector with the help of an example:
How to group multiple HTML elements using a grouping selector
Let’s take a look at the below-given example to understand how to implement a unique style on a group of different HTML elements:
Example This example has different HTML elements i.e. , , and
. We have to style all these elements in italic font style, with the royal blue background color.
linuxhint.com < / h1 >
Hi! welcome to linuxhint.com < / p >
Grouping Selector < / h2 >
this is an example of grouping selector < / p >
The above-given code grouped three elements, implement the same style on all the elements, and as a result, we will get the following output:
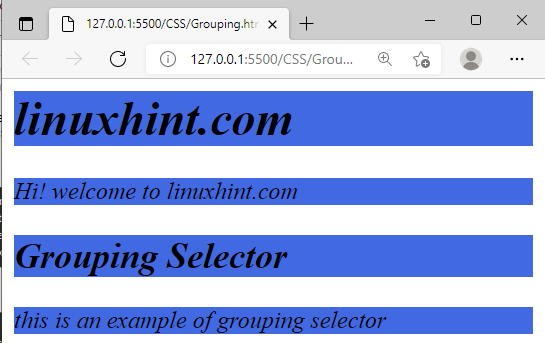
It verifies that all the elements implements the same style and the grouping selector is working properly.
Conclusion
To implement a grouping selector all you have to do is simply write all the element’s names you want to style and add a comma between each element. In this way, the specified style will be implemented to each targeted element simultaneously. This write-up covers every aspect of grouping selectors, starting from what is group selector and how to use it.
About the author
Anees Asghar
I am a self-motivated IT professional having more than one year of industry experience in technical writing. I am passionate about writing on the topics related to web development.