- 10 Essential Sublime Text Plugins for JavaScript Developers
- 1. Babel
- 2. SublimeLinter
- 3. Vue Syntax Highlight
- 4. SideBar Enhancements
- 5. JsPrettier
- 6. TrailingSpaces
- 7. GitGutter
- 8. BracketHighlighter
- 9. Markdown Preview
- 10. Boxy Theme
- Conclusion
- Share This Article
- Настройка проверки синтаксиса «налету» HTML, CSS, JS, PHP в Sublime Text 3 на Windows 7
10 Essential Sublime Text Plugins for JavaScript Developers
Sublime Text is a great application for just about any developer to have in their toolbox. It’s a cross-platform, highly customizable, advanced text editor that sits nicely between full featured IDEs (which are notoriously resource hungry) and command line editors such Vim or Emacs (which have steep learning curves).
In recent years, Sublime has gained welcome competition from both Visual Studio Code and Atom, but Sublime Text still holds its own by being indisputably faster, being able to open larger files faster than the others.
One of the things that makes Sublime so great is its extensible plugin architecture. This makes it easy for developers to extend Sublime’s core functionality with new features like code completion, or the embedding of remote API documentation. Sublime Text doesn’t come with plugins enabled out of the box: they’re typically installed through a 3rd-party package manager simply called Package Control. To install Package Control in Sublime Text, please follow the installation guide on their website.
1. Babel
Of course, the first one on my list is the Babel plugin. This plugin adds proper syntax highlighting to your ES6/2015 and React JSX code. After installing the plugin, the first thing you should do is set it as the default syntax for all of your JavaScript and TypeScript file types.
If you haven’t yet discovered the joy of Babel, I highly suggest it. It allows you to compile ES6/ES7/ESNext, JSX, and TypeScript code down to ES5 for full browser support. It integrates well with all popular build tools and the CLI. Obviously, it doesn’t support legacy browsers, but you can follow the tips on their caveats page if you need to support IE10 and below.

2. SublimeLinter
Next up is SublimeLinter, which provides amazing ESLint and JSHint integration into Sublime. A linter will look over your code and verify it has proper styling and proper syntax based on a configuration file that can be checked in with your source code. No matter if you’re a beginner or have been programming for most of your life: in JavaScript, a linter is a must have. Check out the ESLint or JSHint about pages to see what they can do for you. Depending on which you chose for your project, you’ll also need the supporting packages of SublimeLinter-eslint or SublimeLInter-jshint.
In order for either of these to work, you must include a linter either into your project dependencies or install it globally:
npm install --save-dev eslint If you’re unsure how to use npm, check out our tutorial on getting started with Node Package Manager.
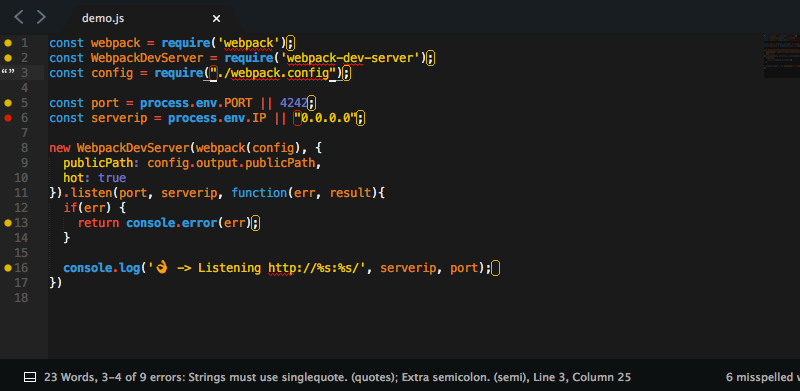
If you’ve installed and configured it correctly, you should see the changes when you open or save a JavaScript file. The plugin is incredibly configurable and can be made to report in a number of ways that might be better for your workflow. By default, the description of the errors will be reported in the status bar at the bottom of the editor.
3. Vue Syntax Highlight
For those out there using the rock-solid framework built by the phenomenal Evan You, when working with *.vue templates you’re going to need a little extra help with making your code readable. Vue Syntax Highlight is there to help.

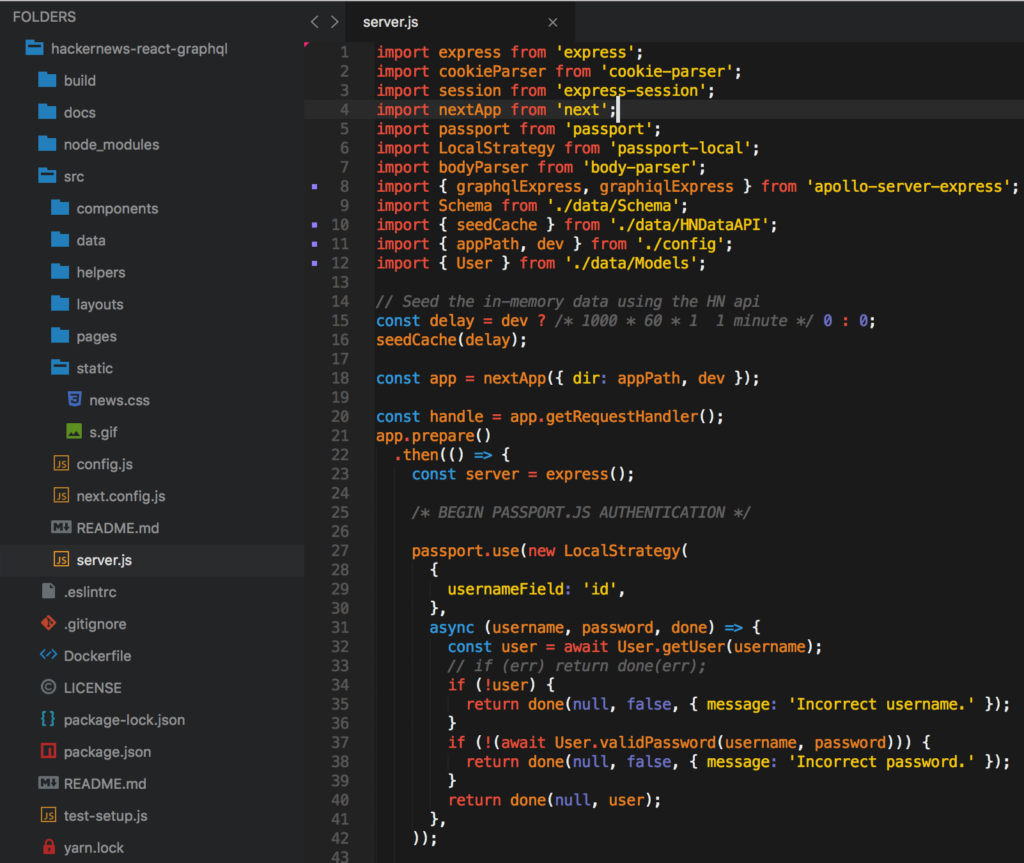
4. SideBar Enhancements
The first plugin to make this list that’s not solely dedicated to JavaScript has to be SideBar Enhancements. Out of the box, Sublime Text has very few options for manipulating files in your sidebar file tree. To put it simply, SideBarEnhancements fixes that. This plugin notably provides a move to trash option for files and folders, an open with.. option, and even a clipboard. It also lets you open files in your web browser, copy the content of a file as data:uri base64 (which is especially handy for embedding images in CSS) and provides a host of search operations. As an added bonus, it integrates nicely with SideBarGit to provide Git commands direct from the sidebar.
With the ever-increasing size of JavaScript code bases, a sensible means of navigating your project and being able to manipulate your project’s files is essential. Therefore, this plugin becomes a must.

5. JsPrettier
Do you or your team prefer taking a fully automated approach to linting to totally ensure it’s perfect? Then you’re probably using Prettier, an opinionated code formatter. And if you are, then wouldn’t it be nice to be able to see the changes on the file you’re currently editing and not have to wait for the build to make the changes for you? That’s where Prettier comes in. This plugin allows developers to run Prettier on the current file they’re editing from within Sublime.
If you’re not using Prettier as an automated tool, this plugin can come in useful as a modern replacement for other Sublime Text plugins such as JsFormat, which can help bring some readability to compacted files or just bad coding standards.
However, if you’re already using ESLint for your project, then ESLint-Formatter would probably be more beneficial, as it will run eslint —fix on the file you’re currently editing.

6. TrailingSpaces
If you’re working in a team environment or in an environment that isn’t obsessively customized, this plugin is going to quickly become a close friend. There’s nothing more annoying than seeing a line change in a commit that does nothing to the actual code, but changes a simple, useless space at the end of a line.
But if you’re the kind of person who tries to keep their Sublime Text plugins on the lighter side, you can just add «trailing_spaces_trim_on_save»: true to your User Preferences to have Sublime Text remove these for you on save. I prefer just to be able to see where they are, to make the changes myself, with the added benefit of being able to catch them in other files I’m not explicitly modifying at the time. Even if you have that option enabled, it doesn’t hurt to have this plugin installed … just in case.

7. GitGutter
If you’re one of the few out there not using Git for your source control, you can probably skip this one. But for those of us who are, GitGutter can be fantastic addition to Sublime Text. The main features it brings are:
- Gutter Icons, indicating inserted, modified or deleted lines
- Diff Popup, with details about modified lines
- Status Bar Text, with information about file and repository
- Goto Change , to easily navigate between modified lines.
It probably won’t make any massive improvements to your workflow, but it’s a very nice addition to have.
8. BracketHighlighter
This plugin comes in late in this list, but it may be one of the most important Sublime Text plugins on this entire list. All BrackHighlighter does is adds in cutter icons and color coding to the matching bracket, brace, parenthesis, or tag. But what it really does, and what makes it so important, is that it allows developers to maintain their sanity.
If you’re a customization nerd, this plugin is highly configurable to look just the way you want. Check out their documentation for more information.
9. Markdown Preview
Hopefully you’re keeping at least some bit of documentation of the things you’re building, even if it’s just a simple README.md file at the root of your project. And if you are, then wouldn’t it be nice to be able to see a preview for that Markdown code before submitting it? Sublime Text includes some pretty good Markdown syntax highlighting by default, but it lacks any sort of way to see how that Markdown is actually rendered … which may not always be what you intended.
10. Boxy Theme
Sublime Text is blazing fast, easy to use, and just downright powerful in a lot of ways. But let’s be honest here: out of the box it doesn’t look that great, especially when you compare it to some of its competition. Normally I wouldn’t think to add a theme to a list like this, but in Sublime Text 3 themes we’re are now allowed to change file icons in the sidebar, and it’s wonderful! Boxy isn’t the only theme that can do this, but Boxy isn’t just a single theme: it’s a group of them, and they’re all very aesthetically pleasing in their own way. If none of these grab your fancy, Seti_UI is also a good choice.
Conclusion
So there we have it — the ten essential Sublime Text plugins for JavaScript development. I urge you to give one or two of them a try and to let me know how you get on in the comments.
If I left your favorite plugin out, please let me know, and I’ll consider adding it to the list.
Before I go, remember that Sublime Text isn’t freeware. It has an unlimited trial version (with a very occasional nag screen), but a license for a single user costs $70. If you spend most of your day working with a text editor, I would say that’s a worthy investment!
Share This Article
Matt is a professional software developer and is passionate about web dev. Find out more about him at mawburn.com.
Настройка проверки синтаксиса «налету» HTML, CSS, JS, PHP в Sublime Text 3 на Windows 7
Всем привет. У Sublime Text 3 есть замечательный плагин Sublime Linter, который позволяет делать проверку кода на наличие синтаксических ошибок. Промучился я как-то с настройкой этого SublimeLinter, аж три дня. Но всё таки мои мучения прошли не зря и теперь Sublime на лету проверяет синтаксис в HTML, CSS, PHP и JS файлах. Вроде бы всё подробно расписано на различных форумах, а он в некоторых случаях не работает — и всё, хоть убей. Поэтому я и пишу эту статью, чтобы охватить всё и сразу.

ВНИМАНИЕ! Статья описывает настройку Sublime Text 3 (далее ST3) на Windows 7 x64 Professional.
1. Представим что вы уже установили ST3 на свой Win 7 и установили Package Control.
2. Теперь необходимо поставить дополнительные пакеты в ST3. Идем в Preferences -> Package Control -> Install Packages
И устанавливаем следующие пакеты:
— SublimeLinter
— SublimeLinter-html-tidy
— SublimeLinter-csslint
— SublimeLinter-jsl
— SublimeLinter-jshint
— SublimeLinter-php
— SublimeLinter-phplint
— LESS
— JSHint
3. Настройка проверки ошибок синтаксиса HTML
3.1. Скачиваем tidy.exe и кладем его в любую понравившуюся вам папку.
3.2. Добавляем путь до этой папки! с tidy.exe в переменную серды пользователя windows (PATH), настройки которой, находятся в Мой компьютер -> Свойства -> Дополнительные параметры системы -> Переменные среды… -> Выбираем переменную «PATH» -> Жмем «Изменить» добавляем путь.
ВНИМАНИЕ! Обратите внимание на точку с запятой «;» после каждого пути и не забудьте её прописать, а так же обратите внимание на обратный \ слеш.
4. Настройка проверки ошибок синтаксиса CSS
4.1. Скачиваем и устанавливаем node.js
4.2. Добавляем путь до папки (до папки!) с node.js в PATH (путь примерно следующий: C:\Users\User_name\AppData\Roaming\npm )! Незабываем про точку с запятой.
4.3. Устанавливаем csslint. Для этого — запускаем командую строку Windows от имени админа и пишем: npm install -g csslint
5. Настройка проверки ошибок синтаксиса JavaScript
5.1. Если не делали пункты 4.1. и 4.2. — то делаем.
5.2. Устанавливаем jslint и jshint, для этого выполняем ту же самую операцию что и в пункте 4.3. только пишем вместо csslint — jslint и jshint соответственно.
6. Настройка проверки ошибок синтаксиса PHP
6.1. Вот с этиим вобще гемор. Лично я долго искал проблему, почему же не работает подсветка.
6.2. (UPDATE) Дело в том, что многие (в том числе и я) в качестве локального сервера ставят себе Denwer. И черт его знает почему (не вдавался в подробности), но PHP денвера не воспринимается ST3, хоть убей. Он может выводить ошибки PHP в консоль ST3, но подсветки синтаксиса так и не будет.
P.S. Я специально добавил этот пункт, т.к. на многих форумах пишут, что ставим PHP, настраиваем пакеты ST3 и будет вам счастье. Но счастья не происходит, т.к. пункт с установкой PHP обычно сразу опускается из-за надежды на работоспособность(пригодность) denwer-a.
6.3. Поэтому, сразу идем сюды и скачиваем PHP. Установка PHP — просто разархивируйте архив в любую папку и пропишите путь до этой папки в PATH (пункт 3.2.)
6.4. Если у вас был прописан в PATH путь до папки с PHP денвера, то обязательно удалите его.
7. Файл конфигурации SublimeLinter.sublime.settings
НЕОБХОДИМО ПОПРАВИТЬ ПУТИ К tidy.exe и php.exe
< "user": < "debug": true, "delay": 0.25, "error_color": "D02000", "gutter_theme": "Packages/SublimeLinter/gutter-themes/Circle/Circle.gutter-theme", "gutter_theme_excludes": [], "lint_mode": "background", "linters": < "csslint": < "@disable": false, "args": [], "errors": "", "excludes": [], "ignore": "", "warnings": "" >, "hlint": < "@disable": false, "args": [], "excludes": [] >, "htmltidy": < "@disable": false, "args": [], "excludes": [] >, "jscs": < "@disable": false, "args": [], "excludes": [] >, "jshint": < "@disable": false, "args": [], "excludes": [] >, "jsl": < "@disable": false, "args": [], "excludes": [] >, "php": < "@disable": false, "args": [], "excludes": [] >, "phplint": < "@disable": false, "args": [], "excludes": [] >>, "mark_style": "outline", "no_column_highlights_line": false, "passive_warnings": false, "paths": < "linux": [], "osx": [], "windows": [] >, "python_paths": < "linux": [], "osx": [], "windows": [] >, "rc_search_limit": 3, "shell_timeout": 10, "show_errors_on_save": false, "show_marks_in_minimap": true, "sublimelinter": true, "sublimelinter_executable_map": < "css": "node", "html": "Z:\\usr\\bin\\tidy.exe", //путь до вашей папки с tidy.exe, обратите внимание на двойные обратные слеши, они обязательны "php": "C:\\Program Files\\PHP_5.6\\php.exe" //путь до вашей папки с php.exe >, "syntax_map": < "css": "css", "html (django)": "html", "html (rails)": "html", "html 5": "html", "js": "js", "php": "php", "python django": "python" >, "warning_color": "DDB700", "wrap_find": true > > 8. Перезапускаем Sublime. Profit.
Еще! Бывает что некоторые забывают про режим debug mode у Sublimelinter. Чтобы его включить, жмем правой кнопкой мыши в любое место области редактирования ST3 -> SublimeLinter -> Debug Mode