- Plotting live data with Matplotlib
- How to visualize real-time data with Python’s Matplotlib
- Real time plotting with Matplotlib in Python
- Plotting Data in Real Time
- Code
- Auto-scaling and Resizing your Matplotlib Graph
- Real-Time Graphing in Python
- Python Real-Time Plotting Function
- https://github.com/engineersportal/pylive
- Plot Data in Real Time Using Matplotlib
- FuncAnimation() Function
- canvas.draw() Along With canvas_flush_events()
- Real Time Scatter Plot
Plotting live data with Matplotlib
How to visualize real-time data with Python’s Matplotlib
Whether you’re working with a sensor, continually pulling data from an API, or have a file that’s often updated, you may want to analyze your data in real-time.
This article will explore a simple way to use functions to animate our plots with Matplotlib’s FuncAnimation.
The data for this first example is from the OS, and to retrieve this information, we’ll use psutil.
We’ll handle the data with deques, but you can adapt the example to work with most collections, like dictionaries, data frames, lists, or others.
By the end of the article, I’ll quickly show another example with Pandas and Geopandas.
import matplotlib.pyplot as plt
import numpy as np
from matplotlib.animation import FuncAnimation
import psutil
import collections
Let’s start with collecting and storing the data. We’ll define two deques filled with zeros.
cpu = collections.deque(np.zeros(10))
ram = collections.deque(np.zeros(10))print("CPU: <>".format(cpu))
print("Memory: <>".format(ram))
Then we’ll create a function to update the deques with new data. It’ll remove the last value of each deque and append a new one.
def my_function():
cpu.popleft()
cpu.append(psutil.cpu_percent(interval=1)) ram.popleft()
ram.append(psutil.virtual_memory().percent)cpu = collections.deque(np.zeros(10))
ram = collections.deque(np.zeros(10))# test
my_function()
my_function()
my_function()print("CPU: <>".format(cpu))
print("Memory: <>".format(ram))
Now we can define the figure and subplots. Besides updating the deques, our function will also need to add this data to our chart.
# function to update the data
def my_function():
cpu.popleft()
cpu.append(psutil.cpu_percent(interval=1))… Real time plotting with Matplotlib in Python
Plotting static graphs in Matplotlib is what we normally do. We have a fixed amount of data, which we then plot using one of the various plotting mechanics in Matplotlib. But what if our data is dynamic, and constantly changing? What if we need to be plotting data in Real time in Matplotlib?
Plotting Data in Real Time
We will be using the matplotlib animation module in order to achieve our goal.
The animation module has a special function called FuncAnimation , which periodically executes a given function at given intervals. Inside this function, we will updating the graph by adding a new value to it.
import matplotlib.pyplot as plt from matplotlib.animation import FuncAnimation from random import randrange
Here are a few important imports that we have to make. We are also importing the random module because we will use it later for adding random values to the graph.
fig = plt.figure(figsize=(6, 3)) x = [0] y = [0]
Here we create a basic matplotlib figure, using the dimensions (6, 3) . I’m basically doing this to make the resulting graph twice as wide as the height (2:1 ratio).
We also initialize the x and y lists to 0 as an initial point. These two lists will be used as the dataset for our matplotlib graph.
ln, = plt.plot(x, y, '-') plt.axis([0, 100, 0, 10])
The plt.plot() returns a special Line object, used for drawing line graphs. The first two parameters are the lists for the x and y axis of the graph.
We can modify the third parameter to alter the appearance of the graph. ‘-‘ produces a regular blue graph. Changing it to ‘*’ will make it more like a scatter plot, with asterisk as points instead of circles. There are also color codes, such as ‘g’ for green, which produces a green line graph.
def update(frame): x.append(x[-1] + 1) y.append(randrange(0, 10)) ln.set_data(x, y) return ln,
This is a function called update where we will append a new value to both the x and y lists. For the x-axis, we just increment the count by 1, ( x[-1] refers to the last element) and for the y-axis we add a random value ranging from 0 to 9 .
Lastly we use set_data to update the values in the graph.
animation = FuncAnimation(fig, update, interval=500) plt.show()
Here is the driver code, which actually calls the FuncAnimation() function. The first parameter is the matplotlib figure we created earlier. Second parameter is the function we wish to call, and the third is the interval after which we want to execute the function. Our update function will execute every 0.5 seconds.
Code
The complete code for our example on real-time plotting in matplotlib:
import matplotlib.pyplot as plt from matplotlib.animation import FuncAnimation from random import randrange fig = plt.figure(figsize=(6, 3)) x = [0] y = [0] ln, = plt.plot(x, y, '-') plt.axis([0, 100, 0, 10]) def update(frame): x.append(x[-1] + 1) y.append(randrange(0, 10)) ln.set_data(x, y) return ln, animation = FuncAnimation(fig, update, interval=500) plt.show()
This is a screenshot of the graph taken after about 20 seconds of it’s execution.
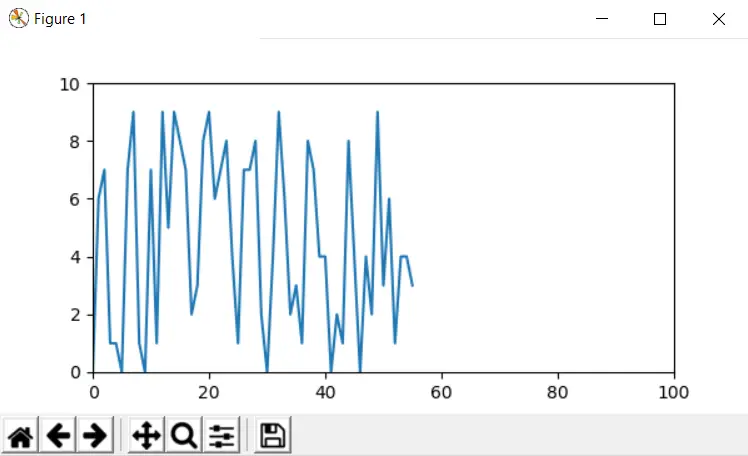
This approach however, may not be suitable for certain situations. For instance, let’s say the data you have is infinite, or you know very little about the range of values you will be plotting. If you get the “x” value of “200”, it will not be shown anywhere on the graph, because the x-axis is only defined uptil 100.
This approach is great so long as you have a rough idea about the data you will be working with. In the next section we will discuss another approach that you can use instead.
Auto-scaling and Resizing your Matplotlib Graph
We will be making a few minor changes in our code from earlier. In short, our goal is to have the graph resize itself automatically based off the range of values being added to it. No matter what values you enter, the graph will adjust its axis’s automatically.
First of all, remove the line where we defined the axis’s, and then add the following two lines of code at the end of the update() function.
fig.gca().relim() fig.gca().autoscale_view()
import matplotlib.pyplot as plt from matplotlib.animation import FuncAnimation from random import randrange fig = plt.figure(figsize=(6, 3)) x = [0] y = [0] ln, = plt.plot(x, y, '-') def update(frame): x.append(x[-1] + 1) y.append(randrange(0, 10)) ln.set_data(x, y) fig.gca().relim() fig.gca().autoscale_view() return ln, animation = FuncAnimation(fig, update, interval=500) plt.show()
Try running the code yourself to see the magic!
This marks the end of the Real time plotting with Matplotlib in Python Tutorial. Any suggestions or contributions for CodersLegacy are more than welcome. Questions regarding the tutorial content can be asked in the comments section below.
Real-Time Graphing in Python
In data visualization, real-time plotting can be a powerful tool to analyze data as it streams into the acquisition system. Whether temperature data, audio data, stock market data, or even social media data — it is often advantageous to monitor data in real-time to ensure that instrumentation and algorithms are functioning properly.
In this tutorial, I will outline a basic function written in Python that permits real-time plotting of data. The function is simple and straight-forward, but its powerful result allows any researcher or data analyst to take full advantage of data monitoring as it streams into the user’s computer!
Python Real-Time Plotting Function
The GitHub repository containing the code used in this tutorial can be found at:
https://github.com/engineersportal/pylive
import matplotlib.pyplot as plt import numpy as np # use ggplot style for more sophisticated visuals plt.style.use('ggplot') def live_plotter(x_vec,y1_data,line1,identifier='',pause_time=0.1): if line1==[]: # this is the call to matplotlib that allows dynamic plotting plt.ion() fig = plt.figure(figsize=(13,6)) ax = fig.add_subplot(111) # create a variable for the line so we can later update it line1, = ax.plot(x_vec,y1_data,'-o',alpha=0.8) #update plot label/title plt.ylabel('Y Label') plt.title('Title: <>'.format(identifier)) plt.show() # after the figure, axis, and line are created, we only need to update the y-data line1.set_ydata(y1_data) # adjust limits if new data goes beyond bounds if np.min(y1_data)<=line1.axes.get_ylim()[0] or np.max(y1_data)>=line1.axes.get_ylim()[1]: plt.ylim([np.min(y1_data)-np.std(y1_data),np.max(y1_data)+np.std(y1_data)]) # this pauses the data so the figure/axis can catch up - the amount of pause can be altered above plt.pause(pause_time) # return line so we can update it again in the next iteration return line1
A few notes on the function above:
- line1.set_ydata(y1_data) can also be switched to line1.set_data(x_vec,y1_data) to change both x and y data on the plots.
- plt.pause() is necessary to allow the plotter to catch up — I’ve been able to use a pause time of 0.01s without any issues
- The user will need to return line1 to control the line as it is updated and sent back to the function
- The user can also customize the function to allow dynamic changes of title, x-label, y-label, x-limits, etc.
Plot Data in Real Time Using Matplotlib

- FuncAnimation() Function
- canvas.draw() Along With canvas_flush_events()
- Real Time Scatter Plot
To plot data in real-time using Matplotlib, or make an animation in Matplotlib, we constantly update the variables to be plotted by iterating in a loop and then plotting the updated values. To view the updated plot in real-time through animation, we use various methods such as FuncAnimation() function, canvas.draw() along with canvas_flush_events() .
FuncAnimation() Function
We can update the plot in real-time by updating the variables x and y and then displaying updates through animation using matplotlib.animation.FuncAnimation .
matplotlib.animation.FuncAnimation(fig, func, frames=None, init_func=None, fargs=None, save_count=None, *, cache_frame_data=True, **kwargs) import numpy as np import matplotlib.pyplot as plt from matplotlib.animation import FuncAnimation x = [] y = [] figure, ax = plt.subplots(figsize=(4,3)) line, = ax.plot(x, y) plt.axis([0, 4*np.pi, -1, 1]) def func_animate(i): x = np.linspace(0, 4*np.pi, 1000) y = np.sin(2 * (x - 0.1 * i)) line.set_data(x, y) return line, ani = FuncAnimation(figure, func_animate, frames=10, interval=50) ani.save(r'animation.gif', fps=10) plt.show() ani = FuncAnimation(figure, func_animate, frames=10, interval=50) figure is the figure object whose plot will be updated.
func_animate is the function to be called at each frame. Its first argument comes from the next value frames .
frames=10 is equal to range(10) . Values from 0 to 9 is passed to the func_animate at each frame. We could also assign an interalbe to frames , like a list [0, 1, 3, 7, 12] .
interval is the delay between frames in the unit of ms .
ani.save('animation.gif', fps=10) We could save the animation to a gif or mp4 with the parameters like fps and dpi .
canvas.draw() Along With canvas_flush_events()
We can update the plot in real-time by updating the variables x and y with set_xdata() and set_ydata() and then displaying updates through animation using canvas.draw() , which is a method based on JavaScript.
import numpy as np import time import matplotlib.pyplot as plt x = np.linspace(0, 10, 100) y = np.cos(x) plt.ion() figure, ax = plt.subplots(figsize=(8,6)) line1, = ax.plot(x, y) plt.title("Dynamic Plot of sinx",fontsize=25) plt.xlabel("X",fontsize=18) plt.ylabel("sinX",fontsize=18) for p in range(100): updated_y = np.cos(x-0.05*p) line1.set_xdata(x) line1.set_ydata(updated_y) figure.canvas.draw() figure.canvas.flush_events() time.sleep(0.1) 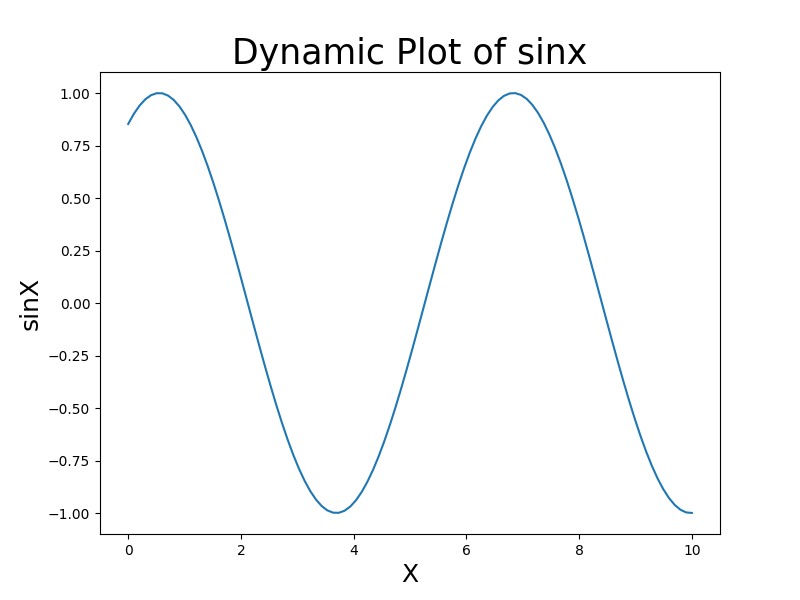
Here the values of x and y get updated repeatedly and the plot also gets updated in real time.
plt.ion() turns on the interactive mode. The plot will not be updated if it is not called.
canvas.flush_events() is method based on JavaScript to clear figures on every iterations so that successive figures might not overlap.
Real Time Scatter Plot
However, to make a real-time scatter, we can just update the values of x and y and add scatter points in each iteration. In this case, we need not clear every figure as a scatter plot generally represents a distinct point in the plane and the points have very little chance of overlapping.
import numpy as np import matplotlib.pyplot as plt x=0 for i in range(100): x=x+0.04 y = np.sin(x) plt.scatter(x, y) plt.title("Real Time plot") plt.xlabel("x") plt.ylabel("sinx") plt.pause(0.05) plt.show() 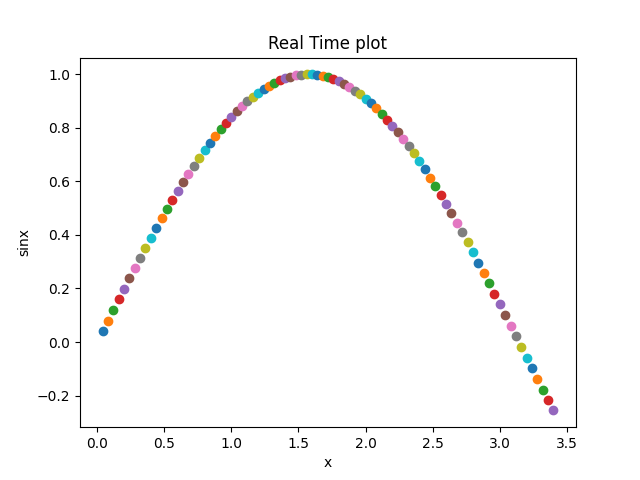
Suraj Joshi is a backend software engineer at Matrice.ai.