- Введение в Tkinter
- Hello world
- Текстовый редактор
- Tkinter
- Section 1. Tkinter Fundamentals
- Section 2. Layout Managements
- Section 3. Ttk & Tkinter Widgets
- Section 4. Tkinter Examples
- Section 5. Object-Oriented Programming with Tkinter
- Section 6. Dialogs and Menus
- Section 7. Tkinter Themes and Styles
- Section 8. Tkinter Asynchronous Programming
- Section 9. Advanced Tkinter Programming
Введение в Tkinter
Tkinter – это кроссплатформенная библиотека для разработки графического интерфейса на языке Python (начиная с Python 3.0 переименована в tkinter). Tkinter расшифровывается как Tk interface, и является интерфейсом к Tcl/Tk.
Tkinter входит в стандартный дистрибутив Python.
Весь код в этой статье написан для Python 2.x.
Чтобы убедиться, что Tkinter установлен и работает, воспользуемся стандартной функцией Tkinter _test():
import Tkinter Tkinter._test()После выполнения данного кода должно появиться следующее окно:
Отлично, теперь можно приступать к написанию нескольких простых программ для демонстрации основных принципов Tkinter.
Hello world
Конечно, куда же без него. Первым делом нам нужно создать главное окно, написав
from Tkinter import * root = Tk()Да-да, всего одна строка, это вам не WinAPI (=. Теперь создадим кнопку, при нажатии на которую будет выводиться текст в консоль:
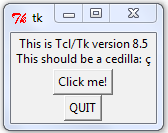
def Hello(event): print "Yet another hello world" btn = Button(root, #родительское окно text="Click me", #надпись на кнопке width=30,height=5, #ширина и высота bg="white",fg="black") #цвет фона и надписи btn.bind("", Hello) #при нажатии ЛКМ на кнопку вызывается функция Hello btn.pack() #расположить кнопку на главном окне root.mainloop()Всё просто, не так ли? Создаём экземпляр класса Button, указываем родителя и при желании список параметров. Есть еще немало параметров, таких как шрифт, толщина рамки и т.д.
Затем привязываем к нажатию на кнопку событие (можно привязать несколько разных событий в зависимости, например, от того, какой кнопкой мыши был нажат наш btn.
mainloop() запускает цикл обработки событий; пока мы не вызовем эту функцию, наше окно не будет реагировать на внешние раздражители.
Упаковщики
Функция pack() — это так называемый упаковщик, или менеджер расположения. Он отвечает за то, как виджеты будут располагаться на главном окне. Для каждого виджета нужно вызвать метод упаковщика, иначе он не будет отображён. Всего упаковщиков три:
pack(). Автоматически размещает виджеты в родительском окне. Имеет параметры side, fill, expand. Пример:
from Tkinter import * root = Tk() Button(root, text = '1').pack(side = 'left') Button(root, text = '2').pack(side = 'top') Button(root, text = '3').pack(side = 'right') Button(root, text = '4').pack(side = 'bottom') Button(root, text = '5').pack(fill = 'both') root.mainloop()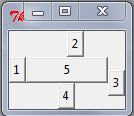
grid(). Размещает виджеты на сетке. Основные параметры: row/column – строка/столбец в сетке, rowspan/columnspan – сколько строк/столбцов занимает виджет. Пример:
from Tkinter import * root = Tk() Button(root, text = '1').grid(row = 1, column = 1) Button(root, text = '2').grid(row = 1, column = 2) Button(root, text = '__3__').grid(row = 2, column = 1, columnspan = 2) root.mainloop()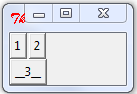
place(). Позволяет размещать виджеты в указанных координатах с указанными размерами.
Основные параметры: x, y, width, height. Пример:
from Tkinter import * root = Tk() Button(root, text = '1').place(x = 10, y = 10, width = 30) Button(root, text = '2').place(x = 45, y = 20, height = 15) Button(root, text = '__3__').place(x = 20, y = 40) root.mainloop()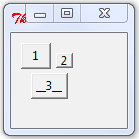
Теперь для демонстрации других возможностей Tkinter, напишем простейший
Текстовый редактор
Без лишних слов приведу код:
from Tkinter import * import tkFileDialog def Quit(ev): global root root.destroy() def LoadFile(ev): fn = tkFileDialog.Open(root, filetypes = [('*.txt files', '.txt')]).show() if fn == '': return textbox.delete('1.0', 'end') textbox.insert('1.0', open(fn, 'rt').read()) def SaveFile(ev): fn = tkFileDialog.SaveAs(root, filetypes = [('*.txt files', '.txt')]).show() if fn == '': return if not fn.endswith(".txt"): fn+=".txt" open(fn, 'wt').write(textbox.get('1.0', 'end')) root = Tk() panelFrame = Frame(root, height = 60, bg = 'gray') textFrame = Frame(root, height = 340, width = 600) panelFrame.pack(side = 'top', fill = 'x') textFrame.pack(side = 'bottom', fill = 'both', expand = 1) textbox = Text(textFrame, font='Arial 14', wrap='word') scrollbar = Scrollbar(textFrame) scrollbar['command'] = textbox.yview textbox['yscrollcommand'] = scrollbar.set textbox.pack(side = 'left', fill = 'both', expand = 1) scrollbar.pack(side = 'right', fill = 'y') loadBtn = Button(panelFrame, text = 'Load') saveBtn = Button(panelFrame, text = 'Save') quitBtn = Button(panelFrame, text = 'Quit') loadBtn.bind("", LoadFile) saveBtn.bind("", SaveFile) quitBtn.bind("", Quit) loadBtn.place(x = 10, y = 10, width = 40, height = 40) saveBtn.place(x = 60, y = 10, width = 40, height = 40) quitBtn.place(x = 110, y = 10, width = 40, height = 40) root.mainloop()Здесь есть несколько новых моментов.
Во-первых, мы подключили модуль tkFileDialog для диалогов открытия/закрытия файла. Использовать их просто: нужно создать объект типа Open или SaveAs, при желании задав параметр filetypes, и вызвать его метод show(). Метод вернёт строку с именем файла или пустую строку, если пользователь просто закрыл диалог.
Во-вторых, мы создали два фрейма. Фрейм предназначен для группировки других виджетов. Один содержит управляющие кнопки, а другой — поле для ввода текста и полосу прокрутки.
Это сделано, чтобы textbox не налезал на кнопки и всегда был максимального размера.
В-третьих, появился виджет Text. Мы его создали с параметром wrap=’word’, чтобы текст переносился по словам. Основные методы Text: get, insert, delete. Get и delete принимают начальный и конечный индексы. Индекс — это строка вида ‘x.y’, где x — номер символа в строке, а y — номер строки, причём символы нумеруются с 1, а строки — с 0. То есть на самое начала текста указывает индекс ‘1.0’. Для обозначения конца текста есть индекс ‘end’. Также допустимы конструкции вида ‘1.end’.
B в-четвёртых, мы создали полосу прокрутки (Scrollbar). После создания её нужно связать с нужным виджетом, в данном случае, с textbox. Связывание двустороннее:
scrollbar['command'] = textbox.yview textbox['yscrollcommand'] = scrollbar.setВот и всё. Tkinter – это, безусловно, мощная и удобная библиотека. Мы осветили не все её возможности, остальные — тема дальнейших статей.
Tkinter
This Tkinter tutorial introduces you to the exciting world of GUI programming in Python.
Tkinter is pronounced as tea-kay-inter. Tkinter is the Python interface to Tk, which is the GUI toolkit for Tcl/Tk.
Tcl (pronounced as tickle) is a scripting language often used in testing, prototyping, and GUI development. Tk is an open-source, cross-platform widget toolkit used by many different programming languages to build GUI programs.
Python implements the Tkinter as a module. Tkinter is a wrapper of C extensions that use Tcl/Tk libraries.
Tkinter allows you to develop desktop applications. It’s a very good tool for GUI programming in Python.
Tkinter is a good choice because of the following reasons:
- Easy to learn.
- Use very little code to make a functional desktop application.
- Layered design.
- Portable across all operating systems including Windows, macOS, and Linux.
- Pre-installed with the standard Python library.
This tutorial assumes that you already have Python 3.x installed on your computer. If it’s not the case, you need to install Python first.
Section 1. Tkinter Fundamentals
- Tkinter Hello, World! – show you how to develop the first Tkinter program called Hello, World!
- Window – learn how to manipulate various attributes of a Tkinter window including title, size, location, resizability, transparency, and stacking order.
- Tk Themed Widgets – introduce you to Tk themed widgets.
- Setting options for a widget – learn various ways to set options for a widget.
- Command Binding – learn how to respond to events using command bindings.
- Event Binding – show you how to use the bind() method to bind an event of a widget.
- Label – learn how to use the Label widget to show a text or image on a frame or window.
- Button – walk you through the step of creating buttons.
- Entry – learn how to create a textbox using the Entry widget.
Section 2. Layout Managements
Geometry managers allow you to specify the positions of widgets inside a top-level or parent window.
- pack – show you how to use the pack geometry manager to arrange widgets on a window.
- grid – learn how to use the grid geometry manager to place widgets on a container.
- place – show you how to use the place geometry manager to precisely position widgets within its container using the (x, y) coordinate system.
Section 3. Ttk & Tkinter Widgets
Tkinter provides you with some commonly used widgets, which allow you to start developing applications more quickly.
- Frame – learn how to use the Frame widget to group other widgets.
- Text – show a multi-line text input field.
- Scrollbar – learn how to link a scrollbar to a scrollable widget e.g., a Text widget.
- ScrolledText – show you how to create a scrolled text widget that consists of Text and vertical scrollbar widgets.
- Separator – use a separator widget to separate fields.
- Checkbox – show how to create a checkbox widget.
- Radio Button – learn how to use radio buttons to allow users to select one of a number of mutually exclusive choices.
- Combobox – walk you through the steps of creating a combobox widget.
- Listbox – show you how to display a list of single-line text items on a Listbox.
- PanedWindow – show you how to use the PanedWindow to divide the space of a frame or a window.
- Slider – learn how to create a slider by using the Tkinter Scale widget.
- Spinbox – show you how to use a Spinbox.
- Sizegrip – guide you on how to use the Sizegrip widget to allow users to resize the entire application window.
- LabelFrame – show you how to group related widgets in a group using the LabelFrame widget.
- Progressbar – show you how to use the progressbar widget to give feedback to the user about the progress of a long-running task.
- Notebook – guide you on how to use the Notebook widget to create tabs.
- Treeview – walk you through the steps of creating treeview widgets that display tabular and hierarchical data.
- Canvas – introduce you to the Canvas widget.
- Cursors – show you how to change the mouse cursor when it is over a widget.
Section 4. Tkinter Examples
- Tkinter example – show you how to build a simple application that converts a temperature from Fahrenheit to Celsius.
Section 5. Object-Oriented Programming with Tkinter
- Creating an object-oriented window – learn how to define an object-oriented window.
- Creating an object-oriented frame – show you how to define an object-oriented Frame.
- Developing a full Tkinter object-oriented application – show you how to develop a full Tkinter object-oriented application.
- Switching between frames – guide you on how to switch between frames in a Tkinter application.
Section 6. Dialogs and Menus
- Displaying a message box – show you how to display various message boxes including information, warning, and error message boxes.
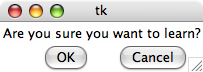
- Displaying a Yes/No Dialog – show you how to use the askyesno() function to display a yes/no dialog.
- Display an OK/Cancel Dialog – show you how to use the askokcancel() function to display an OK/Cancel dialog.
- Display a Retry/Cancel Dialog – show you how to use the askretrycancel() function to display a Retry/Cancel dialog.
- Show an Open File Dialog – display an open file dialog to allow users to select one or more files.
- Displaying the Native Color Chooser – show you how to display the native color-chooser dialog.
- Menu – learn how to add a menu bar and menus to a window.
- Menubutton – show you how to the Menubutton widget.
- OptionMenu – Walk you through the steps of creating an OptionMenu widget that provides a list of options in a drop-down menu.
Section 7. Tkinter Themes and Styles
- Changing the ttk theme – how to change the default ttk theme to the new one.
- Modifying ttk style – show you how to change the appearance of widgets by modifying or extending the ttk style.
- Understanding ttk elements – help you understand ttk elements and how to use them to change the appearance of widgets.
- Modifying the appearance of a widget based on its states – show you how to dynamically change the appearance of a widget based on its specific state.
Section 8. Tkinter Asynchronous Programming
- Scheduling a task with the after() method – how to use the after() method to schedule a task that will run after a timeout has elapsed.
- Developing multithreading Tkinter Applications – show you how to use the threading module to develop a multithreading Tkinter application.
- Displaying a progressbar while a thread is running – walk you through the steps of connecting a progressbar with a running thread.
Section 9. Advanced Tkinter Programming
- Tkinter MVC – structure a tkinter application using the MVC design pattern.
- Tkinter validation – show you how to use the Tkinter validation to validate user inputs.
- Tkinter & Matplotlib – show you how to display a bar chart from the matplotlib in Python.