pyArduinoAPI
A Python API for communicating with your Arduino board.
A lightweight Python library for communicating with Arduino microcontroller boards from a connected computer using standard serial IO, either over a physical wire or wirelessly. It is written using a custom protocol, similar to Firmata.
This is my own fork of the original version of this repo. I’ve added some new commands to suit my needs and use cases for Arduino, and will continue adding my modifications here as I need them.
This library allows a user to quickly prototype programs for Arduino using Python code, or to simply read/control/troubleshoot/experiment with hardware connected to an Arduino board without ever having to recompile and reload sketches to the board itself.
Method names within the Arduino-Python3 Command API are designed to be as close as possible to their Arduino programming language counterparts. This allows for Arduino code to quickly be transcribed into Python, or vice-versa.
Requirements:
- Python 3.7 or above (tested on Windows, Linux and macOS).
- pyserial 2.6 or higher ( pip install pyserial )
- Any Arduino compatible microcontroller with at least 14KB of flash memory
Installation + Setup
- To install, run pip install pyArduinoAPI .
- Load the prototype.ino sketch onto your Arduino board, using the Arduino IDE.
- Set up some kind of serial I/O communication between the Arduino board and your computer (via physical USB cable, Bluetooth, xbee, etc. + associated drivers)
- Add from Arduino import Arduino into your python script to communicate with your Arduino.
What I’ve added so far that is different to the version I adapted this from:
- Added support for tone() and noTone() operations.
- Added (almost) complete support for the LiquidCrystal library for controlling LCD screens (missing write() and createChar() functions)
Examples
Simple usage example (LED blink):
For a collection of examples, see examples.py . This file contains methods which replicate the functionality of many Arduino demo sketches.
Classes
The device name / COM port of the connected Arduino will be auto-detected. If there are more than one Arduino boards connected, the desired COM port can be also be passed as an optional argument:
A time-out for reading from the Arduino can also be specified as an optional argument:
Methods
- Arduino.digitalWrite(pin_number, state) turn digital pin on/off
- Arduino.digitalRead(pin_number) read state of a digital pin
- Arduino.pinMode(pin_number, io_mode) set pin I/O mode
- Arduino.pulseIn(pin_number, state) measures a pulse
- Arduino.pulseIn_set(pin_number, state) measures a pulse, with preconditioning
- Arduino.analogRead(pin_number) returns the analog value
- Arduino.analogWrite(pin_number, value) sets the analog value
Shift Register
- Arduino.shiftIn(dataPin, clockPin, bitOrder) shift a byte in and returns it
- Arduino.shiftOut(dataPin, clockPin, bitOrder, value) shift the given byte out
bitOrder should be either «MSBFIRST» or «LSBFIRST»
Servo Library Functionality Support is included for up to 8 servos.
- Arduino.Servos.attach(pin, min=544, max=2400) Create servo instance. Only 8 servos can be used at one time.
- Arduino.Servos.read(pin) Returns the angle of the servo attached to the specified pin
- Arduino.Servos.write(pin, angle) Move an attached servo on a pin to a specified angle
- Arduino.Servos.writeMicroseconds(pin, uS) Write a value in microseconds to the servo on a specified pin
- Arduino.Servos.detach(pin) Detaches the servo on the specified pin
Software Serial Functionality
- Arduino.SoftwareSerial.begin(ss_rxPin, ss_txPin, ss_device_baud) initialize software serial device on specified pins. Only one software serial device can be used at a time. Existing software serial instance will be overwritten by calling this method, both in Python and on the Arduino board.
- Arduino.SoftwareSerial.write(data) send data using the Arduino ‘write’ function to the existing software serial connection.
- Arduino.SoftwareSerial.read() returns one byte from the existing software serial connection
- Arduino.EEPROM.read(address) reads a byte from the EEPROM
- Arduino.EEPROM.write(address, value) writes a byte to the EEPROM
- Arduino.EEPROM.size() returns size of the EEPROM
LCD Screen LiquidCrystal Support Library (only supports 1 display currently) - Arduino.LCD.LiquidCrystal(rs, en, d4, d5, d6, d7) Creates an object of type LiquidCrystal.
- Arduino.LCD.begin(cols, rows) Initializes the interface to the LCD screen, and specifies the dimensions of the display.
- Arduino.LCD.cleanup() Deletes LCD object from Arduino system memory
- Arduino.LCD.clear() Clears the LCD screen and positions the cursor in the upper-left corner.
- Arduino.LCD.home() Positions the cursor in the upper-left corner of the LCD.
- Arduino.LCD.print(text) Prints text to the LCD screen.
- Arduino.LCD.setCursor(col, row) Sets the location at which subsequent text written to the LCD will be displayed.
- Arduino.LCD.cursor() Displays the LCD cursor.
- Arduino.LCD.noCursor() Hides the LCD cursor.
- Arduino.LCD.blink() Displays the blinking LCD cursor.
- Arduino.LCD.noBlink() Hides the blinking LCD cursor.
- Arduino.LCD.display() Turns the LCD display on.
- Arduino.LCD.noDisplay() Turns the LCD display off.
- Arduino.LCD.scrollDisplayLeft() Scrolls the contents of the display (text and cursor) one space to the left.
- Arduino.LCD.scrollDisplayRight() Scrolls the contents of the display (text and cursor) one space to the right.
- Arduino.LCD.autoscroll() Turns on automatic scrolling of the LCD.
- Arduino.LCD.noAutoscroll() Turns off automatic scrolling of the LCD.
- Arduino.LCD.leftToRight() Set the direction for text written to the LCD to left-to-right.
- Arduino.LCD.rightToLeft() Set the direction for text written to the LCD to right-to-left.
- Arduino.resetFunc() Resets the Arduino.
- Arduino.close() Closes serial connection to the Arduino.
To-do list:
- Add simple reset functionality that zeros out all pin values
- Include a wizard which generates ‘prototype.ino’ with selected serial baud rate and Arduino function support (to help reduce memory requirements).
- Add write() and createChar() functions for the LCD library.
- Anything else that I come across that I need will be added here.
Python & Arduino. Просто, быстро и красиво
Очень часто, у начинающих и не только разработчиков возникают вопросы. Как управлять с Arduino с компьютера? А если компьютер — не Raspberry Pi, а обычный домашний компьютер? А если не хочется мучится с ESP8266 и управлять через веб интерфейс? Неужели надо каждый раз открывать Arduino IDE и отправлять команды через Монитор порта? Именно о том, как создать своё собственное приложение с графическим интерфейсом для управления Arduino я сейчас и расскажу.
Оборудование
Недавно я заполучил очень интересную плату: Arduino SS Micro. Эта плата, внешне напоминающая Digispark Attiny 85, тем не менее является китайской версией Arduino Micro, с выведенным выходом USB.

Подробно рассказывать о ней я не буду, ведь это уже сделал пользователь YouTube с ником iomoio, и его обзор можно посмотреть здесь.
Как мне кажется — это довольно крутое и удобное устройство для небольших домашних проектов, ведь у проводов есть супер-свойство: теряться в самый неподходящий момент.
В качестве управляющего компьютера был использован MacBook Pro с операционной системой macOS Mojave, но не надо закрывать статью, если вы используете Windows или Linux — всё описанное в статье будет работать без изменений на любой операционной системе.
Скетч для Arduino
В качестве примера будет использоваться скетч, включающий и выключающий светодиод, по команде из Serial-порта.
Светодиод в Arduino SS Micro висит на порте SS, и поэтому он автоматически выключается. Не смотря на это, стандартный пример Blink — мигающий светодиод работает.
char inChar; #define LED_PIN SS void setup() < pinMode(LED_PIN, OUTPUT); // Инициализация светодиода Serial.begin(115200); // Инициализация Serial - порта >void loop() < if (Serial.available() >0) < inChar = Serial.read(); if (inChar=='e') // e - Enable - включить < digitalWrite(LED_PIN,HIGH); >> else if (inChar=='d') // d - Disable - выключить < digitalWrite(LED_PIN,LOW); >else if (inChar=='b') // b - Blink - выключить режим мигания < while (true)< digitalWrite(LED_PIN,HIGH); delay(1000); digitalWrite(LED_PIN,LOW); delay(1000); >> > Если вы будете использовать другую Arduino — не забудьте сменить пин светодиода.
Код для компьютера
Одним из достоинств Python, кроме его кроссплатформенности — наличие гигантского числа библиотек. Нам понадобятся:
- PySerial — библиотека для работы с Serial-портом
- PyQT5 — библиотека для создания графического интерфейса
Установка
Для установки, воспользуемся встроенным менеджером пакетов — pip.
pip install pyserial pyqt5Для удобства создания GUI можно установить программу QTDesigner.
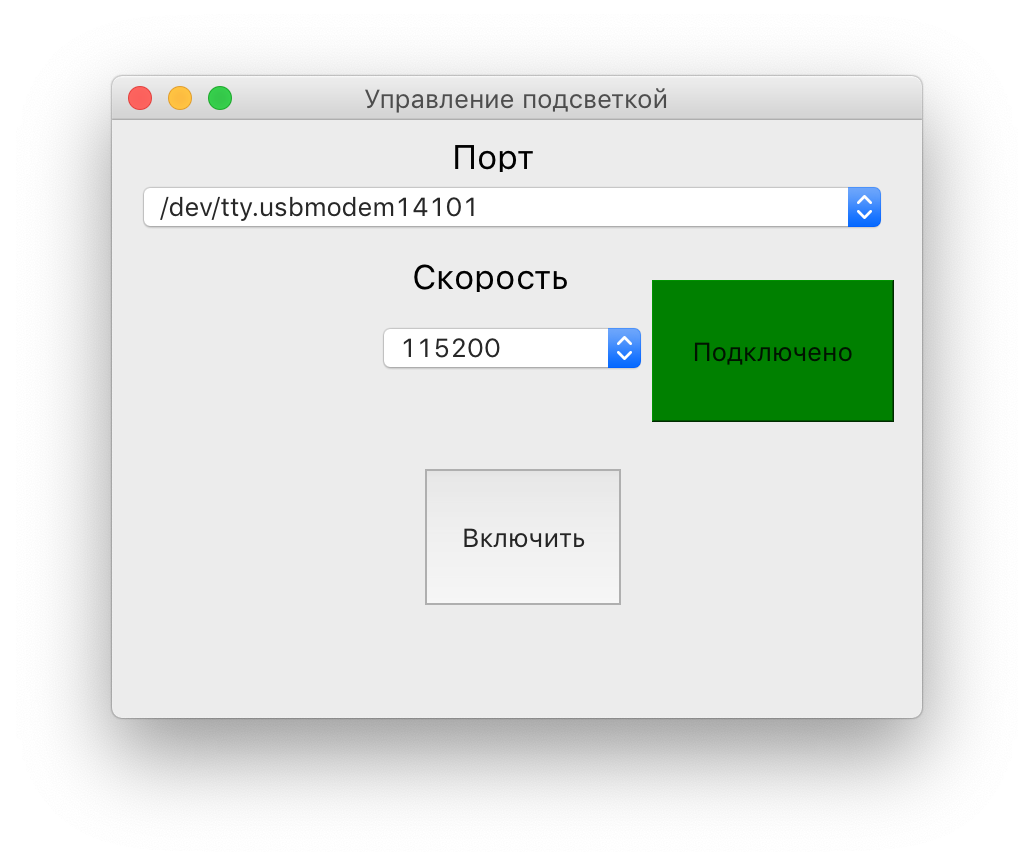
Интерфейс
Поскольку данная программа предназначена скорее, для демонстрации возможностей, пользователь может выбрать порт из предложенных, а так же скорость, с которой будет происходить общение.

Исходный код
Вся работа с устройством происходит благодаря библиотеке PySerial. Но есть несколько нюансов. Например, как узнать, в какой из портов подключено устройство?
На всем прекрасно известном сайте stackoverflow, пользователь с ником Thomas предложил уже готовое решение, которое я и использовал.
def serial_ports(): """ Lists serial port names :raises EnvironmentError: On unsupported or unknown platforms :returns: A list of the serial ports available on the system """ if sys.platform.startswith('win'): ports = ['COM%s' % (i + 1) for i in range(256)] elif sys.platform.startswith('linux') or sys.platform.startswith('cygwin'): # this excludes your current terminal "/dev/tty" ports = glob.glob('/dev/tty[A-Za-z]*') elif sys.platform.startswith('darwin'): ports = glob.glob('/dev/tty.*') else: raise EnvironmentError('Unsupported platform') result = [] for port in ports: try: s = serial.Serial(port) s.close() result.append(port) except (OSError, serial.SerialException): pass return result Кроме этого необходимо хранить список доступных скоростей:
speeds = ['1200','2400', '4800', '9600', '19200', '38400', '57600', '115200']А теперь соберём вместе дизайн(созданный в QtDesigner и сконвертированный с помощью утилиты pyuic5 в .py файл), функции для сканирования портов и основной код программы.
Основной класс, содержащий в себе всю логику программы
class LedApp(QtWidgets.QMainWindow, design.Ui_Form): def __init__(self): super().__init__() self.setupUi(self) self.Port.addItems(serial_ports()) self.Speed.addItems(speeds) self.realport = None self.ConnectButton.clicked.connect(self.connect) self.EnableBtn.clicked.connect(self.send) def connect(self): try: self.realport = serial.Serial(self.Port.currentText(),int(self.Speed.currentText())) self.ConnectButton.setStyleSheet("background-color: green") self.ConnectButton.setText('Подключено') except Exception as e: print(e) def send(self): if self.realport: self.realport.write(b'b') Переменные self.Port и self.Speed — это выпадающие списки, содержащие в себе значения доступных портов и скоростей.
При нажатии на кнопку self.ConnectButton вызывается функция connect, в которой производится попытка подключения к заданному порту с заданной скоростью. Если подключение успешно, то кнопка окрашивается в зелёный цвет, и меняется надпись.
Функция send отправляет в наш порт байтовую строку — заставляющую включить режим мигания.
Таким образом можно управлять различными устройствами, подключёнными к USB.
Данная статья является вводной и обзорной, более полную информацию можно найти например тут: