- How to use MySql with Django — For Beginners
- Django Database System
- Install MySql Server
- Install the Python Driver
- Create the MySql Database
- Update Django Settings
- Start the project
- Installation#
- Installation#
- Extending your QuerySets#
- django-mysql 4.11.0
- Навигация
- Ссылки проекта
- Статистика
- Метаданные
- Сопровождающие
- Классификаторы
- Описание проекта
- What kind of features?
- Requirements and Installation
- Documentation
- Модели
- Настройки подключения к базе данных
- Поддерживаемые субд
How to use MySql with Django — For Beginners
Hello Coders, This article explains How to use MySql with Django and switch from the default SQLite database to a production-ready DBMS (MySql). This topic might sound like a trivial subject but during my support sessions, I got this question over and over especially from beginners. For newcomers, Django is a leading Python web framework built by experts using a bateries-included concept. Being such a mature framework, Django provides an easy way to switch from the default SQLite database to other database engines like MySql, PostgreSQL, or Oracle. MySql is a powerful open-source relational database where the information is correlated and saved in one or more tables.
Django Database System
Django provides a generic way to access multiple database backends using a generic interface. In theory, Django empowers us to switch between DB Engines without updating the SQL code. The default SQLite database usually covers all requirements for small or demo projects but for production use, a more powerful database engine like MySql or PostgreSQL is recommended. The database settings are saved in the file referred by manage.py file. In my Django projects, this file is saved inside the core directory:
< PROJECT ROOT > | |-- manage.py # Specify the settings file | |-- core/ # Implements app logic | |-- settings.py # Django app bootstrapper | |-- wsgi.py # Start the app in production | |-- urls.py # Define URLs served by all apps/nodes # File: core/settings.py . DATABASES = 'default': 'ENGINE': 'django.db.backends.sqlite3', 'NAME' : 'db.sqlite3', > > . - Install the MySql Server (we can also use a remote one)
- Install the Mysql Python driver — used by Django to connect and communicate
- Create the Mysql database and the user
- Update settings Django
- Execute the Django migration and create the project tables
Install MySql Server
The installation process is different on different systems but this phase should not be a blocking point because Unix systems provide by default a MySql server and for Windows, we can use a visual installer. For more information please access the download page and select the installer that matches your operating system:
Install the Python Driver
To successfully access the Mysql Engine, Django needs a driver (aka a connector) to translate the Python queries to pure SQL instructions.
The above instruction will install the Python MySql driver globally in the system. Another way is to use a virtual environment that sandboxes the installation.
$ # Create and activate the virtual environment $ virtualenv env $ source env/bin/activate $ $ # install the mysql driver $ pip install mysqlclient Create the MySql Database
During the initial setup, Django creates the project tables but cannot create the database. To have a usable project we need the database credentials used later by the Django project. The database can be created visually using a database tool (like MySQL Workbench) or using the terminal:
CREATE USER 'test'@'localhost' IDENTIFIED BY 'Secret_1234'; Grant all privileges to the newly created user
GRANT ALL PRIVILEGES ON `mytestdb` . * TO 'test'@'localhost'; FLUSH PRIVILEGES; Update Django Settings
Once the MySql database is created we can move on and update the project settings to use a MySql server.
# File: core/settings.py . DATABASES = 'default': 'ENGINE' : 'django.db.backends.mysql', # 'NAME' : 'mytestdb', # 'USER' : 'test', # 'PASSWORD': 'Secret_1234', # 'HOST' : 'localhost', # 'PORT' : '3306', > > . Start the project
The next step in our simple tutorial is to run the Django migration that will create all necessary tables.
$ # Create tables $ python manage.py makemigrations $ python manage.py migrate $ # Start the application (development mode) $ python manage.py runserver At this point, Django should be successfully connected to the Mysql Server and we can check the database and list the newly created tables during the database migration.

Thanks for reading! For more resources feel free to access:
- Django Dashboards — a curated index with simple starters
- Free Dashboards — open-source projects crafted in different technologies (Flask, Django, React)
Installation#
Python 3.8 to 3.12 supported. Django 3.2 to 4.2 supported. MySQL 8.0 supported. MariaDB 10.4 to 10.8 supported. mysqclient 1.3 to 1.4 supported.
Installation#
$ python -m pip install django-mysql INSTALLED_APPS = [ . , "django_mysql", . , ]
Django-MySQL comes with some extra checks to ensure your database configuration is optimal. It’s best to run these now you’ve installed to see if there is anything to fix:
$ python manage.py check --database default (The —database argument is new in Django 3.1.) For help fixing any warnings, see Checks . Are your tests slow? Check out my book Speed Up Your Django Tests which covers loads of ways to write faster, more accurate tests.
Extending your QuerySets#
Half the fun features are extensions to QuerySet . You can add these to your project in a number of ways, depending on what is easiest for your code — all imported from django_mysql.models . class Model # The simplest way to add the QuerySet extensions — this is a subclass of Django’s Model that sets objects to use the Django-MySQL extended QuerySet (below) via QuerySet.as_manager() . Simply change your model base to get the goodness:
# from django.db.models import Model - no more! from django_mysql.models import Model class MySuperModel(Model): pass # TODO: come up with startup idea.
class QuerySet # The second way to add the extensions — use this to replace your model’s default manager:
from mythings import MyBaseModel from django_mysql.models import QuerySet class MySuperDuperModel(MyBaseModel): objects = QuerySet.as_manager() # TODO: what fields should this model have??
from django.db import models from django_mysql.models import QuerySet class MySuperDuperManager(models.Manager): pass class MySuperDuperModel(models.Model): objects = MySuperDuperManager.from_queryset(QuerySet)() # TODO: fields
class QuerySetMixin # The third way to add the extensions, and the container class for the extensions. Add this mixin to your custom QuerySet class to add in all the fun:
from django.db.models import Model from django_mysql.models import QuerySetMixin from stackoverflow import CopyPasteQuerySet class MySplendidQuerySet(QuerySetMixin, CopyPasteQuerySet): pass class MySplendidModel(Model): objects = MySplendidQuerySet.as_manager() # TODO: profit
add_QuerySetMixin ( queryset ) # A final way to add the extensions, useful when you don’t control the model class — for example with built in Django models. This function creates a subclass of a QuerySet ‘s class that has the QuerySetMixin added in and applies it to the QuerySet :
from django.contrib.auth.models import User from django_mysql.models import add_QuerySetMixin qs = User.objects.all() qs = add_QuerySetMixin(qs) # Now qs has all the extensions!
django-mysql 4.11.0
Django-MySQL extends Django’s built-in MySQL and MariaDB support their specific features not available on other databases.
Навигация
Ссылки проекта
Статистика
Метаданные
Лицензия: MIT License (MIT)
Метки Django, MySQL, MariaDB
Требует: Python >=3.8
Сопровождающие
Классификаторы
Описание проекта

Django-MySQL extends Django’s built-in MySQL and MariaDB support their specific features not available on other databases.
What kind of features?
- QuerySet extensions:
- ‘Smart’ iteration — chunked pagination across a large queryset
- approx_count for quick estimates of count()
- Query hints
- Quick pt-visual-explain of the underlying query
- MariaDB Dynamic Columns for storing dictionaries
- Comma-separated fields for storing lists and sets
- ‘Missing’ fields: differently sized BinaryField / TextField classes, BooleanField s represented by BIT(1)
Requirements and Installation
Documentation
Every detail documented on Read The Docs.
Модели
Для хранения данных в веб-приложении, как правило, применются базы данных. И фреймворк Django уже по умолчанию предоставляет удобный функционал для работы с различными системами баз данных.
Настройки подключения к базе данных
По умолчанию Django в качестве базы данных использует SQLite. Она очень проста в использовании и не требует запущенного сервера. Все файлы базы данных могут легко переноситься с одного компьютера на другой. Однако при необходимости мы можем использовать в Django большинство распространенных СУБД.
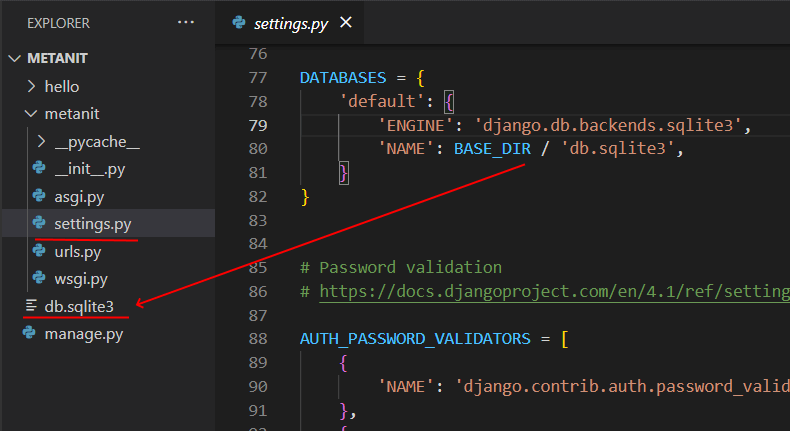
Для работы с базами данных в проекте Django в файле settings.py определен параметр DATABASES , который по умолчанию выглядит следующим образом:
Переменная DATABASES содержит набор конфигураций подключений к базам данных в виде словаря. Ключи в этом словаре — названия подключений. То есть мы можем определить кучу подключений. Но как минимум одно подключение должно быть определено в переменной DATABASES — подключение с именем default , которое представляет подключение по умолчанию.
Конфигурация каждого подключения может состоять из ряда параметров. По умолчанию указываются только два параметра. Параметр ENGINE указывает на используемый движок для доступа к БД. В данном случае это встроенный пакет django.db.backends.sqlite3 .
Второй параметр — NAME указывает на путь к базе данных. По умолчанию база данных называется db.sqlite3 . Для установки пути используется каталог из переменной BASE_DIR, которая задана в начале файла:
BASE_DIR = Path(__file__).resolve().parent.parent
По умолчанию BASE_DIR указывает на каталог, в котором находится папка проекта. И после первого запуска проекта в указанном каталоге по умолчанию будет создан файл db.sqlite3 , который собственно и будет использоваться в качестве базы данных.
Поддерживаемые субд
Чтобы использовать другие системы управления базами данных, необходимо будет установить соответствующий пакет.