- Import Excel File into MySQL Database using PHP
- What is inside?
- About this Excel import example
- File Structure
- Database script
- Creating UI to upload import template
- Parse Excel data using PHPSpreadsheet
- Загрузка Excel-файла в базу данных MySQL с помощью PHP
- Устанавливаем библиотеку PHPSpreadsheet:
- Комментарии ( 0 ):
Import Excel File into MySQL Database using PHP
Database backup and restore is the most important part of maintaining software. Taking automatic periodical backup is a must for any project.
In case of unknown security flaws which may collapse your system. In such an unfortunate situation, it will be the holy grail to save you if you have a backup.
It is not only enough to take a backup by exporting your database. Also, we need to experiment with importing backups to ensure the restoration.
Backup files can be in any format. Many of the database clients support SQL, Excel or CSV format files to import external data.
We will create our own PHP database client only for importing Excel data into a database.
Restoring Excel backup into a database via programming will save us time. Let us study how to implement a quick restore by importing bulk data from Excel files. You may visit my earlier export data in CSV format if you want an export example.
This screenshot shows the output by displaying the list of imported rows from the database.
What is inside?
About this Excel import example
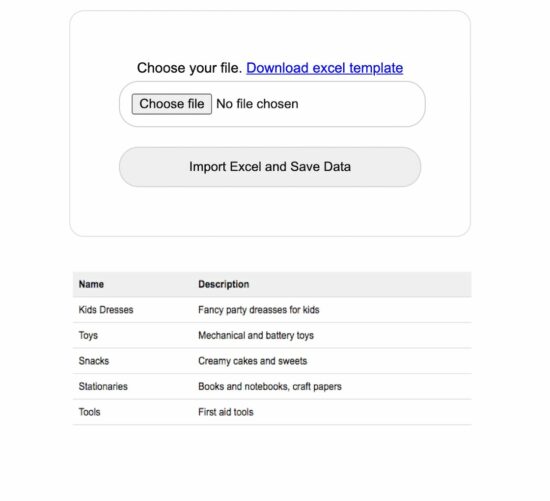
This example allows users to choose the import template via HTML form input. A sample Excel template is added with this downloadable resource.
With a valid file, the HTML form submitted will call PHP to process Excel parsing.
In PHP, the PHPSpreadsheet library is used to read the Excel file data and convert it into an array.
The code will execute the database insert row by row by iterating the array data.
File Structure
See the Excel import example’s file structure shown below. The vendor folder has the PHPSpreadsheet library and its dependencies.
I have given a sample import template with these files to experiment with the import operation.
The schema.sql has the script to create the target database. You can find the SQL script in the next section.

Database script
Import the following SQL script and create a database environment. Also, configure your database details in DataSource.php to make this example work.
-- -- Database: `import_excel` -- -- -------------------------------------------------------- -- -- Table structure for table `tbl_info` -- CREATE TABLE `tbl_info` ( `id` int(11) NOT NULL, `name` varchar(50) NOT NULL, `description` varchar(50) NOT NULL, `date` timestamp NOT NULL DEFAULT CURRENT_TIMESTAMP ON UPDATE CURRENT_TIMESTAMP ); -- -- Indexes for table `tbl_info` -- ALTER TABLE `tbl_info` ADD PRIMARY KEY (`id`); -- -- AUTO_INCREMENT for table `tbl_info` -- ALTER TABLE `tbl_info` MODIFY `id` int(11) NOT NULL AUTO_INCREMENT;; Creating UI to upload import template
This HTML form with the file upload option is used to choose the Excel source. On submitting this form, the Excel file will be sent to the PHP to parse the data source. This file upload option will only allow the Excel files to choose using the accept attribute.
This code also contains the response HTML for displaying the message returned from PHP. This message is shown based on the type of response sent from PHP after Excel import.
Import Excel File into MySQL Database using PHP
?> select($sqlSelect); if (! empty($result)) < ?> Name Description ?>
?> Parse Excel data using PHPSpreadsheet
In this PHP code, I specified the array of allowed file types for the file-type validation in PHP. I validated the uploaded file type along with the array allowed type.
If a match is found, the code will execute other logic. Otherwise, it will return the error message to the user.
With successful validation, excel file parsing read and convert the data into an array. Each array index has an array of row data. After reading the non-empty row data, I ran the database insert and showed the response.
getConnection(); require_once ('vendor/autoload.php'); if (isset($_POST["import"])) < $allowedFileType = [ 'application/vnd.ms-excel', 'text/xls', 'text/xlsx', 'application/vnd.openxmlformats-officedocument.spreadsheetml.sheet' ]; if (in_array($_FILES["file"]["type"], $allowedFileType)) < $targetPath = 'uploads/' . $_FILES['file']['name']; move_uploaded_file($_FILES['file']['tmp_name'], $targetPath); $Reader = new \PhpOffice\PhpSpreadsheet\Reader\Xlsx(); $spreadSheet = $Reader->load($targetPath); $excelSheet = $spreadSheet->getActiveSheet(); $spreadSheetAry = $excelSheet->toArray(); $sheetCount = count($spreadSheetAry); for ($i = 1; $i $description = ""; if (isset($spreadSheetAry[$i][1])) < $description = mysqli_real_escape_string($conn, $spreadSheetAry[$i][1]); >if (! empty($name) || ! empty($description)) < $query = "insert into tbl_info(name,description) values(. )"; $paramType = "ss"; $paramArray = array( $name, $description ); $insertId = $db->insert($query, $paramType, $paramArray); // $query = "insert into tbl_info(name,description) values('" . $name . "','" . $description . "')"; // $result = mysqli_query($conn, $query); if (! empty($insertId)) < $type = "success"; $message = "Excel Data Imported into the Database"; >else < $type = "error"; $message = "Problem in Importing Excel Data"; >> > > else < $type = "error"; $message = "Invalid File Type. Upload Excel File."; >> ?>
Note: Download the PHPSpreadsheet and include it in the vendor directory.
Загрузка Excel-файла в базу данных MySQL с помощью PHP

Доброго времени суток! В прошлой статье я рассказывал Вам о библиотеке PHPSpreadsheet. Там мы рассмотрели пример записи данных в Excel файл. В данной же статье мы прочитаем с Вами Excel файл и загрузим строки из него в базу данных MySQL.
Зачем это может понадобиться? Одной из самых часто встречающихся задач при работе с интернет-магазинами является загрузка больших прайс-листов в базу данных. Делать это вручную, очевидно, не хочется, да и не стоит, так как увеличивается шанс ошибиться при вводе однотипных данных. А скрипт, который я покажу Вам далее справится с этой задачей достаточно просто — в конечном счете все будет упираться в структуру Вашего Excel файла.
Устанавливаем библиотеку PHPSpreadsheet:
Функция, которая загружает данные в базу:
use PhpOffice\PhpSpreadsheet\Spreadsheet;
use PhpOffice\PhpSpreadsheet\Shared\Date as PHPSpreadsheetDate;
/**
* @param Spreadsheet $spreadsheet — Excel-книга с данными
* @param PDO $pdo — PDO-подключение к базе данных
* @param bool $limit_execution — ограничивает количество строк экспортируемых в базу (для тестирования)
* @throws \PhpOffice\PhpSpreadsheet\Exception
*/
function excel2db(Spreadsheet $spreadsheet, PDO $pdo, $limit_execution = true)
// получает названия листов книги в виде массива
$sheetNames = $spreadsheet->getSheetNames();
// возвращает количество листов в книге
$sheetsCount = $spreadsheet->getSheetCount();
// проходимся по каждому листу
for ($c = 0; $c < $sheetsCount; $c++)
// ссылка на лист
$sheet = $spreadsheet->getSheet($c);
// последняя строка в листе
$highestRow = $sheet->getHighestRow(‘A’);
print «Количество строк в книге #$sheetNames[$c] составляет $highestRow» . PHP_EOL;
// SQL-запрос на вставку данных в базу
$sql = «INSERT INTO products (
category, subcategory, name, price, producer, quantity, produced_at
)
VALUES (:category, :subcategory, :name, :price, :producer, :quantity, :produced_at)»;
// подготовленное SQL-выражение
$stmt = $pdo->prepare($sql);
// проходимся по каждой строке в листе
// счетчик начинается с 2-ой строки, так как первая строка — это заголовок
for ($i = 2; $i < $highestRow + 1; $i++)
// для тестирования — заполняет только 30 строк, чтобы посмотреть, что все в порядке
if($limit_execution) if($i == 30) break;
>
// получаем значения из ячеек столбцов
$category = $sheet->getCell(‘A’ . $i)->getValue();
$subcategory = $sheet->getCell(‘B’ . $i)->getValue();
$name = $sheet->getCell(‘C’ . $i)->getValue();
$price = $sheet->getCell(‘D’ . $i)->getValue();
$producer = $sheet->getCell(‘E’ . $i)->getValue();
$quantity = $sheet->getCell(‘G’ . $i)->getValue();
// преобразуем дату из формата Excel в формат PHP
$produced_at = PHPSpreadsheetDate::excelToDateTimeObject($sheet->getCell(‘F’ . $i)->getValue());
$stmt->bindParam(‘:category’, $category);
$stmt->bindParam(‘:subcategory’, $subcategory);
$stmt->bindParam(‘:name’, $name);
$stmt->bindParam(‘:price’, $price);
$stmt->bindParam(‘:producer’, $producer);
$stmt->bindParam(‘:quantity’, $quantity);
$stmt->bindParam(‘:produced_at’, $produced_at);
$res = $stmt->execute();
// если запрос на вставку выполнился успешно, выводим в консоль сообщение
if($res) print «Строка #$i из листа $sheetNames[$c] помещена в базу» . PHP_EOL;
>
>
>
>
Файл, в котором будет вызываться функция:
require __DIR__ . ‘/../vendor/autoload.php’;
$host = ‘127.0.0.1’;
$db = ‘products_db’;
$user = ‘user1’;
$pass = ‘userpass’;
$charset = ‘utf8’;
$dsn = «mysql:host=$host;dbname=$db;charset=$charset»;
$opts= [
\PDO::ATTR_ERRMODE => \PDO::ERRMODE_EXCEPTION,
\PDO::ATTR_DEFAULT_FETCH_MODE => \PDO::FETCH_ASSOC,
\PDO::ATTR_EMULATE_PREPARES => false,
];
// подключение к базе
$pdo = new PDO($dsn, $user, $pass, $opts);
// класс, который читает файл прайса
$reader = new Xlsx();
// получаем Excel-книгу
$spreadsheet = $reader->load(‘products_db_01012020.xlsx’);
// замеряем время работы скрипта
$startTime = microtime(true);
// запускаем экспорт данных
excel2db($spreadsheet, $pdo, false);
$elapsedTime = round(microtime(true) — $startTime, 4);
print «Скрипт выполнился за: $elapsedTime с.»;
Таким образом, после запуска данного скрипта через некоторое время (от ~15 минут при 10 тыс. строк) вы получите содержимое Вашего прайса в базе данных. Конечно это демонстрационный скрипт: в нем нет обработки исключений и возможных ошибок, а также окончательная версия Вашего скрипта может существенно отличаться от приведенной здесь. Это зависит от объема и сложности конкретного прайс-листа.
Создано 08.06.2021 08:53:55
Михаил Русаков Копирование материалов разрешается только с указанием автора (Михаил Русаков) и индексируемой прямой ссылкой на сайт (http://myrusakov.ru)!
Добавляйтесь ко мне в друзья ВКонтакте: http://vk.com/myrusakov.
Если Вы хотите дать оценку мне и моей работе, то напишите её в моей группе: http://vk.com/rusakovmy.
Если Вы не хотите пропустить новые материалы на сайте,
то Вы можете подписаться на обновления: Подписаться на обновления
Если у Вас остались какие-либо вопросы, либо у Вас есть желание высказаться по поводу этой статьи, то Вы можете оставить свой комментарий внизу страницы.
Порекомендуйте эту статью друзьям:
Если Вам понравился сайт, то разместите ссылку на него (у себя на сайте, на форуме, в контакте):
- Кнопка:
Она выглядит вот так: - Текстовая ссылка:
Она выглядит вот так: Как создать свой сайт - BB-код ссылки для форумов (например, можете поставить её в подписи):
Комментарии ( 0 ):
Для добавления комментариев надо войти в систему.
Если Вы ещё не зарегистрированы на сайте, то сначала зарегистрируйтесь.
Copyright © 2010-2023 Русаков Михаил Юрьевич. Все права защищены.