- Output Buffering in PHP
- What is a buffer?
- What is output buffering?
- 1. ob_start()
- 2. ob_get_contents()
- 3. ob_get_status()
- 4. ob_get_level()
- 5. ob_flush()
- 6. ob_end_flush()
- 7. ob_clean()
- 8. ob_end_clean()
- 9. ob_get_clean()
- Php set output buffering
- How to enable and disable the PHP output_buffering directive
- Using the output_buffering directive
- More Information
- Article Details
- How to Enable and Disable PHP output buffering
- How to Enable and Disable PHP output buffering on Linux server
- How to Enable PHP output_buffering
- How to Disable PHP output_buffering
- How to check whether PHP output_buffering is enabled or disabled
Output Buffering in PHP
Output buffering is a concept some developers find hard to understand. In this article, I would explain what it is so you can use it with better understanding in your PHP applications.
What is a buffer?
A buffer is a location in the memory (i.e RAM) of a computer that temporarily stores data for a period of time. An input device sends data to the computer, the data is processed and the output generated is stored in a buffer. Take for example a microphone and speaker, when someone speaks through the microphone, the sound is sent to a buffer before it is sent to the speaker, or else what the person says would not be heard well. In the case of the web, a buffer is a location in memory or cache that stores the output to be sent to the browser.
What is output buffering?
Output buffering is a technique that allows you control when output is sent from your script to the browser. This is important to understand because without output buffering, the browser would be receiving the output in pieces. One thing that makes output buffering very useful is the control it gives you to determine how your output should be sent to the browser. Here is an example of how output is sent with and without output buffering. 

1. ob_start()
In other to do output buffering in PHP, you need to turn it on. When output buffering is on, no output is sent from your script, rather it is stored in an output buffer. Once the script finishes executing, PHP would send the contents stored in the output buffer to the browser. The only output you can send when output buffering is on are headers.
- Output buffering is enabled by default most times in PHP. You can check by
- Going to your php.ini config file and looking for the output buffering configuration setting. If it has a value of 4096, then output buffering is on
- Using the browser. If you use XAMPP for instance, you can go to this link and check if output buffering is on or off.
- You can call ob_start() more than once in your script. When you call ob_start(), you are turning on output buffering at a SPECIFIC LEVEL.
What does this mean?, since output buffering is on by default, the first level of the output buffer is at 0, when you call ob_start() in your script, the level changes to 1, if you call it again, it changes to 2, if you call it again, it changes to 3, I think you get the pattern now. This is important to understand because the level where output buffering is turned on determines where it would work.
2. ob_get_contents()
This function retrieves the content stored in the output buffer. With the help of this function, you can manipulate the output before sending it to the browser.
3. ob_get_status()
This function returns information about the current output buffer, depending on the level where output buffering started.
string(22) "default output handler" ["type"] => int(0) ["flags"] => int(112) ["level"] => int(1) ["chunk_size"] => int(0) ["buffer_size"] => int(16384) ["buffer_used"] => int(5) */ 4. ob_get_level()
This function returns a count of all the output buffers that are running, including the default one.
5. ob_flush()
This function flushes (i.e sends) the content stored in the output buffer to the browser. After the output is sent, the output buffer is emptied.
6. ob_end_flush()
This function does the same thing with ob_flush(), the only difference is immediately ob_end_flush() sends the output, it turns off output buffering.
** N/B :- If you don’t get false, it is because when output buffering is turned off, buffering would go back to the previous level, which in this case would be 0. So you would need to call ob_end_flush() again to turn it off at that level.**
7. ob_clean()
This function removes what is stored in the output buffer. You would call this function last in the output buffering process because if you need to get or send the content stored in the output buffer, calling ob_clean() would clean the contents of the output buffer and there won’t be any content to receive or send.
8. ob_end_clean()
This function removes the contents stored in the topmost output buffer and turns off output buffering at that level. The topmost output buffer is the output buffering process you started last in your script.
9. ob_get_clean()
This function is really cool because you can get the content stored in the output buffer and turn off output buffering at the same time. It’s like using ob_get_contents() and ob_end_clean() together.
This is the basics of getting started with output buffering, you can read more about it from PHP’s documentation website and implement it in your web applications. What still confuses you about output buffering?, I would love to know and help you out.
Connect with me on Twitter and Linkedin and let’s share beautiful ideas and knowledge
Php set output buffering
The behaviour of these functions is affected by settings in php.ini .
| Name | Default | Changeable | Changelog |
|---|---|---|---|
| output_buffering | «0» | PHP_INI_PERDIR | |
| output_handler | NULL | PHP_INI_PERDIR | |
| implicit_flush | «0» | PHP_INI_ALL | |
| url_rewriter.tags | «a=href,area=href,frame=src,form=,fieldset=» | PHP_INI_ALL | Before PHP 7.1.0, this was used to set session’s trans sid rewrite. From PHP 7.1.0, it is only used by output_add_rewrite_var() . |
| url_rewriter.hosts | $_SERVER[‘HTTP_HOST’] is used as default. | PHP_INI_ALL | Available as of PHP 7.1.0 |
For further details and definitions of the PHP_INI_* modes, see the Where a configuration setting may be set.
Here’s a short explanation of the configuration directives.
output_buffering bool / int
You can enable output buffering for all files by setting this directive to ‘On’. If you wish to limit the size of the buffer to a certain size — you can use a maximum number of bytes instead of ‘On’, as a value for this directive (e.g., output_buffering=4096). This directive is always Off in PHP-CLI.
You can redirect all of the output of your scripts to a function. For example, if you set output_handler to mb_output_handler() , character encoding will be transparently converted to the specified encoding. Setting any output handler automatically turns on output buffering.
Note:
Only built-in functions can be used with this directive. For user defined functions, use ob_start() .
false by default. Changing this to true tells PHP to tell the output layer to flush itself automatically after every output block. This is equivalent to calling the PHP function flush() after each and every call to print or echo and each and every HTML block.
When using PHP within an web environment, turning this option on has serious performance implications and is generally recommended for debugging purposes only. This value defaults to true when operating under the CLI SAPI .
url_rewriter.tags string url_rewriter.tags specifies which HTML tags are rewritten by output_add_rewrite_var() values. Defaults to a=href,area=href,frame=src,input=src,form= form is special tag. is added as form variable.
Note: Before PHP 7.1.0, url_rewriter.tags was used to specify session.trans_sid_tags. As of PHP 7.1.0, fieldset is no longer considered as special tag.
url_rewriter.hosts string url_rewriter.hosts specifies which hosts are rewritten to include output_add_rewrite_var() values. Defaults to $_SERVER[‘HTTP_HOST’] . Multiple hosts can be specified by «,», no space is allowed between hosts. e.g. php.net,wiki.php.net,bugs.php.net
How to enable and disable the PHP output_buffering directive
This article describes how to enable and disable the output_buffering directive in a custom php.ini file.
The information in this article only applies to certain types of hosting accounts. To determine whether or not the information below applies to your account, please see this article.
This article assumes that you have already set up a custom php.ini file on your web site. If you have not already set up a custom php.ini file, please read this article first.
Using the output_buffering directive
By default, when PHP processes a script, it sends output to the client in multiple chunks until script processing is complete. You can change this behavior and set PHP to buffer output during script processing instead.
When output buffering is enabled, PHP sends all of the output to the client only after script processing is complete. There are two main reasons why you may want to do this:
- Output buffering enables you to send headers to the client after PHP has started processing a script.
- Output buffering may improve site performance.
To enable output buffering, use a text editor to modify the output_buffering directive in the php.ini file as follows:
Alternatively, to enable output buffering and limit the buffer to a specific size, use a numeric value instead of on. For example, to set the maximum size of the output buffer to 16384 bytes, modify the output_buffering directive in the php.ini file as follows:
To disable output buffering, modify the output_buffering directive in the php.ini file as follows :
To verify the current value of the output_buffering directive and other directives, you can use the phpinfo() function. For more information about how to do this, please see this article.
More Information
- To view a complete list of php.ini directives, please visit http://www.php.net/manual/en/ini.list.php.
- For more information about the output_buffering directive, please visit http://php.net/manual/en/outcontrol.configuration.php.
Article Details
How to Enable and Disable PHP output buffering

How to Enable and Disable PHP output buffering on Linux server
PHP output_buffering is used to keep some data in memory instead of sending it to web browser.
Output is stored in memory for some time and it is sent to the web browser when the script execution is completed.
How to Enable PHP output_buffering
1. Log into your Linux server as ‘root’ user or login as any user with sudo privileges
2. Find the path of php.ini by running the command ‘php —ini’

3. Open php.ini using vi editor and change ‘output_buffering = On’ in php.ini file

How to Enable PHP output_buffering
4. Save the php.ini file and exit
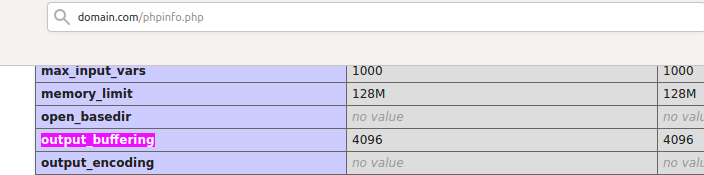
6. Create phpinfo page to verify output_buffering is enabled
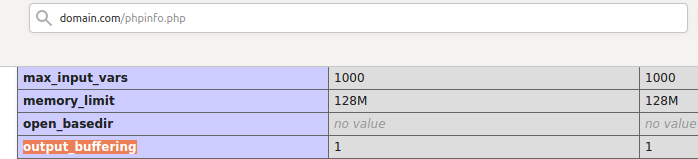
phpinfo – output_buffering enabled
‘output_buffering = 1’ means output_buffering is enabled and buffer is unlimited (Use with caution)
You can set custom value for output_buffering. Example : ‘output_buffering = 4096’
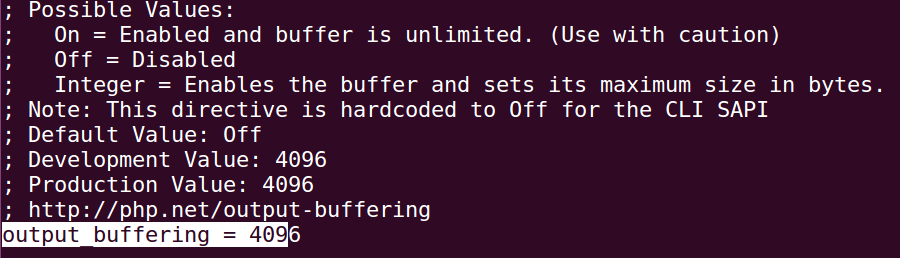
How to set custom value for output_buffering
How to Disable PHP output_buffering
1. Log into you Linux server as ‘root’ user
2. Run the command ‘php —ini’ to find the loaded configuration file
3. Change the line to ‘output_buffering = Off’ in php.ini file
Change the line ‘output_buffering = On’ to ‘output_buffering = Off’
4. Save the php.ini file and exit
5. Restart the webserver for changes to take effect
6. Create phpinfo file to verify output_buffering is disabled
‘output_buffering = 0’ means output_buffering is disabled.
How to check whether PHP output_buffering is enabled or disabled
1. Log into your Linux server as ‘root’ or sudo user
2. Run the command ‘php —ini’ to find the PHP configuration file

3. Grep ‘output_buffering’ in PHP configuration file
[root@server /]# grep output_buffering /etc/php.ini; output_buffering
output_buffering = 4096
; performance, enable output_buffering in addition.
4. You can also check output_buffering by creating phpinfo page in site document root
output_buffering is enabled on the above linux server.