- How To Configure PHP OpenSSL Module On Windows
- Step 1 — Verify Module
- Step 2 — Configure Module
- Summary
- Php openssl windows extensions
- How to enable PHP’s openssl extension to install Composer ?
- How to enable PHP’s openssl extension to install Composer ?
- Configuring PHP OpenSSL Extension with IIS via PHP Manager on Windows
How To Configure PHP OpenSSL Module On Windows
It provides all the steps required to configure the OpenSSL module of PHP on Windows.
We need the relevant PHP module to communicate with an HTTPS or TLS server. This tutorial provides all the steps required to configure the OpenSSL module of PHP on Windows for communication over HTTPS or TLS protocols.
Step 1 — Verify Module
First of all, we will verify whether the SSL module is already installed and enabled by analyzing the output of the phpinfo function.
Write a program having the content as shown below. I have saved the file as info.php.
Now execute it on the console using the PHP executable as shown below.
# Execute the php file
php info.php

# Output:

.
.
gzip compression => enabled
bzip2 compression => disabled (install ext/bz2)
OpenSSL support => disabled (install ext/openssl)

.
.
We can see that the OpenSSL support is disabled for the PHP installed on the system. The output of the same program on the browser is shown in Fig 1.
Step 2 — Configure Module
In order to continue with this step, make sure that the php_openssl.dll is present within the ext directory of your PHP installation.
Now update the php.ini file as shown below.
Save the file and again run the info.php on the console. You should see the output as shown below.
openssl

OpenSSL support => enabled
OpenSSL Library Version => OpenSSL 1.1.1a 20 Nov 2018
OpenSSL Header Version => OpenSSL 1.1.1a 20 Nov 2018
Openssl default config => C:\usr\local\ssl/openssl.cnf
If you run info.php in the browser, it should look like the one as shown in Fig 2. Make sure to restart Apache Web Server to reflect the changes.
Summary
This is how we can enable the OpenSSL module of PHP on Windows. We can communicate over the HTTPS or TLS protocols after enabling this module.
Php openssl windows extensions
PKI Tutorials — Herong’s Tutorial Examples — v2.32, by Herong Yang
∟ Configuring PHP OpenSSL on Windows
This section provides a tutorial example on how to install and configure the PHP OpenSSL module on Windows systems. PHP OpenSSL is provided as a DLL file called php_openssl.dll.
If you want to write your own PHP program to communicate with an HTTPS Web server, you should install a PHP module to help you. Currently, the best PHP module for HTTPS communication is the OpenSSL module.
Here what I did to install and configure the OpenSSL module on my Windows system:
1. Make sure I have PHP installed properly:
herong> \local\php\php -version PHP 7.0.2 (cli) (built: Jan 6 2016 13:05:11) ( ZTS ) Copyright (c) 1997-2015 The PHP Group Zend Engine v3.0.0, Copyright (c) 1998-2015 Zend Technologies
2. Make sure the OpenSSL module DLL file is included in the PHP installation:
herong> dir \local\php\ext\php_openssl.dll 01/06/2016 02:01 PM 91,136 php_openssl.dll
3. Create the PHP configuration file, \local\php\php.ini, if it does not exist:
herong> copy \local\php\php.ini-production \local\php\php.ini 1 file(s) copied.
4. Enable the OpenSSL module by editing the configuration file with a text editor. You need to remove the comment maker (;) on two configuration lines:
. ; Directory in which the loadable extensions (modules) reside. ; http://php.net/extension-dir ; extension_dir = "./" ; On windows: extension_dir = "ext" . extension=php_openssl.dll .
I think I am ready to test the PHP OpenSSL module. See the next tutorial.
How to enable PHP’s openssl extension to install Composer ?
To perform the secure HTTPS transfers you will need to enable the openssl extension then you have to install the composer. In this article, we will cover the enabling openssl for XAMPP as well as WAMP one by one then we will install the composer.
- Enable openssl extension on XAMPP
- Enable openssl extension on WAMP
- Installation of Composer
Enable PHP’s openssl extension on XAMPP:
- Step 1: Open XAMPP control panel and click on the Config button for the Apache module.
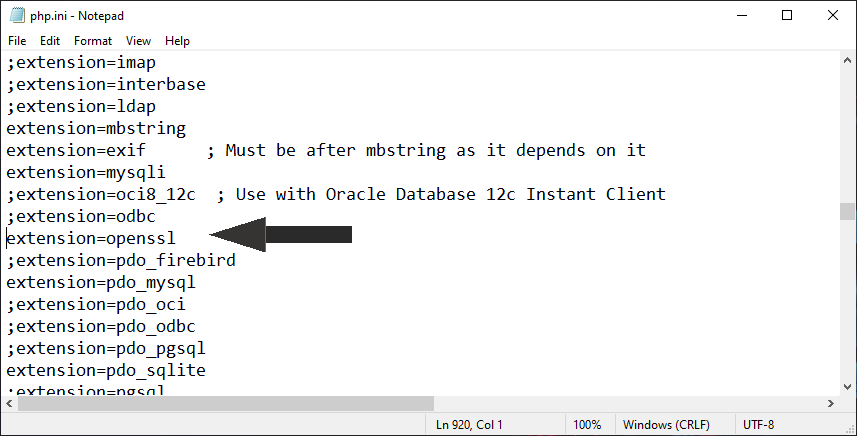
- Step 2: Then from the given options, select PHP (php.ini) option. This will open the php.ini file in the default text editor (example: notepad).

- Step 3: Now we have to search for extension=openssl line in that file.
- Step 4: After you find it, see if there is any semicolon ‘;’ at the beginning of the line. If there is then that means it is disabled. So remove the semicolon to enable the extension.
- Step 5: Save and Close the file. And there you have openssl extension enabled.

Enable PHP’s openssl extension on WAMP:
- Step 1: Run the WAMP Server installed on the system.
- Step 2: Now Left Click on the Green WAMP icon on the bottom right corner in windows and go in PHP option.
- Step 3: Then go to the PHP extensions option and there you will find the openssl option. If there is a green tick mark at the beginning of it then it means it is enabled. If not then you can enable it by clicking it.
- Step 4: Now restart all the services and you have enabled openssl extension.


Note: You can also enable openssl on WAMP by going in the php.ini file.
Install Composer: After following the above steps for enabling the openssl, you can follow the following steps to install Composer
- Step 1: Download the Composer-Setup.exe file and run it.
- Step 2: After running, you will see a popup box asking for the install mode. Here select Install for all users, which is also a recommended option, and hit Yes.
- Step 3: In Installation Options window, we don’t want the Developer mode, so we will let it be unpicked and click on Next.
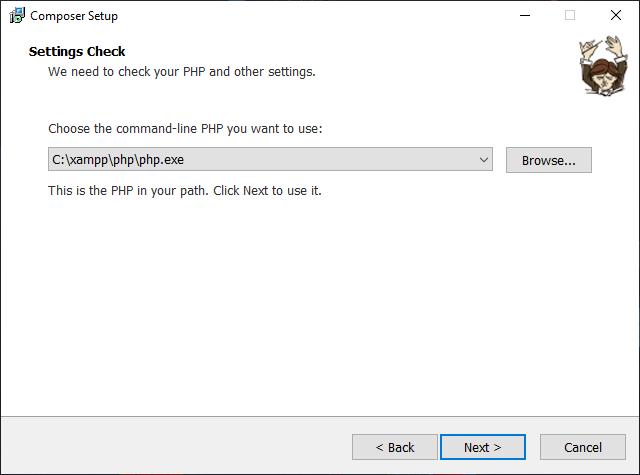
- Step 4: Now, you will have to choose the PHP command-line. For XAMPP, the path will be C:\xampp\php\php.exe and for WAMP, the path will be C:\wamp64\bin\php\php7.3.12\php.exe and click Next. If you don’t find the path in the drop down then you will have to browse it. The version of PHP can be different for you.If don’t have installed Visual C++ Redistributable for Visual Studio then it will show you below error. So to proceed you have to install that first.
- Step 5: Now in the Proxy Setting, leave every thing as it is and click on Next.
- Step 6: Now, verify the settings and click on Install.
- Step 7: Now you will see the following windows which means that the Composer is installed. Click on Next and hit Finish.
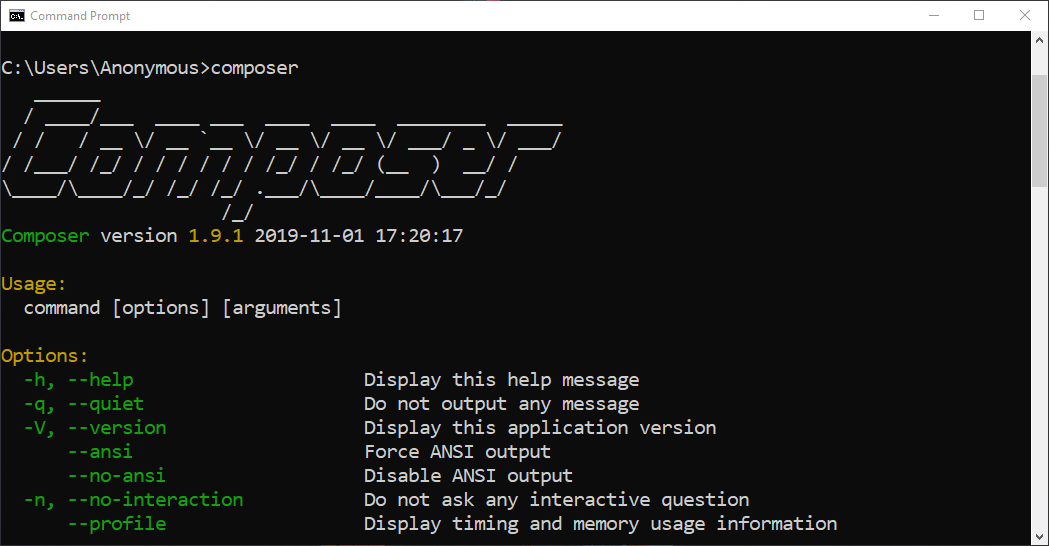
- Step 8: Now, to check if composer installed properly, open cmd, and type composer and hit Enter. If you see the output as below then it is successfully installed. If not then you will have to restart your PC and try again.


 If don’t have installed Visual C++ Redistributable for Visual Studio then it will show you below error. So to proceed you have to install that first.


How to enable PHP’s openssl extension to install Composer ?
To perform the secure HTTPS transfers you will need to enable the openssl extension then you have to install the composer. In this article, we will cover the enabling openssl for XAMPP as well as WAMP one by one then we will install the composer.
- Enable openssl extension on XAMPP
- Enable openssl extension on WAMP
- Installation of Composer
Enable PHP’s openssl extension on XAMPP:
- Step 1: Open XAMPP control panel and click on the Config button for the Apache module.
- Step 2: Then from the given options, select PHP (php.ini) option. This will open the php.ini file in the default text editor (example: notepad).
- Step 3: Now we have to search for extension=openssl line in that file.
- Step 4: After you find it, see if there is any semicolon ‘;’ at the beginning of the line. If there is then that means it is disabled. So remove the semicolon to enable the extension.
- Step 5: Save and Close the file. And there you have openssl extension enabled.
Enable PHP’s openssl extension on WAMP:
- Step 1: Run the WAMP Server installed on the system.
- Step 2: Now Left Click on the Green WAMP icon on the bottom right corner in windows and go in PHP option.
- Step 3: Then go to the PHP extensions option and there you will find the openssl option. If there is a green tick mark at the beginning of it then it means it is enabled. If not then you can enable it by clicking it.
- Step 4: Now restart all the services and you have enabled openssl extension.
Note: You can also enable openssl on WAMP by going in the php.ini file.
Install Composer: After following the above steps for enabling the openssl, you can follow the following steps to install Composer
- Step 1: Download the Composer-Setup.exe file and run it.
- Step 2: After running, you will see a popup box asking for the install mode. Here select Install for all users, which is also a recommended option, and hit Yes.
- Step 3: In Installation Options window, we don’t want the Developer mode, so we will let it be unpicked and click on Next.
- Step 4: Now, you will have to choose the PHP command-line. For XAMPP, the path will be C:\xampp\php\php.exe and for WAMP, the path will be C:\wamp64\bin\php\php7.3.12\php.exe and click Next. If you don’t find the path in the drop down then you will have to browse it. The version of PHP can be different for you.If don’t have installed Visual C++ Redistributable for Visual Studio then it will show you below error. So to proceed you have to install that first.
- Step 5: Now in the Proxy Setting, leave every thing as it is and click on Next.
- Step 6: Now, verify the settings and click on Install.
- Step 7: Now you will see the following windows which means that the Composer is installed. Click on Next and hit Finish.
- Step 8: Now, to check if composer installed properly, open cmd, and type composer and hit Enter. If you see the output as below then it is successfully installed. If not then you will have to restart your PC and try again.
Configuring PHP OpenSSL Extension with IIS via PHP Manager on Windows
This section provides a tutorial example on how to install and configure PHP OpenSSL extension/module with IIS on Windows via PHP Manager.
STEPS — How to do:
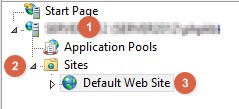
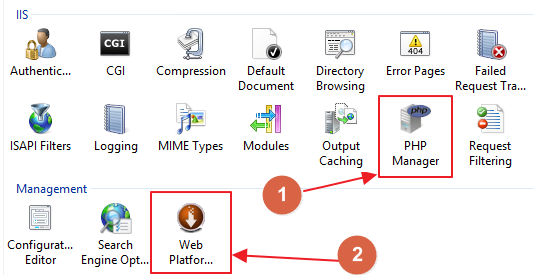
- Open Internet Information Services (IIS) Manager , expand < Your-Server-Name > option then expand Sites then choose the desired [PHPKB] site or Default Web Site if you have only site (see image below).
- On the right side, you would find PHP Manager (if it is unavailable then you can install it using Web Platform Installer highlighted in RED colored box with 2 ), click to open that (see image below).
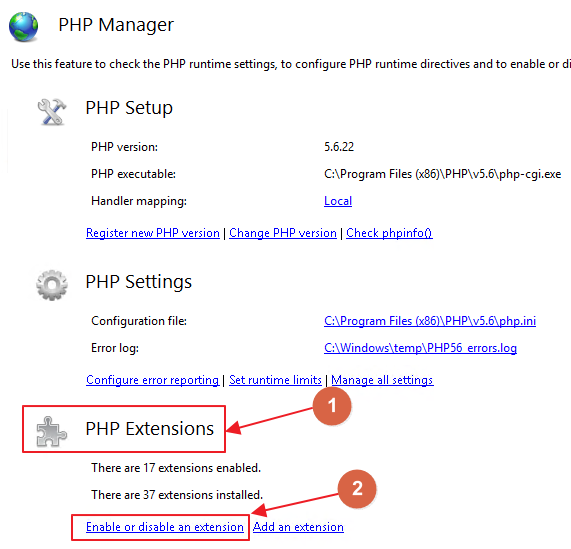
- Under PHP Extensions section, click Enable or disable an extension (see image below).
- Then you would see the enabled extensions under Enabled section and disabled extensions just below the Disabled (it would be greyed out) section (see image below).

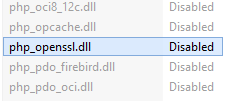
- Scroll down and find php_openssl.dll extension, right click on it and then click Enable option (see image below).
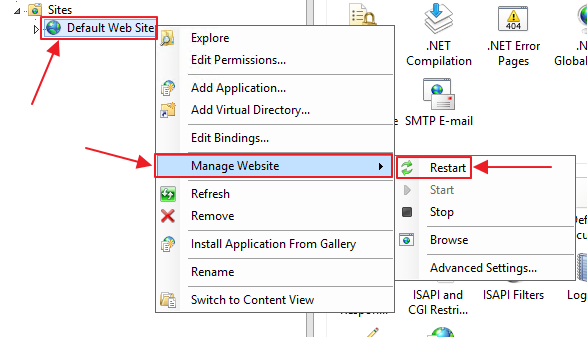
- Now, it would be moved to Enabled extensions list and then right click on your Web Site name (listed on the left side tree) then hover Manage Website and click Restart option (see image below).
5 people found this article helpful what about you?