- Saved searches
- Use saved searches to filter your results more quickly
- License
- Imagick/imagick
- Name already in use
- Sign In Required
- Launching GitHub Desktop
- Launching GitHub Desktop
- Launching Xcode
- Launching Visual Studio Code
- Latest commit
- Git stats
- Files
- README.md
- Установка Imagemagick
- Debian/Ubuntu
- Установка ImageMagick
- Установка php-imagick
- CentOS
- Установка Imagemagick
- Установка php-imagick
- Подключаем ImageMagick в PHP
- 3. Загрузка расширения php_Imagick.dll
- PHP 5.2.x
- PHP 5.3.x
- 4. Настройка PHP
Saved searches
Use saved searches to filter your results more quickly
You signed in with another tab or window. Reload to refresh your session. You signed out in another tab or window. Reload to refresh your session. You switched accounts on another tab or window. Reload to refresh your session.
🌈 The Imagick PHP extension 🌈
License
Imagick/imagick
This commit does not belong to any branch on this repository, and may belong to a fork outside of the repository.
Name already in use
A tag already exists with the provided branch name. Many Git commands accept both tag and branch names, so creating this branch may cause unexpected behavior. Are you sure you want to create this branch?
Sign In Required
Please sign in to use Codespaces.
Launching GitHub Desktop
If nothing happens, download GitHub Desktop and try again.
Launching GitHub Desktop
If nothing happens, download GitHub Desktop and try again.
Launching Xcode
If nothing happens, download Xcode and try again.
Launching Visual Studio Code
Your codespace will open once ready.
There was a problem preparing your codespace, please try again.
Latest commit
Git stats
Files
Failed to load latest commit information.
README.md
Imagick is a PHP extension to create and modify images using the ImageMagick library. There is also a version of Imagick available for HHVM. Although the two extensions are mostly compatible in their API, and they both call the ImageMagick library, the two extensions are completely separate code-bases.
Bugs can also be reported at https://bugs.php.net but may have a slower response time.
The best way of installing Imagick is through a package manager e.g. apt, yum, brew, as they will also install ImageMagick for you.
If you need to compile Imagick from source, first you should install ImageMagick, at least version 6.2.4 but it is STRONGLY recommended to use a more recent version due to the many bug fixes in it.
Once ImageMagick is installed, the following commands will compile and install Imagick:
git clone https://github.com/Imagick/imagick cd imagick phpize && ./configure make make install You will also need to add extension=imagick.so to your PHP ini file to make PHP load the extension.
For Windows please install both Imagick and the underlying ImageMagick library from:
Once compiled, Imagick should be run with the same version of ImageMagick that it was compiled against. Running against a different version of ImageMagick is known to cause stability issues, and so is not recommended or supported.
If using Imagick on NixOS, you probably want to define FONTCONFIG_FILE to avoid a warning message when loading fonts, and MAGICK_CONFIGURE_PATH to have all the information available from Imagick::getConfigureOptions().
Almost all of the functions in the library have an example at www.phpimagick.com, where you can see the example code to call the function, as well as the generated image or output.
ImageMagick, the library that the Imagick extension exposes to PHP has had many bug fixes, that have fixed many image corruption issues. We strongly recommend upgrading to the latest version (greater than 6.9.1 or 7.x) if at all possible.
The PHP extension Imagick works by calling the ImageMagick library. Although the ImageMagick developers take good care in avoiding bugs it is inevitable that some bugs will be present in the code. ImageMagick also uses a lot of third party libraries to open, read and manipulate files. The writers of these libraries also take care when writing their code. However everyone makes mistakes and there will inevitably be some bugs present.
Because ImageMagick is used to process images it is feasibly possible for hackers to create images that contain invalid data to attempt to exploit these bugs. Because of this we recommend the following:
- Do not run Imagick in a server that is directly accessible from outside your network. It is better to either use it as a background task using something like SupervisorD or to run it in a separate server that is not directly accessible on the internet.
Doing this will make it more difficult for hackers to exploit a bug, if one should exist in the libraries that ImageMagick is using.
- Run it as a very low privileged process. As much as possible the files and system resources accessible to the PHP script that Imagick is being called from should be locked down.
- Verify that all image files begin with the expected «magic bytes» corresponding to the image file types you support before sending them to ImageMagick for processing. This an be be done with finfo_file() — see below.
- Check the result of the image processing is a valid image file before displaying it to the user. In the extremely unlikely event that a hacker is able to pipe arbitrary files to the output of Imagick, checking that it is an image file, and not the source code of your application that is being sent, is a sensible precaution. This can be accomplished by the following code:
$finfo = finfo_open(FILEINFO_MIME_TYPE); $mimeType = finfo_file($finfo, $filename); $allowedMimeTypes = [ 'image/gif', 'image/jpeg', 'image/jpg', 'image/png' ]; if (in_array($mimeType, $allowedMimeTypes) == false) < throw new \SecurityException("Was going to send file '$filename' to the user, but it is not an image file."); > - NEVER directly serve any files that have been uploaded by users directly through PHP, instead either serve them through the webserver, without invoking PHP, or use readfile to serve them within PHP.
These recommendations do not guarantee any security, but they should limit your exposure to any Imagick/ImageMagick related security issue.
ImageMagick has the ability to use the Open Multi-Processing API to be able to use multiple threads to process an image at once. Some implementations of OpenMP are known to have stability issues when they are used in certain environments.
We recommend doing one of the following:
- Disabling OpenMP support in ImageMagick by compiling it with the compile flag «—disable-openmp» set.
- Disable the use of threads in ImageMagick via Imagick by calling: Imagick::setResourceLimit(\Imagick::RESOURCETYPE_THREAD, 1); or Imagick::setResourceLimit(6, 1); if your version of Imagick does not contain the RESOURCETYPE_THREAD constant.
- Disable the use of threads in ImageMagick by setting the thread resource limit in ImageMagick’ policy.xml file with This file is possibly located at /etc/ImageMagick-6/policy.xml or similar location.
- If you do want to use OpenMP in ImageMagick when it’s called through Imagick, you should test thoroughly that it behaves correctly on your server.
Установка Imagemagick
![]()
Перейдите в раздел Настройки — Настройки PHP, выделите нужную версию PHP и нажмите кнопку Управление расширениями.
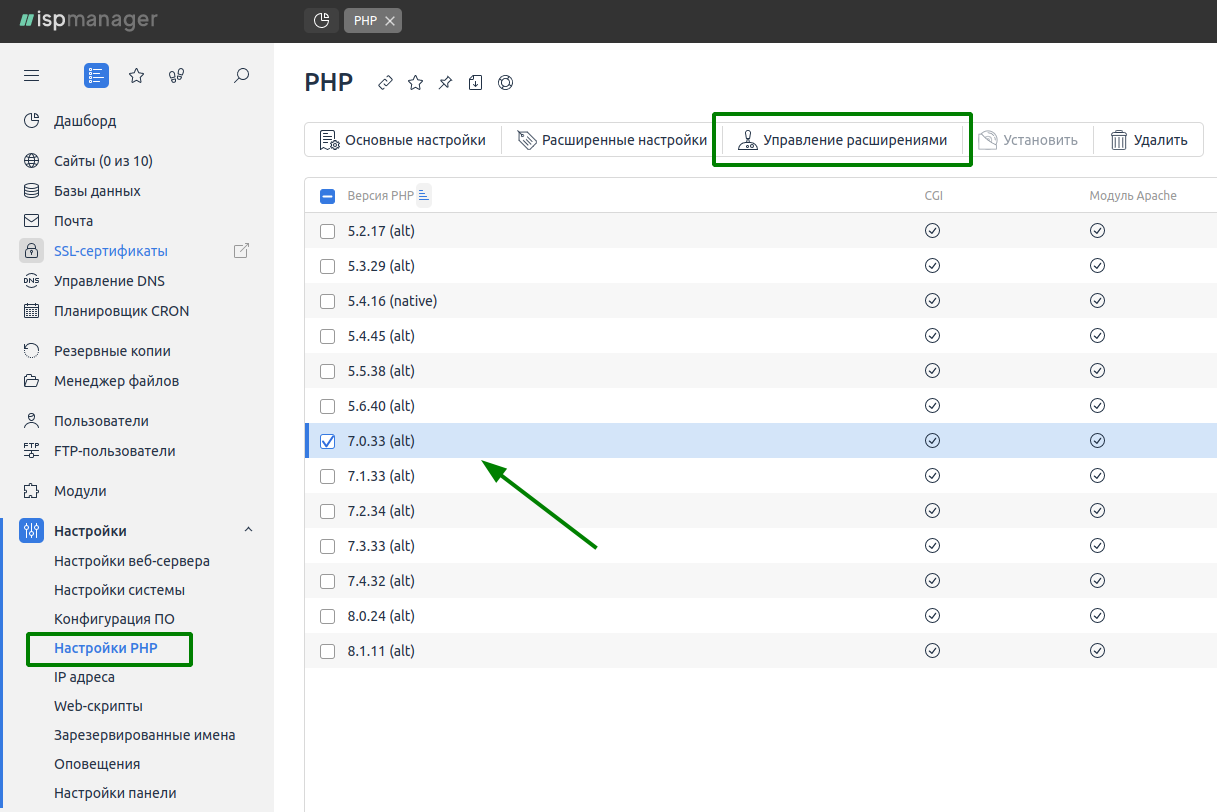
В открывшемся списке найдите imagick, выделите его и нажмите кнопку Установить или Включить — в зависимости от того, какая будет активной.
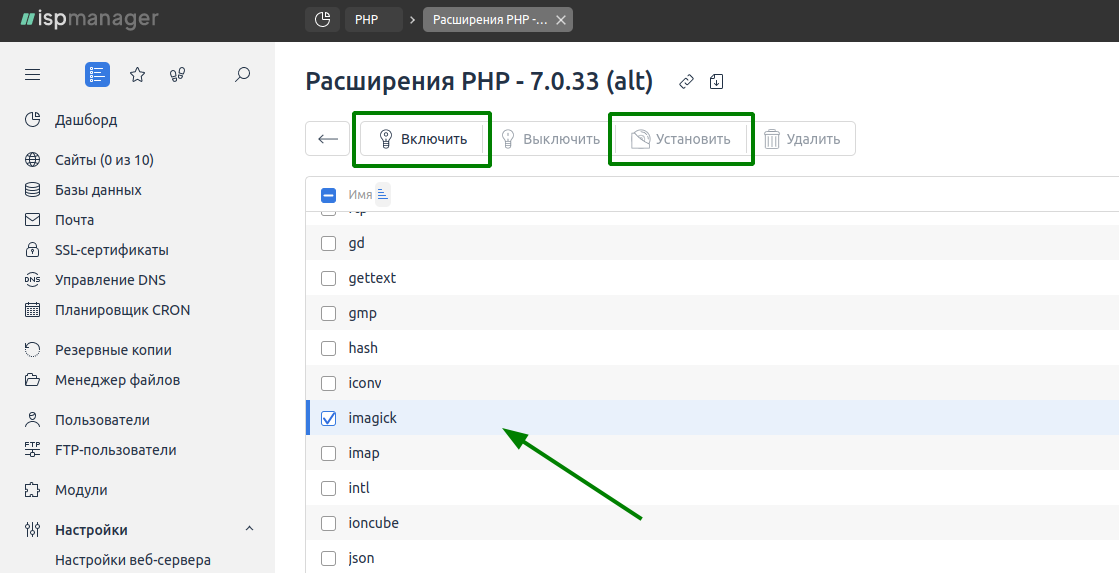
Как только лампочка напортив расширения imagick станет зеленой — расширение включено.

Debian/Ubuntu
Установка ImageMagick
Обновляем информацию о доступных пакетах:
Проверяем установленную версию:
Version: ImageMagick 6.9.10-23 Q16 x86_64 20190101 https://imagemagick.org Copyright: © 1999-2019 ImageMagick Studio LLC License: https://imagemagick.org/script/license.php Features: Cipher DPC Modules OpenMP Delegates (built-in): bzlib djvu fftw fontconfig freetype heic jbig jng jp2 jpeg lcms lqr ltdl lzma openexr pangocairo png tiff webp wmf x xml zlib
Если последняя команда выдала информации о установленной версии, то всё установлено корректно.
Установка php-imagick
Проверяем установленное расширение:
root@ashamans:~# php -m |grep imagick imagick root@ashamans:~#
Перезагружаем веб-сервер apache:
CentOS
Установка Imagemagick
Проверяем корректность установки:
[root@ashamans ~]# convert -version Version: ImageMagick 6.9.10-68 Q16 x86_64 2021-10-14 https://imagemagick.org Copyright: © 1999-2019 ImageMagick Studio LLC License: https://imagemagick.org/script/license.php Features: Cipher DPC Modules OpenMP(3.1) Delegates (built-in): bzlib cairo fontconfig freetype gslib jng jp2 jpeg lcms ltdl lzma openexr pangocairo png ps rsvg tiff wmf x xml zlib
Установка php-imagick
Выполняем в консоли команды:
yum install make gcc yum install php-devel php-pear ImageMagick-devel
Устанавливаем расширение imagick (если php < 5.4):
Если более новая версия PHP:
Please provide the prefix of Imagemagick installation [autodetect] :
По окончинию установки увидим текст с предложение добавить строку extension=imagick.so в php.ini
You should add "extension=imagick.so" to php.ini
echo 'extension=imagick.so' > /etc/php.d/imagick.ini
#php -m |grep imagick imagick
Подключаем ImageMagick в PHP
В принципе установить можно в любую директорию, даже в папку с PHP.
Внимание. Следите за тем, чтобы стояла галочка «Add to system path» так как обращение будет происходить через переменную окружения Path. После установки желательно перезагрузить PC, чтоб пути Path вошли в действие.
3. Загрузка расширения php_Imagick.dll
PHP 5.2.x
файлы лежат здесь valokuva.org/outside-blog-content/imagick-windows-builds/080709
Расшифровка: dyn = dynamic, st = static, q16 = 16 bit, q8= 8 bit. В зависимости от той сборки dll которую вы скачали и установили вам нужно скачать соответствующую библиотеку
Для
PHP 5.3.x
6
в зависимости от Thread Safety вам нужна одна из этих dll www.sk89q.com/downloads/imagick/2.3.0
Если у вас PHP VC
9
4. Настройка PHP
Копируем наш загруженный php_imagick.dll в папку с PHP(/php/ext/), и редактируем php.ini. В главный раздел в конец дописываем строчку
и перезагружаем веб сервер.
Собственно все. Все должно работать.
PS. Для тех у кого все нае заработало с первого разу и при попытке выполнить код типа
thumbnailImage(100, 0); echo $image; ?> apache вылетает с ошибкой и ругается на файл MSVCR100.dll есть решение. Проблема в том, что это файл Visual C++ Redist 2010 и Microsoft что то накосячили в новой версии потому выход один. Скачать болие старую версию imagick. К примеру ImageMagick 6.5.0 вот отсюда mhonarc.veidrodis.com/image_magick/binaries
PSS. Можно отвязать ImageMagick от его текущего местоположения, взявь и скопировав все dll из папки ImageMagick в /apache/bin/