- Upload and Store Image File in Database using PHP and MySQL
- Create Datbase Table
- Database Configuration (dbConfig.php)
- Upload Form HTML
- Upload File to Server and Store in Database (upload.php)
- Display Images from Database
- Conclusion
- How to Upload Image FIle into Database in PHP and MySQL
- How to Upload and Store Image File in database using PHP and MySQL
- Step 1 – Create a Database and Table
- Step 2 – Create PHP App
- Step 3 – Connect App to Database
- Step 4 – Create File/Image Upload Form
- PHP Upload File
- Step 5 – Create uplaod.php file
- Know About – Upload.php File Code
- Conclusion
- File Upload, View and Download using PHP and MySQL
- How to Upload, View & Download File in PHP & MySQL?
- Create MySQL Database:
- dbconnect.php
- index.php
- uploads.php
Upload and Store Image File in Database using PHP and MySQL
Server-side file upload can be easily implemented using PHP. There are various ways available to upload image to server and display images on the webpage. Generally, in a dynamic web application, the uploaded image is stored in a directory of the server and the file name is inserted in the database. Later, the images are retrieved from the server based on the file name stored in the database and display on the web page.
The image can be uploaded directly to the database without storing on the server. But it will increase the database size and web page load time. So, it’s always a good idea to upload images to the server and store file names in the database. In this tutorial, we will show you the entire process to upload and store the image file in MySQL database using PHP.
The example code demonstrates the process to implement the file upload functionality in the web application and the following functionality will be implemented.
- HTML form to upload image.
- Upload image to server using PHP.
- Store file name in the database using PHP and MySQL.
- Retrieve images from the database and display in the web page.
Create Datbase Table
To store the image file name a table need to be created in the database. The following SQL creates an images table with some basic fields in the MySQL database.
CREATE TABLE `images` ( `id` int(11) NOT NULL AUTO_INCREMENT, `file_name` varchar(255) COLLATE utf8_unicode_ci NOT NULL, `uploaded_on` datetime NOT NULL, `status` enum('1','0') COLLATE utf8_unicode_ci NOT NULL DEFAULT '1', PRIMARY KEY (`id`) ) ENGINE=InnoDB DEFAULT CHARSET=utf8 COLLATE=utf8_unicode_ci;
Database Configuration (dbConfig.php)
The dbConfig.php file is used to connect and select the MySQL database. Specify the database hostname ( $dbHost ), username ( $dbUsername ), password ( $dbPassword ), and name ( $dbName ) as per your MySQL credentials.
// Database configuration
$dbHost = "localhost";
$dbUsername = "root";
$dbPassword = "root";
$dbName = "codexworld";

// Create database connection
$db = new mysqli($dbHost, $dbUsername, $dbPassword, $dbName);

// Check connection
if ($db->connect_error) die("Connection failed: " . $db->connect_error);
>
?>
Upload Form HTML
Create an HTML form to allow the user to choose a file they want to upload. Make sure < form >tag contains the following attributes.
Also, make sure < input >tag contains type=»file» attribute.
form action="upload.php" method="post" enctype="multipart/form-data"> Select Image File to Upload: input type="file" name="file"> input type="submit" name="submit" value="Upload"> form>

The file upload form will be submitted to the upload.php file to upload image to the server.
Upload File to Server and Store in Database (upload.php)
The upload.php file handles the image upload functionality and shows the status message to the user.
- Include the database configuration file to connect and select the MySQL database.
- Get the file extension using pathinfo() function in PHP and validate the file format to check whether the user selects an image file.
- Upload image to server using move_uploaded_file() function in PHP.
- Insert image file name in the MySQL database using PHP.
- Upload status will be shown to the user.
// Include the database configuration file
include 'dbConfig.php';
$statusMsg = '';

// File upload path
$targetDir = "uploads/";
$fileName = basename($_FILES["file"]["name"]);
$targetFilePath = $targetDir . $fileName;
$fileType = pathinfo($targetFilePath,PATHINFO_EXTENSION);

if(isset($_POST["submit"]) && !empty($_FILES["file"]["name"])) // Allow certain file formats
$allowTypes = array('jpg','png','jpeg','gif','pdf');
if(in_array($fileType, $allowTypes)) // Upload file to server
if(move_uploaded_file($_FILES["file"]["tmp_name"], $targetFilePath)) // Insert image file name into database
$insert = $db->query("INSERT into images (file_name, uploaded_on) VALUES ('".$fileName."', NOW())");
if($insert) $statusMsg = "The file ".$fileName. " has been uploaded successfully.";
>else $statusMsg = "File upload failed, please try again.";
>
>else $statusMsg = "Sorry, there was an error uploading your file.";
>
>else $statusMsg = 'Sorry, only JPG, JPEG, PNG, GIF, & PDF files are allowed to upload.';
>
>else $statusMsg = 'Please select a file to upload.';
>

// Display status message
echo $statusMsg;
?>
Display Images from Database
Now we will retrieve the uploaded images from the server based on the file names in the database and display images in the web page.
- Include the database configuration file.
- Fetch images from MySQL database using PHP.
- List images from the uploads directory of the server.
// Include the database configuration file
include 'dbConfig.php';

// Get images from the database
$query = $db->query("SELECT * FROM images ORDER BY uploaded_on DESC");

if($query->num_rows > 0) while($row = $query->fetch_assoc()) $imageURL = 'uploads/'.$row["file_name"];
?> img src=" echo $imageURL; ?>" alt="" />  >
>else ?> p>No image(s) found. p>  > ?>

Conclusion
Here we have shown the most effective way to implement image upload functionality on the website. You can easily extend the file upload functionality as per your requirements. For providing the better user-interface you can integrate the Ajax File Upload functionality.
Are you want to get implementation help, or modify or enhance the functionality of this script? Click Here to Submit Service Request
If you have any questions about this script, submit it to our QA community — Ask Question
How to Upload Image FIle into Database in PHP and MySQL
PHP image file upload into MySQL database with validation; This tutorial will show you how to upload image files in MySQL database and directory using php.
And as well as you will learn how to validate a file image before uploading the file to the PHP server.
When you work with PHP and need to upload several types of files like images, zip files, PDF files, document files, text files, video files, audio files on a remote web server.
How to Upload and Store Image File in database using PHP and MySQL
- Step 1 – Create a Database and Table
- Step 2 – Create PHP App
- Step 3 – Connect App to Database
- Step 4 – Create Image Upload Form
- Step 5 – Create uplaod.php file
Step 1 – Create a Database and Table
Execute the following queries to create a database and table:
CREATE DATABASE demos; CREATE TABLE `images` ( `id` int(11) NOT NULL, `file` varchar(255) NOT NULL `type` varchar(255) NOT NULL `size` varchar(255) NOT NULL ) ENGINE=InnoDB DEFAULT CHARSET=utf8;
Step 2 – Create PHP App
Visit your server directory; if you use xampp; So visit xampp/htdocs directory. And create a new directory which name file-upload-app.
Step 3 – Connect App to Database
Connect your app to database; so visit your app root directory and create db.js file and the following code into it:
Step 4 – Create File/Image Upload Form
Create file/image upload html form; so visit your app root directory and create index.php file and add the following code into it:
Step 5 – Create uplaod.php file
Create one file name upload.php file and add the below code into your upload.php file. The following PHP code uploads the files from the web server with validation. Here also we will validate the size of the file.
"image/jpg", "jpeg" => "image/jpeg", "gif" => "image/gif", "png" => "image/png"); $filename = $_FILES["anyfile"]["name"]; $filetype = $_FILES["anyfile"]["type"]; $filesize = $_FILES["anyfile"]["size"]; // Validate file extension $ext = pathinfo($filename, PATHINFO_EXTENSION); if(!array_key_exists($ext, $allowed)) die("Error: Please select a valid file format."); // Validate file size - 10MB maximum $maxsize = 10 * 1024 * 1024; if($filesize > $maxsize) die("Error: File size is larger than the allowed limit."); // Validate type of the file if(in_array($filetype, $allowed)) < // Check whether file exists before uploading it if(file_exists("upload/" . $filename))< echo $filename . " is already exists."; >else< if(move_uploaded_file($_FILES["anyfile"]["tmp_name"], "upload/" . $filename))< $sql="INSERT INTO images(file,type,size) VALUES('$filename','$filetype','$filesize')"; mysqli_query($conn,$sql); echo "Your file was uploaded successfully."; >else < echo "File is not uploaded"; >> > else < echo "Error: There was a problem uploading your file. Please try again."; >> else < echo "Error: " . $_FILES["anyfile"]["error"]; >> ?> Know About – Upload.php File Code
Here, if any you uploaded a file using this field name anyfile, we can obtains its details like the name, type, size, temporary name or any error occurred while attempting the upload via the $_FILES[“anyfile”] associative array, like this:
1). $_FILES[“anyfile”][“name”] — This array value specifies the original name of the file, including the file extension. It doesn’t include the file path.
2). $_FILES[“anyfile”][“type”] — This array value specifies the MIME type of the file.
3). $_FILES[“anyfile”][“size”] — This array value specifies the file size, in bytes.
4). $_FILES[“anyfile”][“tmp_name”] — This array value specifies the temporary name including full path that is assigned to the file once it has been uploaded to the server.
5). $_FILES[“anyfile”][“error”] — This array value specifies error or status code associated with the file upload, e.g. it will be 0, if there is no error.
Conclusion
PHP MySQL file upload example tutorial, you have learned how to upload files on web server using PHP. You also learned how you can validate the size and type of files.
File Upload, View and Download using PHP and MySQL
Hi! In this tutorial let me show you about upload, view and download file in php and mysql. The file uploading process is similar to what we have discussed here, but this php script not only uploads file to the server but also stores the file path and its created date in mysql database. Apart from uploading file, it also gives you the option to view file on browser and download it from server.
With PHP you can practically upload any type of files and the file uploading script I have shared below will work for all file types like PDF, Document, Images, MP3, Videos, Zip archives etc. Just include those file extensions in the filtering process ( $allowed array) and you will be able to upload them.
How to Upload, View & Download File in PHP & MySQL?
Let’s move on to the coding part. First you should create mysql database to store file details.
Create MySQL Database:
CREATE DATABASE `demo` ; Use `demo`; CREATE TABLE IF NOT EXISTS `tbl_files` ( `id` int(9) NOT NULL AUTO_INCREMENT, `filename` varchar(255) NOT NULL, `created` datetime NOT NULL, PRIMARY KEY (`id`) ) ENGINE=MyISAM DEFAULT CHARSET=latin1 AUTO_INCREMENT=1;
Next is the database connectivity script that establishes connection to mysql database from php.
dbconnect.php
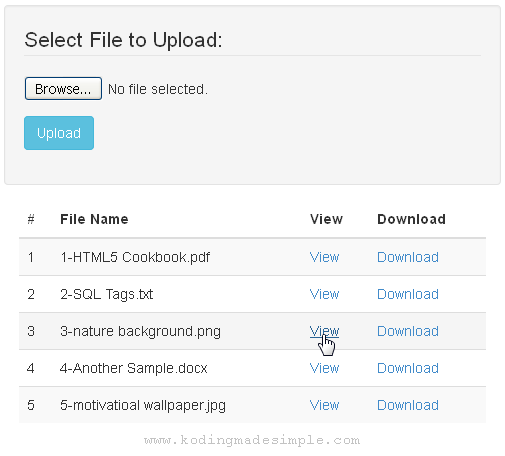
Then create index.php — this is the main file containing user interface. It has an upload form and a html table to display the list of uploaded files from database along with ‘View’ & ‘Download’ links for them.
index.php
# File Name View Download ?> " target="_blank">View " download>Download
Note: This demo uses twitter bootstrap for css stylesheet.
Running index.php will generate a page with upload form and table with files details similar to this. Users can either click on ‘View’ link to view the files on browser or on ‘Download’ to download the files from server.
Finally there is ‘uploads.php’ file which will be executed when the form is submitted to upload the selected file. Here is where we actually upload the file to the server from the client machine and save its name and uploaded date into the database.
uploads.php
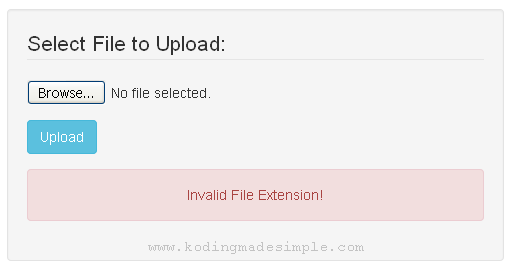
0) < $row = mysqli_fetch_array($result); $filename = ($row['id']+1) . '-' . $filename; >else $filename = '1' . '-' . $filename; //set target directory $path = 'uploads/'; $created = @date('Y-m-d H:i:s'); move_uploaded_file($_FILES['file1']['tmp_name'],($path . $filename)); // insert file details into database $sql = "INSERT INTO tbl_files(filename, created) VALUES('$filename', '$created')"; mysqli_query($con, $sql); header("Location: index.php?st=success"); > else < header("Location: index.php?st=error"); >> else header("Location: index.php"); > ?> This script upload file from local machine to server and stores its details into database and redirects to index.php. If everything goes right you will be able to see success message on completion.

If there’s any error you will be notified about it.
So we have seen about file upload and to view and download them using php and mysql database. If you want you can set the file size limit or restrict users to upload only pdf or images etc.