- How to enable PHP zip extension in your web hosting
- Enable PHP zip in your hosting
- What if you don’t see the zip extension?
- Take your skills to the next level ⚡️
- About
- Search
- How to Enable PHP Zip Extension in cPanel (3 Easy Steps)
- Step 1: Log in to your cPanel
- Step 2: Install PHP Zip Extension
- Step 3: Change the PHP Version and Enable PHP Zip Extension
- Conclusion
- How to enable ZipArchive for PHP
- How to enable ZipArchive on Windows
- Before you enable ZipArchive
- How to enable ZipArchive on Docker
- How to enable ZipArchive on Linux on Ubuntu
- Don’t forget to restart your web server!
- Wrapping up
- You may also be interested in
- Related Posts
- Scan Your Docker Images and Containers with VirusTotal: A Step-by-Step Guide
- Accelerate Your Performance Testing on Ubuntu with k6 and Postman-to-k6
- Solve the “Cannot read properties of undefined (reading ‘type’)” error with these simple fixes
- About Anto Online
- 3 Comments on “How to enable ZipArchive for PHP”
- Leave a Reply
- Tags
- Latest Posts
- Scan Your Docker Images and Containers with VirusTotal: A Step-by-Step Guide
- Bitbucket for Newbies: Mastering Basic Commands and Collaborating on Code
- Accelerate Your Performance Testing on Ubuntu with k6 and Postman-to-k6
- Solve the “Cannot read properties of undefined (reading ‘type’)” error with these simple fixes
- Solving the ‘tail: inotify resources exhausted’ Error on Ubuntu
How to enable PHP zip extension in your web hosting

Posted on Jul 28, 2022
PHP zip extension is used to read and write compressed zip files. This extension is usually required to make PHP-based applications able to interact with zip files.
Sometimes, you may see the “PHP zip is not installed or has been disabled message” in WordPress.
Here are the steps to enable the PHP zip extension in your hosting from cPanel:
- Log into your cPanel account
- Go to the Select PHP Version menu
- Click the Extensions tab
- Check the zip extension to enable it
The tutorial below will show you how to do these steps in detail:
Enable PHP zip in your hosting
Login to your cPanel account, then look for the Select PHP Version menu under the Software tab:

Next, click on the Extensions tab and see the zip extension under the Z entries as shown below:
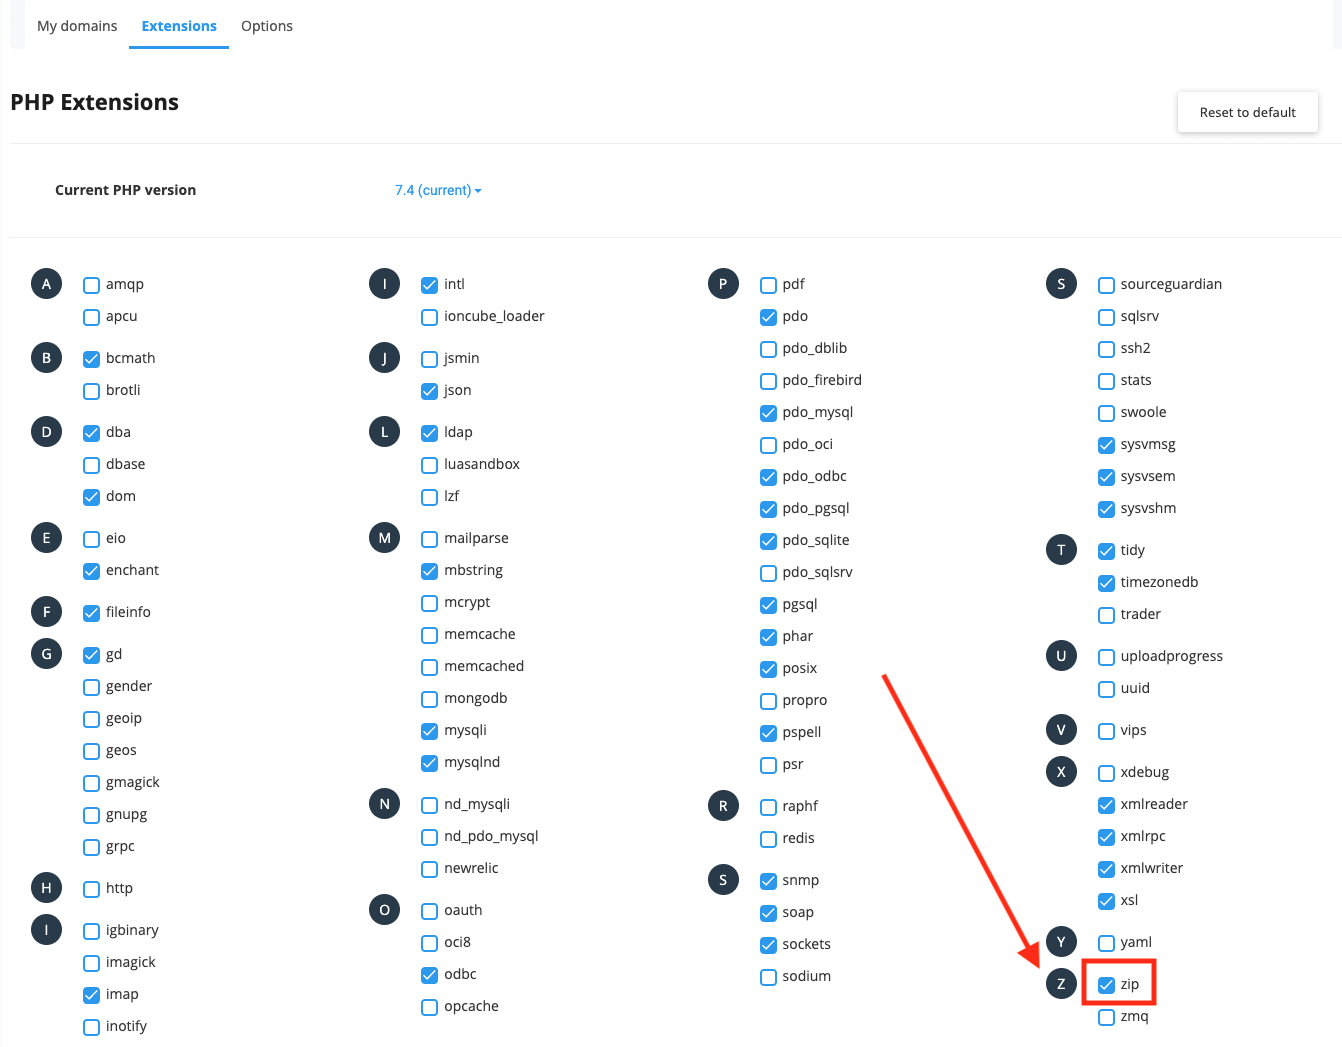
Click the checkbox beside the zip extension to enable it.
What if you don’t see the zip extension?
If you don’t see the zip extension, then you may need to install it first.
Get back to your cPanel home page, then find the PHP PEAR Packages menu.
It’s also located under the Software tab as shown below:

On the PEAR Packages page, use the search menu to look for the “zip” extension.
You should see the Archive_Zip extension shown in the search result like this:
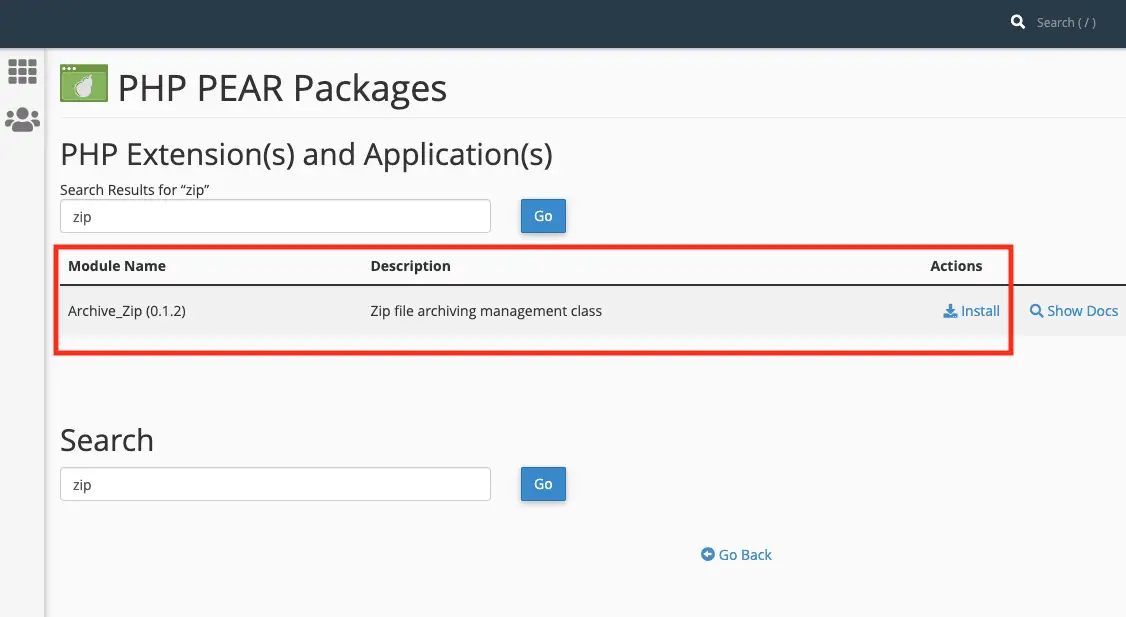
Click on Install to have the extension installed on your hosting.
Finally, go back to the Select PHP Version menu and check the Extensions tab. You should see the zip extension already checked on this page.
And that’s how you enable PHP zip in your hosting provider. Good work! 👍
Take your skills to the next level ⚡️
I’m sending out an occasional email with the latest tutorials on programming, web development, and statistics. Drop your email in the box below and I’ll send new stuff straight into your inbox!
About
Hello! This website is dedicated to help you learn tech and data science skills with its step-by-step, beginner-friendly tutorials.
Learn statistics, JavaScript and other programming languages using clear examples written for people.
Search
Type the keyword below and hit enter
How to Enable PHP Zip Extension in cPanel (3 Easy Steps)

Website speed is really very important in terms of site performance, usability, SEO ranking. To optimize your website, you need PHP zip to be installed on the server, to hold compressed PHP files. Sometimes, you may also encounter an error that PHP zip-archive library is missing or disabled. In this tutorial, I will share a step-by-step guide to enable PHP zip extension in cPanel. So, let’s get started.
Step 1: Log in to your cPanel

Login to cPanel and go to PHP PEAR Package. Type Zip in the search bar.
Step 2: Install PHP Zip Extension

Now, you will find Archive_Zip. Click on install to continue.
Step 3: Change the PHP Version and Enable PHP Zip Extension
Change to PHP version to anything that is not native and click on “Set as Current”
Conclusion
In this tutorial, you have learned to enable PHP zip extension in Cpanel. Hurray, you have successfully enabled PHP zip extension. If you have any doubt, feel free to comment below. Also, you can join our elite Facebook group to get direct help from me. If you like this article, please share this article on your social media handle.
Rajesh Shivam is a seasoned professional with expertise in AWS and Linux System Administration. With over 10 years of freelancing experience, he brings a wealth of knowledge to the table. Rajesh has a strong passion for technology and stays connected with the latest happenings in the field. His dedication and expertise make him a trusted resource for all things tech-related.
How to enable ZipArchive for PHP

Is your PHP saying that it cannot find the ZipArchive class? Then, this post will show you how to enable the ZipArchive module.
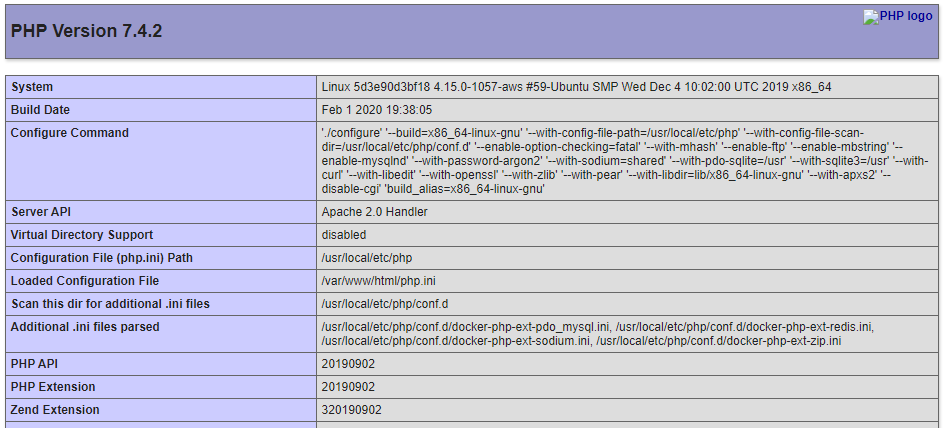
Next, scroll down until you find the heading “Configuration” and then continue until you see the following:

You will know that the ZipArchive class is not enabled if you cannot see: “Zip” configuration “enabled”.
Show compiled in modules using: php -m.
[email protected]:/var/www/html# php -m [PHP Modules] Core ctype date dom zip zlib [Zend Modules]As the PHP module list can get quite large, consider using the grep command to filter your list:
Or you can use “php -m” to show the PHP information in the CLI.
How to enable ZipArchive on Windows
Windows users have it easy! You do not need to do anything if you use PHP 5.3 or newer. So, don’t trust that the code written and evaluated on Windows will work on Linux.
As of PHP 5.3, this extension is built-in. Before, Windows users needed to enable php_zip.dll inside of php.ini to use these functions.
https://www.php.net/manual/en/zip.installation.php
Before you enable ZipArchive
You can enable Zip support during the installation of PHP and after the fact. This post will focus on an after-the-fact ZipArchive installation on Linux. Please read the installing Zip instruction from the PHP manual for more information.
Before you continue, note the following helpful command to get your current version of PHP:
[email protected]:/var/www/html# php -v PHP 7.4.2 (cli) (built: Feb 1 2020 19:39:30) ( NTS ) Copyright (c) The PHP Group Zend Engine v3.4.0, Copyright (c) Zend TechnologiesNote the version in the example above being: 7.4.2. We will, therefore, need to install the Zip module for PHP version 7.4. Please remember to change the version number to match yours if the command requires it!
Also, make sure that your packages are up to date using the “apt-get update” command:
[email protected]:/var/www/html# apt-get update Hit:1 http://security.debian.org/debian-security buster/updates InRelease Hit:2 http://deb.debian.org/debian buster InRelease Hit:3 http://deb.debian.org/debian buster-updates InRelease Reading package lists. DoneLastly, you may need to determine the location of the loaded php.ini file. Please note that the CLI uses its version.
Use the following command to help you:
[email protected]:/var/www/html# php --ini Configuration File (php.ini) Path: /usr/local/etc/php Loaded Configuration File: /usr/local/etc/php/php.ini Scan for additional .ini files in: /usr/local/etc/php/conf.d Additional .ini files parsed: /usr/local/etc/php/conf.d/docker-php-ext-pdo_mysql.ini, /usr/local/etc/php/conf.d/docker-php-ext-redis.ini, /usr/local/etc/php/conf.d/docker-php-ext-sodium.ini, /usr/local/etc/php/conf.d/docker-php-ext-zip.iniHow to enable ZipArchive on Docker
First, run the following command to install Zip and compile PHP correctly to run it.
apt-get install -y libzip-dev zip && docker-php-ext-install zipBelow you will see how to restart Apache or NGINX. Once you install, you have finished.
Note that you will get an “E: Package ‘php-XXX’ has no installation candidate” error if you try to install any of Debian‘s PHP packages. This error is the default intended behavior of the official PHP Docker image.
You can see an example of this behavior below:
[email protected]:/var/www/html# apt-get install php-zip Reading package lists. Done Building dependency tree Reading state information. Done Package php-zip is a virtual package provided by: php7.3-zip 7.3.14-1~deb10u1 [Not candidate version] php7.3-zip 7.3.11-1~deb10u1 [Not candidate version] E: Package 'php-zip' has no installation candidateYou can also get the following error if you specify a specific version.
[email protected]:/var/www/html# apt-get install php7.0-zip Reading package lists. Done Building dependency tree Reading state information. Done E: Unable to locate package php7.0-zip E: Couldn't find any package by glob 'php7.0-zip' E: Couldn't find any package by regex 'php7.0-zip'How to enable ZipArchive on Linux on Ubuntu
The install PHP Zip command:
sudo apt-get install -y php-zipThe output will result in something like this:
[email protected]:/home/user# sudo apt-get install php-zip Reading package lists. Done Building dependency tree Reading state information. Done The following additional packages will be installed: libzip5 php-common php7.3-common php7.3-zip The following NEW packages will be installed: libzip5 php-common php-zip php7.3-common php7.3-zip 0 to upgrade, 5 to newly install, 0 to remove and 48 not to upgrade. 1 not fully installed or removed. Need to get 1,003 kB of archives. After this operation, 7,443 kB of additional disk space will be used.Please note that you may need to specify the PHP version if you upgraded to a recent version of PHP.
Don’t forget to restart your web server!
The configuration file (php.ini) is only read when PHP or the webserver starts. Equally, the php.ini file is only read at invocation for the CGI and CLI versions.
You can restart Apache using:
Likewise, you can restart NGINX using:
Wrapping up
It is easy to get your website zipping files and avoid a fatal error. I hope that you now know how to enable ZipArchive for PHP. No one likes seeing a “Fatal error: Class’ ZipArchive’ not found in”.
You may also be interested in
Anto’s editorial team loves the cloud as much as you! Each member of Anto’s editorial team is a Cloud expert in their own right. Anto Online takes great pride in helping fellow Cloud enthusiasts. Let us know if you have an excellent idea for the next topic! Contact Anto Online if you want to contribute.
Support Anto Online and buy us a coffee. Anything is possible with coffee and code.
Related Posts

Scan Your Docker Images and Containers with VirusTotal: A Step-by-Step Guide

Accelerate Your Performance Testing on Ubuntu with k6 and Postman-to-k6

Solve the “Cannot read properties of undefined (reading ‘type’)” error with these simple fixes
About Anto Online
Having started his career in 1999 as a Desktop Support Engineer, Anto soon changed paths and became a developer. After several years of development experience, he transitioned into a consultant. As an enterprise application consultant for a leading SaaS software provider, Anto specializes in AWS’s serverless technologies. By day, Anto focuses on helping customers leverage the power of serverless technologies. By night, he indulges his passion for cloud computing by playing with Python and trying out things that are currently beyond the scope of his work. Sometimes Anto needs help as there are not enough hours at night. So Anto relies on a team of fellow Cloud enthusiasts to help him out. Each one is a Cloud expert in their own right, and Anto takes great pride in helping them learn and grow. View all posts by Anto Online →
3 Comments on “How to enable ZipArchive for PHP”
Was happy to see a picture with someone scratching his head in front of a Mac ….
but couldn’t find anything on how this extension (and others) can be installed on the standard php install on Mac OS Big SUR. any clue ? great post btw !
Not sure, but please let me know if you resolved it. I will update the post. Thanks for your feedback.
Leave a Reply
You must be logged in to post a comment.
This site uses Akismet to reduce spam. Learn how your comment data is processed.
Tags

Latest Posts
Scan Your Docker Images and Containers with VirusTotal: A Step-by-Step Guide
Bitbucket for Newbies: Mastering Basic Commands and Collaborating on Code
Accelerate Your Performance Testing on Ubuntu with k6 and Postman-to-k6
Solve the “Cannot read properties of undefined (reading ‘type’)” error with these simple fixes
December 19, 2022 May 1, 2023
Solving the ‘tail: inotify resources exhausted’ Error on Ubuntu
December 18, 2022 May 1, 2023
Copyright 2018-2022 Anto Online.
All rights reserved. Please consider the information, scripts and instructions carefully before using it yourself. Make sure you have ample backups! The information, scripts and instructions are provided without warranty. Consult a professional if you are unsure. Anto does not speak on behalf of any company and our opinions are our own.
The feature images have been provided by pexels.com and unsplash.com.