- PHP in Visual Studio Code
- Linting
- Windows
- Linux and macOS
- Snippets
- PHP extensions
- Disable built-in PHP support
- Debugging
- Next steps
- How To Set Up Visual Studio Code (VS Code) for PHP Development
- Prerequisites
- Step 1 — Installing VS Code PHP Extensions for Extra Support
- Step 2 — Importing or Creating a New PHP Project
- Step 3 — Customizing Theme and Editor Font (Optional)
- Changing VS Code Theme
- Adjusting the Font
- Conclusion
- PHP in Visual Studio
- Quick start
- Create your PHP project
- Use the PHP Editor in Visual Studio
- Run and Debug PHP in Visual Studio
- Next steps
PHP in Visual Studio Code
Visual Studio Code is a great editor for PHP development. You get features like syntax highlighting and bracket matching, IntelliSense (code completion), and snippets out of the box and you can add more functionality through community-created VS Code extensions.
Linting
VS Code uses the official PHP linter ( php -l ) for PHP language diagnostics. This allows VS Code to stay current with PHP linter improvements.
Tip: Using XAMPP? Install the full version of PHP in order to obtain the development libraries.
There are three settings to control the PHP linter:
- php.validate.enable : controls whether to enable PHP linting at all. Enabled by default.
- php.validate.executablePath : points to the PHP executable on disk. Set this if the PHP executable is not on the system path.
- php.validate.run : controls whether the validation is triggered on save (value: «onSave» ) or on type (value: «onType» ). Default is on save.
To change the PHP settings, open your User or Workspace Settings ( ⌘, (Windows, Linux Ctrl+, ) ) and type ‘php’ to filter the list of available settings.
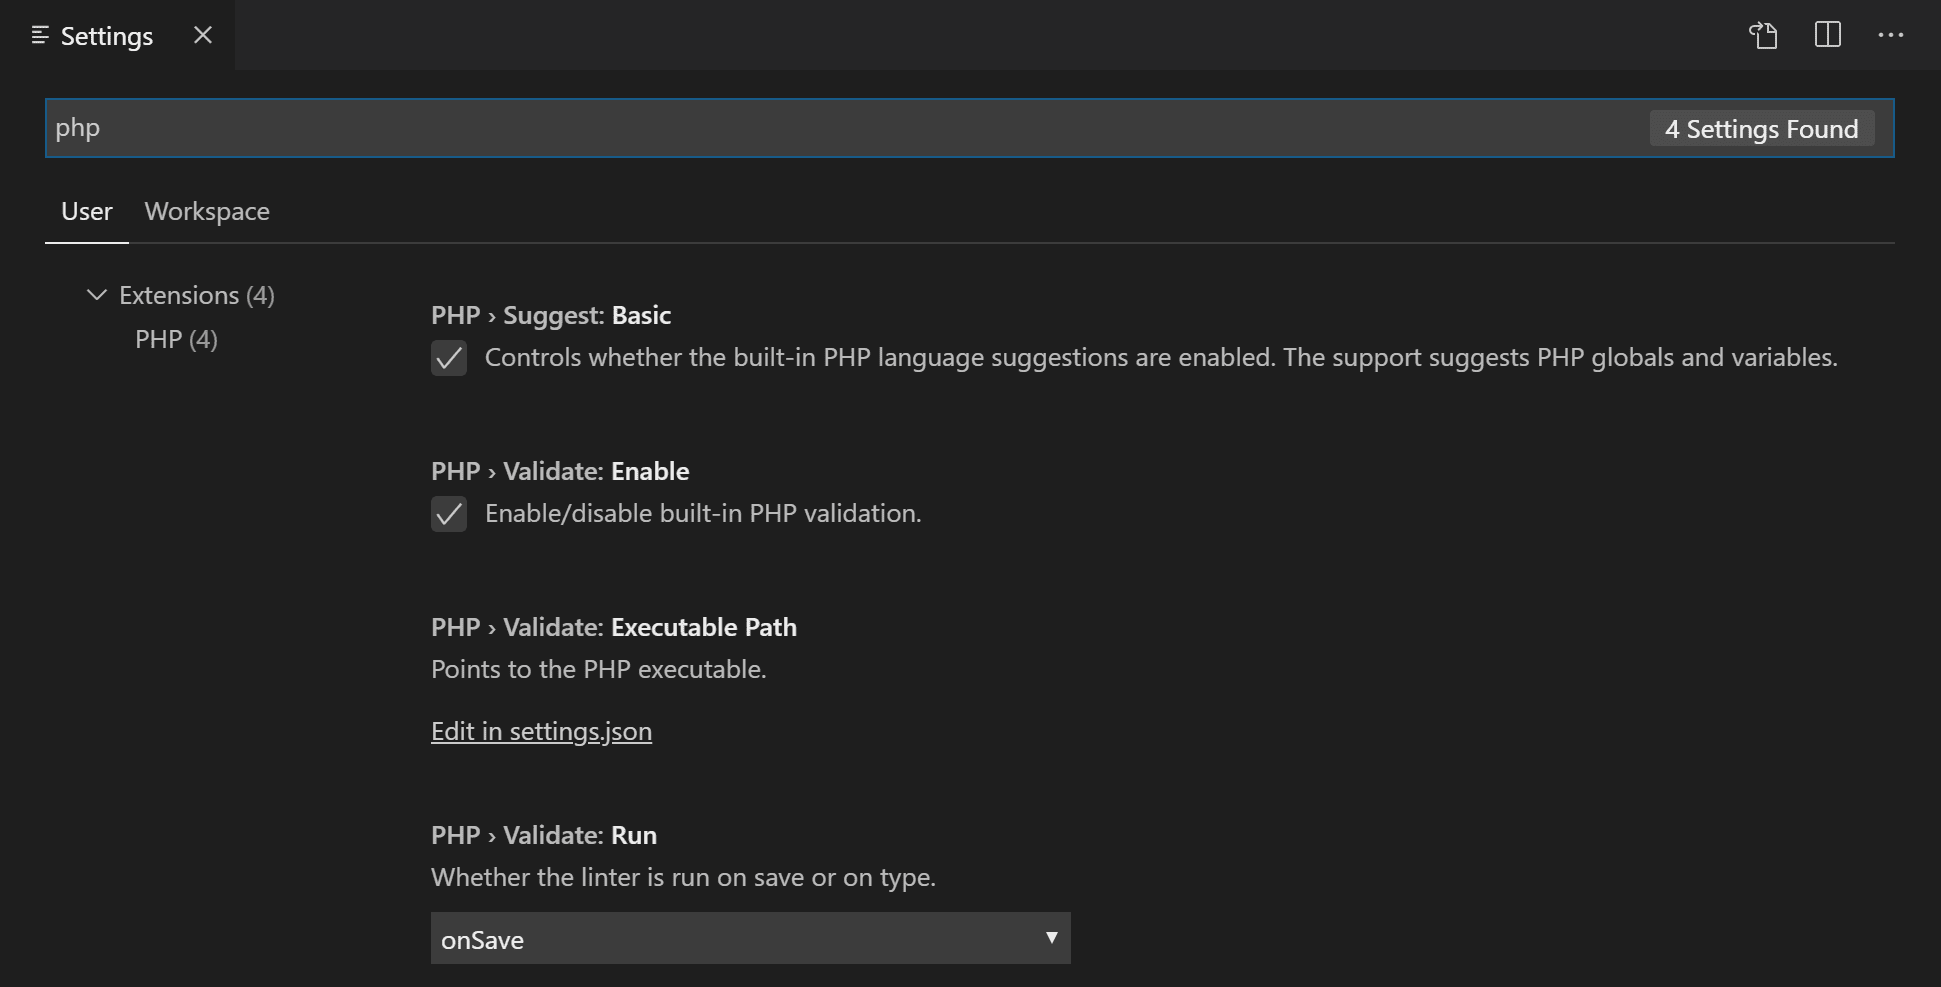
To set the PHP executable path, select the Edit in settings.json link under PHP > Validate: Executable Path, which will open your user settings.json file. Add the php.validate.executablePath setting with the path to your PHP installation:
Windows
"php.validate.executablePath": "c:/php/php.exe" > Linux and macOS
"php.validate.executablePath": "/usr/bin/php" > or "php.validate.executablePath": "/usr/local/bin/php" > Snippets
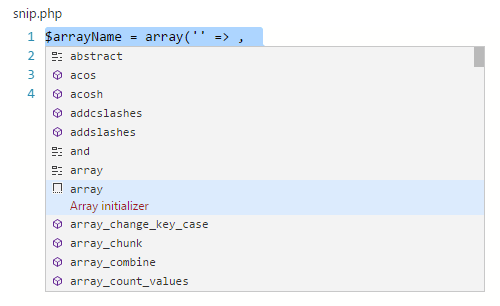
Visual Studio Code includes a set of common snippets for PHP. To access these, hit ⌃Space (Windows, Linux Ctrl+Space ) to get a context-specific list.
PHP extensions
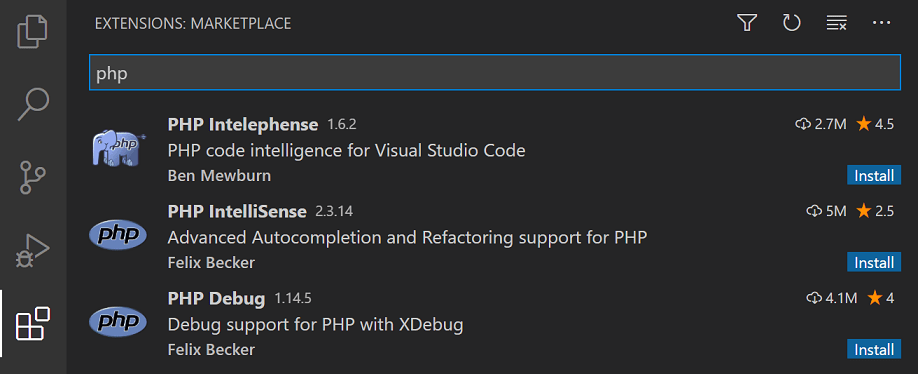
There are many PHP language extensions available on the VS Code Marketplace and more are being created. You can search for PHP extensions from within VS Code in the Extensions view ( ⇧⌘X (Windows, Linux Ctrl+Shift+X ) ) then filter the extensions dropdown list by typing ‘php’.
Disable built-in PHP support
To disable the built-in PHP smart completions in favor of suggestions from an installed PHP extension, uncheck PHP > Suggest: Basic, which sets php.suggest.basic to false in your settings.json file.
Debugging
PHP debugging with XDebug is supported through a PHP Debug extension. Follow the extension’s instructions for configuring XDebug to work with VS Code.
Next steps
Read on to find out about:
How To Set Up Visual Studio Code (VS Code) for PHP Development

Visual Studio Code, also known as VS Code, is a free source code editor — or integrated development environment (IDE) — available for all major operating systems.
With a large collection of extensions for many programming languages, VS Code can be customized to serve a wide variety of development needs. In this guide, you’ll learn how to set up Visual Studio Code for working on PHP projects.
Prerequisites
To follow this guide, you’ll need to download and install the appropriate version of Visual Studio Code for your operating system.
The instructions in this guide were validated on an Ubuntu 20.04 desktop computer, but they should work seamlessly in all operating systems that are supported by VS Code. Please note, though, that keyboard shortcut keys may need to be slightly modified for compatibility with MacOS systems.
Step 1 — Installing VS Code PHP Extensions for Extra Support
Right after installation, VS Code already recognizes PHP code and helps with syntax highlighting, basic debugging, and code indentation. These features are suitable for quick edits or when working with individual PHP scripts. Working in larger projects, though, can become difficult without more context around the code and how each file interacts and integrates within the larger project.
There are a number of VS Code extensions that can help speed up your productivity when working on PHP projects. In this guide, we’ll install and set up PHP Intelephense, a popular PHP extension for VS Code that provides several advanced features such as improved code completion, better navigation between components, rich information tooltips on mouse hover, code auto formatting, and real time error reporting based on static code analysis.
Open the extensions tab by clicking on the last icon on the left menu bar, or by pressing CTRL + SHIFT + X . This will bring up a sidebar menu with a search box and a list of popular or recommended extensions. Type “php” or “intelephense” to locate the PHP Intelephense extension. Click on the Install button to install and enable the extension.
Once installation is complete, Intelephense’s official documentation recommends that you disable the built-in PHP Language Features extension that comes with VS Code.
To disable this extension, type @builtin php in the Extensions search box to locate the built-in PHP extensions. Then click on the settings icon for the PHP Language Features extension, and click the Disable option in the drop-down menu.
If you have any files open in VS Code, you’ll need to reload the editor to apply the changes.
You can install other extensions by following the same process described for the PHP Intelephense extension, but be aware that some extensions will require additional software to be installed on your system. Check the extension documentation to make sure you have requirements set appropriately.
Step 2 — Importing or Creating a New PHP Project
To import an existing PHP project into VS Code, click on the first icon on the left menu bar or type CTRL + SHIFT + E to access the file explorer. Click the Open Folder button and select your project’s directory. In case you are creating a new project, you can create a new folder and select that as your project directory.
The explorer window will now show the project’s directory tree, giving you quick access to files and directories on your project.
Step 3 — Customizing Theme and Editor Font (Optional)
Although not necessary, it is often a good idea to customize the appearance of your editor to make it more comfortable to use in the longer term. As a developer you may spend several hours every day looking at an IDE such as VS Code, and for that reason it’s important to make sure the editor font has an appropriate size, and the contrast is enough for good readability without tiring your eyes too quickly.
You may want to experiment with different themes and fonts in order to find a custom setup that works well for you.
Changing VS Code Theme
VS Code comes with a few different themes that allow you to change the colors used in the editor interface and in the code highlighting. Both dark and light styles are included by default.
Go to File -> Preferences -> Color Theme or type CTRL + K + T to select a different theme for VS Code.
You can also install theme extensions to further customize VS Code’s appearance. If you search for theme within the extensions tab ( CTRL + SHIFT + X ), you’ll find several theme extensions in different styles and colors, including color schemes ported from other popular editors and platforms.
Adjusting the Font
Although the default VS Code font settings will be good enough for many users, you may want to adjust the size and the type of the editor font for increased readability.
If you would like to modify the font size or change to another type, you can go to File -> Preferences -> Settings, then choose Text Editor on the left menu. Then, click on Font in the submenu that opens up. That section contains font family and size settings which you can tweak as preferred.
The changes are immediately saved and applied to all current open files.
Conclusion
Visual Studio Code is a lightweight yet powerful code editor that can be customized to suit the needs of most developers. In this guide, you learned how to install and configure the PHP Intelephense extension for extra support while working on PHP projects, how to import and create new projects within VS Code, and how to customize the editor appearance for a more comfortable coding experience.
For more tutorials on Visual Studio Code, check our VS Code tag page. If you’d like to learn more about PHP development, you can refer to our How To Code in PHP series for an introduction to the language, and our PHP tag page for more PHP tutorials.
Thanks for learning with the DigitalOcean Community. Check out our offerings for compute, storage, networking, and managed databases.
PHP in Visual Studio
PHP is one of the most popular programming languages for server-side web development. It’s used in many frameworks and CSMs like WordPress, Laravel, Symfony, and others which are behind a sizable chunk of the Internet. Visual Studio is a powerful IDE, but its focus didn’t align with some languages, PHP being one of them. As time progressed more languages found their way to Visual Studio, like Python and eventually PHP. A Prague-based company called DEVSENSE developed an extension called PHP Tools for Visual Studio which has been available in the Visual Studio ecosystem for over a decade. Since its inception PHP Tools for Visual Studio was a paid extension, offering a free trial. Now, that’s changed. DEVSENSE is releasing a big part of their offering as a free extension, leaving some features as paid ones. That allows PHP developers to work in Visual Studio and take advantage of all the great stuff which is available. That means developers will get IntelliSense, formatting, project system, on-the-fly code analysis, composer (PHP dependency management) integration and other advanced editor-related features for free. In the latest version, PHP Tools support PHP 8.2 which hasn’t been released officially yet, and other things like generics which are a must-have for frameworks like Laravel. Other features like debugging, refactoring, unit testing, and code lens are available in the premium offering. The detailed comparison matrix can be found at https://www.devsense.com/purchase
Quick start
Create your PHP project
After the installation:
- Select Createa new project from the start page or File >New>Project… from the title bar
- In the language combo box select PHP, select PHP Web Project, then selectNext
- Name your project and select Create.
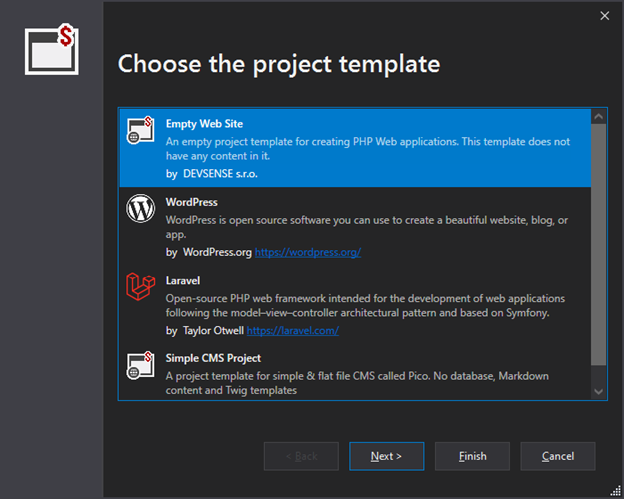
- At this point, you can select the project template. Let’s choose Empty Web Site and select Next:

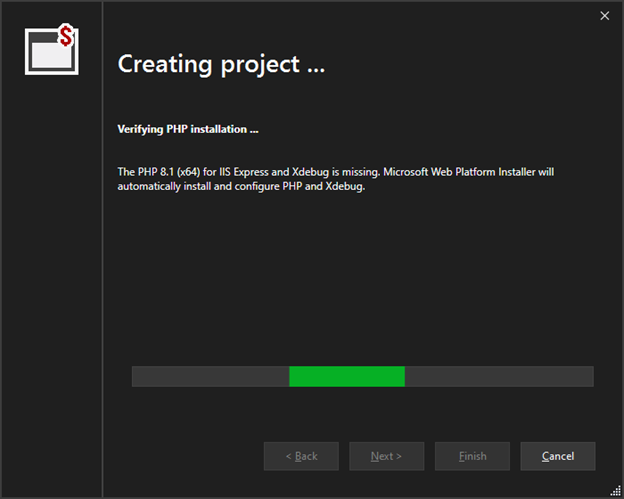
- Now, you can select which PHP version to set for the project. For this short tutorial, we can go with PHP 8.1 and select Finish. PHP Tools will check your environment and install and configure PHP which is set up in the project:
Use the PHP Editor in Visual Studio
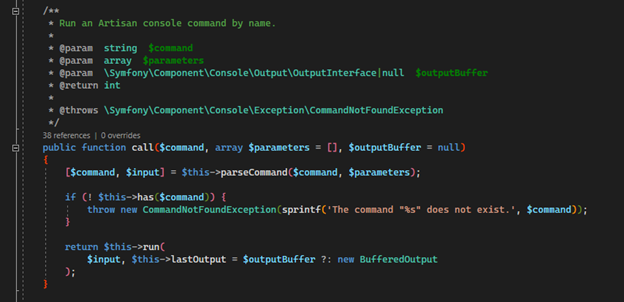
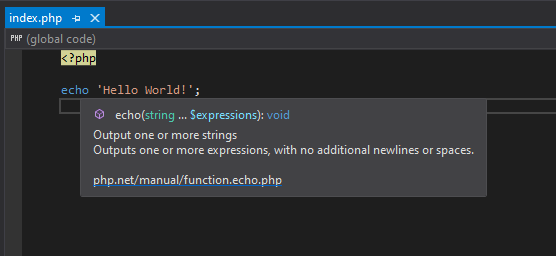
When the installation is finished, the project will open. In the editor, you can hover over any symbol to get a tooltip. Or press Ctrl + Space to see the IntelliSense for the current context.
Run and Debug PHP in Visual Studio
Place a breakpoint F9 and hit F5 to run the project and start debugging. The server which is configured in the project (by default it’s PHP’s built-in Web server) will run and a browser opens. Then the breakpoint will get hit.
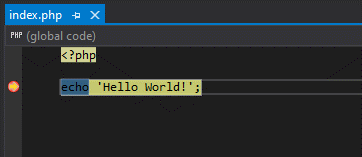
Congratulations! You are debugging PHP in Visual Studio.
This was a simple walkthrough of how PHP Tools for Visual Studio can be used where you have one project in the solution. A more complex setup is possible: developers can add PHP projects to their existing solutions (*.sln) – having one IDE should make their life easier, or they can work with PHP just by opening a folder. More tutorials can be found on DEVSENSE’s documentation.
Next steps
If PHP development in Visual Studio is interesting to you, please install PHP Tools for Visual Studio and make sure to let the authors know how you like it, what features you are missing or if you run into anything that could be further improved. You can reach them at DEVSENSE’s PHP Tools Community Forum.