- PHP Form Validation Tutorial
- Form validation vs form security checks
- How does the form data look like ?
- Form HTML code:
- A simple mandatory field check
- Validating a radio group
- Validating a dropdown list
- Validating a checkbox group
- Validating a single checkbox
- PHP Form Validation Libraries
- Download Source
- See Also
- PHP Forms — Required Fields
- PHP — Required Fields
- PHP — Display The Error Messages
- Example
- Php check form fields
- Learn Latest Tutorials
- Preparation
- Trending Technologies
- B.Tech / MCA
- Javatpoint Services
- Training For College Campus
PHP Form Validation Tutorial
Client-side form validations help in giving immediate feedback to the user. It is also required to add server side form validation in your form processing script. The user can disable Javascript on their server or even auto-bots might try to submit your form as well.
The server side form validations help keeping the form submission data consistent. The validations also help in lesser server side errors. For example, if you have set length limit in the database for a text input, it is better to do the validation before it actually gets cut off by the database system or even getting an error thrown.
Form validation vs form security checks
Often, people confuse form validations with form security. Form security (preventing exploits like SQL injection, XSS attacks etc ) are to be handled in addition to form validation. Form validation is focussed towards the user input where as the security validations should be focused on how you use the data. When you use the form data in an SQL query, it should be validated against SQL Injection. When you have fields like name or email as mandatory in the form, it should be checked in the server side script as well. That is Form validation.
How does the form data look like ?
We have a sample form here with common fields like name, email, a check box group, radio group, drop down list etc.
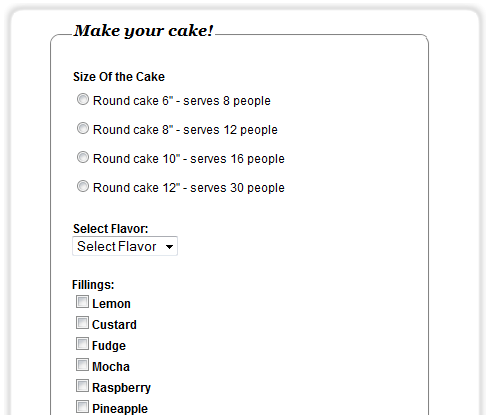
Form HTML code:
form method="post" action='cake-form-proc.php' id="cakeform" > div> div class="cont_order"> fieldset> legend>Make your cake!legend> div class='field_container'> label >Size Of the Cakelabel> label class='radiolabel'>input type="radio" name="selectedcake" value="Round6" />Round cake 6" - serves 8 peoplelabel>br/> label class='radiolabel'>input type="radio" name="selectedcake" value="Round8" />Round cake 8" - serves 12 peoplelabel>br/> label class='radiolabel'>input type="radio" name="selectedcake" value="Round10" />Round cake 10" - serves 16 peoplelabel>br/> label class='radiolabel'>input type="radio" name="selectedcake" value="Round12" />Round cake 12" - serves 30 peoplelabel>br/> div> div class='field_container'> label for="flavor">Select Flavor:label > select id="flavor" name='flavor' > option value="">Select Flavoroption> option >Yellowoption> option >Whiteoption> option >Chocolateoption> option >Combooption> select> div> div class='field_container'> label >Fillings:label> label>input type="checkbox" value="Lemon" name='Filling[]' />Lemonlabel> label>input type="checkbox" value="Custard" name='Filling[]' />Custardlabel> label>input type="checkbox" value="Fudge" name='Filling[]' />Fudgelabel> label>input type="checkbox" value="Mocha" name='Filling[]' />Mochalabel> label>input type="checkbox" value="Raspberry" name='Filling[]' />Raspberrylabel> label>input type="checkbox" value="Pineapple" name='Filling[]' />Pineapplelabel> div> div class='field_container'> label class="inlinelabel">input type="checkbox" id="agree" name='agree' /> I agree to the a href="javascript:void(0);">terms and conditionsa>label> div> fieldset> div> div class="cont_details"> fieldset> legend>Contact Detailslegend> label for='name'>Namelabel> input type="text" id="name" name='name' /> br/> label for='address'>Addresslabel> input type="text" id="address" name='address' /> br/> label for='phonenumber'>Phone Numberlabel> input type="text" id="phonenumber" name='phonenumber'/> br/> fieldset> div> input type='submit' id='submit' value='Submit' /> div> form> First, let us see how the form data appears in the server side script. The php script below will print the $_POST global array:
php echo ''
.print_r($_POST,true).' '; ?>
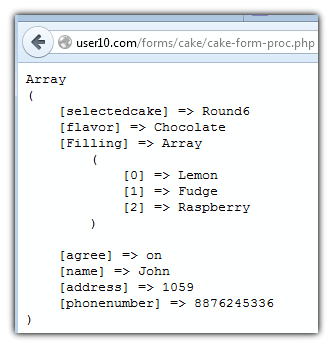
Here is the sample output from that script:
Note that the “Filling[]” checkbox group in the HTML form results in an array in the PHP script
The rest of the fields appear as simple name-value pairs
To validate mandatory fields, we just have to check the presence of the value in the $_POST array. (note that the form method is post in the HTML form). To make it a bit cleaner, we can trim the input to remove any extra space from the beginning and end of the form.
A simple mandatory field check
Here is the PHP script that checks the name for empty input and throws an error if the input is empty.
$name = trim($_POST['name']); if(empty($name)) echo "Please enter your name"; exit; > echo "Success"; However, if we just throw the error and leave it at that, the user has to press the back button to correct the error. That is not user friendly. we should display the error message next to the field.
label for='name'>Namelabel> input type="text" id="name" name='name' value='' /> span class='error'>php echo $name_error ?> When we display the form back again, it should not loose the form data the user already had filled-in. So we have to display the value from the $_POST in the input value attribute. Note that we are using the htmlentities() function to encode any HTML entities like > or < in the input.
Validating a radio group
The radio group item will have the selected item’s value in the form data. If the user didn’t select any radio group item, it will be empty.
if(empty($_POST['selectedcake'])) $select_cake_error = "Please select a cake size"; $error=true; > else $selected_cake = $_POST['selectedcake']; > We have to avoid losing the selection.So we have to check the selection and add a ‘checked’ attribute using the previously selected value.
 label class='radiolabel'>input type="radio" name="selectedcake" value="Round6" php echo ($selected_cake=='Round6')? 'checked':''; ?> />Round cake 6" - serves 8 people
   />Round cake 8" - serves 12 people
   />Round cake 10" - serves 16 people
  />Round cake 12" - serves 30 people
echo ($selected_cake=='Round6')? 'checked':''; checks whether Round6 was selected. If so, adds the checked attribute to the radio button.
Validating a dropdown list
Dropdown lists usually have one item labelled “Select…”. One way to validate that the user selected something other than the default “Select …” item is to keep its value empty. Then you can just check for ’emptiness’ :
if(empty($_POST['flavor'])) $flavor_error ="Please select a flavor from the list"; $error=true; > else $flavor = $_POST['flavor']; > Note that the value of “Select a flavor” default item is empty.
label for="flavor">Select Flavor:label > span class='error'>php echo $flavor_error?> For dropdown lists, we are to set the ‘selected’ attribute for previously selected item.
Validating a checkbox group
Check box groups are great when you want to allow multiple options for a field. Drop down lists or radio groups can be used for single selections and lists with multiple selections are not user friendly. We have used checkbox group for Fillings. The user can select any number of fillings. We need to validate that at least two options are selected. As you have seen in the previous section, the values for the checkbox group come as an array. So we just check the array item count.
if(empty($_POST['Filling']) || count($_POST['Filling']) 2) $filling_error = "Please select at least 2 items for filling"; $error=true; > $filling = $_POST['Filling']; We have to set the ‘checked’ attribute of the previous selections. We can use the in_array() function to check whether a value exists in the array.
label >Fillings:label> span class='error'>php echo $filling_error ?> />Lemon />Raspberry />Pineapple Validating a single checkbox
Validating a single check box (the ‘agree’ check box in the sample form) is similar. We check whether the check box value is empty.
if(empty($_POST['agree'])) $terms_error = "If you agree to the terms, please check the box below"; $error=true; > else $agree = $_POST['agree']; > Set the checked attribute:
span class='error'>php echo $terms_error ?> /> I agree to the terms and conditions PHP Form Validation Libraries
Form validations require quite a bit of repetitive code. One alternative is to use a PHP form validation library. Here are some form validation libraries that you can try:
When you want to do client-side, fast response, user-friendly validations (in addition to the server side form validations) check out these links:
Download Source
You can download the sample form and the validation code in this tutorial from the link below:
See Also
PHP Forms — Required Fields
This chapter shows how to make input fields required and create error messages if needed.
PHP — Required Fields
From the validation rules table on the previous page, we see that the «Name», «E-mail», and «Gender» fields are required. These fields cannot be empty and must be filled out in the HTML form.
| Field | Validation Rules |
|---|---|
| Name | Required. + Must only contain letters and whitespace |
| Required. + Must contain a valid email address (with @ and .) | |
| Website | Optional. If present, it must contain a valid URL |
| Comment | Optional. Multi-line input field (textarea) |
| Gender | Required. Must select one |
In the previous chapter, all input fields were optional.
In the following code we have added some new variables: $nameErr, $emailErr, $genderErr, and $websiteErr. These error variables will hold error messages for the required fields. We have also added an if else statement for each $_POST variable. This checks if the $_POST variable is empty (with the PHP empty() function). If it is empty, an error message is stored in the different error variables, and if it is not empty, it sends the user input data through the test_input() function:
// define variables and set to empty values
$nameErr = $emailErr = $genderErr = $websiteErr = «»;
$name = $email = $gender = $comment = $website = «»;
if ($_SERVER[«REQUEST_METHOD»] == «POST») if (empty($_POST[«name»])) $nameErr = «Name is required»;
> else $name = test_input($_POST[«name»]);
>
if (empty($_POST[«email»])) $emailErr = «Email is required»;
> else $email = test_input($_POST[«email»]);
>
if (empty($_POST[«website»])) $website = «»;
> else $website = test_input($_POST[«website»]);
>
if (empty($_POST[«comment»])) $comment = «»;
> else $comment = test_input($_POST[«comment»]);
>
if (empty($_POST[«gender»])) $genderErr = «Gender is required»;
> else $gender = test_input($_POST[«gender»]);
>
>
?>
PHP — Display The Error Messages
Then in the HTML form, we add a little script after each required field, which generates the correct error message if needed (that is if the user tries to submit the form without filling out the required fields):
Example
The next step is to validate the input data, that is «Does the Name field contain only letters and whitespace?», and «Does the E-mail field contain a valid e-mail address syntax?», and if filled out, «Does the Website field contain a valid URL?».
Php check form fields
Learn Latest Tutorials


Preparation


Trending Technologies


B.Tech / MCA


Javatpoint Services
JavaTpoint offers too many high quality services. Mail us on h[email protected], to get more information about given services.
- Website Designing
- Website Development
- Java Development
- PHP Development
- WordPress
- Graphic Designing
- Logo
- Digital Marketing
- On Page and Off Page SEO
- PPC
- Content Development
- Corporate Training
- Classroom and Online Training
- Data Entry
Training For College Campus
JavaTpoint offers college campus training on Core Java, Advance Java, .Net, Android, Hadoop, PHP, Web Technology and Python. Please mail your requirement at [email protected].
Duration: 1 week to 2 week
Like/Subscribe us for latest updates or newsletter 


