- Run/Debug Configuration: Python
- Prerequisites
- Configuration tab
- Logs tab
- Common settings
- Toolbar
- How to set environment variables for your Python application from PyCharm
- Creating a run configuration with environment variables
- Running or debugging your Python application with the new run configuration containing your environment variables
- About Clivant
Run/Debug Configuration: Python
When you run your application for the very first time, PyCharm automatically creates the temporary Run/Debug configuration. You can modify it to specify or alter the default parameters and save it as a permanent Run/Debug configuration.
Prerequisites
Before you start, ensure that Python and related frameworks are installed.
Refer to their respective download and installation pages for details:
Use this dialog to create a run/debug configuration for Python scripts .
Configuration tab
Click the list to select a type of target to run. Then, in the corresponding field, specify the path to the Python script or the module name to be executed.
In this field, specify parameters to be passed to the Python script.
When specifying the script parameters, follow these rules:
- Use spaces to separate individual script parameters.
- Script parameters containing spaces should be delimited with double quotes, for example, some» «param or «some param» .
- If script parameter includes double quotes, escape the double quotes with backslashes, for example:
-s»main.snap_source_dirs=[\»pcomponents/src/main/python\»]» -s»http.cc_port=8189″ -s»backdoor.port=9189″ -s»main.metadata=»
In this field you can add a macros to pass various project- or context-specific values when running a run/debug configuration. Click + and select one of the available macros from the list. See Adding macros to run/debug configuration for more details.
Click this list to select one of the projects, opened in the same PyCharm window, where this run/debug configuration should be used. If there is only one open project, this field is not displayed.
This field shows the list of environment variables. If the list contains several variables, they are delimited with semicolons.
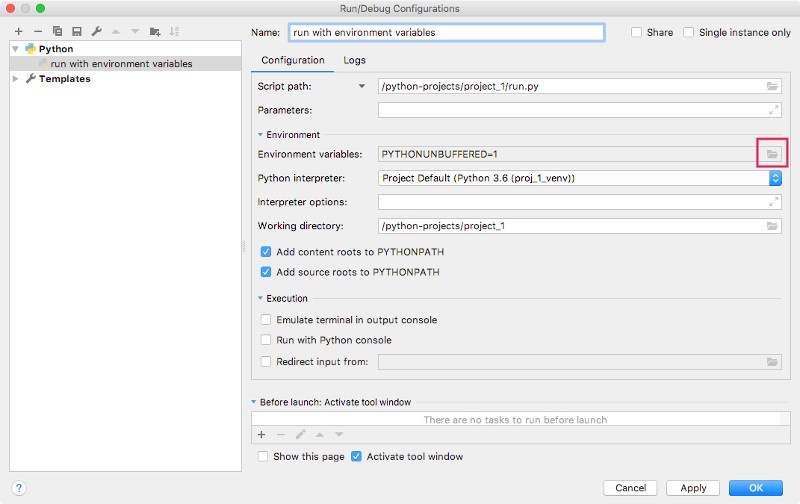
By default, the field contains the variable PYTHONUNBUFFERED set to 1. To fill in the list, click the browse button, or press Shift+Enter and specify the desired set of environment variables in the Environment Variables dialog.
To create a new variable, click , and type the desired name and value.
You might want to populate the list with the variables stored as a series of records in a text file, for example:
Just copy the list of variables from the text file and click Paste () in the Environmental Variables dialog. The variables will be added to the table. Click Ok to complete the task. At any time, you can select all variables in the Environment Variables dialog, click Copy , and paste them into a text file.
Select one of the pre-configured Python interpreters from the list.
When PyCharm stops supporting any of the outdated Python versions, the corresponding Python interpreter is marked as unsupported.
In this field, specify the command-line options to be passed to the interpreter. If necessary, click , and type the string in the editor.
Specify a directory to be used by the running task.
- When a default run/debug configuration is created by the keyboard shortcut Control+Shift+F10 , or by choosing Run from the context menu of a script, the working directory is the one that contains the executable script. This directory may differ from the project directory.
- When this field is left blank, the bin directory of the PyCharm installation will be used.
Add content roots to PYTHONPATH
Select this checkbox to add all content roots of your project to the environment variable PYTHONPATH;
Add source roots to PYTHONPATH
Select this checkbox to add all source roots of your project to the environment variable PYTHONPATH;
Emulate terminal in output console
Enables running your script or module in the output console with the emulated terminal mode. This mode can be helpful for the tasks that cannot be implemented with the standard output console, for example, when your script performs caret return actions ( print(i, flush=True , end=’\r’ ).
Note that emulating terminal in the output console differs from running the Terminal that is a separate tool window used for running system shell commands.
Enables running your script or module with the Python console.
Enables redirecting data from a text file to standard input. Use this option if your script requires some input and you want to automatically submit the values instead of typing them in the Run console. To enable redirecting, select the checkbox and specify the path to the target text file.
Docker container settings
This field only appears when a Docker-based remote interpreter is selected for a project..
Click to open the dialog and specify the following settings:
- Publish all ports : Expose all container ports to the host. This corresponds to the option —publish-all .
- Port bindings : Specify the list of port bindings. Similar to using the -p option with docker run .
- Volume bindings : Use this field to specify the bindings between the special folders- volumes and the folders of the computer, where the Docker daemon runs. This corresponds to the -v option. See Managing data in containers for details.
- Environment variables : Use this field to specify the list of environment variables and their values. This corresponds to the -e option. Refer to the page ENV (environment variables) for details.
- Run options : Use this field to specify the Docker command-line options.
Click to expand the tables. Click , , or to make up the lists.
This field only appears when a Docker Compose-based remote interpreter is selected.
You can use the following commands of the Docker Compose Command-Line Interface:
up: Builds, creates, starts, and attaches to containers for a service.
- —abort-on-container-exit
- —build
- —exit-code-from SERVICE
- —scale SERVICE=NUM.
- —timeout TIMEOUT
run: Runs a one-time command against a service.
- —entrypoint CMD
- -l, —label KEY=VAL
- —name NAME
- -p, —publish=[]
- —rm
- —service-ports
- —use-aliases
- -u, —user=»»
- -v, —volume=[]
exec: Runs arbitrary commands in your services.
Use this field to preview the complete command string.
For example, the up —build exec —user jetbrains combination in the Commands and options field produces the following output in the preview:
docker-compose -f C:\PyCharm-2019.2\Demos\djangodocker-master\docker-compose.yml -f
Logs tab
Use this tab to specify which log files generated while running or debugging should be displayed in the console, that is, on the dedicated tabs of the Run or Debug tool window.
Select checkboxes in this column to have the log entries displayed in the corresponding tabs in the Run tool window or Debug tool window.
The read-only fields in this column list the log files to show. The list can contain:
- Full paths to specific files.
- Aliases to substitute for full paths or patterns. These aliases are also displayed in the headers of the tabs where the corresponding log files are shown. If a log entry pattern defines more than one file, the tab header shows the name of the file instead of the log entry alias.
Select this checkbox to have the previous content of the selected log skipped.
Save console output to file
Select this checkbox to save the console output to the specified location. Type the path manually, or click the browse button and point to the desired location in the dialog that opens.
Show console when a message is printed to standard output stream
Select this checkbox to activate the output console and bring it forward if an associated process writes to Standard.out.
Show console when a message is printed to standard error stream
Select this checkbox to activate the output console and bring it forward if an associated process writes to Standard.err.
Click this button to open the Edit Log Files Aliases dialog where you can select a new log entry and specify an alias for it.
Click this button to edit the properties of the selected log file entry in the Edit Log Files Aliases dialog.
Click this button to remove the selected log entry from the list.
Click this button to edit the select log file entry. The button is available only when an entry is selected.
Common settings
When you edit a run configuration (but not a run configuration template), you can specify the following options:
Specify a name for the run configuration to quickly identify it among others when editing or running.
Allow running multiple instances of this run configuration in parallel.
By default, it is disabled, and when you start this configuration while another instance is still running, PyCharm suggests stopping the running instance and starting another one. This is helpful when a run configuration consumes a lot of resources and there is no good reason to run multiple instances.
Save the file with the run configuration settings to share it with other team members. The default location is .idea/runConfigurations . However, if you do not want to share the .idea directory, you can save the configuration to any other directory within the project.
By default, it is disabled, and PyCharm stores run configuration settings in .idea/workspace.xml .
Toolbar
The tree view of run/debug configurations has a toolbar that helps you manage configurations available in your project as well as adjust default configurations templates.
Create a run/debug configuration.
How to set environment variables for your Python application from PyCharm
When you follow this methodology and want to run your Python application from PyCharm, you need to create a customised run configuration.
In case you need it, this post shows how to set environment variables for your Python application from PyCharm.
Creating a run configuration with environment variables
To create a run configuration with environment variables, you can follow through these screens:
While your project is selected, click on Run -> Edit Configurations.

Give your run configuration a name and click on the folder icon in the Environment Variables text input:
Click + to add a new environment variable. When you had create all the environment variables that you wish to supply to your Python application, click OK.
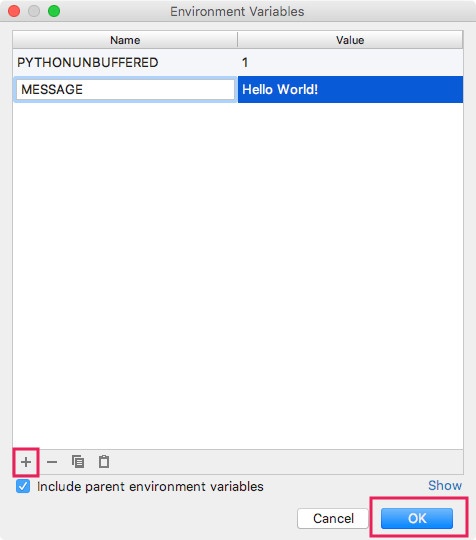

Click Apply then click OK to finalize your run configurations
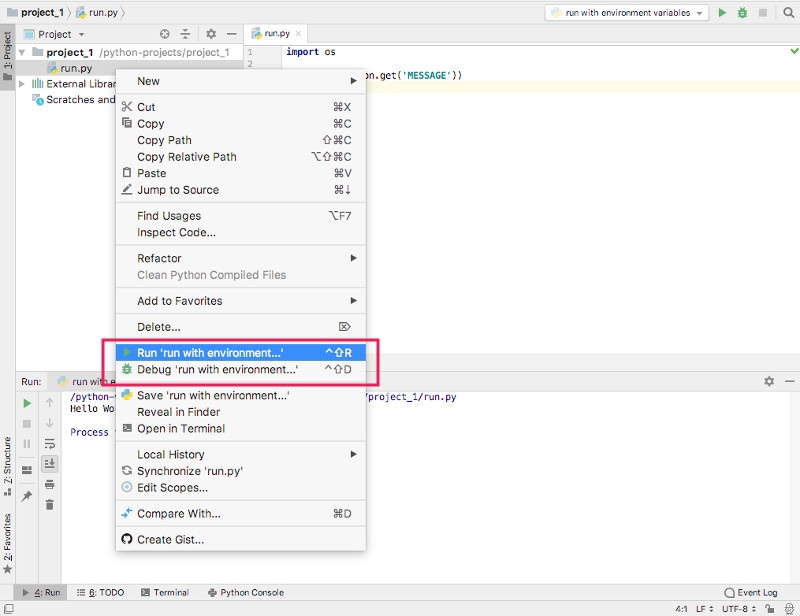
Running or debugging your Python application with the new run configuration containing your environment variables
Once you had created your run configurations with the environment variables that you want to feed your application, you can right click on a Python script to run or debug it:
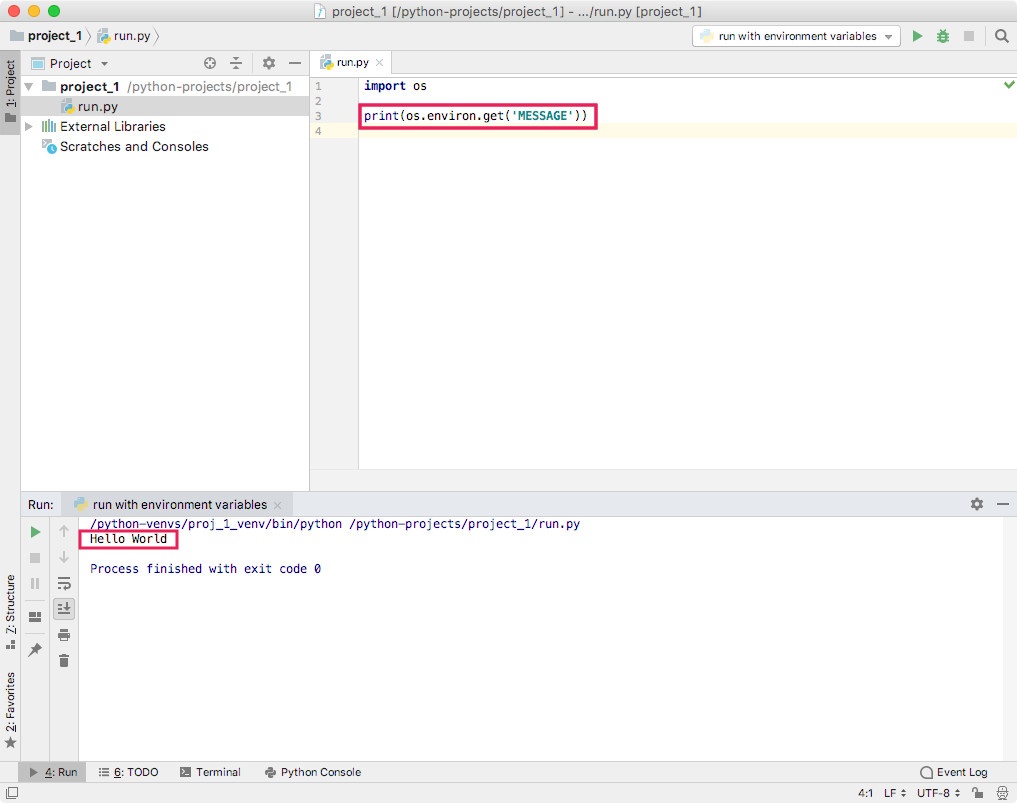
When you run or debug with the new run configurations, your Python application will be able to access the environment variables that you had created:
About Clivant
Clivant a.k.a Chai Heng enjoys composing software and building systems to serve people. He owns techcoil.com and hopes that whatever he had written and built so far had benefited people. All views expressed belongs to him and are not representative of the company that he works/worked for.