- How to Create a PHP Info Page
- How to test PHP using a PHP info page
- How to Easily Create and Use a phpinfo Page (In 3 Steps)
- An Introduction to the phpinfo() Function
- Limited Time Offer: 33% Off Annual Plans
- How to Create a phpinfo Page (In 3 Steps)
- Step 1: Create a phpinfo.php File and Upload It to Your Server
- Step 2: Access the phpinfo Page in Your Browser
- Step 3: Delete or Rename Your phpinfo Page
- Summary
- Hand-picked related articles
- Nginx vs Apache: Web Server Showdown
- Is PHP Dead? No! At Least Not According to PHP Usage Statistics
- 10 Things Not to Do in PHP 7
- Subscribe to our Newsletter
- Create simple Website with PHP
- Code for index.php file
How to Create a PHP Info Page
Creating a simple PHP info page is a great way to test your server’s PHP processing capabilities. This will not only confirm that PHP is installed and working as expected but will also allow you to see what modules are installed and active on your server. The focus of this article is to teach you how to create and use a PHP info page. Once this page is created, you can either leave it in place for future consultation or remove it together. This article implies that you have already installed PHP on your server, however, if you have not yet done so, please review the following articles, which cover the installation of PHP in CentOS 7 or Ubuntu 14.04:
How to test PHP using a PHP info page
Before getting started, you’ll need to access your server using SSH. If you’re not familiar with how to do this, or you love to read, please take a moment and read through the following article: Connecting to Your Server via SSH. Once you have connected to your server via SSH, you can proceed. Also, creating the PHP info page will require you to use your favorite Linux text editor. Wait, what’s this? You don’t have a favorite Linux text editor? No problem, we’ve got you covered with the following article: How to Edit Files from a Linux Shell. For this article, I will be using nano (it’s my favorite). Now that you’re connected to your server via SSH and have a favorite Linux text editor in mind to use let’s get create the PHP info page!
We will essentially create a PHP script that will execute when you navigate to the page in your web browser. To do this, you’ll need to create the file in your website’s webroot. This can be a few different places depending on if you’re using a control panel like cPanel or not. I am using a CentOS 7 server with no control panel for this article, so my webroot is located at /var/www/html/. With that in mind, the command I would then run to create the info.php file using nano is:
With the file now open, you’d enter in the following code:
Please save and close the file once you’re satisfied with the edits that you have made. Test if the file and php are both working navigate to the file in your web browser. If you created this file under your website, this would be:
You should also be able to use your IP address followed by info.php:
You should see a page similar to the following image:
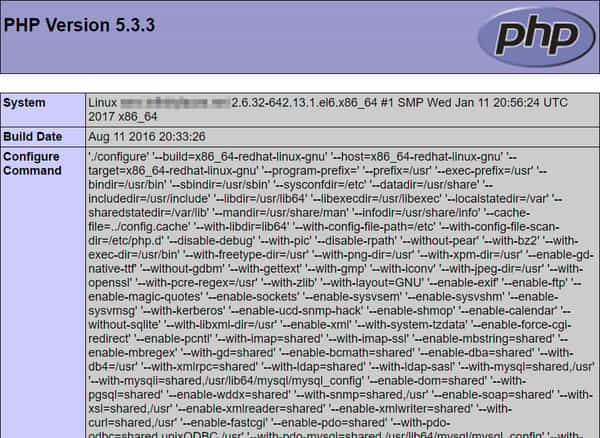
If you see this page, congratulations, this indicates that PHP is installed and is working correctly! You can also use this page to make sure any settings you have changed are being applied and help you with debugging.
Written by Michael Brower / June 22, 2017
How to Easily Create and Use a phpinfo Page (In 3 Steps)

PHP is a vital coding language for WordPress users. Even if you’re not a developer, you may still need to understand a little about it in order to maintain your site. However, if you don’t know where to look, finding even the most basic PHP information for your WordPress installation can be tricky.
Fortunately, if you care to take a few minutes to set it up, you can create a single page where you’ll find all the PHP information you need. Even better, it only takes a single line of code to do so.
In this post, we’ll introduce you to the phpinfo() function and explain why it may be useful to you. Then we’ll show you how to use it to create a phpinfo page for your WordPress site.
An Introduction to the phpinfo() Function
phpinfo() is a PHP function or a snippet of code that takes in one or more parameters and returns a value. Running phpinfo() will display information regarding your site’s PHP configuration, including:
- The current version of PHP your site is running.
- Your server information and environment.
- The PHP environment.
- Your Operating System (OS) version information.
- Paths, including the location of php.ini.
- Master and local values for PHP configuration options.
- HTTP headers.
- The PHP License.
- Modules and extensions currently in use.
Using the function alone will return all available information. However, there are also a handful of parameters you can use, in order to access only the specific information you want to see. These include:
Limited Time Offer: 33% Off Annual Plans
- INFO_GENERAL: Displays the configuration line, web server, OS, and more.
- INFO_CREDITS: Shows a list of PHP developers, modules, etc.
- INFO_CONFIGURATION: Returns the current local and master directives.
- INFO_MODULES: Shares all extensions and their settings.
- INFO_ENVIRONMENT: Includes all environment variable information.
- INFO_VARIABLES: Shows all predefined variables from Environment, GET, POST, Cookie, Server (EGPCS).
- INFO_LICENSE: Displays the PHP License.
- INFO_ALL: Returns all available information (you can accomplish the same thing by using no parameters).
One way to use the phpinfo() function is by creating a phpinfo page, as we’ll describe later in this post. However, it’s important to note that you can find some of the information above without the extra trouble of using that function.
For example, the WordPress Site Health feature included in version 5.2 and above can share details about your web server, PHP version, memory limit, and more. Simply navigate to Tools > Site Health > Info > Server to find this data:

Rather than checking for these pieces of information, phpinfo() is more suited to assist you with debugging attempts. The EGPCS data available via this function makes it particularly helpful in that regard.
How to Create a phpinfo Page (In 3 Steps)
If you have a basic understanding of File Transfer Protocol (FTP) and how to use an FTP client, creating a phpinfo page is really quite simple. In the following sections, we’ve broken it down into three short steps.
Step 1: Create a phpinfo.php File and Upload It to Your Server
To start creating this page, open up your preferred text editor. In a new document, add the following line of code:
If you wish to use one of the parameters mentioned above, you should insert it between the parentheses here. Then, save the file as “phpinfo.php”. If you prefer, you can use a different name (we’ll explain why you might want to do so in Step 3), but you must use the .php extension.
Next, open up FileZilla or another FTP client, and connect to your site’s server using your FTP credentials. Then, upload your new phpinfo.php file to the public_html folder:

You’ve now successfully added the phpinfo page to your site. In order to view the page, however, you’ll need to know where to find it.
Step 2: Access the phpinfo Page in Your Browser
Once it’s uploaded to your server, your phpinfo page will become publicly available. This means you (and anyone else) can view it in a browser by appending /phpinfo.php to the end of your site’s domain:

If you didn’t use any parameters and chose to return all of your PHP information, this page will likely be quite long. You can locate the specific details you’re looking for by using the Find function (CTRL or CMD + F) on your computer:

You can now use this information to carry out any necessary debugging or other tasks.
Step 3: Delete or Rename Your phpinfo Page
As we mentioned in Step 2, because your phpinfo.php file was placed in your public_html folder, it’s now publically available. The problem with this is that some of the information the phpinfo() function returns is sensitive and could help a malicious hacker gain access to your server.
Attackers may even employ bots to search for phpinfo pages in order to exploit them. For this reason, once you’ve finished using yours, it’s best to delete it. You can do so by returning to your FTP client.
Then, connect to your server again and open public_html. Right-click on your phpinfo.php file and select Delete:

Alternatively, some users choose to rename their phpinfo page to help hide it from hackers. You might use a random string of letters and numbers, for example, instead of “phpinfo”. Note that this will change the URL you use to access your phpinfo page as well.
This means that you’ll need to remember the name you assign to your phpinfo page so you can reach it whenever you like. However, this isn’t a guaranteed solution for preventing a security breach, so it’s best to simply create the page when needed and then delete it.
Summary
The phpinfo() function can provide valuable information for debugging your site. An easy way to put it to good use is to create a phpinfo page, so you can easily view all of your PHP information in your browser.
It takes just three simple steps to create and use this page safely:
- Create your phpinfo.php file and upload it to your server via FTP.
- Access your phpinfo page via your browser.
- Delete or rename your phpinfo page when you’re done using it.
Save time and costs, plus maximize site performance, with $275+ worth of enterprise-level integrations included in every Managed WordPress plan. This includes a high-performance CDN, DDoS protection, malware and hack mitigation, edge caching, and Google’s fastest CPU machines. Get started with no long-term contracts, assisted migrations, and a 30-day money-back guarantee.
Check out our plans or talk to sales to find the plan that’s right for you.
Hand-picked related articles

Nginx vs Apache: Web Server Showdown
Nginx vs Apache: what’s the difference between the two? See how these webservers stack against each other and which one is the fastest for WordPres…

Is PHP Dead? No! At Least Not According to PHP Usage Statistics
Is PHP dead? In this post, we try to answer that question by taking a look at some of the data on PHP usage statistics. Spoiler — PHP is not dead.
Reading time 6 min read Publish date November 23, 2018 Topic Learn PHP Topic Web Development Languages
10 Things Not to Do in PHP 7
With PHP 7 it’s time to shed some of our bad habits. Let’s take a look at some bad habits to get rid of as we switch to PHP 7.
Subscribe to our Newsletter
Keep up with the latest web development trends, frameworks, and languages.
Create simple Website with PHP
In this tutorial you can learn how to quickly create a simple website in PHP, with different title, meta description, and content for each page.
We create a file: index.php with PHP instructions to define page data, HTML code, and CSS style for template ( the whole code for this file is presented bellow ).
— The page URL will have the form: index.php?pg=page_name
— The content of each page (which can contains HTML code) is stored into a directory (here named » pages «), in «.htm» files, with the name: page_nme.htm
1. First we create the PHP code. To have different Title and Meta-tags in each page, we set an Array with Title, Description, and Keywords associated with the name of each page, «index» for Home page.
$pgdata['page_name'] = array( 'title'=>'Title of the page', 'description'=>'Here add the page description', 'keywords'=>'meta keywords, of the, page' );
2. Then we set a variable with the name of the page. If there is $_GET[‘pg’] , we get the name of the page from URL, otherwise we set the default name «index»; and get its data from Array.
$pgname = isset($_GET['pg']) ? trim(strip_tags($_GET['pg'])) : 'index';
— We use strip_tags() function to remove posible tags added by visitor in URL, and trim() to delete whitespaces from beginning and end of the name.
3. With this variable we get data for the current /accessed web page, like this for Title.
4. Then we create the HTML code with CSS styles, a menu and the content (see the whole code bellow). In the HTML code we add the Meta data selected from array, like this for Title:
— To can use properly diacritics, or other less common characters, all the files must be saved with UTF-8 encoding . In the PHP code we add this header:
header('Content-type: text/html; charset=utf-8'); Code for index.php file
— This is just an example for a website with three pages: Home, About Me, Images; and the CSS code only to arrange a little the Menu and content area. The files: «index.htm», «about_me.htm», and «images.htm», with the content you want for each one, must be saved into a directory named «pages».
You can create more pages in the web site by setting $pgdata[‘page_name’] array with their data, and create the content in «page_name.htm» file, in «pages» directory.
— To Download the files with this example, click: Create simple Website with PHP .