- Override all css styles
- The seemingly simple problem
- The special case
- The attempt at overriding a CSS rule
- Stepping back for a second
- Wrap the element?
- Two components?
- Smart menu component?
- Global CSS?
- A solution
- What’s next?
- How to overwrite CSS style?
- What is Overriding mean in CSS?
- The order of priority inline style is as follows:
- Method 1: Overriding CSS style with the ID selector:
- Method 2 Overriding CSS style with the Class selector:
- Method 3: Creating CSS class with different property
- Method 4: Using Inline CSS
- Method 5: Using !important directive
Override all css styles
Ali Churcher · 27 Jun 2018
I’m a fan of CSS Modules. This clever build step allows you to write CSS in a clean, manageable way. No longer do you have gigantic CSS files. No longer are you scared to delete CSS rules, for fear of unexpected style changes in murky corners of your application. No longer do you have to implement complex CSS naming schemes that are slowly forgotten or implemented inconsistently.
We get these benefits when we use CSS Modules because we write small and simple CSS files. Each of these files (modules) has its own scope, allowing you to reuse simple class names like button in several different modules. Build tools such as css-loader for Webpack then take care of scoping and naming issues during compilation. These scoped class names let you forget about complex selectors, and for the most part specificity.
After some joyful months of using CSS Modules a seemingly simple problem stumped me, and I found myself longing for my old friend specificity. I set out to find out if my longing was a code smell, a limitation of CSS Modules, or something else.
The seemingly simple problem
In our application we have a reusable menu component that is used on every page. In reality it contains some very long German words, but let’s pretend for now that it looks like this:

This menu component has an outer div, containing three menu items, each with the class item .
// Menu.jsx import item, menu > from '..Menu.css' . const Menu = () => ( div className=menu>> button className=item>>HOMEbutton> button className=item>>STOREbutton> button className=item>>CONTACTbutton> div> ) export default Menu To create the pipe separator between the items we are using the pseudo element ::after .
/* Menu.css */ .item::after content: '|'; > The special case

As with all applications, we have a special case. When the menu is inside a Header we want to remove the separator lines:
To achieve this we can create a CSS rule in Header.css that will remove the separator and replace it with empty content:
/* Header.css replaces the separator with nothing */ .item::after content: ' '; > When the menu is inside a Header we need this new rule to be used. It must override our existing rule from Menu.css.
This sounds like a job for specificity.
The attempt at overriding a CSS rule
Let’s try it. The principles of specificity tell me that if I want my content declaration to be implemented by the browser then its selector (i.e. .item::after ) must have the highest specificity. If I simply make a new rule that is more specific of course it will be used …right?
/* Menu.css */ .item::after /* existing rule */ content: '|'; > /* Header.css */ .menu .item::after /* new rule with more specific selector */ content: ' '; > With two classes, the selector .menu .item::after defined in the Header.css is much more specific than the .item::after we have defined in Menu.css. But does it work?
We still have separators. Our more specific CSS is not being used. Don’t be sad though, this is exactly how things should behave when we use CSS Modules! All the glory of CSS Modules comes from the amazing ability to scope CSS classes uniquely. The reason you are allowed to reuse button classes in several components is because these classes, once compiled, are given scoped names with a unique hash. If we use our developer tools to look at the menu, we can see this happening to the menu’s item class:

The menu item elements do not have the class item . Instead, they have been given the compiled class name Menu__item—3FNtb . Likewise the CSS itself is also compiled with a new name.
.Menu__item--3FNtb::after content: '|'; > .Header__item--1NKCj::after content: ' '; > So while our CSS rule may have won the specificity battle, no element had this class name! For our rule to be picked up, we would need its compiled name .Header__item—1NKCj to be present in the HTML menu item elements.
Stepping back for a second
Getting compiled class names from two different CSS modules into an HTML element sounds complicated. Maybe there are simpler solutions to override our separator style.
Wrap the element?
If we are struggling to target a class inside our menu, could we simply wrap the menu in another element, and apply extra styles to that? This approach works well for things like positioning the menu, but for trying to target an ::after selector on a nested element this solution will fail.
Two components?
You can argue that if we want two different types of menus, then we should have two different components. Sometimes components that look similar actually represent different concepts and should indeed be separated. In this case however, the menus represent the same concept, and I wanted them to be the same component.
Smart menu component?
What if the menu component knew where it was being rendered? It could then display the separators by default, and hide them if it was rendered from the Header component. While this is easy in the short term it means our component is no longer ‘dumb’, it has to deal with things it should not have to worry about. We want our menu to provide a menu, and then be done with it.
Global CSS?
If all else fails we could add our rule to the global CSS. However, while useful for site-wide styles, global CSS is not a good solution for contained components like our menu. We would start to lose the benefits of scoped CSS.
A solution
So we just eliminated many of the common solutions and alternatives for overriding the CSS of a child component from the parent component. It’s time to reapproach the idea of adding the compiled class from Header.css into each of our menu item elements. We know that for our new Header.css rule to be added to the HTML it needs to be present in Menu.jsx when it is compiled. This is something we can achieve by passing the rule into the menu from the Header.
When the header renders the menu we pass in our new .item rule:
//Header.jsx import Menu from '../Menu.jsx' import item > from './Header.css' // rule to REMOVE the separators . const Header = () => ( header> Menu classes= item >> /> header> ) export default Header The menu component accepts this extra class from the Header component and applies it to each menu item. We are using the classnames library cn to allow us to add multiple classes to the element: the item class from Menu.css, and the item class from Header.css. In fact any component that renders a menu now has this option to provide its own implementation of .item .
//Menu.jsx import menu item > from './Menu.css' // rule to ADD the separators import cn from 'classnames' . const Menu = ( classes = <> >) => ( div className=menu>> button className=cn(item, classes.item)>>HOMEbutton> button className=cn(item, classes.item)>>STOREbutton> button className=cn(item, classes.item)>>CONTACTbutton> div> ) export default Menu Let’s check the developer tools to see if these classes are really added:

Looks good! Now we have both Menu_item—3FNtb and Header_item—1NKCj on our elements. One class adds a separator, one class takes it away. So which style with the browser choose? Will specificity come back to us and allow our more specific Header.css style to win?
Let’s see if we managed to remove the separators.
The header styles that remove the separator has won. We have successfully used specificity to override a style using CSS Modules. This pattern of an HTML element sharing classes from two different components is defined as the Adopted Child Pattern by Simurai.
What’s next?
Wanting a parent component to override the styles of a child component turns out to be a common issue in the community. Thankfully a new :external keyword has been proposed to ease the pain. I recommend reading the proposal for some interesting discussions on the topic. In the mean time, always go for the simplest solution, and know that your friend specificity is always there for you.
Have you had this problem? How did you solve it? Let us know your thoughts in the comments!
How to overwrite CSS style?
Using CSS, users can add different features to their web page. When users use multiple CSS rules within the same HTML element, they should direct the browser with the rule of thumb to signify which styling instruction should take priority.
Depending on which selector type users use to style the HTML element, these rules will set or determine which style overrides the other. It is what the article will briefly discuss with its different criteria users can use in CSS.
What is Overriding mean in CSS?
To override means to use the property of one CSS class over another. Overriding in CSS indicates that users use any style property to the specified HTML element for which they have already provided the CSS style.
For example, if users want to change the CSS style they have used to the HTML element using an external CSS, but if they do not find where they have written the line of code, then they can only override another CSS style by using inline CSS which has the highest precedence. Also, they can use or !important directive that overrides the CSS class over another.
The order of priority inline style is as follows:
inline stylesheet (highest) >>
tags >> external style sheet (lowest)
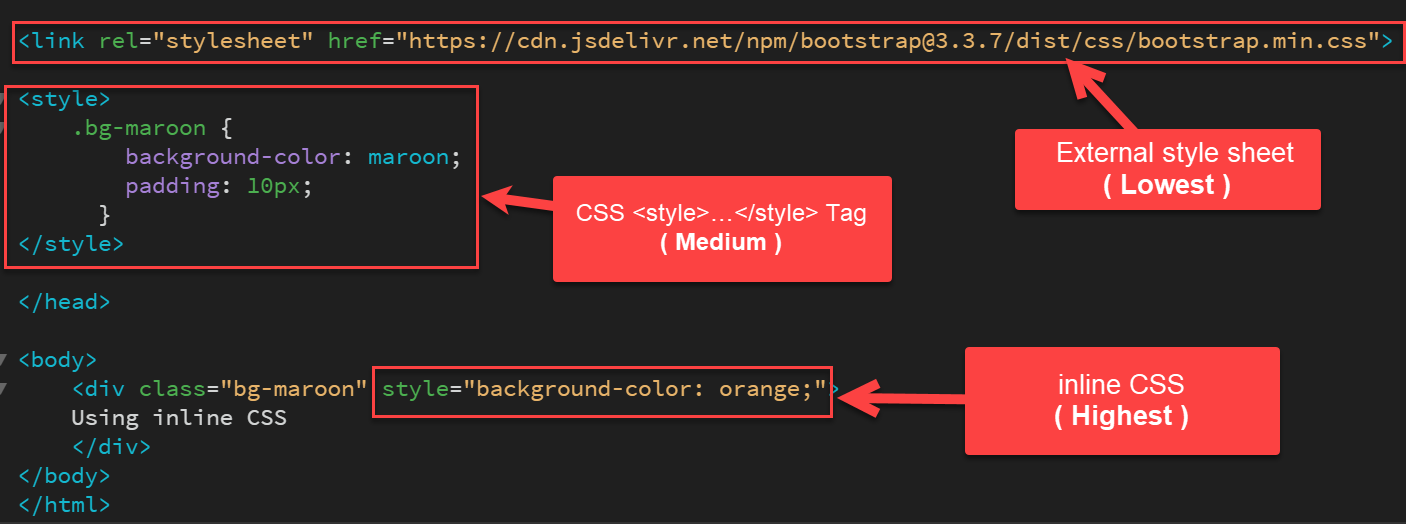
So, when there appears a conflict between two or more CSS styles under the same HTML element, the last style that users will use will take precedence.
The below two rules will make users clear about the concept:
- Users must place the inline styles inside the HTML tag of the HTML document. While they must place the embedded style sheets inside the HTML tag of the HTML document so that the browser uses the inline styles as the last used ones and take precedence.
- In an HTML document, the internal style sheets take a higher priority than external ones. It is only because the browser will always consider the external style sheets or linked style sheets to come before the internal style sheets or embedded sheets, even if users use them or put them after.
Let us look at the different overriding styles in CSS:
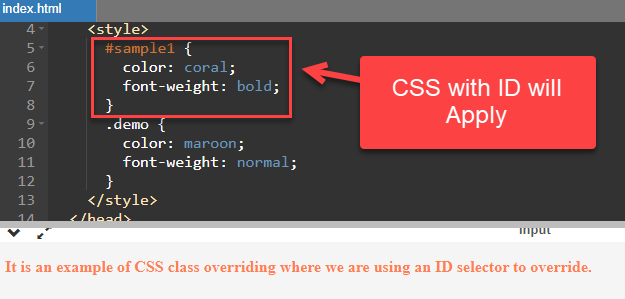
Method 1: Overriding CSS style with the ID selector:
.demo < color: maroon; font-weight: normal; >#sample1 It is an example of CSS class overriding where we are using an ID selector to override.
Explanation:
In the above code snippet, we can see that the ID gets precedence when we place the class after the ID. We can only use this when we set the ID and the CSS class under the same HTML element.
Method 2 Overriding CSS style with the Class selector:
#sample1 < color: #786435; font-style: italic; background-color: green; >.demo It is an example of CSS class overriding where we use an CSS selector to override. 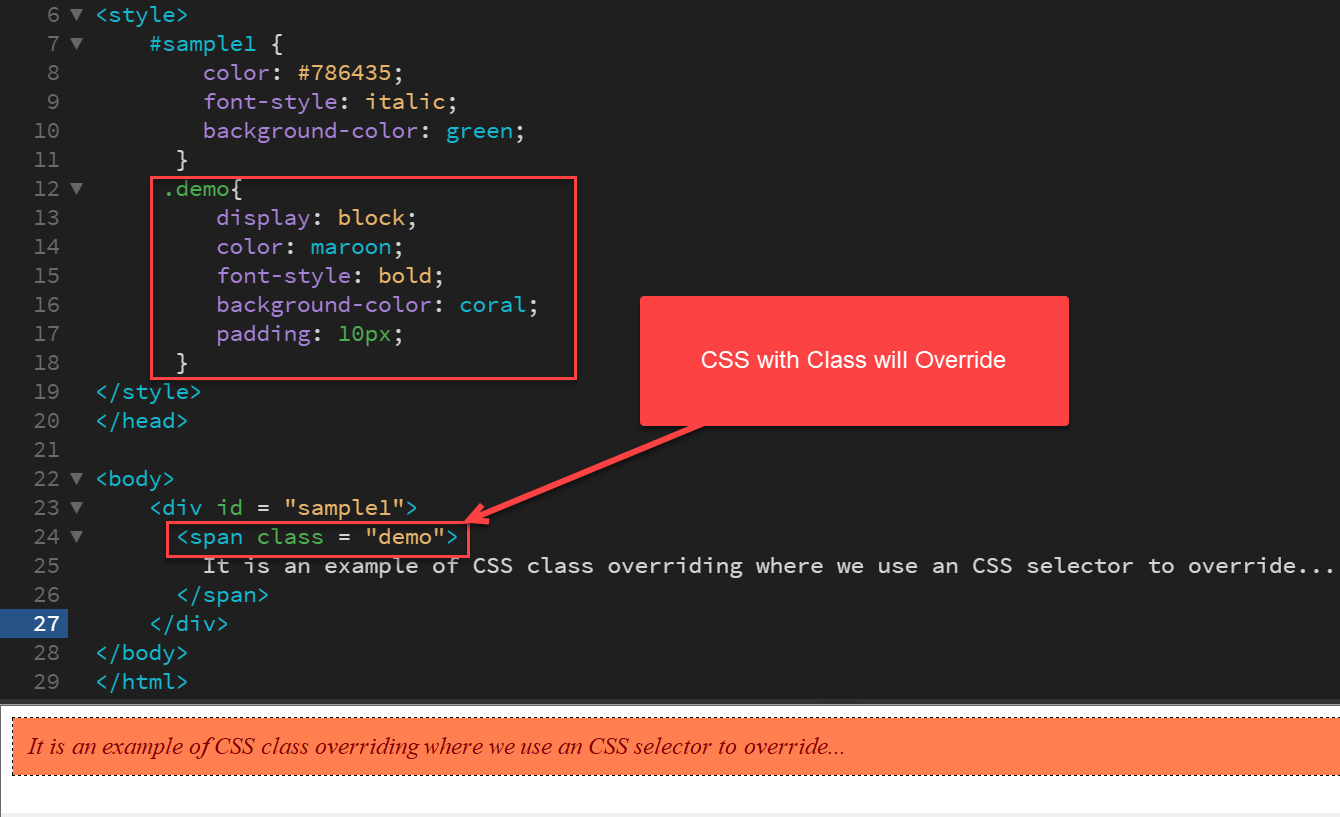
Explanation:
As we have discussed, when we use the Class selector and the ID selector under the same HTML element, the ID selector will have precedence. But in the above code example, we used the Class selector in the last; it will override the ID selector.
Method 3: Creating CSS class with different property
There are other techniques to override CSS style. Users can apply using one CSS class over another. Let us learn how users can use CSS to override one CSS class over another using the code snippets.
Code Snippet:
.bg-maroon < background-color: maroon; padding: 10px; >.bg-orange Overwriting by redeclaring second Class with different property 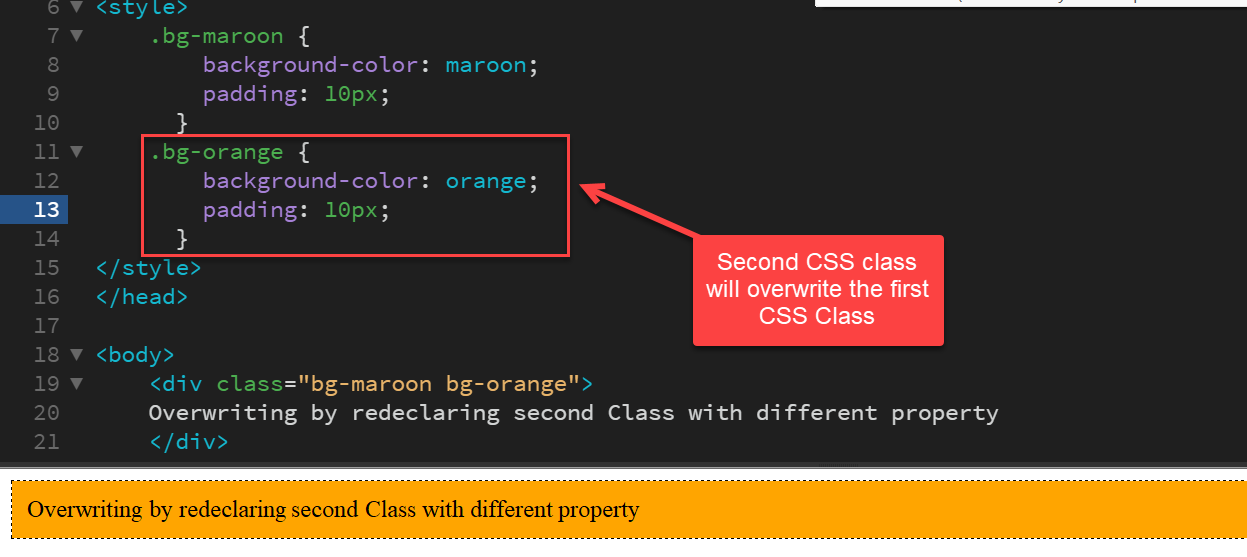
Explanation:
Users can use the dot operator to specify a CSS class name, i.e., .class_name <> . Here, in this example, we have used two CSS classes, namely bg-maroon and bg-orange. In the second class, i.e., inside the CSS class bg-orange, we defined the background color and padding of the text with a value of orange and 60 px. The text inside the HTML tag will refer to the second class.
Note: Users can also change the property of the tag by changing the style in the CSS class itself.
Method 4: Using Inline CSS
As we know inline CSS is the highest weight so it will overwrite all other CSS class
.bg-maroon Using inline CSS 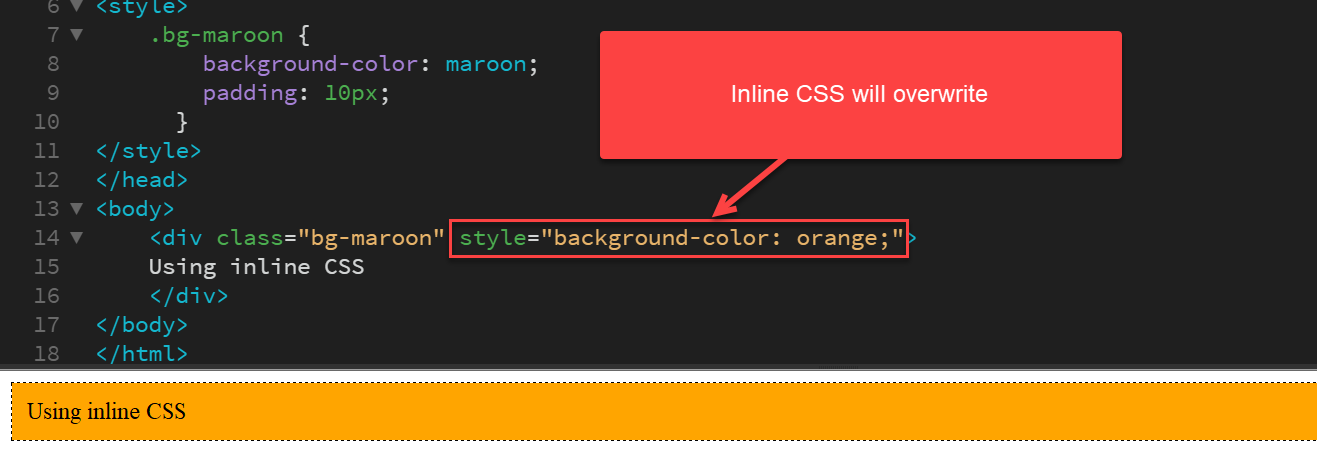
Note: Not recommended, Not Supported in AMP pages
Method 5: Using !important directive
The last method involves one of the most crucial techniques in CSS to override style is the !important directive. To declare a class with the !Important directive is an excellent way to override the styles users want.
When users use any essential rule on the CSS style declaration, this declaration will override the other CSS styles.
Let us see how !important directive works:
Code Snippet:
.bg-maroon < background-color: maroon !important; padding: 10px; color: white; >.bg-orange !important directive 
Note: Not recommended, Not Supported in AMP pages
Explanation:
The directive prioritizes that CSS style property with which users will add the » !important .» It indicates the style is important and can override the inline styling. In the code lines, we have added the «!important» at the end of the styling instruction line.
Conclusion:
When users use a CSS style inside an HTML element, they can change its property by changing or adding a new property in that class. Also; alternatively, they can add a new CSS class with a new property. Overriding a CSS class is easy, efficient, and can save time. We hope all the above techniques in this article help you with CSS style overriding.