- Opening PDF String in new window with javascript
- Answer by Santino Palacios
- Answer by Alison Howe
- Answer by Yousef Fleming
- Answer by Heidi Wiggins
- Answer by Kylie Kerr
- Answer by Julius Lester
- Answer by Harmony Lloyd
- How to Use PDF.js in 2 Easy Steps
- Step 1 — Download and Extract the PDF.js Package
- Step 2 — Embed the PDF Viewer in Website
- Full Screen PDF Viewer
- Customizing the PDF.js Toolbar
- Element ID Reference for PDF.js User Interface Customization
- Next Steps
- Conclusion
Opening PDF String in new window with javascript
does not work anymore in Chrome. Yesterday, I came across with the same issue and tried this solution, but did not work (it is ‘Not allowed to navigate top frame to data URL’). You cannot open the data URL directly in a new window anymore. But, you can wrap it in iframe and make it open in a new window like below. =)
let pdfWindow = window.open("") pdfWindow.document.write( "" ) Answer by Santino Palacios
I am trying to open up this string in a new window as a PDF file. Whenever I use window.open() and write the string to the new tab it thinks that the text should be the contents of an HTML document. I want it to recognize that this is a PDF file.,Use javascript to populate the hidden field’s value with the pdf string and post the form.,The above one pasting the encoded content in URL. That makes restriction of the content length in URL and hence PDF file loading failed (because of incomplete content).,Yo have to append, the following «data:application/pdf;base64» + your pdf String, and set the src of your element to that.
I have a formatted PDF string that looks like
%PDF-1.73 0 obj> /Resources 2 0 R/Contents 4 0 R>> endobj4 0 obj<> streamx��R=o�0��+��=|vL�R���l�-��ځ,���Ge�JK����>startxref2015%%EOF Answer by Alison Howe
Live code validation ,Save anonymous (public) fiddle?
/echo simulates Async calls:
JSON: /echo/json/
JSONP: //jsfiddle.net/echo/jsonp/
HTML: /echo/html/
XML: /echo/xml/
/echo simulates Async calls:
JSON: /echo/json/
JSONP: //jsfiddle.net/echo/jsonp/
HTML: /echo/html/
XML: /echo/xml/
/echo simulates Async calls:
JSON: /echo/json/
JSONP: //jsfiddle.net/echo/jsonp/
HTML: /echo/html/
XML: /echo/xml/
/echo simulates Async calls:
JSON: /echo/json/
JSONP: //jsfiddle.net/echo/jsonp/
HTML: /echo/html/
XML: /echo/xml/
/echo simulates Async calls:
JSON: /echo/json/
JSONP: //jsfiddle.net/echo/jsonp/
HTML: /echo/html/
XML: /echo/xml/
Answer by Yousef Fleming
What is ‘CodeProject’?,Objective-C and Swift ,View Unanswered Questions,View Python questions
I have the following code string path = Server.MapPath("\\Reports\\" + DDEP.SelectedValue + ".pdf"); ClientScript.RegisterStartupScript(this.GetType(), "open", "window.open('"+path+"','_blank' );", true); I am trying to open the .pdf in a new window but its opening a blank window. thanks for the helpstring path = Server.MapPath("\\Reports\\" + DDEP.SelectedValue + ".pdf"); ClientScript.RegisterStartupScript(this.GetType(), "open", "window.open('"+path+"','_blank' );", true);/* StringBuilder sb = new StringBuilder(); sb.Append(""); ClientScript.RegisterStartupScript(this.GetType(), "script", sb.ToString()); */Answer by Heidi Wiggins
Open Base64 Encoded File
Clicking the button above, should open a window that looks like this:

About this SO question: Window.Open with PDF stream instead of PDF location 
Open Base64 Encoded File
Clicking the button above, should open a window that looks like this:
About this SO question: Window.Open with PDF stream instead of PDF location Answer by Kylie Kerr
In this JavaScript quick tutorial, we’ll learn how to select a file using a File input control to convert it into a Base64 URL, also add a View button to preview the selected file by opening in the new Chrome tab by creating a BLOB url.,We have already discussed how to convert the selected file into a Base64 string URL here, you can check the complete tutorial in Angular.,Finally, we’re done with a tutorial on how to convert the selected file into a Blob url, and append the link to open the selected file in a new browser tab.,Let’s create a simple HTML form with input control of type file. This file control is having a change event handler to convert the selected file into a base64 string. The onchange event will take care to convert the file into base64 anf Blog.
Let’s create a simple HTML form with input control of type file . This file control is having a change event handler to convert the selected file into a base64 string. The onchange event will take care to convert the file into base64 anf Blog.
The FileReader() function is used to read files and then load in the browser’s memory. It returns a callback method onload inside of which we’ll get selected file information.
function fileChangeEvent(fileInput) < if (fileInput.target.files && fileInput.target.files[0]) < const reader = new FileReader(); reader.onload = (e) =>< . . >; reader.readAsDataURL(fileInput.target.files[0]); > >Inside the reader.onload , we’ll get Base64 encoded string URL
// Base64 String console.log(e.target.result);To create a Blob we call new Blob() then call window.URL.createObjectURL() to convert it into a URL.
// Create a Blog object for selected file & define MIME type var blob = new Blob(fileInput.target.files, < type: fileInput.target.files[0].type >); // Create Blog URL var url = window.URL.createObjectURL(blob);After the file is selected by a user, we’ll append the selected inside the
function fileChangeEvent(fileInput) < if (fileInput.target.files && fileInput.target.files[0]) < const reader = new FileReader(); reader.onload = (e) =>< // Create a Blog object for selected file & define MIME type var blob = new Blob(fileInput.target.files, < type: fileInput.target.files[0].type >); // Create Blog URL var url = window.URL.createObjectURL(blob); var element = document.getElementById("selected-file"); if ( fileInput.target.files[0].type === 'image/png' || fileInput.target.files[0].type === 'image/gif' || fileInput.target.files[0].type === 'image/jpeg' ) < // View Image using Base64 String console.log(e.target.result); var img = document.createElement("img"); img.src = e.target.result; element.appendChild(img); >// Create Blog View Link var a = document.createElement("a"); var linkText = document.createTextNode("View File"); a.target = "_blank"; a.appendChild(linkText); a.href = url; element.appendChild(a); >; reader.readAsDataURL(fileInput.target.files[0]); > >For an Angular application, we just need to assign the blob url in the tag
But we can’t simply assign the url to the selectedFileBLOB as shown below:
. let blob = new Blob(fileInput.target.files, < type: fileInput.target.files[0].type >); let url = window.URL.createObjectURL(blob); this.selectedFileBLOB = url; . The bypassSecurityTrustUrl() method provided by the DomSanitizer class.
. import < DomSanitizer >from '@angular/platform-browser'; . export class AppComponent implements OnInit < constructor( private sanitizer: DomSanitizer ) <>ngOnInit() < >fileChangeEvent(fileInput: any) < if (fileInput.target.files && fileInput.target.files[0]) < const reader = new FileReader(); reader.onload = (e: any) =>< let blob = new Blob(fileInput.target.files, < type: fileInput.target.files[0].type >); let url = window.URL.createObjectURL(blob); this.selectedFileBLOB = this.sanitizer.bypassSecurityTrustUrl(url); >; reader.readAsDataURL(fileInput.target.files[0]); > > >Answer by Julius Lester
Answer by Harmony Lloyd
To open a new tab, we have to use _blank in second parameter of window.open().,Do not add a third parameter to it as it will result in the opening of a new window rather than a tab,The return value of window.open() is a reference to the newly created window or tab or null if it failed.,How to open URL in a new window using JavaScript ?
How to Use PDF.js in 2 Easy Steps

In this article (a three-minute read), you’ll learn how to quickly embed a PDF in a web page using PDF.js, a popular open-source PDF viewer.
We will also use it as a full screen PDF viewer where we can pass in a PDF filename via URL query string. Try the full screen viewer here:
Step 1 — Download and Extract the PDF.js Package
Let’s head over to GitHub to download the latest stable release and then extract the contents inside our website folder.
Here are the contents of the .zip :
├── build/ │ ├── pdf.js │ └── . ├── web/ │ ├── viewer.css │ ├── viewer.html │ └── . └── LICENSEAfter extracting the .zip contents, our website folder could look something like this:
├── index.html ├── subpage.html ├── assets/ │ ├── pdf/ | ├── my-pdf-file.pdf | ├── my-other-pdf-file.pdf | ├── . ├── build/ - PDF.js files │ ├── pdf.js │ ├── . ├── web/ - PDF.js files │ ├── viewer.css │ ├── viewer.html │ ├── . └── LICENSE - PDF.js licenseNote: Due to browser security restrictions, PDF.js cannot open local PDFs using a file:// URL. You will need to start a local web server or upload the files to your web server.
Step 2 — Embed the PDF Viewer in Website
Our last step will be to embed the viewer in our web page by using an . We will use a query string to tell the PDF viewer which PDF file to open. Like this:
DOCTYPE html> html> head> title>Hello world!title> head> >> >> h2>About Ush2> p>We help software developers do more with PDFs. PDF.js Express gives a flexible and modern UI to your PDF.js viewer while also adding out-of-the-box features like annotations, form filling and signatures.p> Place the following element where you want the PDF to be displayed in your website. You can adjust the size using the width and height attributes. --> div> iframe id="pdf-js-viewer" src="/web/viewer.html?file=%2assets%2pdf%2Fmy-pdf-file.pdf" title="webviewer" frameborder="0" width="500" height="600">iframe> div> div> body> html> If you’d like to load PDF files from a different domain name, you will need to ensure the server hosting the PDFs has been set up for CORS.
Full Screen PDF Viewer
In addition to embedding the viewer in a page, we can also open it in a full screen:
a href="/web/viewer.html?file=%2Fmy-pdf-file.pdf">Open Full Screen PDF.js Viewera> Just change the file query string parameter to open whatever you PDF you wish to open.
Customizing the PDF.js Toolbar
We can also reorganize the toolbar by moving elements around, removing buttons, and changing the icons.
Let’s open public/lib/web/viewer.html and add the following to the section:
script src="customToolbar.js"> script> Next, we’ll create customToolbar.js inside the public/lib/web folder and add the following code:
let sheet = (function() < let style = document.createElement("style"); style.appendChild(document.createTextNode("")); document.head.appendChild(style); return style.sheet; >)(); function editToolBar() < //when the page is resized, the viewer hides and move some buttons around. //this function forcibly show all buttons so none of them disappear or re-appear on page resize removeGrowRules(); /* Reorganizing the UI the 'addElemFromSecondaryToPrimary' function moves items from the secondary nav into the primary nav there are 3 primary nav regions (toolbarViewerLeft, toolbarViewerMiddle, toolbarViewerRight) */ //adding elements to left part of toolbar addElemFromSecondaryToPrimary('pageRotateCcw', 'toolbarViewerLeft') addElemFromSecondaryToPrimary('pageRotateCw', 'toolbarViewerLeft') addElemFromSecondaryToPrimary('zoomIn', 'toolbarViewerLeft') addElemFromSecondaryToPrimary('zoomOut', 'toolbarViewerLeft') //adding elements to middle part of toolbar addElemFromSecondaryToPrimary('previous', 'toolbarViewerMiddle') addElemFromSecondaryToPrimary('pageNumber', 'toolbarViewerMiddle') addElemFromSecondaryToPrimary('numPages', 'toolbarViewerMiddle') addElemFromSecondaryToPrimary('next', 'toolbarViewerMiddle') //adding elements to right part of toolbar addElemFromSecondaryToPrimary('secondaryOpenFile', 'toolbarViewerRight') /* Changing icons */ changeIcon('previous', 'icons/baseline-navigate_before-24px.svg') changeIcon('next', 'icons/baseline-navigate_next-24px.svg') changeIcon('pageRotateCcw', 'icons/baseline-rotate_left-24px.svg') changeIcon('pageRotateCw', 'icons/baseline-rotate_right-24px.svg') changeIcon('viewFind', 'icons/baseline-search-24px.svg'); changeIcon('zoomOut', 'icons/baseline-zoom_out-24px.svg') changeIcon('zoomIn', 'icons/baseline-zoom_in-24px.svg') changeIcon('sidebarToggle', 'icons/baseline-toc-24px.svg') changeIcon('secondaryOpenFile', './icons/baseline-open_in_browser-24px.svg') /* Hiding elements */ removeElement('secondaryToolbarToggle') removeElement('scaleSelectContainer') removeElement('presentationMode') removeElement('openFile') removeElement('print') removeElement('download') removeElement('viewBookmark') >function changeIcon(elemID, iconUrl)< let element = document.getElementById(elemID); let classNames = element.className; classNames = elemID.includes('Toggle')? 'toolbarButton#'+elemID : classNames.split(' ').join('.'); classNames = elemID.includes('view')? '#'+elemID+'.toolbarButton' : '.'+classNames classNames+= "::before"; addCSSRule(sheet, classNames, `content: url($) !important`, 0) > function addElemFromSecondaryToPrimary(elemID, parentID) < let element = document.getElementById(elemID); let parent = document.getElementById(parentID); element.style.minWidth = "0px"; element.innerHTML ='' parent.append(element); >function removeElement(elemID) < let element = document.getElementById(elemID); element.parentNode.removeChild(element); >function removeGrowRules() < addCSSRule(sheet, '.hiddenSmallView *', 'display:block !important'); addCSSRule(sheet, '.hiddenMediumView', 'display:block !important'); addCSSRule(sheet, '.hiddenLargeView', 'display:block !important'); addCSSRule(sheet, '.visibleSmallView', 'display:block !important'); addCSSRule(sheet, '.visibleMediumView', 'display:block !important'); addCSSRule(sheet, '.visibleLargeView', 'display:block !important'); >function addCSSRule(sheet, selector, rules, index) < if("insertRule" in sheet) < sheet.insertRule(selector + "", index); > else if("addRule" in sheet) < sheet.addRule(selector, rules, index); >> window.onload = editToolBarThe PDF.js primary toolbar is broken down into 3 regions:
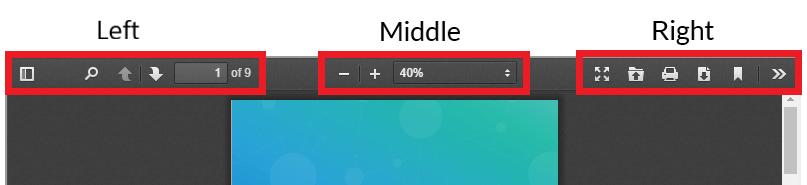
The secondary toolbar is accessed via the chevron icon in the right region:
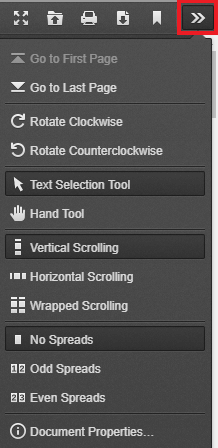
We can move elements from the secondary toolbar into the left, middle, or right regions of the primary toolbar with the addElemFromSecondaryToPrimary function in customToolbar.js . For example, uncommenting this line will move the counter-clockwise rotation tool to the left region of the primary toolbar:
addElemFromSecondaryToPrimary('pageRotateCcw', 'toolbarViewerLeft') If you wanted to move pageRotateCcw to the middle region instead, you’d replace toolbarViewerLeft with toolbarViewerMiddle , or toolbarViewerRight for the right region. To move a different tool, replace the pageRotateCcw ID with the element ID you want to move. (See below for a full list of element IDs.)
We can also hide elements like this:
removeElement('print') removeElement('download') To hide different elements, replace print or download with the element ID.
NOTE: Hiding the download and print buttons is not a bulletproof way to protect our PDF, because it’s still possible to look at the source code to find the file. It just makes it a bit harder.
We can also customize the icons for various tools by swapping out the SVG file, like this:
changeIcon('previous', 'icons/baseline-navigate_before-24px.svg')In the above example, previous is the element ID, while icons/baseline-navigate_before-24px.svg is the path to the tool icon.
Element ID Reference for PDF.js User Interface Customization
Here’s handy reference with the IDs of the various toolbar icons:
![]()
![]()
![]()
![]()
![]()
![]()
![]()
![]()
![]()
![]()
![]()
![]()
![]()
![]()
![]()
![]()
![]()
![]()
![]()
![]()
![]()
![]()
![]()
![]()
![]()
![]()
![]()
![]()
![]()
![]()
![]()
![]()
![]()
Next Steps
Now that you’ve got your PDF.js viewer up and running, consider the following tutorials:
Conclusion
As you can see, building a basic PDF viewer with PDF.js is pretty straightforward. If you require additional capabilities, like PDF annotation, filling forms, or e-signatures, consider PDF.js Express, which provides a PDF.js-based viewer with out-of-the-box annotation, PDF form fill, and signing.
Check out the demo and let us know what you think!