- HTML Syntax – HTML Style Guide and Best Practices for Beginners
- HTML Syntax for Tags
- HTML Syntax for Elements
- is the opening tag for heading one and
- HTML Syntax for Attributes
- HTML Syntax Conventions to Follow
- Name your File in Lowercase
- Do Not Omit the , , , , and Other Boilerplate Tags
- Use Lowercase Letters for Element and Attribute Names
- Add Quotes to Attribute Values
- Always Add Closing Tags to Elements
- Always Specify Alternative Texts for Images
- Add Spaces and Indentations to Long Lines of Code
- Always Add HTML Comments Where Necessary
- Conclusion
- Sharing is caring
- Self Closing Tags In HTML
- HTML Self Closing Tag
- .
- The correct way to write a self closing tag
- List of self closing tags in HTML
- Self closing tags in HTML example
- Html closing tag syntax
HTML Syntax – HTML Style Guide and Best Practices for Beginners
If you are learning HTML, it is necessary to master the HTML syntax so you can write the best possible HTML code.
So, while writing HTML, there are rules and guidelines you should follow. There are also other things to follow that are not rules but conventions.
You should follow these rules and conventions so other people you’re working with can understand your code.
In this article, you will learn how the HTML syntax works – how tags, elements, and attributes should be written.
I will also show you some comparisons and tips, so you can learn good HTML syntax from bad ones.
HTML Syntax for Tags
Tags are the basic building blocks of HTML. They are the encodings that make the content of a web page render as it’s supposed to be.
These encodings in question are the lesser than (<), slash (/), and greater than (>) symbols wrapped around an element. You will see what elements are soon.
HTML tags fall into two categories – opening tags and closing tags.
Opening tags follow the pattern , with x being the element. For example
for paragraph. If you want to add an attribute, you put it in the opening tag too. I will make a detailed touch on HTML attributes and show you a beautiful analogy of it soon in this article soon.
Closing tags follow the patter . With x being the element. For example,
– the closing tag for paragraph.
You can also call the opening tag a start tag, and the closing tag an end tag.
A full example of tag looks as shown below:

HTML Syntax for Elements
An HTML element is the tag and content combined. Remember that
is the opening tag for heading one and
is the closing tag for heading one.
To display the heading, you put the content between the opening and closing tags:
Code language: HTML, XML (xml)h1>Welcome to Codedamn h1>
This results in a big text in the browser:

That is what makes an HTML element. The infographic below can help you understand HTML elements better:

You can also nest an element inside another element. In the example below, I nest a link inside a paragraph:
Code language: HTML, XML (xml)p>Welcome to the best website to learn how to code interractively, a href="https://codedamn.com">Codedamn a>. p>
Some elements don’t have a closing tag, for example, the meta tags, a tag, and an image tag. These elements are called void tags or self-closing tags.
In HTML5, you can show when a tag self-closes by adding an optional trailing slash. For example, for and for
HTML Syntax for Attributes
Attributes are added to the opening tags to store extra information about an element. For example, you can add id and class attributes to style an element or select it with JavaScript.
The basic syntax for an attribute looks as you can see below:
Code language: HTML, XML (xml)p class="welcome-message">Welcome to the best website to learn how to code interractively p>
In the code above, the word class is the attribute name and welcome-message is the value of the attribute.
A better way to show you what an attribute looks like is presented in the infographic below:

At the end of it all, a fully written HTML element looks this way:

HTML Syntax Conventions to Follow
The following conventions won’t stop HTML from working, but they will make your HTML more readable.
Name your File in Lowercase
It is weird to have an HTML file named this way:

The right way to name an HTML file is this:

I can’t say you should not name your HTML file the way you want, but make the name readable. It is a common practice to name your only or first HTML file index.html.
You can use both .htm and .html filenames. Browsers treat both of them the same way.
Do Not Omit the , , , , and Other Boilerplate Tags
You should always add the following boilerplate code to your HTML:
Code language: HTML, XML (xml)html> html lang="en"> head> meta charset="UTF-8"> meta http-equiv="X-UA-Compatible" content="IE=edge"> meta name="viewport" content="width=device-width, initial-scale=1.0"> title>Document Name title> head> body> !—Your HTML codes go here --> body> html>
The first thing you should do while writing HTML is to declare a document type as shown below:
Code language: HTML, XML (xml)html>
It is necessary to declare a document type so different browsers would parse your HTML the same way.
HTML would work without the and tags. However, it is necessary to add both the and tags so you don’t get errors while adding JavaScript to your HTML.
Do Not Skip the tag too. Again, HTML can parse without the tag, but it’s a bad practice for SEO.
In addition, you should add the title tag so your users can understand what the particular web page is about.
Some users are knowledgeable enough to know that the title of a page shows when they hover on a browser tab.

So, if you don’t add a title tag, you’re not doing enough to give your users an excellent user experience.
The Meta Tags help you add various beneficial information that could play a crucial role in SEO.
Code language: HTML, XML (xml)meta charset="UTF-8"> meta http-equiv="X-UA-Compatible" content="IE=edge"> meta name="viewport" content="width=device-width, initial-scale=1.0">
Use Lowercase Letters for Element and Attribute Names
HTML is not case sensitive, so it won’t stop you from using only uppercase, lowercase letters, or even mixing them.
However, it is a convention to use lowercase letters for element and attribute names because it looks cleaner and is what everyone uses.
Code language: HTML, XML (xml)p class="PARAGRAPH-ONE"> p>
Code language: HTML, XML (xml)p class="paragraph-one"> p>
Add Quotes to Attribute Values
It is important to add double quotes or single quotes to attribute values. This is because you might have to add more than one attribute to an element.
If you don’t add quotes to the values of the attributes, it would be difficult to identify individual attributes and read them.
Code language: HTML, XML (xml)p class= unquoted-classname p>
Code language: HTML, XML (xml)p class="quoted-classname"> p>
Always Add Closing Tags to Elements
HTML parses if you don’t add closing tags to an element:

But it is necessary to add the closing tags so you and other people reading your code can easily identify where an element ends.
Code language: HTML, XML (xml)h1>Welcome to Codedamn
Code language: HTML, XML (xml)h1>Welcome to Codedamn h1>
Always Specify Alternative Texts for Images
It is important to specify alternative texts for images so search engines can understand the images better.
It is also important to specify alternative texts for a better user experience and accessibility.
Code language: HTML, XML (xml)img src="codedamn.png" alt="">
Code language: HTML, XML (xml)img src="codedamn.png" alt="Codedamn logo">
Add Spaces and Indentations to Long Lines of Code
For readability, you should avoid an HTML code like this:
Code language: HTML, XML (xml)main> h1>Programming Languages h1> h2>Python h2> p> Python is the most popular programming language. It is a multipurpose language you can use for Data Science, web development, automation, Machine Learning, and many other things. p> h2>JavaScript h2> p> JavaScript is the language of the web. You can use it to make websites, mobile apps, web servers and desktop apps. p> main>
You should write the same code like this:
Code language: HTML, XML (xml)main> h1>Programming Languages h1> h2>Python h2> p> Python is the most popular programming language. It is a multiputpose language that can ber used for Data Scienc, web development, automation, Machine Learning, and many other things. p> h2>JavaScript h2> p> JavaScript is the language of the web. You can use it to make websites, mobile apps, web servers and desktop apps. p> main>
Always Add HTML Comments Where Necessary
If you’re working in a team, you should save your teammates some time and effort by commenting on your code.
The HTML comment syntax falls into two categories: single-line comments and multi-line comments
HTML single-line comment is done this way:
Code language: HTML, XML (xml)em> em>
And an HTML multi-line comment is done like this:
Code language: HTML, XML (xml)
Conclusion
I hope with this article, you have learned everything necessary to write HTML in the proper way.
To get a hang of the right way to write HTML, don’t hesitate to always come back to this article.
If you just started learning HTML, we have a detailed article on what HTML stands for and means.
If you want to learn HTML in a better way, we have an interactive HTML and CSS course for you.
We even have an advanced HTML5 and CSS3 course that can show you deeper things about HTML you won’t see anywhere else.
If you write HTML and you want to validate it, you can use this online HTML syntax checker.
Sharing is caring
Did you like what kolade wrote? Thank them for their work by sharing it on social media.
Self Closing Tags In HTML
In this tutorial, you will learn about self closing tags in HTML, how to use them, and close the self closing tag. Also, you will go through various self closing tags with descriptions and examples.
HTML Self Closing Tag
A self closing tags in HTML are the type of HTML tags that need not to be closed manually by its closing tag, which means there is no saperate closing tag for it as .
A few examples of self closing tags are , ,
,
, etc.
Self closing tags are also alternatively known as void tags, empty tags, singletons tags, etc. i.e these tags do not have contents and also can not have any child.
The following are some examples of self closing tags in HTML.
None of the self closing tags in the above code snippets has content within them, nor do they have any child nodes.
Here are of closing tags in HTML (tags that need to be closed) are
.
,
.
,
, . ,
, etc.
The correct way to write a self closing tag
In HTML, closing a self closing tag with its closing tag is invalid. For example, closing a tag like is not valid.
But the question is do we need to close these tags by using/> at the end of the tag. i.e
, , etc or we just need to end these tags with > .
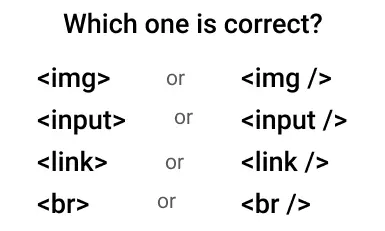
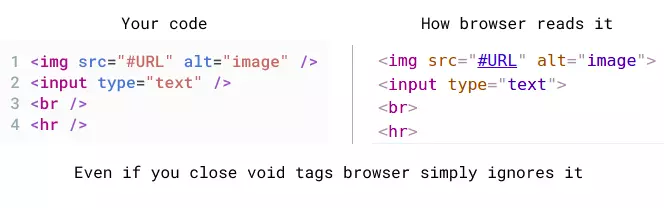
The fact is there is no need to close self closing tags by a slash/> at the end of the tag. Although many people use it but there is no meaning of slash at the end of the start tag even though you use it is ignored by the browsers.
But when using XHTML it is the rule to close the self closing tag by a slash at the end, so for the convenience of XHTML users HTML also allows closing tag like XHTML in HTML but simply ignores the slash.
Even if you close the tag browser remove the slashes and then render the element. You can see the picture below to understand.
Note — Even if the browser ignores the closing slash in void tags, it’s good practice to close it because:
1. in frameworks like react js if these are not close, it creates an error
2. if you want your document to be readable by an XML parser then must close all elements
List of self closing tags in HTML
Here is a list of all the self closing tags in HTML with little description of all. Non of self closing tags can have content or child node.
Self closing tags in HTML example
Let’s see a few examples of self closing tags.
Html closing tag syntax
HTML Tutorials — Herong’s Tutorial Examples — v2.30, by Herong Yang
∟ Opening and Closing Tags of Elements
This section describes the syntax of entering opening tags and closing tags to create HTML elements. It’s better to have all elements closed explicitly with closing tags.
HTML documents are made up by a collection of nested HTML elements. Each element has a required opening tag and an optional closing tag. Here are some basic guidelines on how to enter HTML tags to create HTML elements.
1. Each HTML element must start with an opening tag in the format of:
2. An HTML element that supports content must have the content immediately following the opening tag like this:
3. An HTML element that supports content must have a closing tag or let the browser to determine where is the end. It is strongly recommended that you always provide closing tags yourself like this:
4. An HTML elements that does not support content must have no closing tag or combine the opening tag and closing tag into a short-hand format. It is strongly recommended that you always use the short-hand format like this:
5. HTML element tag names are case insensitive. For example, «body» and «BODY» are identical. It is strongly recommended that you always use lower case letters in tag names.
Here is a good example of HTML document that have some elements without closing tags and some with closing tags:
Tags are used to delimit the start and end of elements in the markup.
Tags are used to delimit the start and end of elements in the markup.