Install OpenCV 4 on macOS (C++ and Python)
If you are still not able to install OpenCV on your system, but want to get started with it, we suggest using our docker images with pre-installed OpenCV, Dlib, miniconda and jupyter notebooks along with other dependencies as described in this blog.
1. Install XCode
Install XCode from App Store.
If XCode available on App Store is not compatible with your OS:
- Find XCode version compatible to your OS from this table https://en.wikipedia.org/w/index.php?title=Xcode#Version_comparison_table
- Go to this webpage https://developer.apple.com/download/more/
- Login if you have apple developer account else create your account and login.
- Search for xcode and download the version compatible to your OS.
- Install XCode.
- After installation open XCode, and accept xcode-build license when it asks.
2. Install OpenCV
Now that XCode has been installed, we will move on to OpenCV installation. First, let’s install Homebrew.
ruby -e "$(curl -fsSL https://raw.githubusercontent.com/Homebrew/install/master/install)" brew update# Add Homebrew path in PATH echo "# Homebrew" >> ~/.bash_profile echo "export PATH=/usr/local/bin:$PATH" >> ~/.bash_profileNext we will install the requirements – Python 3, CMake and Qt 5.
brew install python3 brew install cmake brew install qt5 QT5PATH=/usr/local/Cellar/qt/5.11.2_1We will also save current working directory in cwd variable and OpenCV version (master) in cvVersion.
cwd=$(pwd) cvVersion="master" # Clean build directories rm -rf opencv/build rm -rf opencv_contrib/build # Create directory for installation mkdir installation mkdir installation/OpenCV-"$cvVersion"Now, let’s install the Python libraries and create the Python environment.
sudo -H pip3 install -U pip numpy # Install virtual environment sudo -H python3 -m pip install virtualenv virtualenvwrapper VIRTUALENVWRAPPER_PYTHON=/usr/local/bin/python3 echo "VIRTUALENVWRAPPER_PYTHON=/usr/local/bin/python3" >> ~/.bash_profile echo "# Virtual Environment Wrapper" >> ~/.bash_profile echo "source /usr/local/bin/virtualenvwrapper.sh" >> ~/.bash_profile cd $cwd source /usr/local/bin/virtualenvwrapper.sh ############ For Python 3 ############ # create virtual environment mkvirtualenv OpenCV-"$cvVersion"-py3 -p python3 workon OpenCV-"$cvVersion"-py3 # now install python libraries within this virtual environment pip install cmake numpy scipy matplotlib scikit-image scikit-learn ipython dlib # quit virtual environment deactivate ######################################Next, let’s clone the OpenCV github repositories.
git clone https://github.com/opencv/opencv.git cd opencv git checkout master cd .. git clone https://github.com/opencv/opencv_contrib.git cd opencv_contrib git checkout master cd .. cd opencv mkdir build cd buildDownload Code To easily follow along this tutorial, please download code by clicking on the button below. It’s FREE!
cmake -D CMAKE_BUILD_TYPE=RELEASE \ -D CMAKE_INSTALL_PREFIX=$cwd/installation/OpenCV-"$cvVersion" \ -D INSTALL_C_EXAMPLES=ON \ -D INSTALL_PYTHON_EXAMPLES=ON \ -D WITH_TBB=ON \ -D WITH_V4L=ON \ -D OPENCV_SKIP_PYTHON_LOADER=ON \ -D CMAKE_PREFIX_PATH=$QT5PATH \ -D CMAKE_MODULE_PATH="$QT5PATH"/lib/cmake \ -D OPENCV_PYTHON3_INSTALL_PATH=~/.virtualenvs/OpenCV-"$cvVersion"-py3/lib/python3.7/site-packages \ -D WITH_QT=ON \ -D WITH_OPENGL=ON \ -D OPENCV_EXTRA_MODULES_PATH=../../opencv_contrib/modules \ -D BUILD_EXAMPLES=ON .. make -j$(sysctl -n hw.physicalcpu) make install cd $cwdAnd that’s it! By now you should have OpenCV installed successfully in your system.
Install OpenCV 4 with Python 3 on macOS Catalina
In this article, I will show you how to install OpenCV 4 with Python 3 on macOS Catalina.
There is also a video version of this tutorial:
MacOS comes by default with Python 2.7 which, at this point, receives only bug fixes and will be EOL by 2020. Python 3.x is the future and it is supported by all major Python libraries. In this tutorial, we’ll use the Python 3.8.
Start by installing the Command Line Tools for macOS. Please note, that you will need the Command Line Tools even if you’ve already installed Xcode. Open a Terminal and write:

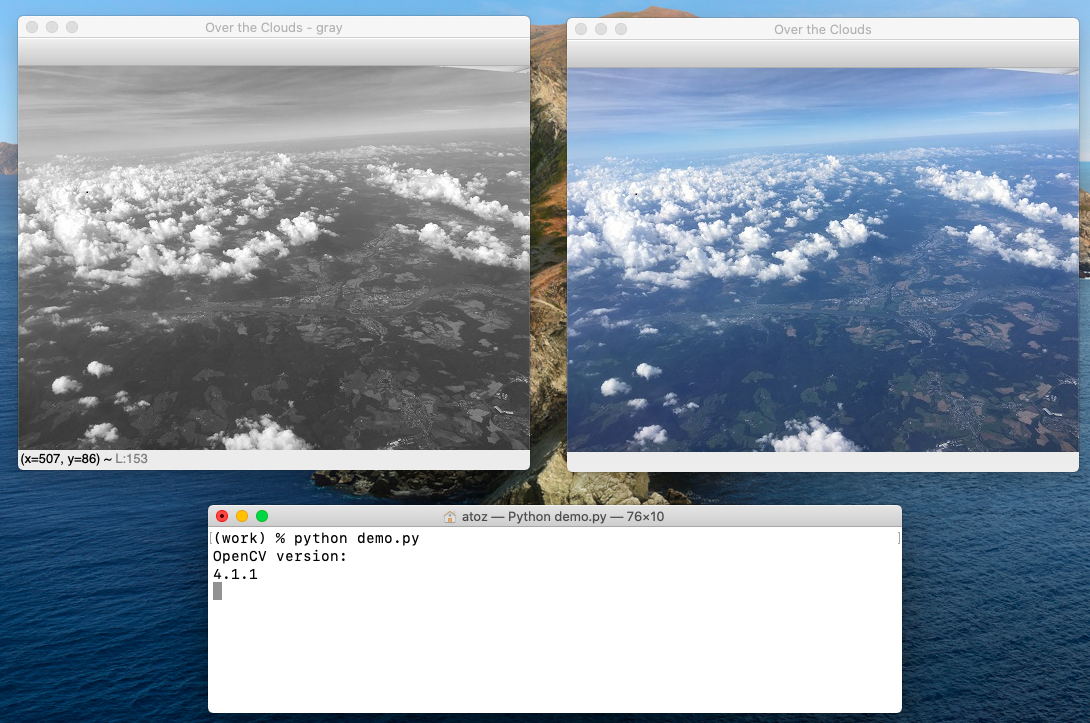
(You can close the two windows by pressing ESC!)
You should see something like in the next figure. By default, the last image (the gray one) will be over the first one. You need to move the window in order to see both images:
If you want to learn more about OpenCV and Python I would recommend reading OpenCV with Python Blueprints by M. Beyeler:
Disclaimer:
All data and information provided on this site is for informational purposes only. solarianprogrammer.com makes no representations as to accuracy, completeness, currentness, suitability, or validity of any information on this site and will not be liable for any errors, omissions, or delays in this information or any losses, injuries, or damages arising from its display or use. All information is provided on an as-is basis. solarianprogrammer.com does not collect any personal information about its visitors except that which they provide voluntarily when leaving comments. This information will never be disclosed to any third party for any purpose. Some of the links contained within this site have my referral id, which provides me with a small commission for each sale. Thank you for understanding.
Copyright © 2023 — Paul Silisteanu