- 3 простых и быстрых техники CSS для обрезки картинок
- Техника 1 — использование отрицательных полей (Negative Margins)
- How To Scale and Crop Images with CSS object-fit
- Prerequisites
- Observing the Default Behavior of a Sample Image
- Using object-fit: fill
- Using object-fit: cover
- Using object-fit: contain
- Using object-fit: none
- Using object-fit: scale-down
- Using object-fit and object-position
- Conclusion
- Самый простой способ кропнуть изображение на CSS
- Object-Fit
- Object-Position
- В заключение
3 простых и быстрых техники CSS для обрезки картинок


18.01.2010 11.02.2014 по 2Web 100 626
В этой статье мы расскажем вам о 3 быстрых и простых методах CSS, которые вы cможете использовать, чтобы показать только часть картинки на вашей страничке.
Все использованные здесь методы, фактически нуждаются только в паре строчек CSS кода. Однако, это не обрезание в прямом смысле этого слова (CSS пока не может сделать этого), мы просто скрываем и показываем только ту часть картинки, которую мы хотим увидеть.
Эти методики могут быть очень полезны, если вы хотите привести картинку к определенному размеру, то есть хотите создать, например, её превьюшку (уменьшенная копия изображения) в секции новостей или что-то подобное.
Техника 1 — использование отрицательных полей (Negative Margins)
Посмотреть пример
По этой технике картинку необходимо поместить в родительский элемент, в нашем случае, это параграф (тэг
) . Родительский абзац должен быть плавающим(floating) элементом (или с заданной шириной). Эта техника не будет работать на элементах с атрибутом «в полную ширину» (full width).
Затем мы задаем отрицательные поля для всех четырех сторон: верх( top ), право( right ), низ( bottom ) и лево( left ). Отрицательные поля определяют: насколько срезано в каждом направлении наше изображение, находящееся в родителе(параграфе). Получаем только часть от первоначальной картинки — обрезок. Затем, когда мы заменяем родительское свойство overflow на hidden , мы скрываем поля, которые находятся за нашим обрезком. Цель достигнута. Вам, правда, придется повозиться со значениями, чтобы по-настоящему почувствовать, как это работает.
Итак, HTML выглядит примерно так:
How To Scale and Crop Images with CSS object-fit

You will likely encounter a scenario where you will want to preserve the original aspect ratio when working with images. Preserving the aspect ratio will prevent images from appearing distorted by either being stretched or squished. A common solution for this problem is to use the background-image CSS property. A more modern approach would be to use the object-fit CSS property.
In this article, you will explore the effects of the fill , cover , contain , none , and scale-down values available to the object-fit CSS property and how it can crop and scale images. You will also explore the object-position CSS property and how it can offset images.
Prerequisites
If you would like to follow along with this article, you will need:
- Understanding CSS property and values.
- Using CSS declarations inline with the style property.
- A code editor.
- A modern web browser that supports object-fit and object-position .
Observing the Default Behavior of a Sample Image
Consider the following code used to display a sample image:
img src="https://assets.digitalocean.com/articles/alligator/css/object-fit/example-object-fit.jpg" width="600" height="337" style="width: 600px; height: 337px;" alt="Sample image of a turtle riding on top of an alligator that is swimming in the water - scaled to 600 x 337." /> This code will produce the following result in the browser:
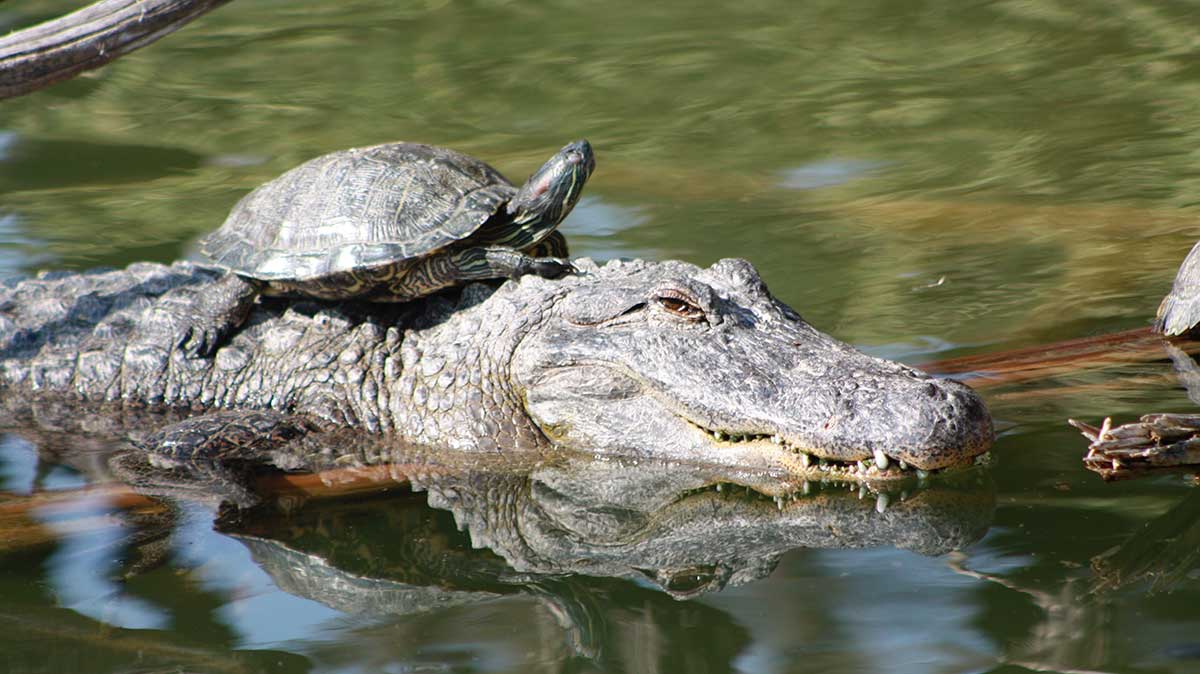
This image has an original width of 1200px and a height of 674px. Using img attributes, the width has been set to 600 and 337 — half the original dimensions — preserving the aspect ratio.
Now, consider a situation where the layout expects images to occupy a width of 300px and a height of 337px:
img src="https://assets.digitalocean.com/articles/alligator/css/object-fit/example-object-fit.jpg" width="600" height="337" style="width: 300px; height: 337px;" alt="Sample image of a tutle riding on top of an alligator that is swimming in the water - scaled to 300 x 337." /> This code will produce the following result in the browser:
The resulting image no longer preserves the original aspect ratio and appears to be visually “squished”.
Using object-fit: fill
The fill value is the initial value for object-fit . This value will not preserve the original aspect ratio.
img . style="width: 300px; height: 337px; object-fit: fill;" . /> This code will produce the following result in the browser:
As this is the “initial” value for browser rendering engines, there is no change in appearance from the scaled image. The resulting image still appears squished.
Using object-fit: cover
The cover value preserves the original aspect ratio, but the image occupies all the available space.
img . style="width: 300px; height: 337px; object-fit: cover;" . /> This code will produce the following result in the browser:
In certain situations, object-fit: cover will result in the image appearing cropped. In this example image, some parts of the original image on the left and right do not appear because they cannot fit within the bounds of the declared width.
Using object-fit: contain
The contain value preserves the original aspect ratio, but the image is also constrained to not exceed the bounds of the available space.
img . style="width: 300px; height: 337px; object-fit: contain;" . /> This code will produce the following result in the browser:
In certain situations, object-fit: contain will result in the image not filling all the available space. In this example image, there is vertical space above and below the image because the declared height is taller than the scaled-down height.
Using object-fit: none
The none value does not resize the image at all.
img . style="width: 300px; height: 337px; object-fit: none;" . /> This code will produce the following result in the browser:
In situations where the image is larger than the available space, it will appear cropped. In this example image, some parts of the original image on the left, right, top, and bottom do not appear because they cannot fit within the bounds of the declared width and height.
Using object-fit: scale-down
The scale-down value will either display an image like contain or none depending on which would result in a smaller image.
img . style="width: 300px; height: 337px; object-fit: scale-down;" . /> This code will produce the following result in the browser:
In this example image, the image has been scaled down to behave like contain .
Using object-fit and object-position
If the resulting image from object-fit appears cropped, by default the image will appear centered. The object-position property can be used to change the point of focus.
Consider the object-fit: cover example from before:
Now let’s change the position of the visible part of the image on the X-axis to reveal the right-most edge of the image:
img . style="width: 300px; height: 337px; object-fit: cover; object-position: 100% 0;" . /> This code will produce the following result in the browser:
In this example image, the turtle has been cropped out of the image.
And finally, let’s observe what happens if the position is specified outside of the bounds of the available space:
img . style="width: 300px; height: 337px; object-fit: cover; object-position: -20% 0;" . /> This code will produce the following result in the browser:
In this example image, the turtle and alligator heads have been cropped out of the image. There is also spacing to make up the 20% of offset on the left of the image.
Conclusion
In this article, you explored the values available for the object-fit and object-position CSS properties.
Before using object-fit in your project, verify that it is supported in the browsers used by your intended audience by checking the browser support on Can I Use?.
If you’d like to learn more about CSS, check out our CSS topic page for exercises and programming projects.
Want to deploy your application quickly? Try Cloudways, the #1 managed hosting provider for small-to-medium businesses, agencies, and developers — for free. DigitalOcean and Cloudways together will give you a reliable, scalable, and hassle-free managed hosting experience with anytime support that makes all your hosting worries a thing of the past. Start with $100 in free credits!
Самый простой способ кропнуть изображение на CSS
Как только не извращались верстальщики, чтобы кропнуть изображение средствами CSS. С появлением свойств object-fit и object-position, задача сильно упростилась.
Во-первых, что такое кроп и для чего он нужен?
Кроп (crop) в переводе с английского значит «обрезать». В этом и есть основная задача кропа — вписывать без искажений изображения в блоки с иными размерами и пропорциями. Чаще всего используется в галереях, плитке, списках и т.п.
Кропировать изображение можно по-разному. Обычно вырезают середину по меньшей стороне изображения. Потому что именно там чаще всего находится смысловая нагрузка изображения.
Чтобы вырезать середину изображения и задать ему размеры 100×100 воспользуемся CSS-свойством object-fit и object-position

Остановимся подробнее на свойствах.
Object-Fit
Свойство Object-Fit определяет, как содержимое элемента должно заполнять контейнер относительно его высоты и ширины.
Object-Fit может принимать следующие значения:
- Fill — дефолтное значение, изображение заполняет полностью контейнер по всей высоте и ширине.
- Contain — изображение масштабируется, выравниваясь по центру с сохранением пропорций таким образом, чтобы полностью поместиться внутри контейнера.
- Cover — изображение обрезается, выравниваясь по центру с сохранением пропорций таким образом, чтобы полностью заполнить область контейнера.
- None — изображение не изменяет свои размеры, чтобы поместиться и заполнить область контейнера.
- Scale-Down — изображение выбирает из двух значений none и contain то значение, которое даёт меньшие размеры.
Object-Position
Свойство object-position используется в сочетании с object-fit и задаёт положение элемента внутри контейнера относительно координатных осей X и Y.
Значение по умолчанию 50% 50%.
Для позиционирования можно использовать относительные и абсолютные единицы, в том числе их комбинации.
В заключение
Напомню, в Вордпресс для кропа существует прекрасная функция add_image_size(), которая регистрирует новый размер изображений для последующего использования в интерфейсе. Если на сайте повсеместно используется какой-то конкретный размер изображений, целесообразнее его зарегистрировать (или скорректировать имеющийся) и использовать на уровне бэкенда.
⚡️ Подписывайся на мой канал @DanilinBiz и ты узнаешь, почему фриланс это свобода, а работа в штате рабство.
Делаю сайты на Вордпресс с 2008 года, в том числе уникальные инструменты для решения сложных бизнес‑задач.