- Java Downloads
- JDK Development Kit 20.0.2 downloads
- Release information
- JDK Development Kit 17.0.8 downloads
- Release information
- GraalVM for JDK 20.0.2 downloads
- Release information
- GraalVM for JDK 17.0.8 downloads
- Release information
- Protect your investment—and more
- Java SE subscribers have more choices
- Java SE Development Kit 8u381
- JRE 8
- Server JRE 8
- Which Java 8 package do I need?
- Release information
- How to Upgrade Java on Ubuntu?
- Method 1: Using Apt Package Manager to Upgrade Java on Ubuntu
- Install the Latest Version (Upgraded)
- Verify the Upgraded Java Version
- Method 2: Using the .deb File to Upgrade Java (Manually)
- Conclusion
- Как обновить Oracle Java на Ubuntu Linux
- Инструкция по обновлению для 32-битной системы:
- Инструкция по обновлению для 64-битной системы:
- Редактирование системного файла:
Java Downloads
JDK 20 is the latest release of Java SE Platform and JDK 17 LTS is the latest long-term support release for the Java SE platform.
JDK Development Kit 20.0.2 downloads
JDK 20 binaries are free to use in production and free to redistribute, at no cost, under the Oracle No-Fee Terms and Conditions.
JDK 20 will receive updates under these terms, until September 2023 when it will be superseded by JDK 21.
Release information
JDK Development Kit 17.0.8 downloads
JDK 17 binaries are free to use in production and free to redistribute, at no cost, under the Oracle No-Fee Terms and Conditions.
JDK 17 will receive updates under these terms, until September 2024, a year after the release of the next LTS.
Release information
GraalVM for JDK 20.0.2 downloads
GraalVM for JDK 20 binaries are free to use in production and free to redistribute, at no cost, under the GraalVM Free Terms and Conditions.
GraalVM for JDK 20 will receive updates under these terms, until September 2023 when it will be superseded by GraalVM for JDK 21.
Oracle GraalVM uses the Graal just-in-time compiler and includes the Native Image feature as optional early adopter technology.
Native Image is extensively tested and supported for use in production, but is not a conformant implementation of the Java Platform. GraalVM for JDK 20 without the Native Image feature included is available for customers at My Oracle Support.
Release information
GraalVM for JDK 17.0.8 downloads
GraalVM for JDK 17 binaries are free to use in production and free to redistribute, at no cost, under the GraalVM Free Terms and Conditions.
GraalVM for JDK 17 will receive updates under these terms, until September 2024, a year after the release of the next LTS.
Oracle GraalVM uses the Graal just-in-time compiler and includes the Native Image feature as optional early adopter technology.
Native Image is extensively tested and supported for use in production, but is not a conformant implementation of the Java Platform. GraalVM for JDK 17 without the Native Image feature included is available for customers at My Oracle Support.
Release information
Script-friendly Download URLs
The URLs listed above will remain the same for update releases to allow their use in scripts.
![]()
Protect your investment—and more
Java SE subscribers get support for JDK 17, receive updates until at least October 2029, are entitled to GraalVM Enterprise, Java Management Service, and bundled patch releases (BPRs) with fixes not yet available to nonsubscribers, and more.
Java SE subscribers have more choices
Also available for development, personal use, and to run other licensed Oracle products.
Java SE Development Kit 8u381
Java SE subscribers will receive JDK 8 updates until at least December 2030.
The Oracle JDK 8 license changed in April 2019
The Oracle Technology Network License Agreement for Oracle Java SE is substantially different from prior Oracle JDK 8 licenses. This license permits certain uses, such as personal use and development use, at no cost — but other uses authorized under prior Oracle JDK licenses may no longer be available. Please review the terms carefully before downloading and using this product. FAQs are available here.
Commercial license and support are available for a low cost with Java SE Universal Subscription.
Java SE 8u381 checksums and OL 8 GPG Keys for RPMs
JRE 8
Java SE Runtime Environment 8u381
Server JRE 8
Server JRE (Java SE Runtime Environment) 8u381
Which Java 8 package do I need?
Software developers: Java SE Development Kit (JDK) For Java developers. Includes a complete JRE plus tools for developing, debugging, and monitoring Java applications.
Running headless Linux workloads at or near your systems’ CPU or memory limits Enterprise Performance Pack brings significant memory and performance improvements including modern garbage collection algorithms, reduced memory usage and many other optimizations. Learn more
Administrators running applications on a server Server Java Runtime Environment (Server JRE). For deploying Java applications on servers. Includes tools for JVM monitoring and tools commonly required for server applications, but does not include browser integration (Java plug-in), auto-update, or an installer. Learn more
End user running Java on a desktop: Java Runtime Environment (JRE) Covers most end-users needs. Contains everything required to run Java applications on your system.
Release information
How to Upgrade Java on Ubuntu?
Java is a high-level, object-oriented programming language that is widely used for developing desktop, mobile, and web applications. Java, like other applications, offers updated versions regularly. If your system or any programs are Java-dependent, then it is necessary to keep the Java version updated to get the latest features and support.
This post will address the possible methods to upgrade Java on Ubuntu:
Method 1: Using Apt Package Manager to Upgrade Java on Ubuntu
The most common method is to use the “APT” package manager, which allows users to easily upgrade to the latest version of Java by running a few commands in the terminal.
Step 1: Check the Existing Java Version
To check the installed java version in the operating system, run the “java” command with the “version” option:

The output shows that currently, the “1.8.0_352” version of Java is installed in the system.
Step 2: Update the Package Manager
To update the package manager’s list, use the “apt” command with the “update” utility in the following command:

The output shows that the package manager has been updated.
Install the Latest Version (Upgraded)
To install the latest version of OpenJDK, use the “APT” package manager by specifying the “openjdk-19-jdk” command:
$ sudo apt install openjdk-19-jdk
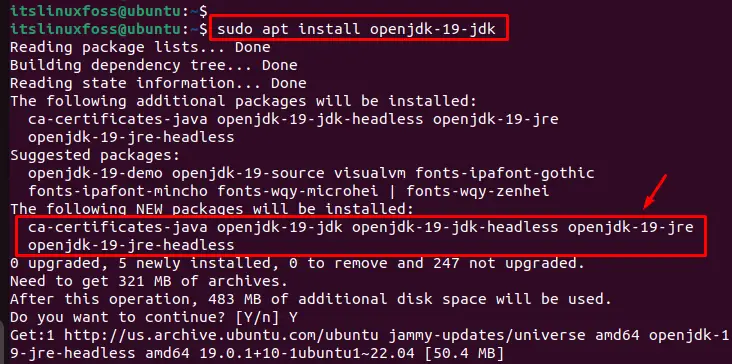
The output shows that the latest version of Java 19 along with dependent files have been installed in the system.
Note: Users can also utilize the “sudo apt upgrade” command to upgrade all installed packages, including Java, in the current system. In addition, Java 19 is the extended version of the Java 17 LTS version.
Verify the Upgraded Java Version
To verify the installed version of Java, specify the “java” command with the “version” option as below:

This command displays the “19.0.1” version of Java that is upgraded on the system.
Method 2: Using the .deb File to Upgrade Java (Manually)
To upgrade Java manually, download the latest version of Oracle JDK from the Official Website and install it on the Ubuntu system. Follow these steps to do this:
Step 1: Download the Latest JDK Version
Go to the Oracle JDK download page and download the upgraded version of the .deb file for Linux:
$ sudo wget https://download.oracle.com/java/19/latest/jdk-19_linux-x64_bin.deb
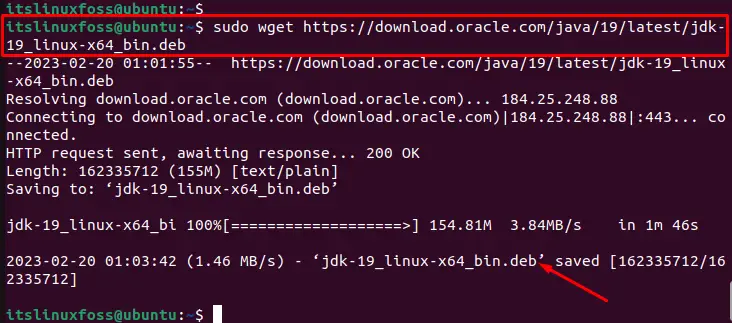
The output shows that the latest version of the .deb file has been downloaded in the system.
Note: Go to the Official Website to have the latest available “.deb” version of Java.
Step 2: Install the Latest Version of OpenJDK
To upgrade Java on Ubuntu, use the .deb package file to install the most recent version of OpenJDK:
$ sudo apt install ./jdk-19_linux-x64_bin.deb
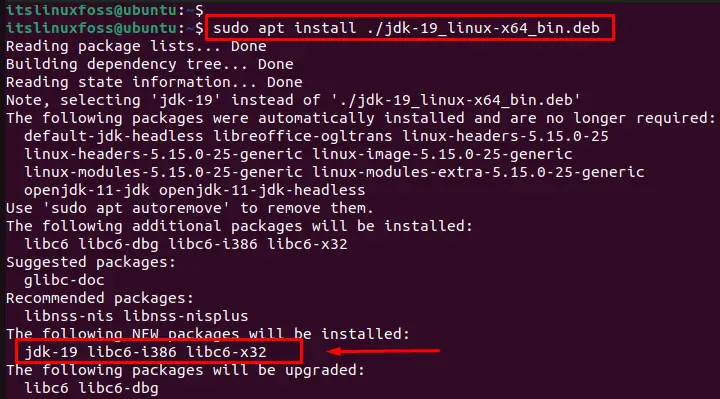
In this way, all dependencies with the latest version of java are installed in the system.
Step 3: Verify Upgraded Version of Java
To verify the upgraded version of Java, utilize the “version” option with the “java” command:

It displays the “19.0.1” version of Java that is currently installed on the system.
Conclusion
To upgrade Java on Ubuntu, use the “$ sudo apt install openjdk-19-jdk” command or download the latest version of Java from the Oracle Website and install it manually on the system. After the upgrade, execute the “java -version” to confirm the installed version of Java.
This article has explained all possible methods to upgrade Java on Ubuntu.
Как обновить Oracle Java на Ubuntu Linux
wikiHow работает по принципу вики, а это значит, что многие наши статьи написаны несколькими авторами. При создании этой статьи над ее редактированием и улучшением работали, в том числе анонимно, 10 человек(а).
Количество просмотров этой статьи: 24 473.
Эта статья научит вас, как обновить Oracle Java JDK/JRE на Ubuntu Linux. Oracle выпускает обновления Java JDK/JRE довольно часто с целью устранения ошибок и повышения безопасности.
- Внимание: Данная статья подразумевает, что у вас уже установлена 32- или 64-битная версия Oracle Java 7, расположенная в /usr/local/java и вы хотите обновить ее до последних версий Oracle Java. Если это не так, прочитайте следующую статью:
- Как установить Oracle Java на Ubuntu Linux

- jdk-7u40-linux-i586.tar.gz (32-bit)
- jre-7u40-linux-i586.tar.gz (32-bit)
- или
- jdk-7u40-linux-x64.tar.gz (64-bit)
- jre-7u40-linux-x64.tar.gz (64-bit)
Инструкция по обновлению для 32-битной системы:

- Напечатайте/скопируйте/вставьте: cd /home/«your_user_name»/Downloads
- Напечатайте/скопируйте/вставьте: sudo cp -r jdk-7u40-linux-i586.tar.gz /usr/local/java
- Напечатайте/скопируйте/вставьте: sudo cp -r jre-7u40-linux-i586.tar.gz /usr/local/java
- Напечатайте/скопируйте/вставьте: cd /usr/local/java

- Напечатайте/скопируйте/вставьте: sudo tar xvzf jdk-7u40-linux-i586.tar.gz
- Напечатайте/скопируйте/вставьте: sudo tar xvzf jre-7u40-linux-i586.tar.gz
Инструкция по обновлению для 64-битной системы:

- Напечатайте/скопируйте/вставьте: cd /home/«your_user_name»/Downloads
- Напечатайте/скопируйте/вставьте: sudo -s cp -r jdk-7u40-linux-x64.tar.gz /usr/local/java
- Напечатайте/скопируйте/вставьте: sudo -s cp -r jre-7u40-linux-x64.tar.gz /usr/local/java
- Напечатайте/скопируйте/вставьте: cd /usr/local/java

- Напечатайте/скопируйте/вставьте: sudo tar xvzf jdk-7u40-linux-x64.tar.gz
- Напечатайте/скопируйте/вставьте: sudo tar xvzf jre-7u40-linux-x64.tar.gz
jdk1.7.0_25
jre1.7.0_25

Редактирование системного файла:

- Напечатайте/скопируйте/вставьте: sudo gedit /etc/profile
- или
- Напечатайте/скопируйте/вставьте: sudo nano /etc/profile
Перейдите в конец файла /etc/profile и добавьте следующие строки в самом конце (сейчас вы поменяете номера версий Oracle Java со старого на новый; вы это делаете в системном файле /etc/profile):
Отредактируйте файл /etc/profile:
JAVA_HOME=/usr/local/java/jdk1.7.0_25
PATH=$PATH:$HOME/bin:$JAVA_HOME/bin
JRE_HOME=/usr/local/java/jre1.7.0_25
PATH=$PATH:$HOME/bin:$JRE_HOME/bin
export JAVA_HOME
export JRE_HOME
export PATH
JAVA_HOME=/usr/local/java/jdk1.7.0_40
PATH=$PATH:$HOME/bin:$JAVA_HOME/bin
JRE_HOME=/usr/local/java/jre1.7.0_40
PATH=$PATH:$HOME/bin:$JRE_HOME/bin
export JAVA_HOME
export JRE_HOME
export PATH
Сохраните файл и закройте его