- LabVIEW 2021 myRIO Toolkit Readme
- System Requirements
- Supported Operating Systems
- Installation Instructions
- Installing the High Throughput Add-On for myRIO
- Product Security and Critical Updates
- Accessing the LabVIEW for myRIO Environment
- Accessing the Documentation
- Finding Examples
- Automating the Installation of NI Products
- Using NI Software with Microsoft Windows 10
- Unsupported Windows Operating Systems
- Legal Information
- Required and Optional Software to Program NI myRIO
- Contents
- NI LabVIEW Support for NI myRIO
- The required software for programming myRIO includes:
- The optional software for programming myRIO includes:
- Activating your NI myRIO Software
- LabVIEW Programming for myRIO
- C Support for NI myRIO
Если вы всё же решились заняться разработкой робота для компетенции «Мобильная робототехника» WSR и у вас уже есть робототехнический конструктор от Studica, то традиционно вторым вопросом будет: «Ну вот, железку я собрал, как теперь заставить ЭТО двигаться?»
Попробуем решить эту задачу.
Основной программируемый модуль, допустимый к использованию при создании роботов в соответствии с заданием тестового проекта компетенции «Мобильная робототехника» WorldSkills в 2016-2017 годах — это многоцелевой блок управления myRIO от компании National Instruments. Традиционно, для его программирования используется среда разработки LabView той же компании, но с установленным дополнительным модулем LabView for myRIO.
Рекомендуем вам также установить модули для работы с техническим зрением. Они понадобятся позднее.
Установке программного обеспечения, подключению и настройке myRIO будет посвящена отдельная статья. А сейчас будем считать, что всё уже готово.
Итак, для выполнения следующих заданий необходимо иметь:
- Ноутбук или настольный компьютер с программным обеспечением LabView;
- Модуль myRIO с блоком питания или подключённым к аккумуляторной батарее;
- Активированное соединение компьютера с модулем myRIO по USB-кабелю или WiFi;
- Плату драйвера моторов (NI зовёт их адаптерами) Digilent Motor Adapter (аналог от Studica будет рассмотрен отдельно);
- Батарею для питания моторов, лучше не ту, что питает сам myRIO;
- Пару DC-моторов (ходовых) Tetrix или близких по характеристикам.
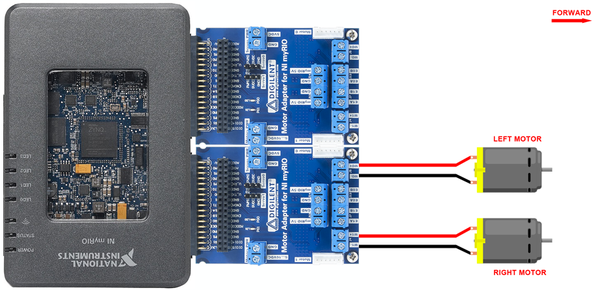
Подключаем моторы согласно схеме на рисунке:
Надеюсь, что с подключением батареи к клеммам платы драйвера проблем не возникло (на схеме не указано как это сделать). Затем вставляем платы в подходящие разъемы MXP myRIO.
Неплохой идеей является установка на оси моторов колёс с нанесенными на них отметками положения. Например, можно наклеить цветную изоленту на один из роликов onmi-колеса.
ВНИМАНИЕ!
Крайне желательно перед продолжением закрепить моторы или, если они уже установлены на робота, вывесить колёса, установив робота на подставку!
Начинаем программировать!
Открываем LabView и создаем новый проект для myRIO.
LabVIEW 2021 myRIO Toolkit Readme
The LabVIEW myRIO Toolkit provides you with tools for creating and deploying applications on the myRIO.
System Requirements
LabVIEW 2021 myRIO Toolkit has the following requirements:
- (Optional for C Programming) LabVIEW 2021 SP1 Community, Full, or Professional Development System
- (Optional for C Programming) LabVIEW 2021 Real-Time Module
- At least 2 GB of disk space in addition to the LabVIEW-recommended minimum
- 1 GB RAM
Refer to the LabVIEW Readme for additional system requirements and supported operating systems for LabVIEW 2021.
- The myRIO Toolkit is compatible with only 32-bit LabVIEW. Install 32-bit LabVIEW even if you use a 64-bit operating system.
- You might need more memory than the LabVIEW-recommended minimum depending on the size of the application you design in LabVIEW on the host computer.
Supported Operating Systems
LabVIEW 2021 myRIO Toolkit supports the following operating systems:
- Windows 10
- Windows Server 2022
- Windows Server 2019
- Windows Server 2016
Note Refer to Unsupported Windows Operating Systems for more information about support for Microsoft Windows OSes.
Installation Instructions
Download the LabVIEW myRIO Toolkit installer from ni.com/downloads. NI software includes NI Package Manager to handle the installation. Refer to the NI Package Manager Manual for more information about installing, removing, and upgrading NI software using Package Manager.
- If Windows Update is enabled, the installation process might hang if Windows Update interferes with the installation of Microsoft Visual C++ 2015 Run-Time. Visit ni.com/r/exjq43 for more information and steps to resolve this issue.
Installing the High Throughput Add-On for myRIO
The High Throughput Add-On for myRIO provides the High Throughput FPGA Personality VIs which support high-speed analog or digital data access. The High Throughput FPGA Personality VIs appear on the myRIO palette only after you install the High Throughput Add-On for myRIO.
Visit ni.com/info and enter the Info Code ex6g5a to download the High Throughput Add-On for myRIO installer. Double-click the setup.exe file in the root directory of the installer and follow the instructions on the screen to install this product.
Product Security and Critical Updates
Visit ni.com/security to view and subscribe to receive security notifications about NI products. For information about critical updates from NI, refer to Available Critical and Security Updates for NI Software.
Accessing the LabVIEW for myRIO Environment
The myRIO Toolkit provides the LabVIEW for myRIO environment to allow you to easily access myRIO-specific features and focus on developing myRIO applications.
You can use the Choose Environment Settings dialog box to change your LabVIEW environment. To display this dialog box, select Tools»Choose Environment from LabVIEW.
Accessing the Documentation
Refer to the LabVIEW Help, accessible by selecting Help»LabVIEW Help from LabVIEW, for information about the myRIO Toolkit.
Finding Examples
Select Help»Find Examples from LabVIEW to launch the NI Example Finder. LabVIEW examples for the myRIO Toolkit are located in the labview\examples\myRIO directory. You can modify an example VI to fit an application, or you can copy and paste from one or more examples into a VI that you create.
Automating the Installation of NI Products
You can automate the installation of most NI products using command-line arguments to suppress some or all of the installer user interface and dialog boxes.
If the NI product you are installing uses Microsoft .NET 4.6.2, the .NET installer may run before any NI software installs and may require a reboot before the installation of NI software begins. To avoid a .NET reboot, install .NET 4.6.2 separately before you install NI software.
For more information about automating the installation of NI products, refer to Automating an Installer in the NI Package Manager manual.
Using NI Software with Microsoft Windows 10
For more information about NI support for Windows 10, refer to NI Product Compatibility for Microsoft Windows 10.
Unsupported Windows Operating Systems
LabVIEW myRIO Toolkit no longer supports Windows Vista/XP/7/8.x, Windows Server 2003/2008/2012, or any 32-bit Windows operating system. Versions of this product that ship after May 1, 2021, may not install or execute correctly on these operating systems. For detailed information about NI operating system support, visit https://www.ni.com/r/win32bitsupport.
Legal Information
© 2013–2022 National Instruments Corporation. All rights reserved.
Under the copyright laws, this publication may not be reproduced or transmitted in any form, electronic or mechanical, including photocopying, recording, storing in an information retrieval system, or translating, in whole or in part, without the prior written consent of National Instruments Corporation.
NI respects the intellectual property of others, and we ask our users to do the same. NI software is protected by copyright and other intellectual property laws. Where NI software may be used to reproduce software or other materials belonging to others, you may use NI software only to reproduce materials that you may reproduce in accordance with the terms of any applicable license or other legal restriction.
End-User License Agreements and Third-Party Legal Notices
You can find end-user license agreements (EULAs) and third-party legal notices in the following locations after installation:
- Notices are located in the \_Legal Information and directories.
- EULAs are located in the \Shared\MDF\Legal\license directory.
- Review \_Legal Information.txt for information on including legal information in installers built with NI products.
U.S. Government Restricted Rights
If you are an agency, department, or other entity of the United States Government («Government»), the use, duplication, reproduction, release, modification, disclosure or transfer of the technical data included in this manual is governed by the Restricted Rights provisions under Federal Acquisition Regulation 52.227-14 for civilian agencies and Defense Federal Acquisition Regulation Supplement Section 252.227-7014 and 252.227-7015 for military agencies.
IVI Foundation Copyright Notice
Content from the IVI specifications reproduced with permission from the IVI Foundation.
The IVI Foundation and its member companies make no warranty of any kind with regard to this material, including, but not limited to, the implied warranties of merchantability and fitness for a particular purpose. The IVI Foundation and its member companies shall not be liable for errors contained herein or for incidental or consequential damages in connection with the furnishing, performance, or use of this material.
Refer to the NI Trademarks and Logo Guidelines at ni.com/trademarks for information on NI trademarks. Other product and company names mentioned herein are trademarks or trade names of their respective companies.
For patents covering the NI products/technology, refer to the appropriate location: Help»Patents in your software, the patents.txt file on your media, or the NI Patent Notice at ni.com/patents.
Required and Optional Software to Program NI myRIO
NI myRIO is an embedded hardware device designed specifically to help students design real, complex engineering systems more quickly and affordably than ever before. NI myRIO features a fully programmable dual-core ARM Cortex-A9 processor running a real-time OS as well as a customizable FPGA.
Contents
NI LabVIEW Support for NI myRIO
With NI LabVIEW software, you can take full advantage of both the processor and FPGA on NI myRIO. The easiest way to access the latest myRIO software is with the myRIO Software Bundle.
The required software for programming myRIO includes:
Note: This is included in the above myRIO Software Bundle.
The optional software for programming myRIO includes:
Note: This is included in the above myRIO Software Bundle.
- LabVIEW FPGA Module
- Compilation Tools for Vivado
- Vision Development Module
- Vision Acquisition Software
- LabVIEW Control Design and Simulation Module
- Control Design Assistant
- System Identification Assistant
Activating your NI myRIO Software
Your myRIO hardware may have included a software serial number that can be used to activate both the required and optional software. This serial number would be located on the software DVD packaging. If not, you can activate the software using your school’s Academic Volume License, or by purchasing individual licenses.
LabVIEW Programming for myRIO
After installing the required software for myRIO, start by following a customized getting started experience designed to ensure your success with NI myRIO and access to NI myRIO resources directly from the LabVIEW Getting Started Window.
After completing the Getting Starting Wizard, you can write programs quickly using I/O-specific Express VIs directly from the LabVIEW pallette.
When you are ready to graduate to the next level of programming, click the “View Code” tab on any Express VI to see the underlying code.
Additionally, you can click the Connection Diagram tab to help you wire to the I/O type you have chosen on the myRIO.
You can program with NI myRIO Low Level VIs to learn more about the open, read/write, close architecture, which is common to LabVIEW programming.
To customize the FPGA of NI myRIO, you must use the LabVIEW FPGA Module. This gives you the ability to view the NI myRIO FPGA shipping personality as well as make customizations to the FPGA.
C Support for NI myRIO
You can program the NI myRIO processor using C or C++. It is important to note that you must use the LabVIEW FPGA Module to customize the FPGA. Learn more about C programming with NI myRIO and how to get started.