- Python: Network Automation with Telnetlib
- NetworkAutomation-1 Configuration
- Router Configuration
- Switch Configuration
- Telnet
- Python telnetlib Module
- SSH configuration
- 5 Top Free Python Libraries for Network Automation
- Advanced Network Automation with Cisco and Python
- 1. Netmiko
- 2. NAPALM
- 3. Genie
- 4. NCClient
- 5. Requests
- Final Thoughts
Python: Network Automation with Telnetlib
Network automation is the process of automating the configuration, management and operations of a computer network. The tasks that are normally done by the network or system administrator can be automated using a number of tools and technologies such as Python and Ansible.
In this blog, we are going to set up Network Automation hands-on lab for Python in GNS3. Create the simple topology as the figure below:
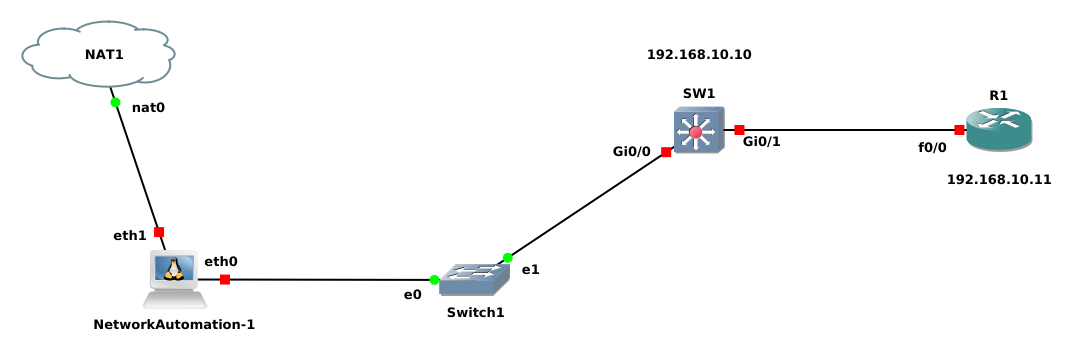
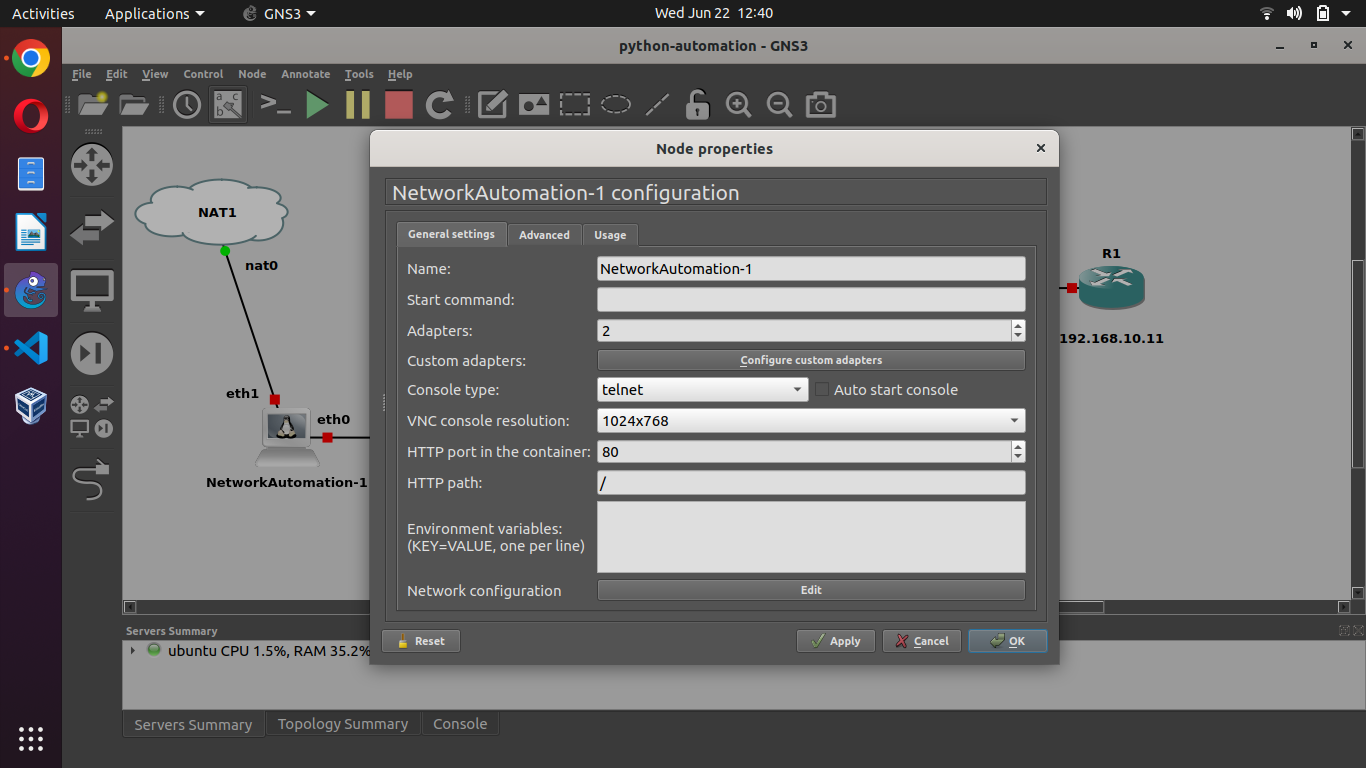
NetworkAutomation-1 Configuration
First, Aad two interface as below:
Open console connection of container and type command nano /etc/network/interfaces and configure as below:
# Static config for eth0 auto eth0 iface eth0 inet static address 192.168.10.2 netmask 255.255.255.0 # gateway 192.168.0.1 # up echo nameserver 192.168.0.1 > /etc/resolv.conf # DHCP config for eth0 #auto eth0 #iface eth0 inet dhcp # Static config for eth1 #auto eth1 #iface eth1 inet static # address 192.168.1.2 # netmask 255.255.255.0 # gateway 192.168.1.1 # up echo nameserver 192.168.1.1 > /etc/resolv.conf # DHCP config for eth1 auto eth1 iface eth1 inet dhcp Save with ctrl+o and exit with ctrl+x .
Then restart network automation, and check the IP address with ifconfig command. Now configure the router in the same subnet as the container network address.
Router Configuration
conf t hostname R1 int fa0/0 ip address 192.168.10.11 255.255.255.0 no shut end We need to enable a password for the telnet connection to the router. We set transport input all so that all types of connections are permitted including telnet.
conf t enable password cisco username admin password cisco line vty 0 4 login local transport input all end wr Switch Configuration
On switch S1, we see that only the default VLAN is configured with sh vlan and sh vlan brief commands, configure S1 as below:
conf t hostname S1 enable password cisco username admin password cisco line vty 0 4 login local transport input all end Check interface with command sh ip int brief
Configure the IP address on VLAN1
conf t int vlan 1 ip address 192.168.10.10 255.255.255.0 no shut end wr Telnet
Telnet is a type of network protocol that allows a user in one computer to login, to another computer.
The telnet command is used along with the hostname and then the user credentials are entered. Telnet sends commands and retrieves data from the remote devices in plain text, so it is recommended that not be used in the production environment.
Python telnetlib Module
The telnetlib is a Python module, that provides a Telnet class that implements the Telnet protocol. Python’s telnetlib lets you easily automate access to Telnet servers, even from non-Unix machines. The telnetlib library is already included in the python package. We don’t need to install it rather just import it into our program as given below:
Now I’m going to show you how to use telnetlib with practical examples.
Copy the python script from Python website to your PC and amend it, as per your requirement.
Below is the python code for achieving our task, which shows the IP interface brief. Write the code using a nano editor as exe_01.py.
A simple example to show IP interface brief on S1.
import getpass import telnetlib # Declare a variable for storing the IP address HOST = "192.168.10.10" # Declare a variable for storing username user = input("Enter your Username: ") # Use getpass module, to get the password from the user password = getpass.getpass() # Pass the IP variable value in to the Telnet class tn = telnetlib.Telnet(HOST) tn.read_until(b"Username: ") # read until found the Username: # Convert user string in ascii encoding to be send to the switch as ascii characters tn.write(user.encode('ascii') + b"\n") if password: tn.read_until(b"Password: ") tn.write(password.encode('ascii') + b"\n") tn.write(b"sh ip int bri\n") tn.write(b"exit\n") # read_all() function will show the output on your screen after decoding the ascii to unicode print(tn.read_all().decode('ascii')) import getpass import telnetlib HOST = "192.168.10.11" user = input("Enter your telnet username: ") password = getpass.getpass() tn = telnetlib.Telnet(HOST) tn.read_until(b"Username: ") tn.write(user.encode('ascii') + b"\n") if password: tn.read_until(b"Password: ") tn.write(password.encode('ascii') + b"\n") tn.write(b"enable\n") tn.write(b"cisco\n") tn.write(b"conf t\n") tn.write(b"int loop 0\n") tn.write(b"ip address 1.1.1.1 255.255.255.255\n") tn.write(b"end\n") tn.write(b"exit\n") print(tn.read_all().decode('ascii')) SSH configuration
Python code to configure ssh using for loop on S1 and R1.
import telnetlib import getpass user = input("Welcome, if authorized. \nPlease enter your telnet Username: ") password = getpass.getpass() # for loop for IP in range (10,12): HOST = "192.168.10." + str(IP) print ('configuration of 192.168.10.' + str(IP)) tn = telnetlib.Telnet(HOST) tn.read_until(b"Username: ") tn.write(user.encode('ascii') + b"\n") if password: tn.read_until(b"Password: ") tn.write(password.encode('ascii') + b"\n") tn.write(b"enable\n") tn.write(b"cisco\n") tn.write(b"conf t\n") tn.write(b"ip domain-name cisco.com\n") tn.write(b"crypto key generate rsa modulus 1024\n\n") tn.write(b"end\n") tn.write(b"write memory\n") tn.write(b"exit\n") print(tn.read_all().decode("ascii")) print() # add blank line print("Done") print() Updated: November 29, 2021
5 Top Free Python Libraries for Network Automation

Within the past few years network automation has seen an explosion in popularity. As a result, there seems to be an ever-increasing supply of tools available to the modern engineer to help implement automated network configuration and change management. While having such a wide and diverse array of tooling available is undoubtedly of great benefit to the community, it can certainly feel a little bit overwhelming and even intimidating.
To help simplify this, I’ve identified what I believe to be the top five free Python libraries for network automation both in this article and also this YouTube video:
All of these libraries are sufficiently mature, well-tested, and have a strong support within the automation community. In addition to the libraries listed here, there are also some great free python courses out there to get you started. So, l et’s dig in.
Advanced Network Automation with Cisco and Python
1. Netmiko
Netmiko is an exceptional Python library developed by Kirk Byers designed to act as an abstraction layer over the Paramiko Python implementation of the SSHv2 protocol. In effect, Netmiko is Paramiko reimagined and adapted to interact with networking devices specifically. In real terms, Netmiko has been programmed to have an awareness of the quirks of networking devices and subsequently hides these lower-level details away from the automation engineer.
For example, Netmiko understands that when issuing a configuration change to a Cisco device, all commands sent must first begin with an elevation to Global Configuration mode and, thus, will automatically issue a «configure terminal» on your behalf. These seemingly small details ultimate amount to a drastic reduction in the complexity of your automation scripts.
Moreover, Netmiko tightly integrates with parsing solutions such as TextFSM and Genie, giving you the option to return the output of your show commands in the form of structured data.
2. NAPALM
NAPALM is a Python library developed by David Barroso and has been carefully written to simplify automated interactions with networking devices — regardless of operating system through the use of a unified API. NAPALM has a multitude of great features but my personal favourite is its «Getter» concept.
Let’s suppose, for example, you wanted to pull BGP Neighbor information from your network. Now if all of your devices are Cisco IOS, then you could simply use Netmiko to issue a «show ip bgp neighbor» and retrieve that information handily. However, what if your network was 1/3rd Cisco, 1/3rd Juniper and 1/3Rd Arista?
By using NAPALM Getters, you can pull all of that information simply by issuing the vendor-agnostic command «get_bgp_neighbors». Under the hood, NAPALM will issue the appropriate platform-specific show commands to each device and present that output back to you in a standardised format, structured in JSON.
3. Genie
Genie is a Python library developed and tailored to be used for automated network testing. For anyone new to network automation, my first recommendation is always to learn how to use the Genie CLI. In my opinion there is no better «bang for your buck» in the world of automation today. It is simple to use and immediately grants the engineer an incredible level of insight into the state of their network. Through using the Genie CLI, engineers are essentially able to capture and compare different snapshots of the network state and run an automated comparison to identify exactly what has changed.
Let’s imagine you were running OSPF within your network. By issuing the Genie CLI command «genie learn ospf», Genie will automatically run a massive volume of different OSPF-specific show commands and collate that information to document all of the OSPF details running within the network. Now, if we assume later down line connectivity in some part of the network was suddenly lost. Through reissuing the «genie learn ospf» command, the current OSPF state will be relearned, thus enabling Genie the ability to compare the current broken state to the original state.
Subsequently, Genie will identify all of the relevant changes and return to the engineer a highly targeted summary of items to begin troubleshooting. This is a feature any engineer, even those with no programming experience, can learn to use within one day of training and one which will continually optimise and simplify their network troubleshooting.
4. NCClient
NCClient is a Python library written to simplify scripting and automation over the NETCONF protocol. Modern automation aims to interact with networking devices via the use of APIs as opposed to the Command Line Interface. NETCONF is feature-rich and offers the ability to exact granular control over the network with its ability to lock a device’s configuration datastore, conduct full operation configuration replacements and much more.
The XML-based protocol can be somewhat complex to use, particularly for beginners. However, NCClient and its «Manager» function simplifies this by enabling an API for RPC operations as method calls with support for both Subtree and Xpath filtering. As such, NCClient has become the standard way of interacting with the NETCONF protocol and an essential Python library for the modern network automation engineer.
5. Requests
RESTCONF is a lightweight, stateless HTTP-based protocol and has burst onto the scene as the newer and simpler cousin of NETCONF. As RESTCONF’s presence gradually increases, you’re going to hear more and more about the Python Requests library. The Requests library abstracts many of the complexities of making HTTP requests behind a simple API and offers several built-in methods to retrieve or push data to a REST-based API, such as GET or POST requests.
For each method, Requests returns back a «response» object for inspection. Included in this object are many extremely useful attributes such as the returned Status Code and the ability to easily raise exceptions upon failure via the raise_for_status() object. If you’re going to be writing Python scripts to automate your network over RESTCONF, you’re going to be importing the Requests library.
Final Thoughts
There are many new Python-based projects bursting on the scene that I am extremely excited about. I would encourage you to be adventurous and explore the landscape. That said, if you’re simply looking to find tools that are stable, effective, and efficient, these five Python libraries are all tried and true. All of them, in my opinion, represent the very best Python library-based network automation options available on the market.