- Creating, Debugging, and Profiling a Mobile Embedded Application
- Installing Oracle Java ME Embedded
- Overview of JDK 8 Support in NetBeans IDE
- Enabling JDK 8 Support in NetBeans IDE
- Configuring a Project to use JDK 8
- Using Compact Profiles Support
- Using Lambda Expressions Support
- Using Repeating Annotations Support
- Выбор версии Java в NetBeans
- How to change NetBeans Default Java Platform
- Creating a new Java Platform profile
- Changing the Default Java Platform
Creating, Debugging, and Profiling a Mobile Embedded Application
Mobile embedded applications are employed in small embedded devices such as industrial metering devices, vending machines, security systems, modems, home electronics devices, and similar devices with either simple or no display and with some limited network connectivity. This example shows you how to develop a new Java ME embedded project in the NetBeans IDE using the Oracle Java Micro Edition Embedded platform that includes support for JSR 228, the Information Module Profile-Next Generation API (IMP-NG). It will also explain how to debug and profile your own IMlet using NetBeans support for Oracle Java ME Embedded.
To complete this tutorial, you need the following software and resources:
Version 7.3 and more recent
Version 3.2 and more recent
Important: This tutorial runs on Win32 compatible platforms only.
Installing Oracle Java ME Embedded
To set up the NetBeans IDE with the Oracle Java ME Embedded software for the Windows platform, you need to:
- install Oracle Java ME SDK
- activate the Java ME feature in the NetBeans IDE
- install the Oracle Java ME Embedded platform in the NetBeans IDE
To install Oracle Java ME SDK:
![]()
- Go to the Java ME SDK download page.
- Click the Accept License Agreement option.
- Download an Oracle Java ME SDK installer file (for example, oracle-jmesdk-3-4-rr-win32-bin.exe) and save it to any location on your computer.
- Double-click the installer file to run the installer, and follow the instructions. When the installation is complete, the Java ™ ME Platform SDK Device Manager icon ( ) appears in the Windows system tray.
To activate the Java ME feature:
- Choose Tools > Plugins from the main IDE’s toolbar.
- In the Plugins dialog box, click the Installed tab and select Java ME in the list of available features.
Overview of JDK 8 Support in NetBeans IDE
NetBeans IDE supports JDK 8 features, such as lambda expressions, repeatable annotations, compact profiles, etc. When these constructs are used in your code, the IDE recognizes them, correctly highlights errors, and lets you automatically fix syntax. Thus, NetBeans IDE helps you write code that is compatible with Java SE 8 Release Contents Early Draft Review Specification.
In this tutorial, you will learn how to get started with JDK 8 in NetBeans IDE and how to use the IDE support for such Java SE 8 features as compact profiles, lambda expressions, and repeating annotations.

To complete this tutorial, you need the software and resources listed in the following table.
Enabling JDK 8 Support in NetBeans IDE
After JDK 8 is downloaded and installed on your system, it needs to be registered in the IDE as follows:
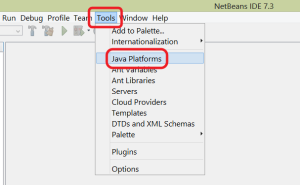
- In the IDE, choose Tools > Java Platforms from the main menu.
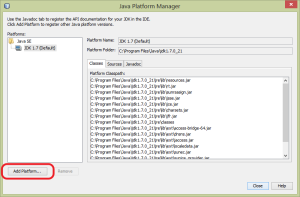
- Click Add Platform in the Java Platform Manager dialog.
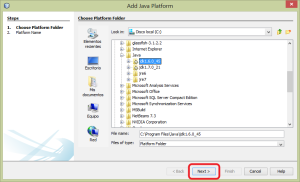
- In the Add Java Platform dialog, select Java Standard Edition and click Next.
- Specify the directory that contains the JDK and click Next.

- Verify that the default locations of the Platform Sources zip file and API documentation are valid. Click Finish to close the Add Java Platform dialog box. JDK 8 is registered as a platform in the IDE.

Configuring a Project to use JDK 8
After you registered JDK 8 in the IDE, your project needs to be configured to use JDK 8 for compilation, running, and debugging.
We will start by creating a new Java SE project with the Anagram game example which is shipped with NetBeans IDE.
- In the IDE, choose File > New Project.
- In the New Project wizard, expand the Samples category and select Java.
- Choose Anagram Game in the Projects list. Then click Next.
- In the Name and Location panel, leave the default values for the Project Name and Project Location fields.
- Click Finish. The IDE creates and opens the Java SE project in the Projects window.
To configure your project to use JDK 8:
- Right-click the AnagramGame project in the Projects window and select Properties from the context menu.
- In the Project Properties dialog box, choose the Libraries category and set JDK 1.8 as the Java Platform.


Using Compact Profiles Support
Java SE 8 introduces subset profiles of the Java SE platform specification that can be used to deploy and run applications that do not require the entire platform.
Three profiles that have been defined so far are named compact1, compact2, and compact3. Each profile specifies a particular set of Java API packages and contains all of the APIs in profiles smaller than itself: compact1 is a subset of compact2, which is a subset of compact3, which in its turn is a subset of the full JRE. The table below lists packages that are comprised in each profile.
* java.lang * java.io * java.nio * java.text * java.math * java.net * javax.net * java.util * java.util.logging * java.security * javax.crypto * javax.security
compact1 plus the following:
* java.sql * javax.sql * javax.xml * org.w3c.dom * org.xml.sax * java.rmi * javax.rmi * javax.transaction
compact2 plus the following:
* java.lang.management * javax.management * javax.naming * javax.sql.rowset * javax.security.auth.kerberos * org.ietf.jgss * javax.script * javax.xml.crypto * java.util.prefs * javax.security.sasl * javax.security.acl * java.lang.instrument * javax.annotation.processing * javax.lang.model * javax.lang.model.element * javax.lang.model.type * javax.lang.model.util * javax.tools
compact3 plus the following:
The IDE allows you to switch between the profiles and the full JRE when needed.
To set a project profile for a Java SE Project:
- Right-cick a project and choose Properties from the context menu.
- In the Project Properties dialog box, select the Sources category.
- Use the Profile drop-down list to specify the JDK 8 profile that your application will support.

To see how the IDE checks whether classes used in your project belong to the specified profile, select Compact1 as a profile for the AnagramGame project and click OK. The IDE displays errors to notify that the AnagramGame project is not compliant with the compact1 profile.

You can go back and set the AnagramGame project’s profile to Full JRE which is supported by the Anagrams application.
Using Lambda Expressions Support
Lambda expressions address the bulkiness of anonymous inner classes by expressing the machinery of anonymous inner classes more compactly.
The general syntax of a lambda expression consists of a set of parameters, an arrow token, and a function body (either a single expression or a statement block):
NetBeans IDE detects pre-lambda expressions and displays the hints in the Editor proposing to turn such constructs into lambda expressions.
For example, the AnagramGame project features a pre-lambda construct in the Anagrams.java file as shown in the screenshot below.

After you click the light bulb in the margin or press Alt-Enter, the IDE shows the Use Lambda hint with a set of options available:

If the Use Lambda hint is selected, the IDE converts the anonymous inner class into a lambda expression.

If you choose the Run Inspect on option, the IDE displays the Inspect dialog box that allows to run a single Convert to Lambda inspection on the specified file.
| For more information on initiating the Inspect operation in the IDE, see Using Hints in Source Code Analysis and Refactoring in Developing Applications with NetBeans IDE. |

After you press the Inspect button to launch the inspection, the IDE identifies all the pre-lambda constructs in the file and displays them in the Inspector window.

If you choose the Run Inspect&Transform on option, the IDE displays the Inspect and Transform dialog box that allows to run a single Convert to Lambda inspection (or a selected configuration) on the specified code and refactor it if needed.
| For more information on initiating the Inspect and Transform operation, see Using Hints in Source Code Analysis and Refactoring in Developing Applications with NetBeans IDE. |

Using Repeating Annotations Support
Java SE 8 features include repeating annotations that enable you to apply annotations with the same type to a single program element, as shown in the following code example:
@ProjectServiceProvider(service=Foo.class,"org-nebeans-modules-j2seproject") @ProjectServiceProvider(service=Foo.class,"org-nebeans-modules-j2eeproject") public class MyService extends Foo <>NetBeans IDE support for repeating annotations allows you to write code with the same annotations provided the repeatable and containing annotation types are declared:
- a repeatable annotation type must be marked with @Repeatable () , otherwise you get an error at compilation
- a containing annotation type must have a value element with an array type; the component type of the array type must be the repeatable annotation type
Выбор версии Java в NetBeans
Версию JDK, под которой запускается сам экземпляр NetBeans можно задать при запуске с помощью ключа —jdkhome . Пример для Linux:
Также внутри самого NetBeans можно указать путь к JDK, который он будет использовать для компиляции, для этого в горизонтальном меню нужно выбрать Tools ➣ Java Platforms.

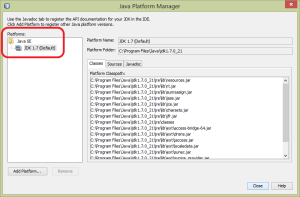
Откроется диалоговое окно управления установленными JDK:

В левой части окна отображается список доступных JDK. Можно добавить новую JDK, кликнув по кнопке “Add Platform…”, тогда откроется окно выбора пути:

Оставьте выбранным Java Standard Edition, как есть по умолчанию, и кликните Next. Откроется окно выбора пути к JDK:

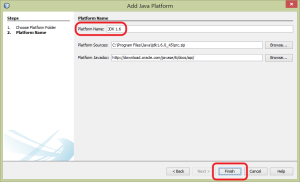
Выберите путь и кликните Next. В следующем окне кликните Finish:
Теперь в левой части окна появится ещё одна JDK, которую мы только что добавили. Выберите её, кликнув на неё мышкой и кликните на Close:

Можно также задавать версию JDK для каждого проекта отдельно в свойствах проекта, тогда версия в свойствах проекта будет иметь приоритет над глобальным свойством.
How to change NetBeans Default Java Platform

Due to the consecutive security holes discovered in Java 7, you have been able to notice how JDK version has been upgrading month after month this year 2013. The latest release you can find at the moment that this post has been made is JDK SE 7u21.

Otherwise, when you install NetBeans, the installer looks for the right distribution of JDK available in your computer and references it as the Default Java Platform. This will be the default JDK and you will not be able to change it from NetBeans UI, even if you uninstall that JDK and turn to install another newer version again.
Of course, in order to setup the Default Java Platform you can uninstall NetBeans and turn to install it again. But usually, this is not a good idea.
Creating a new Java Platform profile
Of course, you can work in NetBeans with several JDK if you have them installed into your machine. You only have to create a Java Platform profile for each one.
To do so, in NetBeans, go to Tools menu and select Java platforms.
In the opening dialog do click on the Add Platform… button.
In the opening window navigate to the folder where the JDK you want to add is installed, select it and click on the Next button.
In the next window write a name for the platform. Revise Javadoc and Sources location folders and do click on the Finish button.
Notice how you have a new Java Platform now.
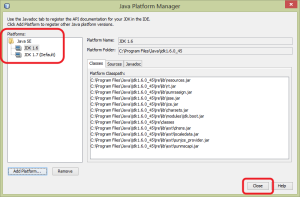
When you press the Close button, the new profile will be ready to use.
Changing the Default Java Platform
You can have inside your NetBeans any number of Java Platforms. This could be useful if you want to test the behavior of your programs under several Java Platforms. But only one of them can be the Default Java Platform. To change your Default Java Platform, follow the next instructions.
C:\Program Files\NetBeans 7.3\etc
- You will see something like this. In this example the Default Java Platform is Java SE 7u17 x64.
netbeans_jdkhome="C:\Program Files\Java\jdk1.7.0_17"
- Change the value according to the version you want to select. Be careful, type exactly the right folder name where the target version is. In this example you are going to select Java SE 7u21 x64, so this option will keep something like:
netbeans_jdkhome="C:\Program Files\Java\jdk1.7.0_21"