- How to fully implement the Navigation Drawer template in Kotlin
- Navigation drawer activity kotlin
- Android Navigation Drawer in Kotlin
- Navigation Drawer
- Алгоритм добавления шторки в интерфейс
- Зависимости
- Фрагменты
- Навигация
- Меню для шторки
- Header для шторки
- Объединяем все вместе в макете activity
- Подключение в классе MainActivity
- Цвет иконки
- Полезные ссылки
How to fully implement the Navigation Drawer template in Kotlin
I’m expecting this to be a really simple answer. I am developing my first real app on android (a workout tracker) and I am wanting it to have a navigation drawer layout for the majority of the app. I have a bunch of pages that I want the drawer to navigate to. I have figured out how to change the names of the menu items in activity_main_drawer.xml menu file, but I don’t know how to attach a navigation to when the user taps on them. My code is the default code from the template: MainActivity.kt
package com.example.grahamfitnesstracker import android.os.Bundle import android.support.design.widget.FloatingActionButton import android.support.design.widget.Snackbar import android.support.v4.view.GravityCompat import android.support.v7.app.ActionBarDrawerToggle import android.view.MenuItem import android.support.v4.widget.DrawerLayout import android.support.design.widget.NavigationView import android.support.v7.app.AppCompatActivity import android.support.v7.widget.Toolbar import android.view.Menu class MainActivity : AppCompatActivity(), NavigationView.OnNavigationItemSelectedListener < override fun onCreate(savedInstanceState: Bundle?) < super.onCreate(savedInstanceState) setContentView(R.layout.activity_main) val toolbar: Toolbar = findViewById(R.id.toolbar) setSupportActionBar(toolbar) val fab: FloatingActionButton = findViewById(R.id.fab) fab.setOnClickListener < view ->Snackbar.make(view, "Replace with your own action", Snackbar.LENGTH_LONG) .setAction("Action", null).show() > val drawerLayout: DrawerLayout = findViewById(R.id.drawer_layout) val navView: NavigationView = findViewById(R.id.nav_view) val toggle = ActionBarDrawerToggle( this, drawerLayout, toolbar, R.string.navigation_drawer_open, R.string.navigation_drawer_close ) drawerLayout.addDrawerListener(toggle) toggle.syncState() navView.setNavigationItemSelectedListener(this) > override fun onBackPressed() < val drawerLayout: DrawerLayout = findViewById(R.id.drawer_layout) if (drawerLayout.isDrawerOpen(GravityCompat.START)) < drawerLayout.closeDrawer(GravityCompat.START) >else < super.onBackPressed() >> override fun onCreateOptionsMenu(menu: Menu): Boolean < // Inflate the menu; this adds items to the action bar if it is present. menuInflater.inflate(R.menu.main, menu) return true >override fun onOptionsItemSelected(item: MenuItem): Boolean < // Handle action bar item clicks here. The action bar will // automatically handle clicks on the Home/Up button, so long // as you specify a parent activity in AndroidManifest.xml. return when (item.itemId) < R.id.action_settings ->true else -> super.onOptionsItemSelected(item) > > override fun onNavigationItemSelected(item: MenuItem): Boolean < // Handle navigation view item clicks here. when (item.itemId) < R.id.nav_current_workout -> < // Handle the camera action >R.id.nav_log -> < >R.id.nav_exercises -> < >R.id.nav_workouts -> < >R.id.nav_stats -> < >R.id.nav_settings -> < >> val drawerLayout: DrawerLayout = findViewById(R.id.drawer_layout) drawerLayout.closeDrawer(GravityCompat.START) return true > > And finally content_main.xml which I assume is where I need to put fragments (which I still don’t fully understand. ). From one guide I changed it to including a FrameLayout as:
I really just don’t know what to add into the onNavigationItemSelected items in MainActivity.kt in order to handle navigation. I have learned that I need to replace the content in content_main.xml with some fragment where I put in my page’s ui, but I don’t know how to do that. Can anyone help me out? I’ve looked at a bunch of examples, but they usually implement their own custom nav bars, or are using java which confuses me as a newcomer.
Navigation drawer activity kotlin

Android Navigation Drawer in Kotlin
Welcome, In this chapter we are focusing on NavigationDrawer, or we can say NavigationView. NavigationView is the panel which shows you the menu, it’s hidden, but when the user swipes from left to right, this menu bar gets open or from the top when the user touches the hamburger icon (3 horizontal lines).
Before using it in your app, you should be clear when to use it and what are the use cases when an app needs the NavigationView:
- Apps with five or more top-level destinations
- Apps with two or more levels of the navigation hierarchy
- Quick navigation between unrelated destinations
Let’s start the development:
1. Create a new project and add the material dependency where our required navigationView is and sync the project.
implementation ‘com.google.android.material:material:1.0.0’2. First, create the main screen layout where we will see the navigation menu.
3. Here, we have DrawerLayout, which is our parent view, helps us to draw the view on the screen as its child item.
We are also using toolbar and removed the default toolbar from the styles.xml by change the parent theme
@color/colorPrimary - @color/colorPrimaryDark
- @color/colorAccent
We also have a FrameLayout, so that our navigation view can come over it.
4. We have a NavigationView and two attributes in it:
5. We need to declare that what are the items which we need to show in the navigation view, the list of menu.
To create a menu, first, we need to create a menu folder inside res folder. And now, we will create a menu file by right-clicking on the menu and go to the new > menu resource file and create one.
app:headerLayout=”@layout/nav_header”We need to define the layout which is the header layout in the navigation view, the top part of the navigation view which is mostly used to describe user details or app details.
6. The layout part is completed now, let’s move to the kotlin class. Inside our MainActivity, we will first set the toolbar as a actionbar.
setSupportActionBar(toolbar)7. Now, we will set the actionBar to toggle state, which is used when we open and close our navogation view.
8. To get the hamburger icon, we will set the indicator
toggle.isDrawerIndicatorEnabled = true9. To make our NavigationView interactable, we need to set the listener to it.
For that, we will override the method of its interface.
class MainActivity : AppCompatActivity(), NavigationView.OnNavigationItemSelectedListener<>And set the specific action on menuItem clicks. Here, we are showing the toast message. You can also start a new activity, or open fragment etc.
override fun onNavigationItemSelected(menuItem: MenuItem): Boolean < when (menuItem.itemId) < R.id.nav_public -> < Toast.makeText(this, "Publication", Toast.LENGTH_SHORT).show() >R.id.nav_store -> < Toast.makeText(this, "Android Store", Toast.LENGTH_SHORT).show() >R.id.nav_news -> < Toast.makeText(this, "Newsletter", Toast.LENGTH_SHORT).show() >R.id.nav_join -> < Toast.makeText(this, "Join Community", Toast.LENGTH_SHORT).show() >R.id.nav_contact -> < Toast.makeText(this, "Contact us", Toast.LENGTH_SHORT).show() >> drawer_layout.closeDrawer(GravityCompat.START) return true >We also need to make sure that if the user press back button, we should check the navigationView should be closed first and then the app. For this, we will override the onBackPressed() method.
override fun onBackPressed() < if (drawer_layout.isDrawerOpen(GravityCompat.START)) < drawer_layout.closeDrawer(GravityCompat.START) >else < super.onBackPressed() >>Let’s run this application. Cool!! This is working fine. There is much more in NavigationView like icons in the menu items etc. Try to explore more and share us with on our twitter or slack channel.
Navigation Drawer
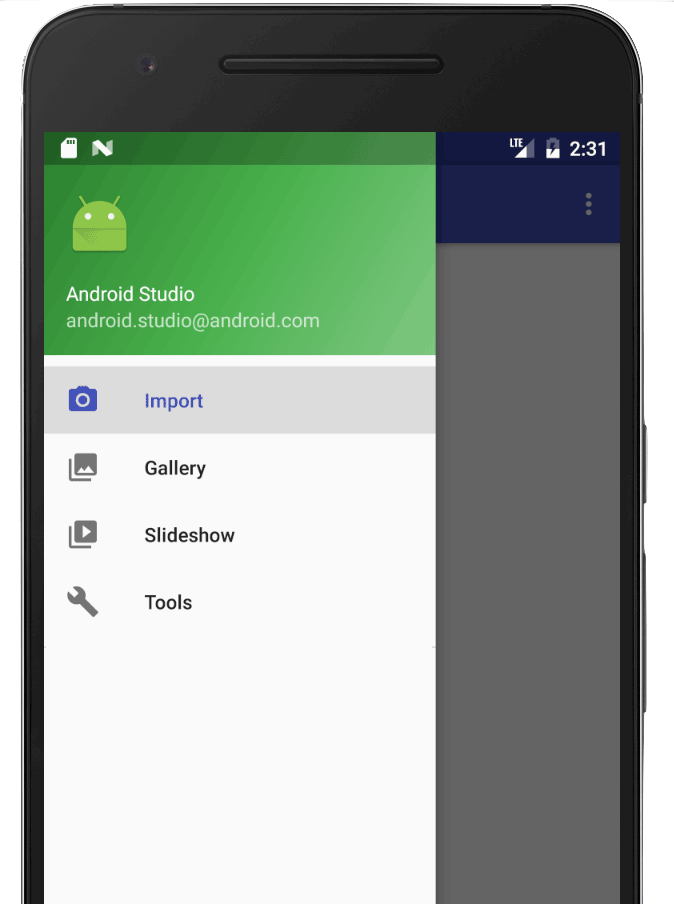
Navigation drawer — это главное меню приложения, которое выдвигается слева направо при нажатии пользователем на значок “гамбургера”. Либо свайпом слева направо. Его еще называют “шторкой” и в открытом виде выглядит так:
Когда этот элемент интерфейса только только появился, необходимо было осуществлять много манипуляций по его добавлению на экран (если не учитывать наличие специального шаблона). Ради интереса можно ознакомиться со статьей, в которой описывается весь этот нелегкий путь.
Но вот на Google I/O 2018 была предложена совершенно новая концепция навигации по приложению, для которой уже весной 2019 года выпустили стабильную версию. Первоначально носила название Navigation Architecture Component, теперь же именуется Jetpack Navigation.
Главная цель — создание приложений по типу singleActivity.
С выходом Jetpack Navigation добавление шторки в приложении значительно упростилось, уменьшилось количество кода и настроек. Ну и, конечно же, был обновлен шаблон Navigation Drawer Activity.
В примере ниже рассмотрим добавление шторки вручную.
Алгоритм добавления шторки в интерфейс
Зависимости
// Java language implementation implementation "androidx.navigation:navigation-fragment:$nav_version" implementation "androidx.navigation:navigation-ui:$nav_version" // Kotlin implementation "androidx.navigation:navigation-fragment-ktx:$nav_version" implementation "androidx.navigation:navigation-ui-ktx:$nav_version"
В этом же файле build.gradle должно быть:

Иначе словите ошибку:
Фрагменты
Так как основная цель Jetpack Navigation — создание приложений по типу singleActivity, основной контент будет отображаться во фрагментах.
На этом этапе нужно создать классы фрагментов и макеты к ним. В моем приложении будет три фрагмента — MainFragment , SettingsFragment , AboutFragment . По внутреннему содержанию они идентичны (все отображают TextView ), а значит будет достаточно создать один файл разметки.
Макет для MainFragment, SettingsFragment, AboutFragment — fragment_page.xml
1 2 3 4 5 6 7 8 9 10 11 12
Код для класса MainFragment
Для остальных фрагментов код идентичен, разница только в отображаемом тексте.
1 2 3 4 5 6 7 8 9 10 11 12 13 14 15 16 17 18 19 20 21 22
import android.os.Bundle import android.view.LayoutInflater import android.view.View import android.view.ViewGroup import androidx.fragment.app.Fragment import kotlinx.android.synthetic.main.fragment_page.* class MainFragment : Fragment() < override fun onCreateView( inflater: LayoutInflater, container: ViewGroup?, savedInstanceState: Bundle? ): View? = inflater.inflate(R.layout.fragment_page, container, false) override fun onViewCreated(view: View, savedInstanceState: Bundle?) < super.onViewCreated(view, savedInstanceState) // каждому фрагменту установите уникальный текст для наглядности tv_info.text = "Main Content" >>
Навигация
Теперь для созданных фрагментов нужно выстроить навигацию.
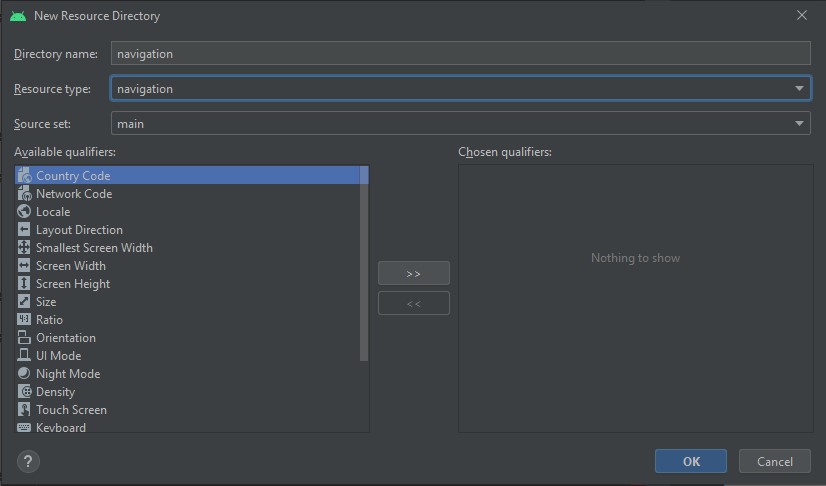
Добавляем новую директорию в ресурсы через контекстное меню New -> Android Resource Directory. В новом окне полю Resource type задать значение navigation:
В созданной папке добавляем новый файл nav_graph.xml .
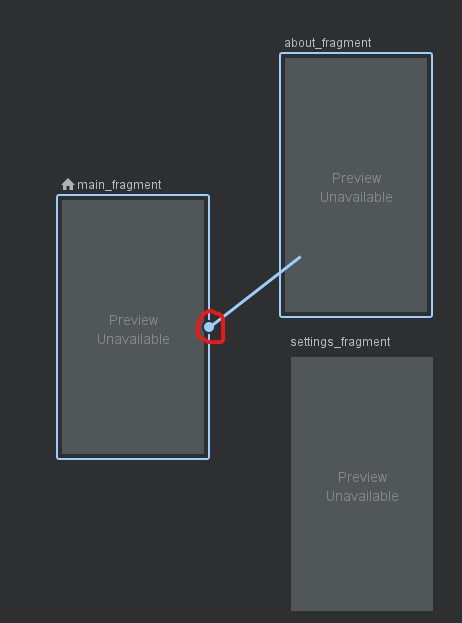
Проще всего спроектировать навигацию через визуальный конструктор. В левом верхнем углу находится кнопка “New Destination”, с ее помощью можно добавить в граф все вышесозданные фрагменты.
При выделении фрагмента в визуальном редакторе появляется кружок в центре правого края. С помощью него выстраивается цепочка переходов от фрагмента к фрагменту.
В результате в nav_graph.xml должен получится такой код:
1 2 3 4 5 6 7 8 9 10 11 12 13 14 15 16 17 18 19 20 21 22 23 24 25 26 27
Обратите внимание на атрибут android:label — он отвечает за заголовок, который будет отображаться в тулбаре для каждого фрагмента.
Меню для шторки
По аналогии с навигацией, нужно добавить папку в ресурсы для меню и файл nav_drawer_menu.xml :
Обратите внимание на идентификаторы в меню — для корректной работы они должны быть идентичны идентификаторам из nav_graph.xml .
Header для шторки
Создается в папке layouts, дизайн на ваше усмотрение. Вот, что получилось у меня ( nav_header.xml ):
1 2 3 4 5 6 7 8 9 10 11 12 13 14 15 16
Объединяем все вместе в макете activity
Корневым элементом макета activity обязательно должен быть DrawerLayout, так как именно он позволяет шторке выдвигаться из края экрана. Внутри DrawerLayout’а объявляется основное содержимое экрана: toolbar, контейнер для фрагментов и сама шторка — NavigationView.
1 2 3 4 5 6 7 8 9 10 11 12 13 14 15 16 17 18 19 20 21 22 23 24 25 26 27 28 29 30 31 32 33 34 35 36 37 38 39
Элемент является контейнером для наших фрагментов. Подробнее об особо важных атрибутах:
- Значение атрибута android:name=»androidx.navigation.fragment.NavHostFragment» говорит о том, что данный элемент в разметке будет являться хостом для фрагментов. Указывается обязательно в таком виде без изменений, так как хост должен быть производным от NavHostFragment, который в свою очередь обрабатывает смену фрагментов местами.
- app:defaultNavHost=»true» — позволяет перехватывать нажатие на системную кнопку “Назад”, т.е. не нужно ее дополнительно отслеживать и обрабатывать.
- app:navGraph=»@navigation/nav_graph» — связывает NavHostFragment с созданным нами графом навигации.
Для NavigationView устанавливаем ранее подготовленные файлы — header и меню, а также с помощью атрибута android:layout_gravity указываем с какой стороны она будет выезжать.
Так как в макете мы объявили реализацию toolbar , требуется отключить стандартный actionBar . Для этого заходим в values/styles.xml и меняем DarkActionBar на NoActionBar . Должно получится так:
Подключение в классе MainActivity
1 2 3 4 5 6 7 8 9 10 11 12 13 14 15 16 17 18 19 20 21 22 23 24 25 26 27 28 29 30 31 32 33
import android.os.Bundle import androidx.appcompat.app.AppCompatActivity import androidx.navigation.findNavController import androidx.navigation.ui.* import kotlinx.android.synthetic.main.activity_main.* class MainActivity : AppCompatActivity() < lateinit var appBarConfig: AppBarConfiguration override fun onCreate(savedInstanceState: Bundle?) < super.onCreate(savedInstanceState) setContentView(R.layout.activity_main) // устанавливаем свою реализацию тулбара setSupportActionBar(toolbar) val navController = findNavController(R.id.fragment_container) // конфигурация тулбара appBarConfig = AppBarConfiguration(navController.graph, drawer_layout) setupActionBarWithNavController(navController, appBarConfig) // метод, который связывает шторку с навигацией nav_view.setupWithNavController(navController) >// отслеживает клик по иконке гамбургера и стрелке UP override fun onSupportNavigateUp(): Boolean < val navController = findNavController(R.id.fragment_container) return navController.navigateUp(appBarConfig) || super.onSupportNavigateUp() >>
AppBarConfiguration — устанавливает в тулбаре иконку “гамбургера” и меняет ее на стрелку UP, если мы находимся не на главном экране приложения. Вместо графа в качестве первого параметра можно указать список фрагментов, у которых не будет происходить смена иконки “гамбургера” на стрелку UP:
appBarConfig = AppBarConfiguration(setOf(R.id.main_fragment), drawer_layout)
Запускаем приложение и наслаждаемся результатом.
Цвет иконки
Добавляем в values/styles.xml следующий код:
1 2 3 4 5 6 7 8 9 10 11 12
Значение colorWhite задано в файле colors.xml . Соответственно можно указать любой цвет по вкусу.
Полезные ссылки
Полный код текущего проекта здесь.