- Переменная окружения JAVA_HOME
- Что такое JAVA_HOME
- Какие программы используют JAVA_HOME
- Ошибки, связанные с JAVA_HOME
- Как установить переменную окружения JAVA_HOME в Windows
- Резюме
- PATH and CLASSPATH
- Update the PATH Environment Variable (Microsoft Windows)
- Update the PATH Variable (Solaris and Linux)
- Checking the CLASSPATH variable (All platforms)
- Установка JDK в Windows
- Как установить JDK
- Скачайте нужный дистрибутив JDK
- Настройка переменных окружения
- Проверка установки
- Резюме
Переменная окружения JAVA_HOME
Во многих статьях в интернете, документации к инструментам для разработки на Java и в книгах зачастую упоминается JAVA_HOME. Что же такое JAVA_HOME?
Что такое JAVA_HOME
JAVA_HOME это переменная окружения, указывающая на директорию с установленным JDK (Java Development Kit, комплект разработчика Java). JAVA_HOME это соглашение, используемое во многих программах из экосистемы Java.
Какие программы используют JAVA_HOME
- Intellij IDEA, Eclipse, NetBeans
- Apache Maven, Apache Ant, Gradle
- Apache Tomcat
- Jenkins
Некоторые игры, написанные на Java (например, Minecraft), тоже могут требовать установленной переменной JAVA_HOME.
Ошибки, связанные с JAVA_HOME
Если переменная окружения JAVA_HOME не определена, некоторые программы могут выдавать следующие ошибки:
- Переменная среды java_home не определена
- Cannot determine a valid Java Home
- JAVA_HOME is set to an invalid directory
- JAVA_HOME is not defined correctly
- JAVA_HOME environment variable is not set
- JAVA_HOME command not found
- JAVA_HOME not found in your environment
- JAVA_HOME does not point to the JDK
При появлении таких ошибок просто установите переменную JAVA_HOME
Как установить переменную окружения JAVA_HOME в Windows
Сперва вам нужно установить JDK или JRE.
- Установите JDK, если вы занимаетесь разработкой программ на Java
- Установите JRE, если вам нужно только запустить прикладную программу на Java
После установки JDK либо JRE запишите путь установки, он понадобится.
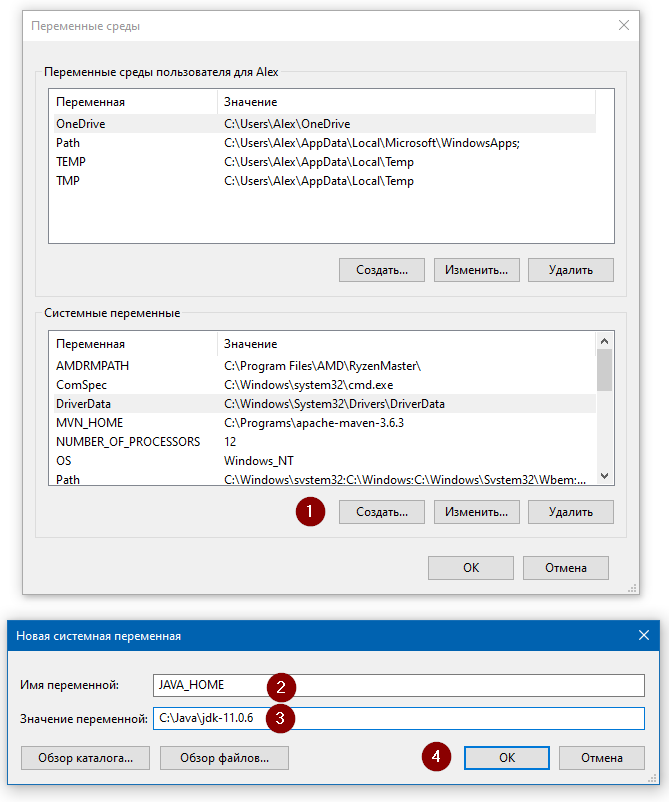
Теперь щёлкните правой кнопкой на «Мой компьютер» → «Свойства» → «Дополнительные параметры системы» → «Переменные среды…». В разделе «Системные переменные» нажмите кнопку «Создать…» и укажите следующие данные:
| Имя переменной | JAVA_HOME |
| Значение переменной | Путь к директории JDK / JRE, например: C:\Java\jdk-11.0.6 |
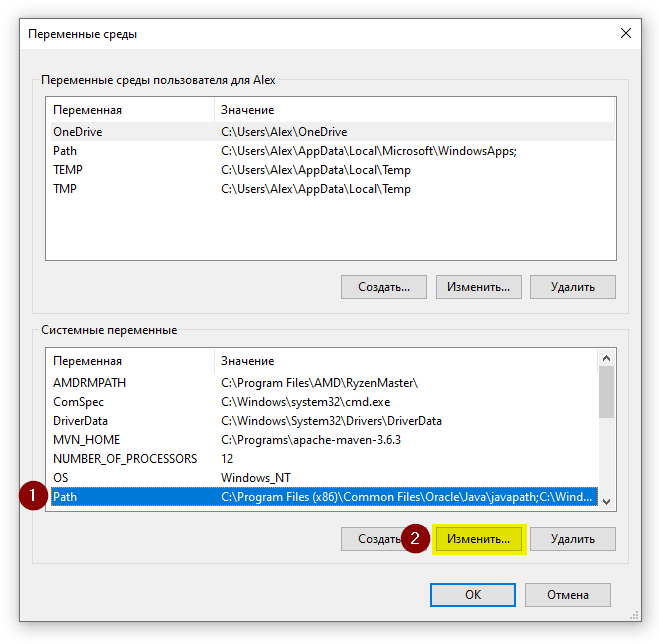
Сохраните изменения, кликнув «OK». Теперь выберите в списке переменную окружения Path и нажмите «Изменить…». В конце списка добавьте строчку со значением «%JAVA_HOME%\bin«
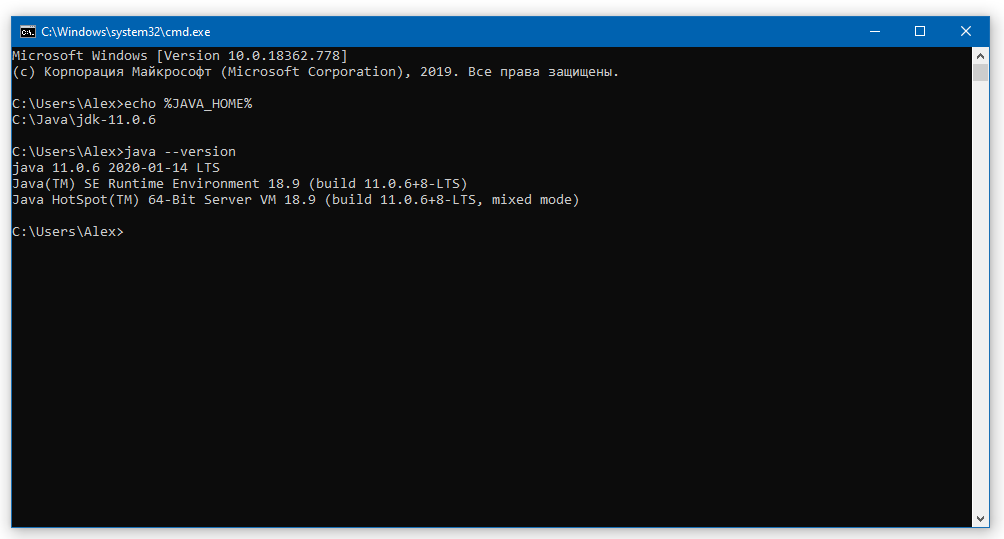
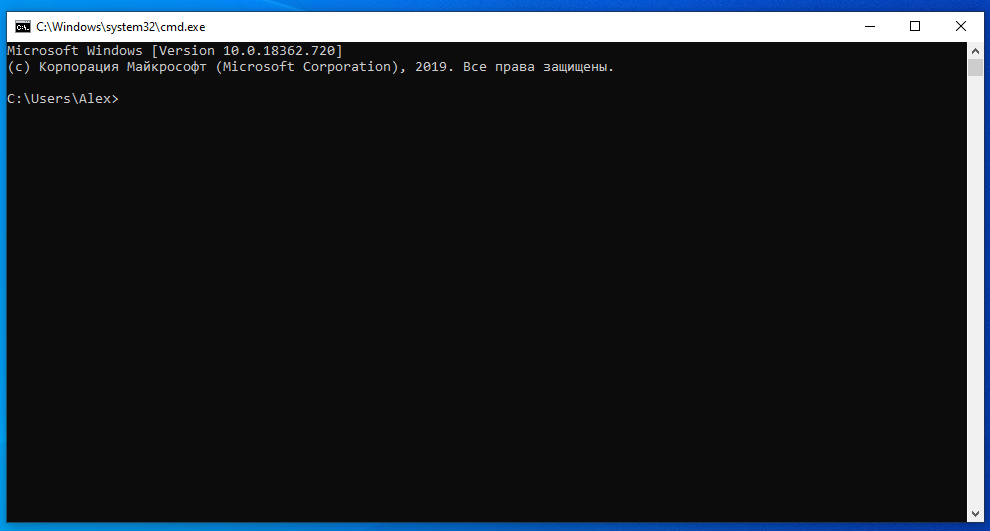
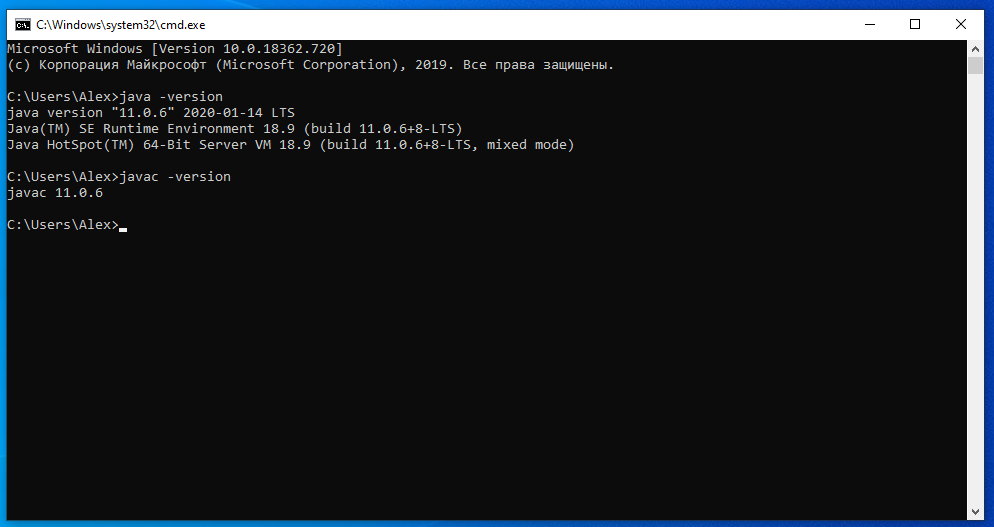
Для проверки откройте консоль (Win+R, cmd) и укажите последовательно укажите две команды:
Если вы правильно установили JDK/JRE и правильно установили переменные окружения, вы увидите вывод наподобие этого:
Это будет служить результатом того, что переменная JAVA_HOME установлена правильно и Java работает из командной строки.
Резюме
В данной статье мы рассказали вам, что являет собой переменная окружения JAVA_HOME, где она используется и как её корректно указать.
PATH and CLASSPATH
This section explains how to use the PATH and CLASSPATH environment variables on Microsoft Windows, Solaris, and Linux. Consult the installation instructions included with your installation of the Java Development Kit (JDK) software bundle for current information.
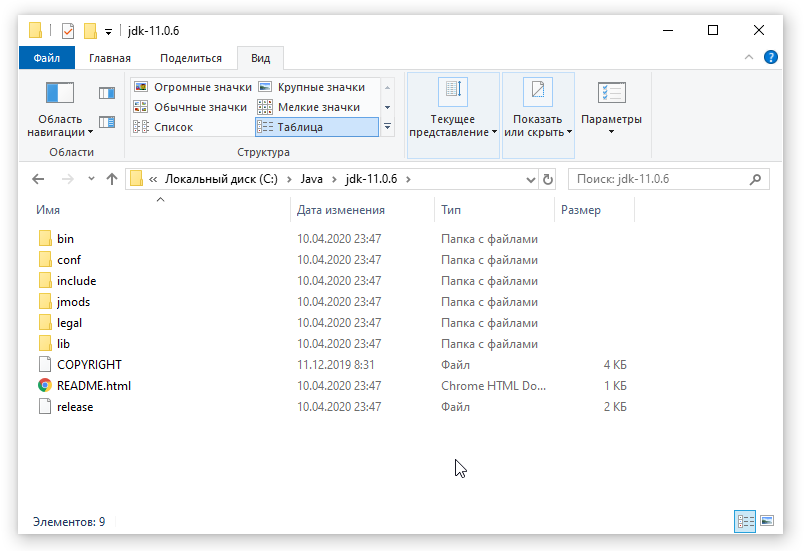
After installing the software, the JDK directory will have the structure shown below.
The bin directory contains both the compiler and the launcher.
Update the PATH Environment Variable (Microsoft Windows)
You can run Java applications just fine without setting the PATH environment variable. Or, you can optionally set it as a convenience.
Set the PATH environment variable if you want to be able to conveniently run the executables ( javac.exe , java.exe , javadoc.exe , and so on) from any directory without having to type the full path of the command. If you do not set the PATH variable, you need to specify the full path to the executable every time you run it, such as:
C:\Java\jdk1.7.0\bin\javac MyClass.java
The PATH environment variable is a series of directories separated by semicolons ( ; ). Microsoft Windows looks for programs in the PATH directories in order, from left to right. You should have only one bin directory for the JDK in the path at a time (those following the first are ignored), so if one is already present, you can update that particular entry.
The following is an example of a PATH environment variable:
C:\Java\jdk1.7.0\bin;C:\Windows\System32\;C:\Windows\;C:\Windows\System32\Wbem
It is useful to set the PATH environment variable permanently so it will persist after rebooting. To make a permanent change to the PATH variable, use the System icon in the Control Panel. The precise procedure varies depending on the version of Windows:
- Select Start, select Control Panel. double click System, and select the Advanced tab.
- Click Environment Variables. In the section System Variables, find the PATH environment variable and select it. Click Edit. If the PATH environment variable does not exist, click New .
- In the Edit System Variable (or New System Variable) window, specify the value of the PATH environment variable. Click OK. Close all remaining windows by clicking OK.
- From the desktop, right click the My Computer icon.
- Choose Properties from the context menu.
- Click the Advanced tab (Advanced system settings link in Vista).
- Click Environment Variables. In the section System Variables, find the PATH environment variable and select it. Click Edit. If the PATH environment variable does not exist, click New .
- In the Edit System Variable (or New System Variable) window, specify the value of the PATH environment variable. Click OK. Close all remaining windows by clicking OK.
- From the desktop, right click the Computer icon.
- Choose Properties from the context menu.
- Click the Advanced system settings link.
- Click Environment Variables. In the section System Variables, find the PATH environment variable and select it. Click Edit. If the PATH environment variable does not exist, click New .
- In the Edit System Variable (or New System Variable) window, specify the value of the PATH environment variable. Click OK. Close all remaining windows by clicking OK.
Note: You may see a PATH environment variable similar to the following when editing it from the Control Panel:
%JAVA_HOME%\bin;%SystemRoot%\system32;%SystemRoot%;%SystemRoot%\System32\Wbem
Variables enclosed in percentage signs ( % ) are existing environment variables. If one of these variables is listed in the Environment Variables window from the Control Panel (such as JAVA_HOME ), then you can edit its value. If it does not appear, then it is a special environment variable that the operating system has defined. For example, SystemRoot is the location of the Microsoft Windows system folder. To obtain the value of a environment variable, enter the following at a command prompt. (This example obtains the value of the SystemRoot environment variable):
Update the PATH Variable (Solaris and Linux)
You can run the JDK just fine without setting the PATH variable, or you can optionally set it as a convenience. However, you should set the path variable if you want to be able to run the executables ( javac , java , javadoc , and so on) from any directory without having to type the full path of the command. If you do not set the PATH variable, you need to specify the full path to the executable every time you run it, such as:
% /usr/local/jdk1.7.0/bin/javac MyClass.java
To find out if the path is properly set, execute:
This will print the version of the java tool, if it can find it. If the version is old or you get the error java: Command not found, then the path is not properly set.
To set the path permanently, set the path in your startup file.
For C shell ( csh ), edit the startup file (~/.cshrc ):
set path=(/usr/local/jdk1.7.0/bin $path)
For bash , edit the startup file ( ~/.bashrc ):
PATH=/usr/local/jdk1.7.0/bin:$PATH export PATH
For ksh , the startup file is named by the environment variable, ENV . To set the path:
PATH=/usr/local/jdk1.7.0/bin:$PATH export PATH
For sh , edit the profile file ( ~/.profile ):
PATH=/usr/local/jdk1.7.0/bin:$PATH export PATH
Then load the startup file and verify that the path is set by repeating the java command:
% source ~/.cshrc % java -version
Checking the CLASSPATH variable (All platforms)
The CLASSPATH variable is one way to tell applications, including the JDK tools, where to look for user classes. (Classes that are part of the JRE, JDK platform, and extensions should be defined through other means, such as the bootstrap class path or the extensions directory.)
The preferred way to specify the class path is by using the -cp command line switch. This allows the CLASSPATH to be set individually for each application without affecting other applications. Setting the CLASSPATH can be tricky and should be performed with care.
The default value of the class path is «.», meaning that only the current directory is searched. Specifying either the CLASSPATH variable or the -cp command line switch overrides this value.
To check whether CLASSPATH is set on Microsoft Windows NT/2000/XP, execute the following:
On Solaris or Linux, execute the following:
If CLASSPATH is not set you will get a CLASSPATH: Undefined variable error (Solaris or Linux) or simply %CLASSPATH% (Microsoft Windows NT/2000/XP).
To modify the CLASSPATH , use the same procedure you used for the PATH variable.
Class path wildcards allow you to include an entire directory of .jar files in the class path without explicitly naming them individually. For more information, including an explanation of class path wildcards, and a detailed description on how to clean up the CLASSPATH environment variable, see the Setting the Class Path technical note.
Previous page: Miscellaneous Methods in System
Next page: Questions and Exercises: The Platform Environment
Установка JDK в Windows
В этой статье мы установим JDK 11 на Windows. Java Development Kit (JDK) – это набор программ и библиотек для разработки программ на Java. Если вы хотите разрабатывать на Java программы, сперва вам нужно установить актуальную версию JDK.
В данной статье мы покажем, как установить JDK 11. Эта версия LTS (long time support), которая будет поддерживаться до сентября 2022 года. Вы можете установить любую другую версию JDK на ваш вкус, используя эту инструкцию.
Как установить JDK
Скачайте нужный дистрибутив JDK
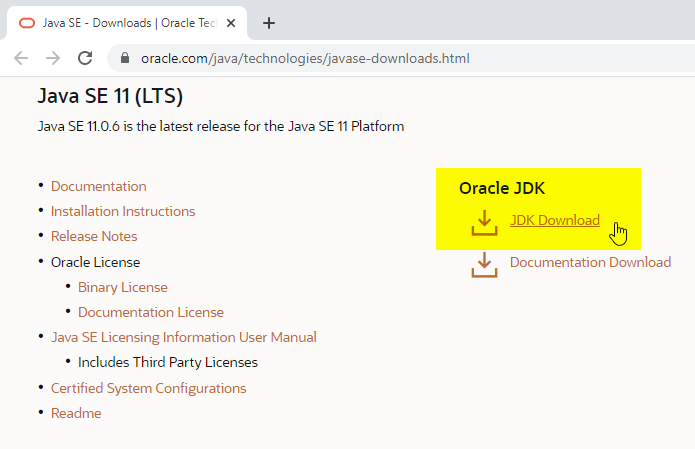
Зайдите на страницу загрузки JDK и нажмите JDK Download
На следующей страницу выберите дистрибутив «Windows x64 Installer»:
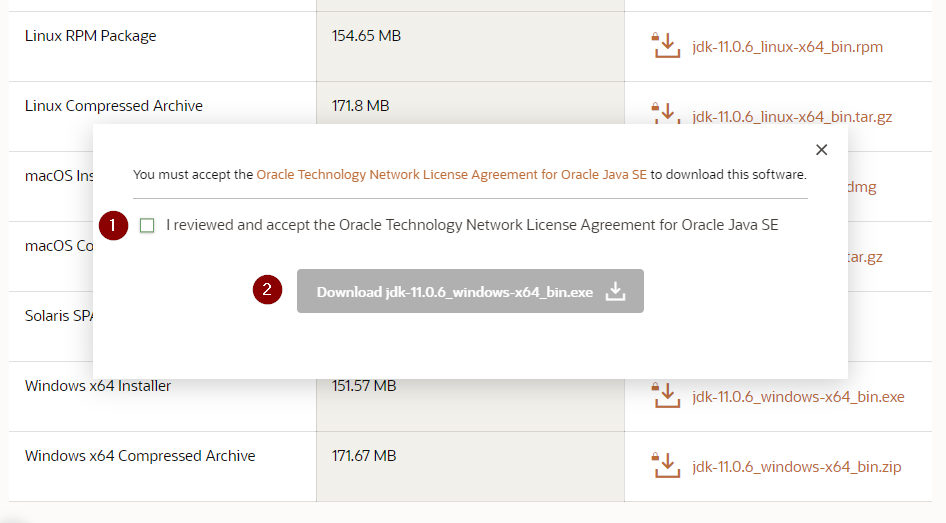
Появится всплывающее окно. Согласитесь с условиями лицензии и нажмите кнопку Download:
Для скачивания вам потребуется залогиниться в существующую учётную запись Oracle. Если у вас её нет, вы можете создать новую учётную запись.
Если вам лень заморачиваться с созданием учётных записей, найдите работающий логин/пароль на сайте bugmenot
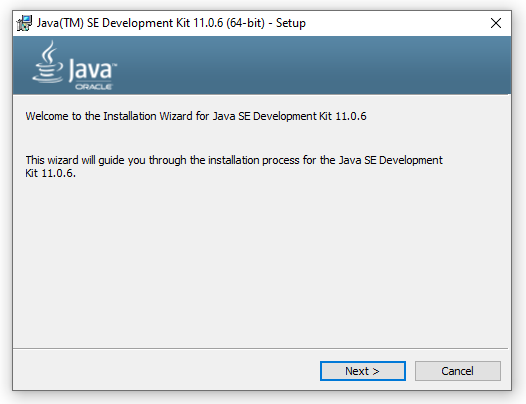
Начнётся скачивание инсталлятора. По окончанию загрузки запустите установку:
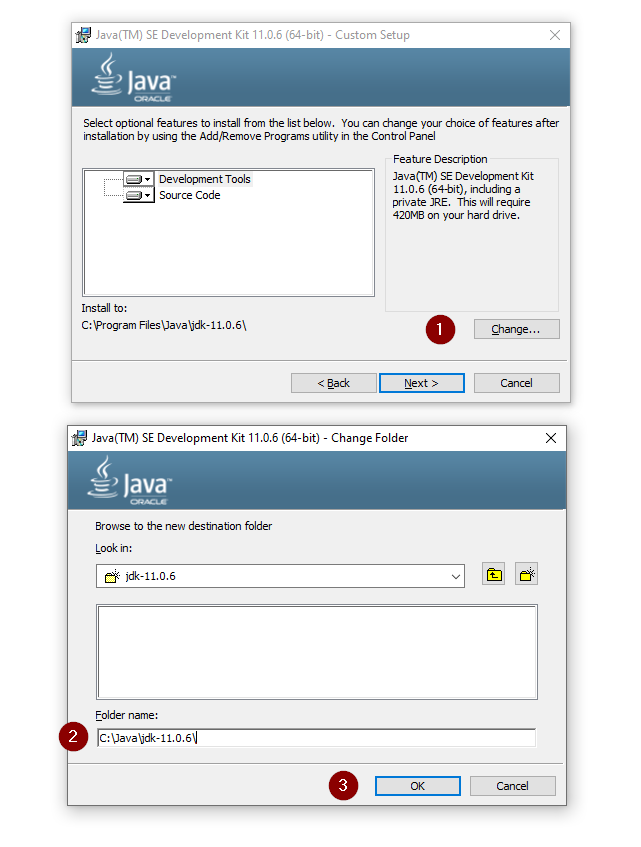
На этапе выбора компонентов укажите путь установки. Я крайне рекомендую вам заменить стандартный путь C:\Program Files путём, не содержащих пробелов, например, C:\Java\jdk-11
Через несколько минут установка завершится:
Для проверки вы можете зайти в указанный вами путь и проверить, что там есть следующий контент:
Настройка переменных окружения
После успешной установки JDK, крайне желательно объявить переменную окружения JAVA_HOME. Эта переменная используется многими программами и инструментами из стандартного набора Java разработчика.
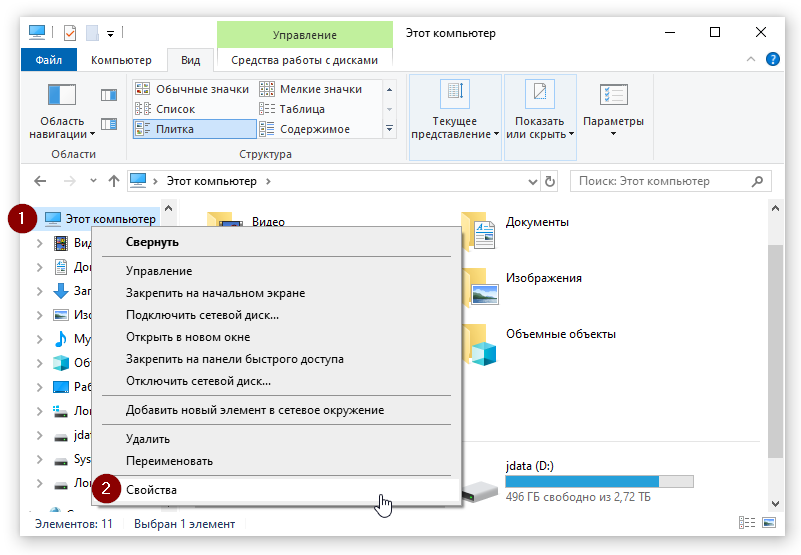
Для этого откройте окно «Этот компьютер» → «Свойства»:
Затем откройте окно «Дополнительные параметры системы» и в нём нажмите кнопку «Переменные среды…»
В окне «Переменные среды» нажмите кнопку «Создать…»
В появившемся окне введите следующие значения:
Имя переменной: JAVA_HOME
Значение переменной:
Затем найдите системную переменную Path и измените её:
Нажмите кнопку «Создать», и укажите в новой строке значение %JAVA_HOME%\bin
Также, если вы видите в этом списке путь к программе javapath (как на скриншоте), удалите его.
Проверка установки
После установки переменных окружения откройте консоль (Win+R, cmd)
Последовательно выполните две команды:
java -version javac -version
Если вы видите вывод наподобие этого, значит, вы корректно установили JDK и правильно указали переменные окружения. Вы готовы написать свою программу на Java!
Резюме
В данном уроке мы научились устанавливать JDK и настраивать перменные окружения. В следующих уроках мы установим основные инструменты Java программиста.
