MySQL Java Connector
MySQL provides connectivity for Java client applications with MySQL Connector/J, a driver that implements the Java Database Connectivity (JDBC) API. The API is the industry standard for database-independent connectivity between the Java programming language and a wide range of SQL databases, spreadsheets etc. The JDBC API can do the following things :
- Establish a connection with a database or access any tabular data source.
- Send SQL statements.
- Retrieve and process the results received from the database.
In the following section, we have discussed how to install, configure, and develop database applications using MySQL Connector/J (JDBC driver).
| Connector/J version | JDBC version | MySQL Server version | Status |
|---|---|---|---|
| 5.1 | 3.0, 4.0 | 4.1, 5.0, 5.1, 5.5, 5.6, 5.7 | Recommended version |
| 5.0 | 3.0 | 4.1, 5.0 | Released version |
| 3.1 | 3.0 | 4.1, 5.0 | Obsolete |
| 3.0 | 3.0 | 3.x, 4.1 | Obsolete |
Download Connector/J :
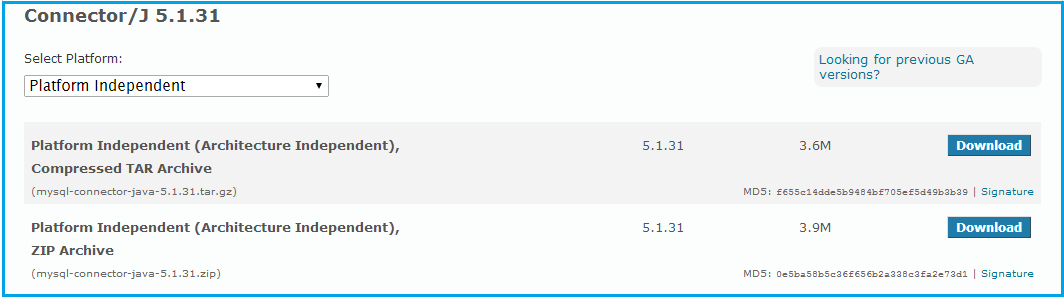
MySQL Connector/J is the official JDBC driver for MySQL. You can download the latest version of MySQL Connector/J binary or source distribution from the following web site —
http://dev.MySQL.com/downloads/connector/j/
For Platform Independent select any one from the following :
Installation
You can install the Connector/J package drivers using either the binary, binary installation or source installation. The binary method is easy which is a bundle of necessary libraries and other files pre-built, with an installer program. The source installation method is important where you want to customize or modifies the installation process or for those platforms where a binary installation package is not available. Apart from that solution, you manually add the Connector/J location to your Java classpath.
MySQL Connector/J is distributed as a .zip or .tar.gz archive containing the sources, the class files. After extracting the distribution archive, you can install the driver by placing MySQL-connector-java-version-bin.jar in your classpath, either by adding the full path to it to your classpath environment variable or by directly specifying it with the command line switch -cp when starting the JVM.
You can set the classpath environment variable under Unix, Linux or Mac OS X either locally for a user within their .profile, .login or another login file. You can also set it globally by editing the global /etc/profile file.
For example add the Connector/J driver to your classpath using one of the following forms, depending on your command shell :
# Bourne-compatible shell (sh, ksh, bash, zsh): shell> export CLASSPATH=/path/MySQL-connector-java-ver-bin.jar:$CLASSPATH # C shell(csh, tcsh): shell> setenv CLASSPATH /path/MySQL-connector-java-ver-bin.jar:$CLASSPATH
In Windows 2000, Windows XP, Windows Server 2003 and Windows Vista, you can set the environment variable through the System Control Panel.
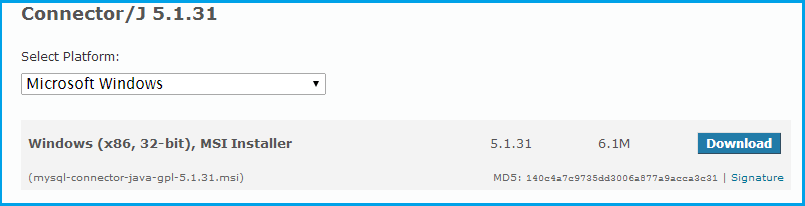
Install Java Connector on Microsoft Windows
Select and download the MSI installer packages from http://dev.MySQL.com/downloads/connector/j/ as per your requirement.
Now follow the following steps :
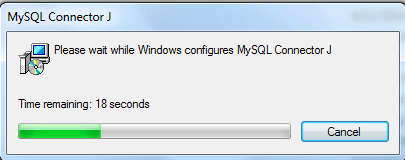
Step -1 :
Double click the installer (here it is «MySQL-connector-java-gpl-5.1.31.msi»)

Step -2 :
Click on ‘Run’ and complete the process.
Connecting to MySQL using MySQL Connector/J
The following example shows how to connect/terminate and handle errors. (Java version 7 Update 25 (build 1.7.0_25-b16))
import java.sql.Connection; import java.sql.DriverManager; import java.sql.SQLException; public class test < public static void main (String[] args) < System.out.println("\n\n***** MySQL JDBC Connection Testing *****"); Connection conn = null; try < Class.forName ("com.MySQL.jdbc.Driver").newInstance (); String userName = "root"; String password = "pqrs123"; String url = "jdbc:MySQL://localhost/sakila"; conn = DriverManager.getConnection (url, userName, password); System.out.println ("\nDatabase Connection Established. "); >catch (Exception ex) < System.err.println ("Cannot connect to database server"); ex.printStackTrace(); >finally < if (conn != null) < try < System.out.println("\n***** Let terminate the Connection *****"); conn.close (); System.out.println ("\nDatabase connection terminated. "); >catch (Exception ex) < System.out.println ("Error in connection termination!"); >> > > > To create a java jdbc connection to the database, you must import the following java.sql package.
- import java.sql.Connection;
- import java.sql.DriverManager;
- import java.sql.SQLException;
Now we will make a class named ‘test’ and then the main method.
To create a connection to a database, the code is :
conn = DriverManager.getConnection (url, userName, password);
The JDBC DriverManager class defines objects which can connect Java applications to a JDBC driver. DriverManager is the backbone of the JDBC architecture. The DriverManager has a method called getConnection(). The method uses a jdbc url, username and a password to establish a connection to the database and returns a connection object. We have used the following url, username and password in the above code.
- The url string is «jdbc:MySQL://localhost/sakila» where the first part «jdbc:MySQL://localhost» is the database type (here it is MySQL) and server (here it is localhost). Rest part is the database name (here it is ‘sakila’).
- The user name for MySQL is defined inside the variable ‘userName’.
- The password for MySQL is defined inside the variable ‘password’.
The DriverManager attempts to connect to the database, if the connection is successful, a Connection object is created, (here it is called ‘conn’) and the program will display a message «Database Connection Established. «
If the connection fails (e.g. supplying wong password, host address etc.) then you need to handle the situation. We are trapping the error in catch part of the try … catch statement with appropriate messages and finally close the connection.
Compile and Run it
Assume that ‘test.java’ is stored in E:\ and ‘MySQL-connector-java-5.1.31-bin.jar’ is stored in «C:\Program Files\MySQL\MySQL Connector J\».
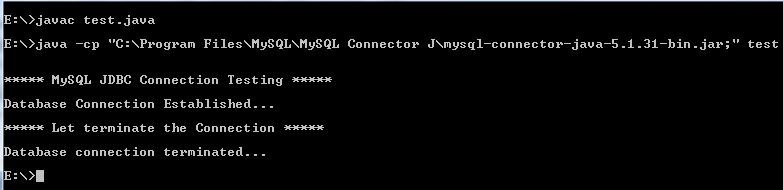
Note : The class path is the path that the Java Runtime Environment (JRE) searches for classes and other resource files. You can change the class path by using the -classpath or -cp option of some Java commands when you call the JVM or other JDK tools or by using the classpath environment variable.
Querying data using MySQL Connector/J
Suppose we want to get the names (first_name, last_name), salary of the employees who earn more than the average salary and who works in any of the IT departments.
Structure of ‘hr’ database :
Sample table : employees
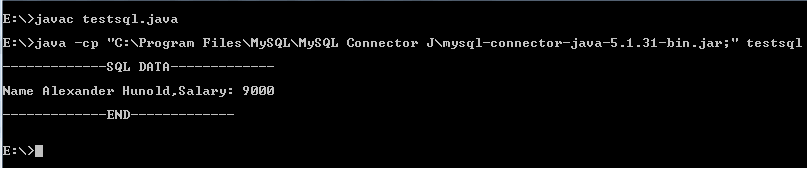
SELECT first_name, last_name, salary FROM employees WHERE department_id IN (SELECT department_id FROM departments WHERE department_name LIKE 'IT%') AND salary > (SELECT avg(salary) FROM employees); Here is the Java Code (version 7 Update 25 (build 1.7.0_25-b16))
import java.sql.Connection; import java.sql.DriverManager; import java.sql.SQLException; import java.sql.Statement; import java.sql.ResultSet; public class testsql < public static void main (String[] args) < Connection conn = null; try < Class.forName ("com.MySQL.jdbc.Driver").newInstance (); String userName = "root"; String password = "datasoft123"; String url = "jdbc:MySQL://localhost/hr"; conn = DriverManager.getConnection (url, userName, password); // Run SQL ->start from here Statement stmt = null; ResultSet rs = null; try < stmt = conn.createStatement(); rs = stmt.executeQuery("SELECT first_name, last_name, salary FROM employees WHERE department_id IN (SELECT department_id FROM departments WHERE department_name LIKE 'IT%') AND salary >(SELECT avg(salary) FROM employees)"); // Extract data from result set System.out.println ("\n-------------SQL DATA-------------\n"); while(rs.next()) < //Retrieve by column name String fname = rs.getString("first_name"); String lname = rs.getString("last_name"); int salary = rs.getInt("Salary"); //Display values System.out.print("Name " + fname+' '+lname); System.out.print(",Salary: " + salary); >System.out.println ("\n\n-------------END-------------\n"); > catch (SQLException ex) < // handle any errors System.out.println("SQLException: " + ex.getMessage()); System.out.println("SQLState: " + ex.getSQLState()); System.out.println("VendorError: " + ex.getErrorCode()); >finally < if (rs != null) < try < rs.close(); >catch (SQLException sqlEx) < >// ignore rs = null; > if (stmt != null) < try < stmt.close(); >catch (SQLException sqlEx) < >// ignore stmt = null; > > // SQL end at here > catch (Exception ex) < System.err.println ("Cannot connect to database server"); ex.printStackTrace(); >finally < if (conn != null) < try < ///System.out.println("\n***** Let terminate the Connection *****"); conn.close (); // System.out.println ("\n\nDatabase connection terminated. "); >catch (Exception ex) < System.out.println ("Error in connection termination!"); >> > > > Compile and Run it
Assume that ‘testsql.java’ is stored in E:\ and ‘MySQL-connector-java-5.1.31-bin.jar’ is stored in «C:\Program Files\MySQL\MySQL Connector J\».
Note : The class path is the path that the Java Runtime Environment (JRE) searches for classes and other resource files. You can change the class path by using the -classpath or -cp option of some Java commands when you call the JVM or other JDK tools or by using the classpath environment variable.
Follow us on Facebook and Twitter for latest update.
- Weekly Trends
- Java Basic Programming Exercises
- SQL Subqueries
- Adventureworks Database Exercises
- C# Sharp Basic Exercises
- SQL COUNT() with distinct
- JavaScript String Exercises
- JavaScript HTML Form Validation
- Java Collection Exercises
- SQL COUNT() function
- SQL Inner Join
- JavaScript functions Exercises
- Python Tutorial
- Python Array Exercises
- SQL Cross Join
- C# Sharp Array Exercises
We are closing our Disqus commenting system for some maintenanace issues. You may write to us at reach[at]yahoo[dot]com or visit us at Facebook
Installing JDBC Driver
Download, extract, and copy the JDBC driver, renamed, to /usr/share/java/ . If the target directory does not yet exist, create it.
Installing the Postgres JDBC Driver
- Install the PostgreSQL JDBC driver. If you would like to use the PostgreSQL JDBC driver version shipped with the OS repositories, run the following command:
yum install postgresql-jdbc*cp /usr/share/java/postgresql-jdbc.jar /usr/share/java/postgresql-connector-java.jarls /usr/share/java/postgresql-connector-java.jarchmod 644 /usr/share/java/postgresql-connector-java.jarInstalling the MySQL JDBC Driver for MariaDB
The MariaDB JDBC driver is not supported. Follow the steps in this section to install and use the MySQL JDBC driver instead.
Install the JDBC driver on the Cloudera Manager Server host, as well as any other hosts running services that require database access.
If you already have the JDBC driver installed on the hosts that need it, you can skip this section. However, MySQL 5.6 requires a version 5.1.26 or higher.
Cloudera recommends that you consolidate all roles that require databases on a limited number of hosts, and install the driver on those hosts. Locating all such roles on the same hosts is recommended but not required. Make sure to install the JDBC driver on each host running roles that access the database.
Using the yum install command to install the MySQL driver package before installing a JDK installs OpenJDK, and then uses the Linux alternatives command to set the system JDK to be OpenJDK. If you intend to use an Oracle JDK, make sure that it is installed before installing the MySQL driver using yum install . If you want to use OpenJDK, you can install the driver using yum .
Alternatively, use the following procedure to manually install the driver.
- Download the MySQL JDBC driver from http://www.mysql.com/downloads/connector/j/5.1.html (in .tar.gz format). As of the time of writing, you can download version 5.1.46 using wget as follows:
wget https://dev.mysql.com/get/Downloads/Connector-J/mysql-connector-java-5.1.46.tar.gztar zxvf mysql-connector-java-5.1.46.tar.gzsudo mkdir -p /usr/share/java/ cd mysql-connector-java-5.1.46 sudo cp mysql-connector-java-5.1.46-bin.jar /usr/share/java/mysql-connector-java.jarsudo zypper install mysql-connector-javasudo apt-get install libmysql-javaInstalling the MySQL JDBC Driver
Install the JDBC driver on the Cloudera Manager Server host, as well as any other hosts running services that require database access.
If you already have the JDBC driver installed on the hosts that need it, you can skip this section. However, MySQL 5.6 requires a 5.1 driver version 5.1.26 or higher.
Cloudera recommends that you consolidate all roles that require databases on a limited number of hosts, and install the driver on those hosts. Locating all such roles on the same hosts is recommended but not required. Make sure to install the JDBC driver on each host running roles that access the database.
Using the yum install command to install the MySQL driver package before installing a JDK installs OpenJDK, and then uses the Linux alternatives command to set the system JDK to be OpenJDK. If you intend to use an Oracle JDK, make sure that it is installed before installing the MySQL driver using yum install . If you want to use OpenJDK, you can install the driver using yum .
Alternatively, use the following procedure to manually install the driver.
- Download the MySQL JDBC driver from http://www.mysql.com/downloads/connector/j/5.1.html (in .tar.gz format). As of the time of writing, you can download version 5.1.46 using wget as follows:
wget https://dev.mysql.com/get/Downloads/Connector-J/mysql-connector-java-5.1.46.tar.gztar zxvf mysql-connector-java-5.1.46.tar.gzsudo mkdir -p /usr/share/java/ cd mysql-connector-java-5.1.46 sudo cp mysql-connector-java-5.1.46-bin.jar /usr/share/java/mysql-connector-java.jarsudo zypper install mysql-connector-javasudo apt-get install libmysql-javaInstalling the Oracle JDBC Connector
You must install the JDBC connector on the Cloudera Manager Server host and any other hosts that use a database.
- Download the Oracle JDBC Driver from the Oracle website. For example, the version 6 JAR file is named ojdbc6.jar . For more information about supported Java versions, see Java Requirements. To download the JDBC driver, visit the Oracle JDBC and UCP Downloads page, and click on the link for your Oracle Database version. Download the ojdbc6.jar file (or ojdbc8.jar , for Oracle Database 12.2).
- Copy the Oracle JDBC JAR file to /usr/share/java/oracle-connector-java.jar . The Cloudera Manager databases and the Hive Mestastore database use this shared file. For example:
sudo mkdir -p /usr/share/java sudo cp /tmp/ojdbc8-12.2.0.1.jar /usr/share/java/oracle-connector-java.jar sudo chmod 644 /usr/share/java/oracle-connector-java.jar