- How to Embed Audio and Video in HTML?
- How to embed audio in HTML?
- Syntax:
- HTML
- How to embed video in HTML?
- How to embed video and audio in your HTML
- Video Element
- Source Element
- Audio Element
- Create Music Player With Playlist using HTML,CSS and JavaScript
- Html Code For Music Player
- CSS Code For Music Player
- Javascript Code For Music Player and Playlist
How to Embed Audio and Video in HTML?
HTML stands for HyperText Markup Language. It is used to design web pages using a markup language. It is a combination of Hypertext and Markup language. HTML uses predefined tags and elements that tell the browser how to properly display the content on the screen. So, in this article, we will learn how to embed audio and video in HTML. In order to insert multimedia files on web pages, we already know how to insert images in HTML.
How to embed audio in HTML?
To embed audio in HTML, we use the tag. Before HTML5, audio cannot be added to web pages in the Internet Explorer era. To play audio, we used web plugins like Flash. After the release of HTML5, it is possible. This tag supports Chrome, Firefox, Safari, Opera, and Edge in three audio formats – MP3, WAV, OGG. Only Safari browser doesn’t support OGG audio format.
Syntax:
Attributes of tag
In this example, we will add an audio file to a webpage. To add audio files on the webpage, we need a notepad or another text editor.
Step 1: Open your notepad by searching notepad in your application list.
Step 2: Save a new file with a valid name following with .html extension.
Step 3: Once the HTML file is saved, you can write HTML code inside this file. In this example, we have to embed an audio file so first keep ready an audio file and save it in the same directory where your HTML is saved. Then we write HTML code as shown below code snippet following by HTML code format.
HTML
Note: Before adding an audio source must be sure that the audio file is in the same directory and specified name.
How to embed video in HTML?
To embed video in HTML, we use the tag. It contains one or more video sources at a time using tag. It supports MP4, WebM, and Ogg in all modern browsers. Only Ogg video format doesn’t support in Safari browser.
Attributes of tag
| Attribute | Value | Description |
|---|---|---|
| autoplay | autoplay | When the page is loaded. It specifies to play video as soon as possible. |
| controls | controls | It displays video control such as play, pause, and stop. |
| loop | loop | It will start the video again when it is finished. |
| muted | muted | When the page is loaded video will be automatically muted. |
| poster | URL | It specifies an image will be shown until video play. |
| preload | auto metadata none | It specifies how the author thinks the video will be loaded when the page is ready. |
| src | URL | It specifies the URL of the audio file. |
| width | pixels | It specifies the width of the video area. The default value of width is ‘auto’. |
| height | pixels | It specifies the height of the video area. The default value of height is ‘auto’. |
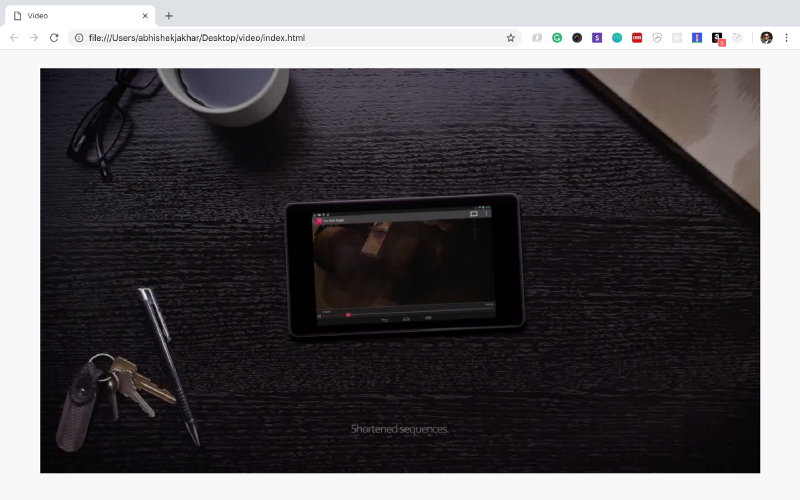
In this example, we will add a video to our webpage. To add video, we will use the tag defining source using tag. Create an HTML file just like an audio file example and save the video file in the same directory. Suppose a video file name test.mp4 save in the same directory where your HTML file was saved.
How to embed video and audio in your HTML
HTML allows us to create standards-based video and audio players that don’t require the use of any plugins. Adding video and audio to a webpage is almost as easy as adding an image or formatting some text.
There are two different ways to include video elements. We will be discussing both of them below.
Video Element
The element allows us to embed video files into an HTML, very similar to the way images are embedded.
Attributes we can include are:
- src This attribute stands for the source, which is very similar to the src attribute used in the image element. We will add the link to a video file in the src attribute.
- type This is going to be video/mp4 because .mp4 is the format of the video we are using. We can also use different video formats like .ogg or .webm, then the value of type attribute will change to video/ogg or video/WebM respectively.
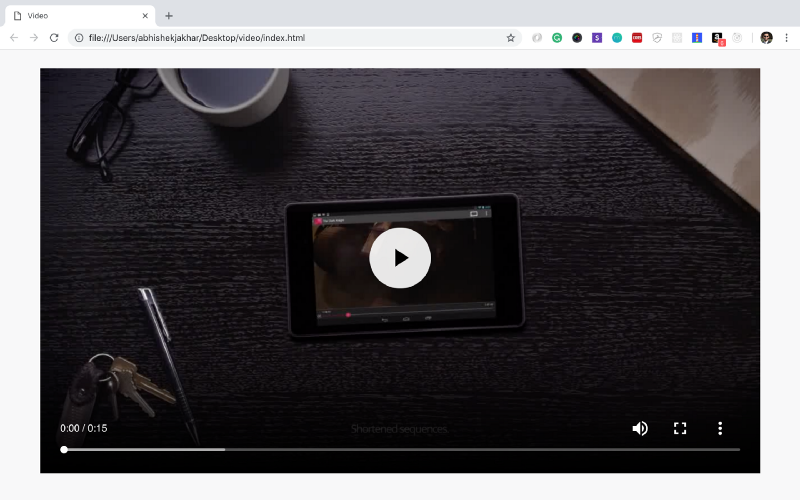
We now have this video on our page. But there’s a problem. This video isn’t playing automatically and there are also no controls to start the video.
We will have to add controls manually by using the controls attribute to our video element.
This attribute doesn’t take any value, because it’s a boolean attribute. That means it can either be true or false.
Now, by having the controls attribute in our video element, it means that it’s true and it will display playback controls.
Now, if we remove the controls we could also make the video autoplay, by using the autoplay attribute. This is also a boolean attribute.
Now, as you can see the video is playing by itself, and there’s no control. So, we didn’t actually start the video, but we also can’t stop the video.
We can also have controls and autoplay together.
You can provide different attributes to the video element, depending on the requirement.
I mentioned above that there are two different ways to add the video element. Let’s try the other way.
Source Element
Earlier we used a video element with self-closing tag, but here we will close the video element. So we have an opening and closing tag now.
We will also remove the type and source attributes from the video element and paste it into another element.
We just moved the attributes over to the source element.
Now, why would we want to do that?
Well, in most cases, with the video we will have multiple sources because we need to provide different file types depending on which browser is viewing your video because different browsers support different file types.
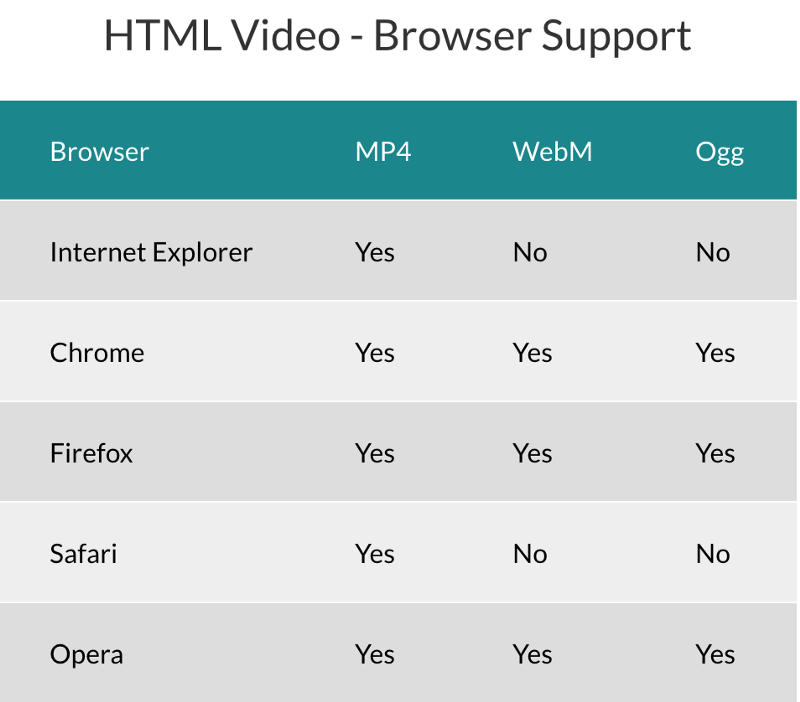
The video will look exactly the same. But now we have broader browser support.
Now, if we want to add attributes like controls , autoplay , loop etc, we will add it to the element.
Audio Element
The element is very similar to the video element. However, the only major difference is that there are no visuals.
We can use the audio element to play an audio file on our web page — such as an mp3 file.
Now, just like the video tag, there are two different ways to do this.
- Use a single tag representing the entire element.
- Opening and closing tag with the child elements in between.
Now, we’ll have an opening and closing audio tag, and then we will add the source element in between.
The folder structure might look like this:
|-- project |-- audio |-- sample.mp3 |-- sample.ogg |-- css |-- main.css |-- normalize.css index.htmlThere is no controls attribute given to the element in the example above, s o the & lt;audio> element won’t show up in the HTML document.
Now, you can see that there are only a few key differences here. The value in type attribute is changed from “video/mp4” to “audio/mp3”. In the src attribute, we’ve changed from a video file with .mp4 extension to an audio file with .mp3 extension.
Now, just like the video element, we won’t actually be able to stop or start the audio without any controls. So, we will be adding the controls attribute to the audio element.
You can also add other attributes in the element like autoplay, loop etc.
We have covered the essentials of audio and video elements in HTML.
You can learn more about audio and video in the links given below:
I hope you’ve found this post informative and helpful. I would love to hear your feedback!
Create Music Player With Playlist using HTML,CSS and JavaScript
Welcome To the Codewithrandom Blog. In This Blog, We Learn How To Create a Music Player With a Playlist using HTML, CSS, and JavaScript. We Have a Thumbnail Of music, play, and Pause. Next and Previous song functionality using JavaScript. You can also Skip song Timing Using the Cursor Click On Song Timer. Hope You Enjoy Our Blog So Let’s Start With A Basic Html Structure For A Music Player.
Html Code For Music Player

no timelastlings
blinding lightsthe weeknd
джованнаenrasta
a mantravis scott
unforgettingzaxx
waharanRandall
starlight feat mr gabriel 4am remixjai wolf


There Is All Html Code For The Music Player. Now, You Can See Output Without Css, Then We Write Css & Javascript For The Music Player.
CSS Code For Music Player
@import url('https://fonts.googleapis.com/css2?family=Quicksand:wght@700&display=swap'); html < box-sizing: border-box ; --parent-height : 20em ; --duration: 1s ; --duration-text-wrap: 12s 1.5s cubic-bezier(0.82, 0.82, 1, 1.01) ; --cubic-header: var(--duration) cubic-bezier(0.71, 0.21, 0.3, 0.95) ; --cubic-slider : var(--duration) cubic-bezier(0.4, 0, 0.2, 1) ; --cubic-play-list : .35s var(--duration) cubic-bezier(0, 0.85, 0.11, 1.64) ; --cubic-slider-context : cubic-bezier(1, -0.01, 1, 1.01) ; >html *, html *::before, html *::after < box-sizing: inherit ; scrollbar-width: none ; >body < margin: 0 ; height: 100vh ; display: flex ; user-select: none ; align-items: center ; justify-content: center ; background-color: #e5e7e9 ; font-family: 'Quicksand', sans-serif ; -webkit-tap-highlight-color: transparent ; transition: background-color var(--cubic-slider) ; >.img < width: 100% ; flex-shrink: 0; display: block ; object-fit: cover ; >.list < margin: 0 ; padding: 0 ; list-style-type: none ; >.flex < display: flex ; align-items: center ; justify-content: space-between ; >.uppercase < text-transform: uppercase ; >.player < width: 17.15em ; display: flex ; overflow: hidden ; font-size: 1.22em ; border-radius: 1.35em ; flex-direction: column ; background-color: white ; height: var(--parent-height) ; >.player__header < z-index: 1 ; gap: 0 .4em ; width: 100% ; display: flex; height: 5.85em ; flex-shrink: 0 ; position: relative; align-items: flex-start ; border-radius: inherit ; justify-content: flex-end ; background-color: white ; padding: .95em 0.6em 0 1.2em ; box-shadow: 0 2px 6px 1px #0000001f ; transition: height var(--cubic-header), box-shadow var(--duration), padding var(--duration) ease-in-out ; >.player__header.open-header < height: 100% ; padding-left: 0 ; padding-right: 0 ; box-shadow: unset ; >.player__img < width: 3.22em ; height: 3.22em ; border-radius: 1.32em ; >.player__img--absolute < top: 1.4em ; left: 1.2em ; position: absolute ; >.slider < flex-shrink: 0 ; overflow: hidden ; transition: width var(--cubic-header), height var(--cubic-header), top var(--cubic-header), left var(--cubic-header); >.slider.open-slider < top: 0 ; left: 0 ; width: 100% ; height: 14.6em ; >.slider__content < display: flex ; height: 100% ; will-change : transform ; transition: transform var(--cubic-slider); >.slider__img < filter: brightness(75%) ; >.slider__name, .slider__title < overflow: hidden ; white-space: nowrap ; >.text-wrap < display: block ; white-space: pre ; width: fit-content ; animation: text-wrap var(--duration-text-wrap) infinite ; >@keyframes text-wrap < 75%< transform: translate3d(-51.5%, 0, 0) ; >100% < transform: translate3d(-51.5%, 0, 0) ; >> .player__button < all: unset ; z-index: 100 ; width: 2.5em ; height: 2.5em ; cursor: pointer ; >.playlist < transform: scale(0) ; transition: transform calc(var(--duration) / 2) ; >.slider.open-slider .playlist < transform: scale(1) ; transition: transform var(--cubic-play-list) ; >.player__button--absolute--nw < top: 5.5% ; left: 5.5% ; position: absolute ; >.player__button--absolute--center < top: 0 ; left: 0 ; right: 0 ; bottom: 0 ; margin: auto ; position: absolute ; >img[alt ="pause-icon"] < display: none ; >.player__controls < width: 77% ; gap: .5em 0 ; display: flex ; flex-wrap: wrap ; align-items: center ; will-change: contents ; align-content: center ; justify-content: center ; transition: transform var(--cubic-header) , width var(--cubic-header) ; >.player__controls.move < width: 88% ; transform: translate3d(-1.1em , calc(var(--parent-height) - 153%) , 0) ; >.player__context < margin: 0 ; width: 100% ; display: flex ; line-height: 1.8 ; flex-direction: column ; justify-content: center ; text-transform: capitalize ; >.slider__context < width: 56.28% ; cursor: pointer ; text-align: center ; padding-bottom: .2em ; will-change: contents ; transition: width var(--cubic-header) ; animation: calc(var(--duration) / 2) var(--cubic-slider-context) ; >@keyframes opacity < 0% < opacity: 0 ; >90% < opacity: 1 ; >> .player__controls.move .slider__context < width: 49.48% ; >.player__title < font-size: .7em ; font-weight: bold ; color: #00000086 ; >.progres < width: 90% ; height: .25em ; cursor: pointer ; border-radius: 1em ; touch-action : none ; background-color: #e5e7ea ; transition: width var(--cubic-header) ; >.player__controls.move .progres < width: 98% ; >.progres__filled < width: 0% ; height: 100% ; display: flex ; position: relative ; align-items: center ; border-radius: inherit ; background-color: #78adfe ; >.progres__filled::before < right: 0 ; width: .35em ; content: " " ; height: .35em ; border-radius: 50% ; position: absolute ; background-color: #5781bd ; >.player__playlist < height: 100% ; overflow: auto ; padding: 1.05em .9em 0 1.2em ; >.player__playlist::-webkit-scrollbar < width: 0 ; >.player__song < /* gap: 0 .65em ; */ display: flex ; cursor: pointer ; margin-bottom: .5em ; padding-bottom: .7em ; border-bottom: .1em solid #d8d8d859 ; >.player__song .player__context < line-height: 1.5 ; margin-left: .65em ; >.player__song-name < font-size: .88em ; >.player__song-time < font-size: .65em ; font-weight: bold ; color: #00000079 ; height: fit-content ; align-self: flex-end ; >.audio Javascript Code For Music Player and Playlist
// Designed by: Mauricio Bucardo // Original image: https://dribbble.com/shots/6957353-Music-Player-Widget "use strict"; // add elemnts const bgBody = ["#e5e7e9", "#ff4545", "#f8ded3", "#ffc382", "#f5eda6", "#ffcbdc", "#dcf3f3"]; const body = document.body; const player = document.querySelector(".player"); const playerHeader = player.querySelector(".player__header"); const playerControls = player.querySelector(".player__controls"); const playerPlayList = player.querySelectorAll(".player__song"); const playerSongs = player.querySelectorAll(".audio"); const playButton = player.querySelector(".play"); const nextButton = player.querySelector(".next"); const backButton = player.querySelector(".back"); const playlistButton = player.querySelector(".playlist"); const slider = player.querySelector(".slider"); const sliderContext = player.querySelector(".slider__context"); const sliderName = sliderContext.querySelector(".slider__name"); const sliderTitle = sliderContext.querySelector(".slider__title"); const sliderContent = slider.querySelector(".slider__content"); const sliderContentLength = playerPlayList.length - 1; const sliderWidth = 100; let left = 0; let count = 0; let song = playerSongs[count]; let isPlay = false; const pauseIcon = playButton.querySelector("img[alt = 'pause-icon']"); const playIcon = playButton.querySelector("img[alt = 'play-icon']"); const progres = player.querySelector(".progres"); const progresFilled = progres.querySelector(".progres__filled"); let isMove = false; // creat functions function openPlayer() < playerHeader.classList.add("open-header"); playerControls.classList.add("move"); slider.classList.add("open-slider"); >function closePlayer() < playerHeader.classList.remove("open-header"); playerControls.classList.remove("move"); slider.classList.remove("open-slider"); >function next(index) < count = index || count; if (count == sliderContentLength) < count = count; return; >left = (count + 1) * sliderWidth; left = Math.min(left, (sliderContentLength) * sliderWidth); sliderContent.style.transform = `translate3d(-$%, 0, 0)`; count++; run(); > function back(index) < count = index || count; if (count == 0) < count = count; return; >left = (count - 1) * sliderWidth; left = Math.max(0, left); sliderContent.style.transform = `translate3d(-$%, 0, 0)`; count--; run(); > function changeSliderContext() < sliderContext.style.animationName = "opacity"; sliderName.textContent = playerPlayList[count].querySelector(".player__title").textContent; sliderTitle.textContent = playerPlayList[count].querySelector(".player__song-name").textContent; if (sliderName.textContent.length >16) < const textWrap = document.createElement("span"); textWrap.className = "text-wrap"; textWrap.innerHTML = sliderName.textContent + " " + sliderName.textContent; sliderName.innerHTML = ""; sliderName.append(textWrap); >if (sliderTitle.textContent.length >= 18) < const textWrap = document.createElement("span"); textWrap.className = "text-wrap"; textWrap.innerHTML = sliderTitle.textContent + " " + sliderTitle.textContent; sliderTitle.innerHTML = ""; sliderTitle.append(textWrap); >> function changeBgBody() < body.style.backgroundColor = bgBody[count]; >function selectSong() < song = playerSongs[count]; for (const item of playerSongs) < if (item != song) < item.pause(); item.currentTime = 0; >> if (isPlay) song.play(); > function run() < changeSliderContext(); changeBgBody(); selectSong(); >function playSong() < if (song.paused) < song.play(); playIcon.style.display = "none"; pauseIcon.style.display = "block"; >else < song.pause(); isPlay = false; playIcon.style.display = ""; pauseIcon.style.display = ""; >> function progresUpdate() < const progresFilledWidth = (this.currentTime / this.duration) * 100 + "%"; progresFilled.style.width = progresFilledWidth; if (isPlay && this.duration == this.currentTime) < next(); >if (count == sliderContentLength && song.currentTime == song.duration) < playIcon.style.display = "block"; pauseIcon.style.display = ""; isPlay = false; >> function scurb(e) < // If we use e.offsetX, we have trouble setting the song time, when the mousemove is running const currentTime = ( (e.clientX - progres.getBoundingClientRect().left) / progres.offsetWidth ) * song.duration; song.currentTime = currentTime; >function durationSongs() < let min = parseInt(this.duration / 60); if (min < 10) min = "0" + min; let sec = parseInt(this.duration % 60); if (sec < 10) sec = "0" + sec; const playerSongTime = `$:$`; this.closest(".player__song").querySelector(".player__song-time").append(playerSongTime); > changeSliderContext(); // add events sliderContext.addEventListener("click", openPlayer); sliderContext.addEventListener("animationend", () => sliderContext.style.animationName =''); playlistButton.addEventListener("click", closePlayer); nextButton.addEventListener("click", () => < next(0) >); backButton.addEventListener("click", () => < back(0) >); playButton.addEventListener("click", () => < isPlay = true; playSong(); >); playerSongs.forEach(song => < song.addEventListener("loadeddata" , durationSongs); song.addEventListener("timeupdate" , progresUpdate); >); progres.addEventListener("pointerdown", (e) => < scurb(e); isMove = true; >); document.addEventListener("pointermove", (e) => < if (isMove) < scurb(e); song.muted = true; >>); document.addEventListener("pointerup", () => < isMove = false; song.muted = false; >); playerPlayList.forEach((item, index) => < item.addEventListener("click", function() < if (index >count) < next(index - 1); return; >if (index < count) < back(index + 1); return; >>); >); Now we have completed our javascript code section for music player. Here is our updated output with Html, Css, And Javascript. Hope you like the Music Player. you can see output video and project screenshots. See our other blogs and gain knowledge in front-end development. Thank you ! In this post, we learn how to create a Music Player using simple HTML & CSS, and javascript. If we made a mistake or any confusion, please drop a comment to reply or help you in easy learning. Written by — Code With Random/Anki Codepen by — abxlfazl khxrshidi__